Page is loading ...

Clamp Not included
Clamp Not includedClamp Not included
Clamp Not included
For Technical Support:
For Technical Support:For Technical Support:
For Technical Support:
Call our Technical Service Department
Monday through Friday, 9 a.m. to 5 p.m. (EST)
1-800-832-8697
customer_support@enablingdevices.com
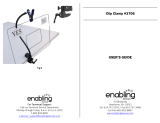
Super Clamp Retro Kit #1541
USER’S GUIDE
50 Broadway
Hawthorne, NY 10532
Tel. 914.747.3070 / Fax 914.747.3480
Toll Free 800.832.8697
www.enablingdevices.com

Retrofit your
Retrofit yourRetrofit your
Retrofit your
old gooseneck mount or switch!
old gooseneck mount or switch!old gooseneck mount or switch!
old gooseneck mount or switch!
Our Super Clamp Retro kit allows you to up-grade any of our older gooseneck
mounting systems or gooseneck mounted switches or devices which had black
plastic or aluminum clamps to our new Super Clamp. The Clamp is super simple
to attach. Kit comes with black mounting strap and two Phillips head machine
screws. Size: 1¾"L x ¾"H x 2"W.
1. To use the Retro Kit you will need to remove your old or broken clamp from
your Gooseneck if you have not already done so. This will require a 3/16
Allen wrench or metric equivalent 4.5mm. Loosen the Allen bolt from the
clamp and remove the clamp as shown in (Fig. 1).
Fig.1
Fig.1Fig.1
Fig.1
2. Press the adapter on the Gooseneck just before the flare out and secure to
your new Super Clamp item No.1559 (Sold Separately) with the included
mounting screws as shown in (Fig. 2 & 3). Make sure you tighten the
screws evenly for proper clamp attachment.
Fig. 2
Fig. 2Fig. 2
Fig. 2
Fig. 3
Fig. 3Fig. 3
Fig. 3
3. Clamping Options:
Clamping Options: Clamping Options:
Clamping Options: Our mounting clamp is designed for mounting to
tubular (wheelchair, bedrail, walker, etc.) or flat surfaces such as a
table top or desk. For flat surface mounting use the included wedge
insert shoe stored in front of the locking knob on the clamp (see Fig.4
& 5)
Loosen locking knob slightly to remove wedge, tighten knob once
wedge has been removed.
Fig.4
Fig.4Fig.4
Fig.4
Fig. 5
Fig. 5Fig. 5
Fig. 5
3. Using the mounting clamp, attach the Clip Clamp to a Wheel Chair, Table or
Desk. Tighten the clamp enough to hold the Clip Clamp securely, but do not
over-Tighten the clamp.
Care of Unit:
Care of Unit:Care of Unit:
Care of Unit:
Clip Clamp can be wiped clean with any household multi-purpose cleaner and
disinfectant. We recommend Simple Green, which is a non toxic biodegradable
all-purpose cleaner.
Do not use abrasive cleaners,
Do not use abrasive cleaners,Do not use abrasive cleaners,
Do not use abrasive cleaners, as they will scratch the surface of the unit.
Rev
Rev Rev
Rev 5
55
5/1
/1/1
/1/17
/17/17
/17
/