Page is loading ...

Thermasheath
®
-3: Insulation for the Building Envelope
Attic and Crawl Space Applications
www.rmax.com (800) 527-0890
Application Rmax Thermasheath
®
-3
Thermasheath
®
-3 may be applied to the interior face of stud walls or roof rafters within attics and crawl spaces to
provide a layer of continuous insulation (ci). Simply nail the Thermasheath
®
-3 to the framing members and cover
with an approved ignition barrier such as 3/8” gypsum wallboard or 1/4” wood structural panel, particle board or
hardboard, as required.
Thermasheath
®
-3 has been tested to be left exposed in attics and crawl spaces without the code prescribed ignition
barrier, provided the space is limited to servicing utilities. The maximum thickness is 1” in walls and ceilings or up
to 4.5” in walls only.
Refer to Thermasheath
®
-3 data sheet for additional application/installation, compliances, thermal and physical
properties, limitations and warnings.
Warranty: See Rmax “Sales Policy” and “Fifteen Year Limited Thermal Warranty” for terms and conditions. Rmax does not assume any responsibility or
liability for the performance of any products other than those manufactured by Rmax. NOTE: All Rmax products must be tarped, placed on skids
and kept dry before and throughout construction.
2017-11
THERMASHEATH
®
-3
IGNITION BARRIER
Required if Thermasheath
®
-3
is greater than 4.5”
Notes:
1. Refer to local building codes for requirements on proper ventilation and bracing.

Thermasheath
®
-3: Insulation for the Building Envelope
Cavity Wall (Brick Veneer) Application
www.rmax.com (800) 527-0890
Application Rmax Thermasheath
®
-3
Thermasheath
®
-3 is an excellent cavity insulation product fitting between the masonry block and finished brick
veneer of any residential or commercial project. It may be secured to the dry face of the masonry block wall with
a quality grade construction adhesive. Thermasheath
®
-3 can be cut to fit between masonry joint reinforcements
placed to tie the brick veneer to the concrete block back-up and installed horizontally in strips to allow the wall ties
to extend beyond the face of the insulation leaving the proper air spaces as required.
Refer to Thermasheath
®
-3 data sheet for additional application/installation, compliances, thermal and physical
properties, limitations and warnings.
Warranty: See Rmax “Sales Policy” and “Fifteen Year Limited Thermal Warranty” for terms and conditions. Rmax does not assume any responsibility or
liability for the performance of any products other than those manufactured by Rmax. NOTE: All Rmax products must be tarped, placed on skids
and kept dry before and throughout construction.
2017-11
04
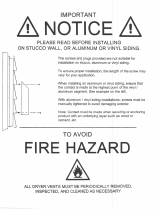
Cavity Wall Construction (Brick Veneer)
Thermasheath-3 Exterior Application
A1.00
THERMASHEATH - 3
16" OR 24" WIDTHS AVAILABLE
TO FIT BETWEEN MASONRY
WALL TIES OR IMPALE
INSULATION OVER WALL
TIE PENTILES
BRICK VENEER (Provide
weeps as required)
THRU-WALL FLASHING
(Metal)
BRICK LEDGE
CMU WALL
FOUNDATION WALL
FLASHING TAPE

Cedar siding has been a popular siding choice for years as it
offers an attractive yet durable nish - providing a premiere
sustainable option. Utilizing Rmax Thermasheath®-3 and
R-SEAL Construction Tape provides continuous insulation
for a more energy-efcient home, adding a full air barrier
to the walls of the structure as well as a drainage plane for
rainscreen applications. This allows for a more efcient
building process - saving on labor and material.
GREEN ATTRIBUTES
Rmax Thermasheath®-3 utilizes CFC, HCFC, HFC free
blowing agent with virtually no global warming potential and
Rainscreen Application
Utilizing Rmax Thermasheath®-3 and Cedar Siding
Choose the Best Side with Rmax Thermasheath®-3
Improving Your Design.
www.rmax.com (800) 527-0890
CONTINUOUS INSULATION
Thermasheath®-3, can be installed continuously, meeting
the newer, more stringent code requirements. Eliminates
thermal bridging improving thermal efficiency, home comfort
and reduces energy costs.
HIGHEST R-VALUE
Thermasheath®-3 is composed of a closed-cell
polyisocyanurate (polyiso) foam core with up to 29% higher
R-value than XPS. Allows you to meet or exceed energy
codes and provides you more insulation value for your
dollar – lowering the home’s energy consumption, therefore
lowering energy bills.
WATER-RESISTIVE BARRIER
Properly sealed with R-SEAL Construction Tape,
Thermasheath®-3 is an approved, tested WRB. Resisting
water intrusion and moisture migration, it helps defend
against the growth of mold and mildew.
AIR BARRIER
Properly sealed with R-SEAL Construction Tape,
Thermasheath®-3 prevents air infiltration. Keeping homes
comfortable while making your HVAC systems run more
efficient.
RADIANT BARRIER
A reflective surface is built into the product providing all the
benefits of stand-alone radiant barrier products.
FIRE PERFORMANCE
Thermasheath®-3 is a thermoset material that will not melt
or drip within a fire or even at elevated temperatures. It can
be used without a code prescribed interior thermal or ignition
barrier within many attics spaces, such as on gable ends –
reducing material and labor costs.
LIGHTWEIGHT
Thermasheath®-3 is lightweight, durable and easy to handle.
Making it easier and faster to install which positively affects
labor time and your bottom line.
Why Rmax Thermasheath®-3
zero ozone depletion potential. This low environmental impact
insulation is cost effective, optimizes energy performance
and provides a long service life.

INSTALLATION: Step by step construction tips for basic
rainscreen construction utilizing Rmax Thermasheath-3
under cedar siding (check with local building codes for
specic requirements).
Before You Begin: For additional information and good
practice on general construction details, reference the
following documents from the Foam Sheathing Coalition
(FSC) and Western Red Cedar Lumber Association (WRCLA):
• FSC Guide to Attaching Exterior Wall Coverings Through
Foam Sheathing to Wood or Steel Wall Framing
• FSC TER No. 1205-05 Construction Details for the Use
of Foam Plastic Insulating Sheathing (FPIS) in Light-
Frame Construction
• WRCLA How to Install Western Red Cedar Siding
Step 1: Thermasheath®-3 Continuous Insulation
Install panels vertically with the length dimension parallel to
framing. Fasten boards using weather resistant bugle-head
screws, galvanized roong nails or common nails driven
through cap washers. When necessary, a circular saw with a
ne tooth blade can be used to cut Thermasheath-3 panels.
Step 2: WRB/Air Barrier
• Option 1: Thermasheath-3 as the tested WRB and Air
Barrier
• Tape all joints with 3” R-SEAL Construction Tape.
• Center the tape over clean, dry joints to cover
fasteners and apply. Refer to tape data sheet for
additional information.
• Fasteners in the eld of the board do not need to be
taped to achieve WRB.
• Option 2: Alternate WRB/Air Barrier
• Install per manufacturer’s instructions over
continuous insulation. (Taping the insulation joints is
not required.)
NOTE: The WRB/Air Barrier created in Step 2 shall be
maintained with all subsequent work (i.e., sealing through-wall
penetrations, repairing damage to exterior surface, etc.).
Step 3: Furring Strips
Install furring strips vertically ensuring they line up with the stud
framing behind. Use fasteners of sufcient length to secure
through the insulation and wood sheathing into the structural
framing. Keep insects and small critters out of the rain screen
cavity with screen material attached across the top/bottom of the
furring strips/cavity. Fold the screen material over and staple to
the front of the furring strips.
NOTE: For additional protection, use a self-sealing butyl
based tape behind all furring strips. When used, it can replace
the standard joint tape referenced above.
Step 4: Cedar Siding
• Attach per manufacturer’s instructions.
Nominal Thickness
Thermal R-Value
1
Inches °F•ft
2
•hr/Btu
0.5 3.2
0.75 5.0
1.0 6.0
1.5 9.6
1.55 10.0
1
Thermal values are determined by using ASTM C518 test method at
75°F mean temperature on material conditioned according to PIMA
Technical Bulletin No. 101.
Visit www.rmax.com for a complete list of thicknesses and packaging
information.
WOOD SHEATHING
RMAX
THERMASHEATH-3
TREATED WOOD
FURRING STRIPS
REAL CEDAR SIDING
RMAX
THERMASHEATH-3
Improving Your Design.
www.rmax.com (800) 527-0890
Rmax Thermasheath®-3 Cedar Siding Rainscreen Applicaion

Thermasheath
®
-3: Insulation for the Building Envelope
Concrete Foundations
www.rmax.com (800) 527-0890
Application Rmax Thermasheath
®
-3
Thermasheath
®
-3 may be installed horizontally under foundations and vertically inside of the footings. A separate
vapor retarder sheet should be installed over or under the insulation against the crushed stone base and well
tamped backfill or undisturbed earth. Simply lay in the insulation with tightly butted joints. While not required,
taping the joints is acceptable using Rmax R-SEAL 3000, Rmax R-SEAL Construction Tape, or equivalent.
Refer to Thermasheath
®
-3 data sheet for additional application/installation, compliances, thermal and physical
properties, limitations and warnings.
Warranty: See Rmax “Sales Policy” and “Fifteen Year Limited Thermal Warranty” for terms and conditions. Rmax does not assume any responsibility or
liability for the performance of any products other than those manufactured by Rmax. NOTE: All Rmax products must be tarped, placed on skids
and kept dry before and throughout construction.
2017-11
Notes:
1. Thermasheath
®
-3 insulation panels are simply laid over the specially prepared base
of crushed stone, sand or other materials that is spread for leveling.
2. Exact placement of the polyethylene vapor barrier is up to the building designer and local code requirements.

Thermasheath
®
-3: Insulation for the Building Envelope
Exterior Stucco Application
www.rmax.com (800) 527-0890
Application Rmax Thermasheath
®
-3
Thermasheath
®
-3 may be used as the insulated sheathing under hard coat stucco finishes. It may be
secured to the studs with bugle-head screws, galvanized roofing nails or common-nails driven through cap
washers. Cover the Thermasheath
®
-3 with a suitable separation layer such as an organic or inorganic felt.
Then, attach conventional metal wire lath and expansion joints with appropriate fasteners as dictated by the
local Building Code. Rmax does not recommend the direct attachment of stucco, such as Portland cement
or polymer-modified types, directly to the face of the insulation product. Consult stucco manufacturers
for details.
Refer to Thermasheath
®
-3 data sheet for additional application/installation, compliances, thermal and physical
properties, limitations and warnings.
Warranty: See Rmax “Sales Policy” and “Fifteen Year Limited Thermal Warranty” for terms and conditions. Rmax does not assume any responsibility or
liability for the performance of any products other than those manufactured by Rmax. NOTE: All Rmax products must be tarped, placed on skids
and kept dry before and throughout construction.
2017-11
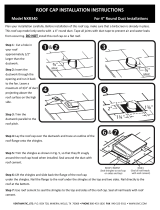
06
Stucco Construction
Thermasheath-3 Exterior Application
A1.00
THERMASHEATH - 3
ORGANIC / INORGANIC
FELT
METAL FLASHING
HARD COAT STUCCO
FOUNDATION WALL
SUBFLOORING &
FLOOR FRAMING
TERMITE SHIELD
VAPOR RETARDER
(if required)
METAL LATHE
FLASHING TAPE
1/2" GYPSUM
WALLBOARD
Notes:
1. Stud walls must be properly braced for lateral loads
according to the requirements of local Building Codes.
Notes:
1. Stud walls must be properly braced for lateral loads according to the requirements of local Building Codes.

Thermasheath
®
-3: Insulation for the Building Envelope
Exterior Ductwork Application
www.rmax.com (800) 527-0890
Application Rmax Thermasheath
®
-3
Rmax Thermasheath
®
-3 is suitable for use on the exterior side of existing ductwork. When the ductwork is solely
on the exterior of the building, the insulation need only be protected from the outside weather conditions. As an
example, this can be done with a waterproofing membrane installed per the manufacturer’s recommendations.
Refer to Thermasheath
®
-3 data sheet for additional application/installation, compliances, thermal and
physical properties, limitations and warnings.
Warranty: See Rmax “Sales Policy” and “Fifteen Year Limited Thermal Warranty” for terms and conditions. Rmax does not assume any responsibility or
liability for the performance of any products other than those manufactured by Rmax. NOTE: All Rmax products must be tarped, placed on skids
and kept dry before and throughout construction.
2018-03

Thermasheath
®
-3: Insulation for the Building Envelope
Masonry Wall Application
www.rmax.com (800) 527-0890
Application Rmax Thermasheath
®
-3
Thermasheath
®
-3 is applied to the interior face of concrete or concrete masonry walls to provide a layer of
continuous insulation (ci) over the entire surface. It may be secured over or under furring strips, followed by a
minimum 1/2” gypsum wallboard interior finish. Adhesive or fasteners may be used to hold the Thermasheath
®
-3 in
place temporarily until the furring strips and/or gypsum wallboard are mechanically fastened through the insulation
back to the concrete substrate and/or furring strips.
Refer to Thermasheath
®
-3 data sheet for additional application/installation, compliances, thermal and physical
properties, limitations and warnings.
Warranty: See Rmax “Sales Policy” and “Fifteen Year Limited Thermal Warranty” for terms and conditions. Rmax does not assume any responsibility or
liability for the performance of any products other than those manufactured by Rmax. NOTE: All Rmax products must be tarped, placed on skids
and kept dry before and throughout construction.
2017-11
05
Masonary Wall Construction
Thermasheath-3 Interior Application
A1.00
THERMASHEATH - 3
1/2" GYSUM WALL
BOARD
TREATED WOOD
FURRING 16" O.C.
CMU WALL
TREATED WOOD
FURRING AT BASE
TREATED WOOD
END CAP
FOUNDATION WALL

Thermasheath
®
-3: Insulation for the Building Envelope
Re-Siding Application
www.rmax.com (800) 527-0890
Application Rmax Thermasheath
®
-3
Thermasheath
®
-3 may be used in retrofit construction provided the existing siding is sound and solidly attached. It
is secured with galvanized nails of sufficient length to penetrate the old sidings, sheathings below and at least one
inch into the existing wall studs. Then, cover the Thermasheath
®
-3 with a suitable new siding of aluminum, vinyl,
fiber cement, wood or wood fiber based products.
Refer to Thermasheath
®
-3 data sheet for additional application/installation, compliances, thermal and physical
properties, limitations and warnings.
Warranty: See Rmax “Sales Policy” and “Fifteen Year Limited Thermal Warranty” for terms and conditions. Rmax does not assume any responsibility or
liability for the performance of any products other than those manufactured by Rmax. NOTE: All Rmax products must be tarped, placed on skids
and kept dry before and throughout construction.
2017-11
03
Re-Siding Construction
Thermasheath-3 Exterior Application
A1.00
EXISTING SHEATHING
AND SIDING SEE
NOTE #1
AIR / WATER RESISTIVE
BARRIER (if required)
EXTERIOR SIDING
FLASHING TAPE
METAL FLASHING
TREATED WOOD
FOUNDATION WALL
SUBFLOORING &
FLOOR FRAMING
VAPOR RETARDER
(if required)
FOUNDATION
THERMASHEATH - 3
Notes:
1. Existing siding must be inspected and re-nailed to provide
for solid back-up to attach new sheathing and siding
materials. Deteriorated or rotted areas of existing siding
must be removed and replaced to restore original thickness.
2. Stud walls must be properly braced for lateral loads
according to the requirements of local Building Codes.
TERMITE SHIELD
1/2" GYPSUM
WALLBOARD

Thermasheath
®
-3: Insulation for the Building Envelope
Roong Application
www.rmax.com (800) 527-0890
Application Rmax Thermasheath
®
-3
Thermasheath
®
-3 is laid over a suitable roof deck such as tongue-and-groove timber, plywood or metal deck
and covered with a suitable layer of plywood, wafer board or OSB. Asphalt or wood shingles, concrete or clay
tiles or a standing seam metal roof may be installed over the insulated roof deck according to the roofing system
instructions. NOTE: It may not be necessary to cover the insulation with a nailable surface when used under a
standing seam metal roof assembly, consult manufacturer for details.
Refer to Thermasheath
®
-3 data sheet for additional application/installation, compliances, thermal and
physical properties, limitations and warnings.
Warranty: See Rmax “Sales Policy” and “Fifteen Year Limited Thermal Warranty” for terms and conditions. Rmax does not assume any responsibility or
liability for the performance of any products other than those manufactured by Rmax. NOTE: All Rmax products must be tarped, placed on skids
and kept dry before and throughout construction.
2017-11
10
Asphalt Shingle Roof Construction
Thermasheath-3 Exterior Application
A1.00
UNDERLAYMENT
ASPHALT SHINGLE
ROOFING SYSTEM
NAILABLE SURFACE
THERMASHEATH - 3
VAPOR RETARDER
(if required)
STRUCTURAL
ROOF DECK
WOOD RAFTER OR
TRUSS
FASCIA
Notes:
1. Consult shingle manufacturer for above deck
roofing ventilation requirements.
Notes:
1. Consult shingle manufacturer for above deck roofing ventilation requirements.
2. Refer to local code for requirement of thermal barrier.

Thermasheath
®
-3: Insulation for the Building Envelope
Stud Wall Application
www.rmax.com (800) 527-0890
Application Rmax Thermasheath
®
-3
Thermasheath
®
-3 applied to the exterior or interior face of studs, to cover all studs, sills, plates and header
constructions, provides a layer of continuous insulation (ci) over details not normally covered by insulation
products. It may be secured to the framing or structural sheathing with bugle-head screws, galvanized roofing nails
or common nails driven through cap washers. Quality-grade construction adhesives may also be used to secure
the Thermasheath
®
-3 on interior applications. Exterior facades may include brick/stone veneer, exterior siding and
stucco. Thermasheath
®
-3 must be separated from the interior with a minimum 1/2” gypsum wallboard or equivalent
thermal barrier. When insulation extends into the attic or crawl space, Thermasheath
®
-3 has been tested to be
left exposed without the code prescribed ignition barrier, provided the space is limited to servicing utilities. The
maximum thickness is 1” in walls and ceilings or up to 4.5” in walls only.
Refer to Thermasheath
®
-3 data sheet for additional application/installation, compliances, thermal and physical
properties, limitations and warnings.
Warranty: See Rmax “Sales Policy” and “Fifteen Year Limited Thermal Warranty” for terms and conditions. Rmax does not assume any responsibility or
liability for the performance of any products other than those manufactured by Rmax. NOTE: All Rmax products must be tarped, placed on skids
and kept dry before and throughout construction.
2017-11
02
Stud Wall Construction (Brick Veneer)
Thermasheath-3 Exterior Application
A1.00
THERMASHEATH - 3
AIR / WATER RESISTIVE
BARRIER (if required)
FLASHING TAPE
BRICK VENEER (Provide
weeps as required)
THRU-WALL FLASHING
(Metal)
SUBFLOORING &
FLOOR FRAMING
BRICK TIES AS REQ.
TREATED WOOD
TERMITE SHIELD
VAPOR RETARDER
(if required)
FOUNDATION WALL
1/2" GYPSUM
WALLBOARD
Notes:
1. Stud walls must be properly braced for lateral loads
according to the requirements of local Building Codes.

Thermasheath
®
-3: Insulation for the Building Envelope
Vaulted Ceiling Application
www.rmax.com (800) 527-0890
Application Rmax Thermasheath
®
-3
Thermasheath
®
-3 may be applied to the inside face of the roof rafters in vaulted ceiling construction to provide a
layer of continuous insulation (ci) and increase the R-value of the roof. Simply nail the Thermasheath
®
-3 to the face
of the rafter, cover with a minimum 1/2” gypsum wallboard and finish.
Refer to Thermasheath
®
-3 data sheet for additional application/installation, compliances, thermal and physical
properties, limitations and warnings.
Warranty: See Rmax “Sales Policy” and “Fifteen Year Limited Thermal Warranty” for terms and conditions. Rmax does not assume any responsibility or
liability for the performance of any products other than those manufactured by Rmax. NOTE: All Rmax products must be tarped, placed on skids
and kept dry before and throughout construction.
2017-11
07
Stud Wall & Vaulted Ceiling Construction
Thermasheath-3 Interior Application
A1.00
ROOF JOIST / RAFTER
STUD WALL
1/2" GYPSUM
WALLBOARD
THERMASHEATH - 3
Notes:
1. Refer to local building codes
for requirements on proper ventilation
2. Stud walls must be properly braced for
lateral loads according to the requirements of
local Building Codes.
VAPOR RETARDER
(if required)
EXTERIOR WOOD
SHEATHING
/