Page is loading ...

Find your full manual and product information here: bit.ly/laxtech_support
RAIN SENSOR
QUICK START GUIDE
MODEL #: LTV-R3V2
DC: 091322
STEP 1:
POWER U P S E N S O R S AND S TATIONS
STEP 3:
MOUN T YOU R S E NSOR S
STEP 2:
CONNECT TO THE LA CROSSE VIEW™ A P P
SENSORS
In any order, insert batteries into your Thermo-Hygro, Wind,
and Rain Sensors.
AAA
+
-
AAA
+
-
STATIONS
• Insert the power cord into an outlet, then into your weather
station.
• Remove the battery insulation tab installed on the bottom of the
station.
• Insert 2 “AAA”batteries into the Bonus Display.
Note: It may take up to 10 minutes for your sensor data to appear
on your stations’ screen.
THERMO-HYGRO
Keep out of direct sunlight & ensure the sensor is well ventilated.
We recommend mounting under a deck or eave facing north.
WIND
Ensure the sensor is mounted vertically, an unobstructed rooftop is
ideal. Your Wind Sensor should be the tallest object in the area to
avoid reduced wind speed values.
RAIN
Check the sensor often to remove leaves or other debris that
could cause low rainfall readings.
AA
+
-
AA
+
-
AA
+
-
AA
+
-
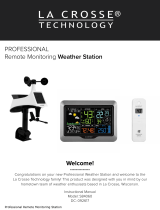
Thermo-Hygro Sensor
LTV-TH2i
Weather Station
V30v4
Bonus Display
LTV-D2
C
C
Wind Sensor
LTV-W2
Rain Sensor
LTV-R3V2
DOWNLOAD
onto your mobile device.
LAUNCH & FOLLOW
CONNECT TO YOUR WI-FI NETWORK
1. The La Crosse View App is required to connect your station to the Wi-Fi
Network. Download the app first.
2. The app will provide detailed instructions and inform you which buttons to press
while connecting your station to the Wi-Fi Network.
INITIAL SETUP OF NEW STATION If this is a new station and not yet added to
your account, tap ADD DEVICE in the app and follow the instructions to add
your staion to the app and connect to Wi-Fi.
RECONNECTING TO WI-FI: If the station is already in your account and you
want to recoonect to Wi-Fi, tap CONNECT WIFI in the app and follow the
instruction on your mobile device to connect to Wi-Fi.
3. When connected the Wi-Fi Indicator will become solid on your station.
For more troubleshooting tips and support visit:
www.lacrossetechnology.com/lacrosseviewsupport
Feature Standalone Connected
Wind Speed ✓ ✓
Wind Direction ✓
Rainfall Data ✓ ✓
Indoor & Outdoor Temperature ✓ ✓
“Feels Like” Temperature ✓ ✓
Indoor & Outdoor Humidity ✓ ✓
12-Hour Forecast ✓ ✓
Barometric Pressure ✓ ✓
Internet Time & Calendar ✓
Advanced Forecast Icons ✓
Daily Forecast HIs & LOs ✓
% Chance of Precipitation ✓
Ability to Add Sensors ✓ ✓
Data Stream Technology ✓
Benefits of Connecting to La Crosse View™
Page 2 Page 3 Page 4
For weather station V30v4

ACCUWEATHER FORECASTS
Other benefits of connecting your station to the La CrosseView™
app include Daily and Hourly Forecasts from AccuWeather. These
will display changes in your station’s Weather Icons, HI/LO Temps,
Wind Direction, and Chance of Precipitation values.
DAILY FORECAST
Press the DAILY button to view predictions for each of the next 7
days of weather data.
HOURLY FORECAST
Press the HOURLY button to view predictions for each of the next
12 hours of forecast data.
Note: These buttons will not provide a function if your station is not
connected to the La Crosse View app.
BUTTONS & FUNCTIONS
Buttons located on top of Color Weather Station
Buttons located on side of Color Weather Station
SET Hold for basic setting. Press to view Wi-Fi status.
TEMP, WIND, RAIN Press to view history.
LIGHT Press to adjust brightness. Hold to set Auto Dim.
+ or Use + or – to adjust values in settings.
+ & Hold both buttons to search for Wi-Fi.
SENSOR Press to view sensor ID numbers, then hold PLUS (+) to search, or hold
MINUS (–) to remove.
DAILY, HOURLY Press to see forecast. Must be connected to Wi-Fi.
RAIN & LIGHT Hold both buttons to reset all sensor ID’s and Wi-Fi settings.
EXTRA SENSOR Press to toggle through “extra sensor” & Barometric Pressure. Hold to
add Sensors. WE’RE HERE TO HELP!
If you require additional support, call our friendly customer support
representatives based out of our office in La Crosse, Wisconsin.
(2830 26th ST S.)
Phone: 1.844.200.8752 Online: bit.ly/contact_techsupport
Our knowledgeable customer support team is available:
Monday-Friday, 8am-6pm CST.
JOIN THE CONVERSATION
Ask questions, watch detailed setup videos, and provide feedback
on our social media outlets!
STATION ICONS
Wi-Fi Indicator: Will flash when your station is ready to connect
to the Internet, and be solid on screen when connected.
Internet Indicators: Will display in areas to indicate data
coming from the Internet.
Low Battery Indicators: Individual station/sensor indicators will
let you know which batteries to replace.
Sensor Reception Indicators: Indicate the reception strength
between your sensors and station.
• Use the hole at the top to hang your
sensor from the back using a nail. Or,
insert one mounting screw through the
front of your sensor.
• Mount your sensor on a north-facing
wall or in any shaded area. Under an
eave or deck rail is preferred to avoid
inaccurate readings from the sun.
• The maximum wireless transmission
range to the station is up to 400 feet
(121 meters) in open air, not including
walls or floors.
• Be sure your sensor is mounted
vertically, to allow moisture to drain out
properly.
Adding Sensors to Your Station
Whether you choose to connect to the La Crosse View app or not,
this station can display data for up to 4 extra sensors. This data will
appear in the light green section on the LCD and in your La Crosse
View app if connected.
If you have multiple add-on sensors connected, press the EXTRA
SENSOR button to cycle through the data you’d like displayed on
the LCD.
The relative pressure data shares space with the extra sensors(s).
*Water Leak Sensor Example
SENSOR PLACEMENT AND MOUNTING
ADD-ON SENSORS
1. Hold the EXTRA SENSOR button until the Sensor Reception
Indicator starts to animate.
2. Install batteries into your sensor. If the sensor has a TX button,
press it to force a transmission signal. This button is usually
located in or near the sensor’s battery compartment. The LED
light on the sensor will flash once.
3. Your sensor should connect within the next 3 minutes, briefly
displaying its ID and type on the LCD. The Sensor Reception
Indicator will show solid on the screen when a sensor is
connected
Note: When first powering up, or after a factory reset, extra
sensors should automatically connect to your station.
Page 6 Page 7 Page 8Page 5
For weather station V30v4 For weather station V30v4

FCC STATEMENT
This equipment has been tested and found to comply with the limits for a Class B digital device,
pursuant to part 15 of the FCC Rules. These limits are designed to provide reasonable
protection against harmful interference in a residential installation. This equipment generates,
uses and can radiate radio frequency energy and, if not installed and used in accordance with
the instructions, may cause harmful interference to radio communications. However, there is no
guarantee that interference will not occur in a particular installation. If this equipment does
cause harmful interference to radio or television reception, which can be determined by turning
the equipment o and on, the user is encouraged to try to correct the interference by
one or more of the following measures:
• Reorient or relocate the receiving antenna.
• Increase the separation between the equipment and receiver.
• Connect the equipment into an outlet on a circuit dierent from that to which the receiver is
connected.
• Consult the dealer or an experienced radio/TV technician for help.
Caution!
Any changes or modifications not expressly approved by the party responsible for compliance
could void the user’s authority to operate the equipment.
All rights reserved. This manual may not be reproduced in any form, even in part, or duplicated or
processed using electronic, mechanical or chemical process without the written permission of the
publisher. This booklet may contain errors or misprints. The information it contains is regularly checked
and corrections are included in subsequent editions. We disclaim any responsibility for any technical
error or printing error, or their consequences. All trademarks and patents are recognized.
Apple and the Apple logo are trademarks of Apple Inc., registered in the U.S. and other
countries. App Store is a service mark of Apple Inc.
Google Play and the Google Play logo are trademarks of Google Inc.
STATION & SENSOR SPECS
V30v4 LTV-D2
Indoor Temperature Range 32°F to 99°F (0°C to 37°C) 32°F to 122°F (0°C to 50°C)
Indoor Humidity Range 10% to 99%RH 10% to 99%RH
Relative Pressure Range 23.62 to 32.48 InHg
(800 to 1100 hPa) n/a
Power Requirements 5.0V AC Adapter (included)
1 CR2032 Battery (included) 2 “AAA” Batteries (not included)
The plug on the power adapter is intended to serve as the disconnect device, the
socket-outlet shall be installed near the equipment and shall be easily accessible.
THERMO-HYGRO (LTV-TH2i)
• Outdoor Temperature Range: -40°F to 140°F (-40°C to 60°C)
• Outdoor Humidity Range: 10% to 99%RH
• Power Requirements: 2 “AA” Batteries (not included)
WIND (LTV-W1 or LTV-W2)
• Wind Speed Range: 0 to 111 MPH (0 to 178 KMH)
• Power Requirements: 2 “C” Batteries (not included)
RAIN (LTV-R3)
• Rainfall Range: 0-393.6 inches (0-9999 mm)
• Power Requirements: 2 “AA” Batteries (not included)
Sensor Transmission Range: 400 Feet (121.92 Meters) open air
WI-FI NETWORK REQUIREMENTS
• Broadcast Frequency: 2.4GHz (802.11 b/g/n)
• Network Name/Password: Must Not Exceed 45 Characters
• Network Speed: Must Be Greater than 1 Mbps
Note: If you have a multiple band router, be sure your mobile device is connected
to the
2.4 GHz frequency when connecting your station to the app.
MOBILE REQUIREMENTS
Apple phones require iOS with Wi-Fi service.
Android phones require Android OS with Wi-Fi service
LA CROSSE TECHNOLOGY™ PATENTS
Visit www.lacrossetechnology.com/patents for patent information.
Battery Replacement Instructions
When batteries of dierent brand or type are used together, or new and old
batteries are used together, some batteries may be over-discharged due to a
dierence of voltage or capacity. This can result in venting, leakage, and rupture
and may cause personal injury.
• Always purchase the correct size and grade of battery most suitable for the
intended use.
• Always replace the whole set of batteries at one time, taking care not to mix old
and new ones, or batteries of dierent types.
• Clean the battery contacts and also those of the device prior to battery
installation.
• Ensure the batteries are installed correctly with regard to polarity (+ and -).
• Remove batteries from product during periods of non-use. Battery leakage can
cause corrosion and damage to this product.
• Remove used batteries promptly.
• For recycling and disposal of batteries, and to protect the environment, please
check the internet or your local phone directory for local recycling centers and/or
follow local government regulations.
Replace the Coin Cell Battery
1. Use a coin to turn the battery cover to the left to remove it.
2. Pull back the metal pin and gently remove the battery.
3. Insert a fresh CR2032 battery with the + side up and snap into place.
4. Replace the battery cover and use the coin to turn it to the right to lock.
The manufacturer is not responsible for any radio or TV interference caused by unauthorized
changes or modifications to this equipment. Such changes or modifications could void the user
authority to operate the equipment.
All rights reserved. This manual may not be reproduced
in any form, even in part, or duplicated or processed using electronic, mechanical or chemical
process without the written permission of the publisher.
This booklet may contain errors or misprints. The information
it contains is regularly checked and corrections are included in subsequent editions. We
disclaim any responsibility for any technical error or printing error, or their consequences.
All trademarks and patents are recognized.
WARNING: KEEP BATTERIES OUT OF REACH OF CHILDREN
1. Swallowing may lead to serious injury in as little as 2 hours or death, due to
chemical burns and potential perforation of the esophagus.
2. If you suspect your child has swallowed or inserted a button battery, immediately
seek urgent medical assistance.
3. Examine devices and make sure the battery compartment is correctly secured,
e.g. that the screw or other mechanical fastener is tightened.
4. Do not use if compartment is not secure.
5. Dispose of used button batteries immediately and safely. Flat batteries can still
be dangerous.
6. Tell others about the risk associated with button batteries and how to keep their
children safe.
Caution!
CA WARNING: This product can expose you to chemicals including
acrylonitrile, butadiene, and styrene, which are known to the State of California
to cause cancer and birth defects or other reproductive harm. For more
information go to: www.P65Warnings.ca.gov
CARE & MAINTENANCE
WARNING
1. This product contains a button battery.
2. If swallowed, it could cause severe injury or death in just 2 hours.
3. Seek medical attention immediately.
CALIFORNIA RESIDENTS
Page 10 Page 11 Page 12
Page 9
WARNING: CHOKING HAZARD - Small Parts
Not for chidren under 3 yrs.
(For weather station V30v4)
/