JBA PERFORMANCE EXHAUST 1830S-4 User manual

Type
User manual

JBA Performance Exhaust 1830S-4, designed for Chevrolet and GMC Pickups and Suburbans, unleashes enhanced exhaust flow and improves engine performance. These headers are meticulously engineered to deliver optimal fitment and are crafted from durable materials to withstand the rigors of the road. With JBA's 1830S-4 headers, you'll experience increased horsepower, improved throttle response, and a throaty exhaust note that commands attention.

JBA Performance Exhaust 1830S-4, designed for Chevrolet and GMC Pickups and Suburbans, unleashes enhanced exhaust flow and improves engine performance. These headers are meticulously engineered to deliver optimal fitment and are crafted from durable materials to withstand the rigors of the road. With JBA's 1830S-4 headers, you'll experience increased horsepower, improved throttle response, and a throaty exhaust note that commands attention.

Installation Instruction & Warranty Information
Chevrolet & GMC Pickups & Suburban 5.0/5.7
1830S-4 ~ 1987-91 W/O AIR Inj.
1830S-5 ~ 1987-91 W/ AIR Inj.
1830S-6 ~ 1965-86 Carbureted
Cat4Ward® Headers
REV. 8 5-10-22 DSL
SPECIAL TOOLS NEEDED:
Power Steering Pump Pulley Puller. Snap-On® # CJ117A or Lisle par no. 40000
Power Steering Pump Pulley Installer. Snap-On® # CJ113B101 or equivalent.
1. Do not attempt to work on a hot engine. Raise the front of the vehicle to obtain adequate access to
the bottom exhaust manifold anges.
2. Spray penetrating oil on all accessible fasteners and ttings before attempting to remove them.
3. From underneath the vehicle disconnect the Y-pipe from the exhaust manifolds.
4. On the drivers side, remove the spark plugs and plug wires.
5. On serpentine belt equipped trucks, the Power Steering bracket interferes with removal of the
driver’s side exhaust manifold. The power steering pump must be freed from its bracket in order to
remove the driver’s side manifold. The steel bracket is fastened to the
exhaust manifold studs on both sides of the front exhaust port. The studs
cannot be removed until the bracket is pulled outward from the engine.
Remove the top half of the fan shroud. Remove the serpentine belt. Using
a pulley remover, remove the power steering pump pulley. Remove the
three bolts on the front of the power steering pump. Remove the bolt
going from the black steel bracket into the back of the alternator. Remove
the nuts holding the black steel bracket to the head on both sides of the
number one exhaust port. The black steel bracket will still be attached to
the back of the power steering pump. The pump assembly should be loose
enough to wiggle outward from the engine such that the remaining two
nuts holding the steel bracket to the back of the pump can be removed.
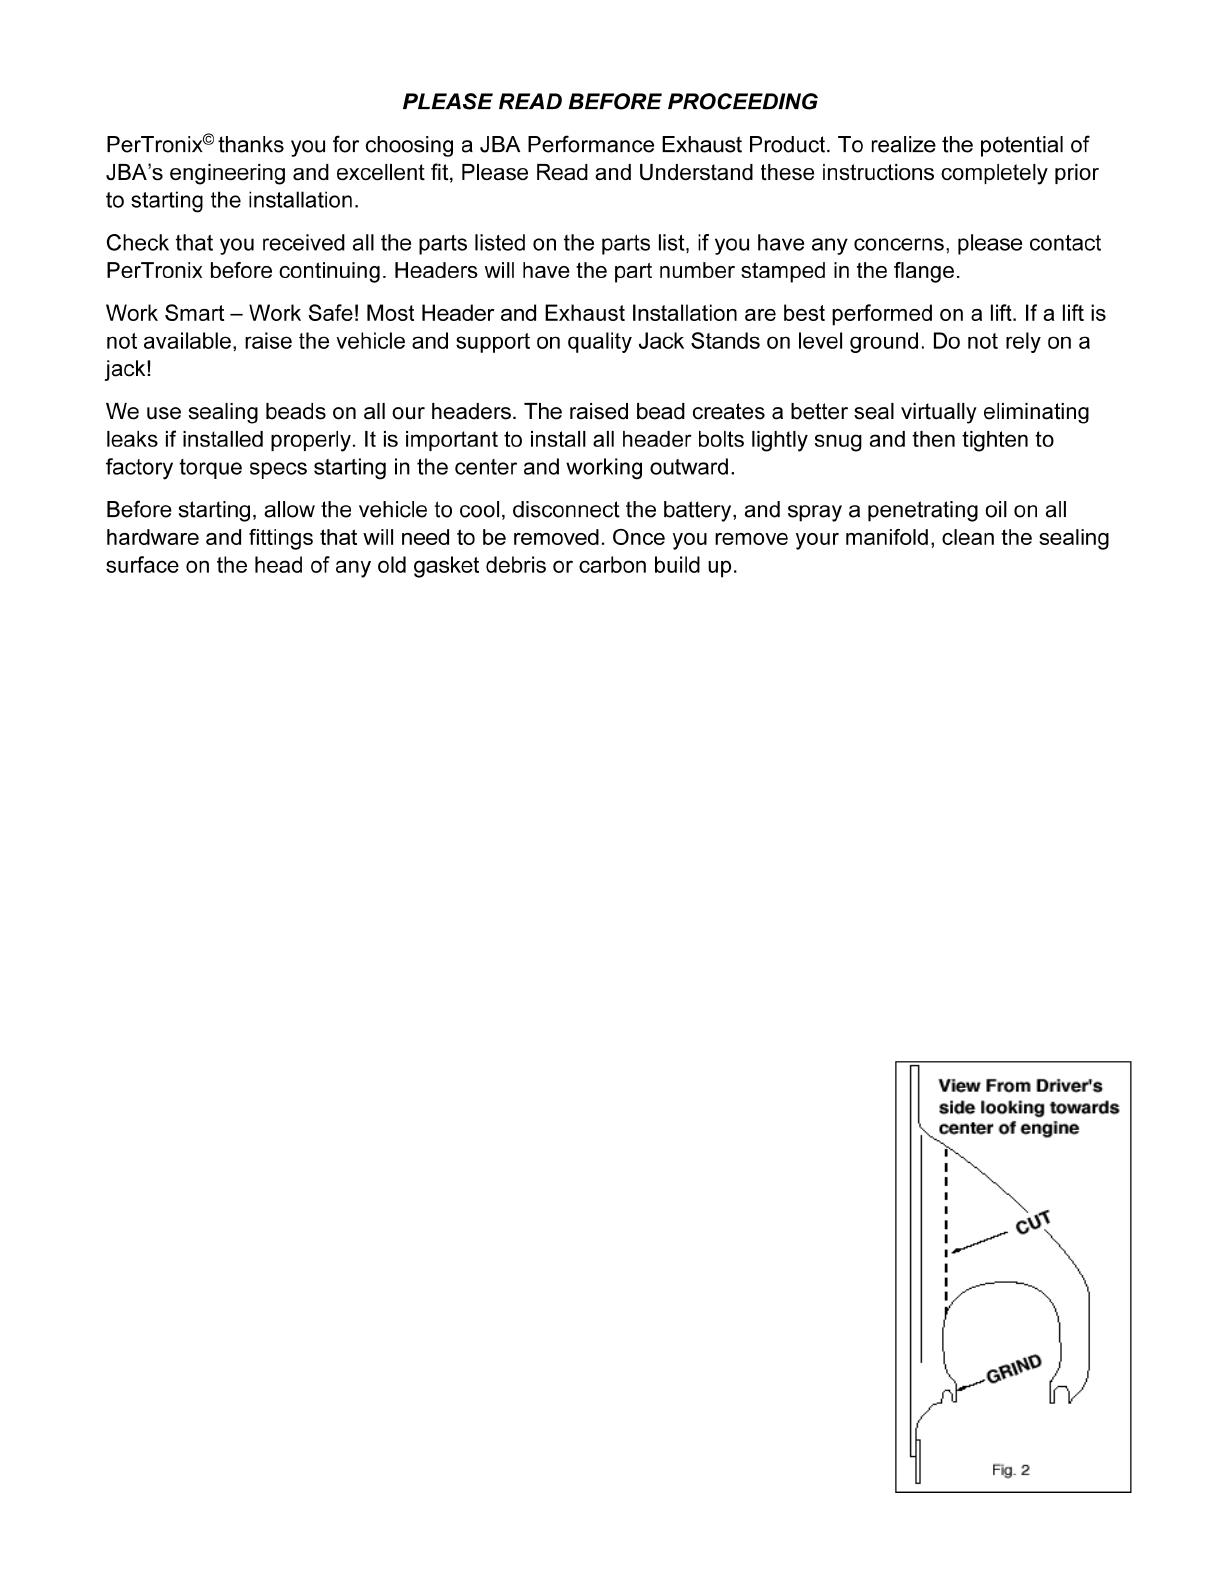
Remove the steel bracket. Using a hack saw, abrasive cut-o wheel,
or band saw, cut the bracket as shown in gure 2. Grind the bracket for
clearance as indicated. Clean up the edges with a le or sander and
repaint.
6. Remove the remaining exhaust manifold bolts and remove the exhaust manifold and gasket. If
your truck has AIR Injection, remove the hose connecting it to the manifold tubes.
7. Clean the exhaust manifold head surface of old gasket debris and carbon deposits.
8. Install the headers using the supplied gaskets and hardware. Tighten to factory specications.
9. On applications with air injection tubes, remove the air injection tubes from your manifolds and
install them on the new headers and reconnect the hose.
10. Repeat for the passenger side.
11. Re-install the spark plugs and plug wires using the included straight boot on the #5 cylinder (driver
side, 3rd cylinder back) with the heat shield slipped onto boot, spring end out and original 90º boots
on all the others. NOTE: Spark plug access on the passenger side is limited. We suggest using an
oset box wrench or a modied plug socket for installation.
12. On applications with heat riser (apper valve), use a replacement for a big block Chevy truck such
as a Maremont part #X-1059 (std. 2-1/2) or X-1059 W.V. (with vacuum diaphragm). This is required to
remain emissions legal.
13. Reconnect your exhaust system using the provided hardware or have a new system installed to
further improve the exhaust ow.
14. Check to make sure there is adequate clearance on plug wires, battery cables, wire looms, brake
lines, etc. Re-connect battery cables.
15. Start the engine and let it warm up. Check for leaks. Shut engine o and let it cool down. Check to
make sure all fasteners are tight.
16. ALL TUBULAR HEADERS require maintenance including periodically checking and retightening
of the header bolts.
Parts List:
(1) Driver’s Side Header Assembly (1) Passenger’s Side Header Assembly
(2) Header gaskets (Header to Head ange) (12) 3/8” x 1” header bolts & washers
(6) 5/16” Collector Bolts, Washers, Locknuts (2) Three bolt ange (1830S-6 only)
(1) #20 Hose clamp (1) Three bolt gasket (1830S-6 only)
(1) Spark plug shielded boot and terminal (4) 1/4-20 x 1” Bolts
(1) 1-1/2” Heat Stove (1) 2” Heat Stove
(1) CARB EO Sticker
  • Page 1 1
  • Page 2 2
  • Page 3 3
  • Page 4 4

JBA PERFORMANCE EXHAUST 1830S-4 User manual

Type
User manual

JBA Performance Exhaust 1830S-4, designed for Chevrolet and GMC Pickups and Suburbans, unleashes enhanced exhaust flow and improves engine performance. These headers are meticulously engineered to deliver optimal fitment and are crafted from durable materials to withstand the rigors of the road. With JBA's 1830S-4 headers, you'll experience increased horsepower, improved throttle response, and a throaty exhaust note that commands attention.

Ask a question and I''ll find the answer in the document

Finding information in a document is now easier with AI