HP AA-RS2JA-TE User manual
- Category
- Network switches
- Type
- User manual
This manual is also suitable for

hp StorageWorks
edge switch 2/16
service manual
Part Number: A7284-96002/AA-RS2JA-TE
First Edition (August 2002)
This manual describes the hp StorageWorks edge switch 2/16
and attached hp StorageWorks ha-fabric manager (HAFM)
application. For service representatives, it describes diagnostic
procedures, repair procedures, and the removal and replacement
procedures for field-replaceable units (FRUs). An illustrated parts
breakdown is included for all FRUs.

© Hewlett-Packard Company, 2002. All rights reserved.
Hewlett-Packard Company makes no warranty of any kind with regard to this material, including,
but not limited to, the implied warranties of merchantability and fitness for a particular purpose.
Hewlett-Packard shall not be liable for errors contained herein or for incidental or consequential
damages in connection with the furnishing, performance, or use of this material.
This document contains proprietary information, which is protected by copyright. No part of this
document may be photocopied, reproduced, or translated into another language without the prior
written consent of Hewlett-Packard. The information contained in this document is subject to change
without notice.
Microsoft, MS-DOS, and Windows are trademarks of Microsoft Corporation in the U.S. and/or
other countries.
All other product names mentioned herein may be trademarks of their respective companies.
Hewlett-Packard Company shall not be liable for technical or editorial errors or omissions contained
herein. The information is provided “as is” without warranty of any kind and is subject to change
without notice. The warranties for Hewlett-Packard Company products are set forth in the express
limited warranty statements accompanying such products. Nothing herein should be construed as
constituting an additional warranty.
Printed in the U.S.A.
edge switch 2/16 service manual
First Edition (August 2002)
Part Number: A7284-96002/AA-RS2JA-TE

edge switch 2/16 installation guide iii
Contents
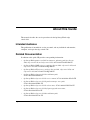
About this Guide
Intended Audience . . . . . . . . . . . . . . . . . . . . . . . . . . . . . . . . . . . . . . . . . . . . . . . . . . . . . . xiii
Related Documentation . . . . . . . . . . . . . . . . . . . . . . . . . . . . . . . . . . . . . . . . . . . . . . . . . .xiii
Document Conventions . . . . . . . . . . . . . . . . . . . . . . . . . . . . . . . . . . . . . . . . . . . . . . . . . . xiv
Symbols in Text . . . . . . . . . . . . . . . . . . . . . . . . . . . . . . . . . . . . . . . . . . . . . . . . . . . . . . . . xv
Symbols on Equipment . . . . . . . . . . . . . . . . . . . . . . . . . . . . . . . . . . . . . . . . . . . . . . . . . . xv
Rack Stability. . . . . . . . . . . . . . . . . . . . . . . . . . . . . . . . . . . . . . . . . . . . . . . . . . . . . . . . . .xvi
Getting Help. . . . . . . . . . . . . . . . . . . . . . . . . . . . . . . . . . . . . . . . . . . . . . . . . . . . . . . . . . xvii
HP Technical Support . . . . . . . . . . . . . . . . . . . . . . . . . . . . . . . . . . . . . . . . . . . . . . . xvii
HP Website . . . . . . . . . . . . . . . . . . . . . . . . . . . . . . . . . . . . . . . . . . . . . . . . . . . . . . . xvii
HP Authorized Reseller . . . . . . . . . . . . . . . . . . . . . . . . . . . . . . . . . . . . . . . . . . . . . . . . . xvii
General InformationI
Switch Description. . . . . . . . . . . . . . . . . . . . . . . . . . . . . . . . . . . . . . . . . . . . . . . . . . . . . 1–1
Switch Management . . . . . . . . . . . . . . . . . . . . . . . . . . . . . . . . . . . . . . . . . . . . . . . . 1–3
Error-Detection, Reporting, and Serviceability Features . . . . . . . . . . . . . . . . . . . . 1–5
Zoning Feature. . . . . . . . . . . . . . . . . . . . . . . . . . . . . . . . . . . . . . . . . . . . . . . . . . . . . 1–7
Multi-Switch Fabrics. . . . . . . . . . . . . . . . . . . . . . . . . . . . . . . . . . . . . . . . . . . . . . . . 1–8
Switch Specifications. . . . . . . . . . . . . . . . . . . . . . . . . . . . . . . . . . . . . . . . . . . . . . . . . . . 1–9
Physical Characteristics . . . . . . . . . . . . . . . . . . . . . . . . . . . . . . . . . . . . . . . . . . 1–9
HAFM Server Description. . . . . . . . . . . . . . . . . . . . . . . . . . . . . . . . . . . . . . . . . . . . . . 1–11
HAFM Server Specifications. . . . . . . . . . . . . . . . . . . . . . . . . . . . . . . . . . . . . . . . . 1–12
Ethernet Hub . . . . . . . . . . . . . . . . . . . . . . . . . . . . . . . . . . . . . . . . . . . . . . . . . . . . . 1–13
Embedded Web Server Interface. . . . . . . . . . . . . . . . . . . . . . . . . . . . . . . . . . . . . . 1–13
Maintenance Approach . . . . . . . . . . . . . . . . . . . . . . . . . . . . . . . . . . . . . . . . . . . . . . . . 1–13
Remote Workstation Configurations . . . . . . . . . . . . . . . . . . . . . . . . . . . . . . . . . . . . . . 1–14
Minimum Remote Console Hardware Specifications . . . . . . . . . . . . . . . . . . . . . . 1–16
Field Replaceable Units . . . . . . . . . . . . . . . . . . . . . . . . . . . . . . . . . . . . . . . . . . . . . . . . 1–17
SFP Transceivers. . . . . . . . . . . . . . . . . . . . . . . . . . . . . . . . . . . . . . . . . . . . . . . . . . 1–19
Cooling Fans . . . . . . . . . . . . . . . . . . . . . . . . . . . . . . . . . . . . . . . . . . . . . . . . . . . . . 1–19

iv edge switch 2/16 installation guide
Contents
Power Supplies. . . . . . . . . . . . . . . . . . . . . . . . . . . . . . . . . . . . . . . . . . . . . . . . . . . . 1–19
Connectors and Indicators . . . . . . . . . . . . . . . . . . . . . . . . . . . . . . . . . . . . . . . . . . . 1–19
Initial Machine Load Button . . . . . . . . . . . . . . . . . . . . . . . . . . . . . . . . . . . . . . . . . 1–20
Ethernet LAN Connector . . . . . . . . . . . . . . . . . . . . . . . . . . . . . . . . . . . . . . . . . . . . 1–20
Power and System Error LEDs . . . . . . . . . . . . . . . . . . . . . . . . . . . . . . . . . . . . . . . 1–20
FRU Status LEDs. . . . . . . . . . . . . . . . . . . . . . . . . . . . . . . . . . . . . . . . . . . . . . . . . . 1–21
Maintenance Port . . . . . . . . . . . . . . . . . . . . . . . . . . . . . . . . . . . . . . . . . . . . . . . . . . 1–21
Software Diagnostic Features. . . . . . . . . . . . . . . . . . . . . . . . . . . . . . . . . . . . . . . . . . . . 1–21
HAFM Diagnostics . . . . . . . . . . . . . . . . . . . . . . . . . . . . . . . . . . . . . . . . . . . . . . . . 1–22
HAFM Status Symbols . . . . . . . . . . . . . . . . . . . . . . . . . . . . . . . . . . . . . . . . . . 1–23
Hardware View Layout and Function . . . . . . . . . . . . . . . . . . . . . . . . . . . . . . . . . . 1–24
Menu Bar . . . . . . . . . . . . . . . . . . . . . . . . . . . . . . . . . . . . . . . . . . . . . . . . . . . . . 1–24
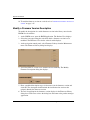
Product Manager Diagnostics . . . . . . . . . . . . . . . . . . . . . . . . . . . . . . . . . . . . . . . . 1–25
Hardware View . . . . . . . . . . . . . . . . . . . . . . . . . . . . . . . . . . . . . . . . . . . . . . . . 1–25
Status Table . . . . . . . . . . . . . . . . . . . . . . . . . . . . . . . . . . . . . . . . . . . . . . . . . . . 1–26
LED Emulation . . . . . . . . . . . . . . . . . . . . . . . . . . . . . . . . . . . . . . . . . . . . . . . . 1–27
Product Manager Status Symbols . . . . . . . . . . . . . . . . . . . . . . . . . . . . . . . . . . 1–27
View Tabs . . . . . . . . . . . . . . . . . . . . . . . . . . . . . . . . . . . . . . . . . . . . . . . . . . . . 1–28
View Panel. . . . . . . . . . . . . . . . . . . . . . . . . . . . . . . . . . . . . . . . . . . . . . . . . . . . 1–28
Status Bar. . . . . . . . . . . . . . . . . . . . . . . . . . . . . . . . . . . . . . . . . . . . . . . . . . . . . 1–35
Topology Tab. . . . . . . . . . . . . . . . . . . . . . . . . . . . . . . . . . . . . . . . . . . . . . . . . . . . . 1–37
Zone Set Tab . . . . . . . . . . . . . . . . . . . . . . . . . . . . . . . . . . . . . . . . . . . . . . . . . . . . . 1–38
HAFM Services Application . . . . . . . . . . . . . . . . . . . . . . . . . . . . . . . . . . . . . . . . . 1–38
Event Table . . . . . . . . . . . . . . . . . . . . . . . . . . . . . . . . . . . . . . . . . . . . . . . . . . . 1–39
Status Line. . . . . . . . . . . . . . . . . . . . . . . . . . . . . . . . . . . . . . . . . . . . . . . . . . . . 1–40
Embedded Web Server Diagnostics. . . . . . . . . . . . . . . . . . . . . . . . . . . . . . . . . . . . 1–41
SNMP Trap Message Support . . . . . . . . . . . . . . . . . . . . . . . . . . . . . . . . . . . . . . . . 1–42
E-Mail and Call-Home Support . . . . . . . . . . . . . . . . . . . . . . . . . . . . . . . . . . . . . . . 1–43
Tools and Test Equipment . . . . . . . . . . . . . . . . . . . . . . . . . . . . . . . . . . . . . . . . . . . . . . 1–43
Tools Supplied with the Switch . . . . . . . . . . . . . . . . . . . . . . . . . . . . . . . . . . . . . . . 1–43
Tools Supplied by Service Personnel. . . . . . . . . . . . . . . . . . . . . . . . . . . . . . . . . . . 1–44
Diagnostics
Maintenance Analysis Procedures . . . . . . . . . . . . . . . . . . . . . . . . . . . . . . . . . . . . . . . . . 2–1
Factory Defaults. . . . . . . . . . . . . . . . . . . . . . . . . . . . . . . . . . . . . . . . . . . . . . . . . . . . 2–1
Quick Start . . . . . . . . . . . . . . . . . . . . . . . . . . . . . . . . . . . . . . . . . . . . . . . . . . . . . . . . 2–1
MAP 0000: Start MAP . . . . . . . . . . . . . . . . . . . . . . . . . . . . . . . . . . . . . . . . . . . . . . . . . . 2–7
MAP 0100: Power Distribution Analysis. . . . . . . . . . . . . . . . . . . . . . . . . . . . . . . . . . . 2–26

Contents
edge switch 2/16 installation guide v
MAP 0200: POST, Reset, or IPL Failure Analysis . . . . . . . . . . . . . . . . . . . . . . . . . . . 2–32
MAP 0300: Console Application Problem Determination . . . . . . . . . . . . . . . . . . . . . 2–33
MAP 0400: Loss of Console Communication . . . . . . . . . . . . . . . . . . . . . . . . . . . . . . . 2–39
MAP 0500: Fan and CTP Failure Analysis . . . . . . . . . . . . . . . . . . . . . . . . . . . . . . . . . 2–58
MAP 0600: Port Failure and Link Incident Analysis. . . . . . . . . . . . . . . . . . . . . . . . . . 2–63
MAP 0700: Fabric, ISL, and Segmented Port Problem Determination. . . . . . . . . . . . 2–79
MAP 0800: Console PC Problem Determination . . . . . . . . . . . . . . . . . . . . . . . . . . . . 2–90
Repair Information
Factory Defaults. . . . . . . . . . . . . . . . . . . . . . . . . . . . . . . . . . . . . . . . . . . . . . . . . . . . . . . 3–2
Procedural Notes . . . . . . . . . . . . . . . . . . . . . . . . . . . . . . . . . . . . . . . . . . . . . . . . . . . . . . 3–2
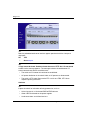
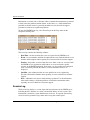
Using Log Information. . . . . . . . . . . . . . . . . . . . . . . . . . . . . . . . . . . . . . . . . . . . . . . . . . 3–3
HAFM Audit Log . . . . . . . . . . . . . . . . . . . . . . . . . . . . . . . . . . . . . . . . . . . . . . . . . . 3–3
HAFM Event Log . . . . . . . . . . . . . . . . . . . . . . . . . . . . . . . . . . . . . . . . . . . . . . . . . . 3–3
Session Log . . . . . . . . . . . . . . . . . . . . . . . . . . . . . . . . . . . . . . . . . . . . . . . . . . . . . . . 3–4
Product Status Log. . . . . . . . . . . . . . . . . . . . . . . . . . . . . . . . . . . . . . . . . . . . . . . . . . 3–5
Fabric Log . . . . . . . . . . . . . . . . . . . . . . . . . . . . . . . . . . . . . . . . . . . . . . . . . . . . . . . . 3–5
Audit Log. . . . . . . . . . . . . . . . . . . . . . . . . . . . . . . . . . . . . . . . . . . . . . . . . . . . . . . . . 3–6
Event Log . . . . . . . . . . . . . . . . . . . . . . . . . . . . . . . . . . . . . . . . . . . . . . . . . . . . . . . . 3–6
Refresh the Event Log. . . . . . . . . . . . . . . . . . . . . . . . . . . . . . . . . . . . . . . . . . . . 3–7
Clear the Event Log . . . . . . . . . . . . . . . . . . . . . . . . . . . . . . . . . . . . . . . . . . . . . 3–7
Hardware Log . . . . . . . . . . . . . . . . . . . . . . . . . . . . . . . . . . . . . . . . . . . . . . . . . . . . . 3–7
Link Incident Log . . . . . . . . . . . . . . . . . . . . . . . . . . . . . . . . . . . . . . . . . . . . . . . . . . 3–9
Refresh the Link Incident Log . . . . . . . . . . . . . . . . . . . . . . . . . . . . . . . . . . . . 3–10
Clear the Link Incident Log . . . . . . . . . . . . . . . . . . . . . . . . . . . . . . . . . . . . . . 3–10
Threshold Alert Log . . . . . . . . . . . . . . . . . . . . . . . . . . . . . . . . . . . . . . . . . . . . . . . 3–10
Using Views. . . . . . . . . . . . . . . . . . . . . . . . . . . . . . . . . . . . . . . . . . . . . . . . . . . . . . . . . 3–12
Port List View . . . . . . . . . . . . . . . . . . . . . . . . . . . . . . . . . . . . . . . . . . . . . . . . . . . . 3–12
FRU List View. . . . . . . . . . . . . . . . . . . . . . . . . . . . . . . . . . . . . . . . . . . . . . . . . . . . 3–14
Node List View . . . . . . . . . . . . . . . . . . . . . . . . . . . . . . . . . . . . . . . . . . . . . . . . . . . 3–16
Performance View . . . . . . . . . . . . . . . . . . . . . . . . . . . . . . . . . . . . . . . . . . . . . . . . . 3–17
Zone Set View . . . . . . . . . . . . . . . . . . . . . . . . . . . . . . . . . . . . . . . . . . . . . . . . . . . . 3–17
Performing Port Diagnostics . . . . . . . . . . . . . . . . . . . . . . . . . . . . . . . . . . . . . . . . . . . . 3–19
Port LEDs . . . . . . . . . . . . . . . . . . . . . . . . . . . . . . . . . . . . . . . . . . . . . . . . . . . . . . . 3–19
Hardware View . . . . . . . . . . . . . . . . . . . . . . . . . . . . . . . . . . . . . . . . . . . . . . . . . . . 3–20
Performance View . . . . . . . . . . . . . . . . . . . . . . . . . . . . . . . . . . . . . . . . . . . . . . . . . 3–24
Perform Loopback Tests . . . . . . . . . . . . . . . . . . . . . . . . . . . . . . . . . . . . . . . . . . . . 3–26
Internal Loopback Test . . . . . . . . . . . . . . . . . . . . . . . . . . . . . . . . . . . . . . . . . . 3–26

vi edge switch 2/16 installation guide
Contents
External Loopback Test. . . . . . . . . . . . . . . . . . . . . . . . . . . . . . . . . . . . . . . . . . 3–28
Perform Channel Wrap Test. . . . . . . . . . . . . . . . . . . . . . . . . . . . . . . . . . . . . . . . . . 3–29
Swapping Ports . . . . . . . . . . . . . . . . . . . . . . . . . . . . . . . . . . . . . . . . . . . . . . . . . . . . . . . 3–30
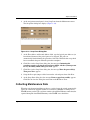
Collecting Maintenance Data . . . . . . . . . . . . . . . . . . . . . . . . . . . . . . . . . . . . . . . . . . . . 3–31
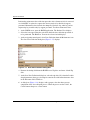
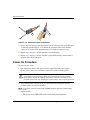
Clean Fiber-Optic Components . . . . . . . . . . . . . . . . . . . . . . . . . . . . . . . . . . . . . . . . . . 3–33
Power-On Procedure. . . . . . . . . . . . . . . . . . . . . . . . . . . . . . . . . . . . . . . . . . . . . . . . . . . 3–34
Power-Off Procedure . . . . . . . . . . . . . . . . . . . . . . . . . . . . . . . . . . . . . . . . . . . . . . . . . . 3–35
Reset or IPL the Switch . . . . . . . . . . . . . . . . . . . . . . . . . . . . . . . . . . . . . . . . . . . . . . . . 3–35
Reset the Switch. . . . . . . . . . . . . . . . . . . . . . . . . . . . . . . . . . . . . . . . . . . . . . . . . . . 3–36
IPL the Switch . . . . . . . . . . . . . . . . . . . . . . . . . . . . . . . . . . . . . . . . . . . . . . . . . . . . 3–36
Set the Switch Online or Offline . . . . . . . . . . . . . . . . . . . . . . . . . . . . . . . . . . . . . . . . . 3–37
Set Online State . . . . . . . . . . . . . . . . . . . . . . . . . . . . . . . . . . . . . . . . . . . . . . . . . . . 3–37
Set Offline State . . . . . . . . . . . . . . . . . . . . . . . . . . . . . . . . . . . . . . . . . . . . . . . . . . . 3–38
Block and Unblock Ports . . . . . . . . . . . . . . . . . . . . . . . . . . . . . . . . . . . . . . . . . . . . . . . 3–39
Block a Port . . . . . . . . . . . . . . . . . . . . . . . . . . . . . . . . . . . . . . . . . . . . . . . . . . . . . . 3–39
Unblock a Port . . . . . . . . . . . . . . . . . . . . . . . . . . . . . . . . . . . . . . . . . . . . . . . . . . . . 3–39
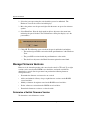
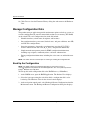
Manage Firmware Versions . . . . . . . . . . . . . . . . . . . . . . . . . . . . . . . . . . . . . . . . . . . . . 3–40
Determine a Switch Firmware Version . . . . . . . . . . . . . . . . . . . . . . . . . . . . . . . . . 3–40
Add a Firmware Version . . . . . . . . . . . . . . . . . . . . . . . . . . . . . . . . . . . . . . . . . . . . 3–41
Modify a Firmware Version Description . . . . . . . . . . . . . . . . . . . . . . . . . . . . . . . . 3–44
Delete a Firmware Version . . . . . . . . . . . . . . . . . . . . . . . . . . . . . . . . . . . . . . . 3–45
Download a Firmware Version to a Switch. . . . . . . . . . . . . . . . . . . . . . . . . . . . . . 3–45
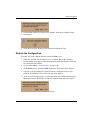
Manage Configuration Data . . . . . . . . . . . . . . . . . . . . . . . . . . . . . . . . . . . . . . . . . . . . . 3–48
Back Up the Configuration . . . . . . . . . . . . . . . . . . . . . . . . . . . . . . . . . . . . . . . . . . 3–48
Restore the Configuration . . . . . . . . . . . . . . . . . . . . . . . . . . . . . . . . . . . . . . . . . . . 3–49
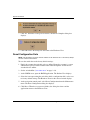
Reset Configuration Data. . . . . . . . . . . . . . . . . . . . . . . . . . . . . . . . . . . . . . . . . . . . 3–50
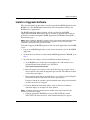
Install or Upgrade Software . . . . . . . . . . . . . . . . . . . . . . . . . . . . . . . . . . . . . . . . . . . . . 3–51
FRU Removal and Replacement
Remove and Replace FRUs . . . . . . . . . . . . . . . . . . . . . . . . . . . . . . . . . . . . . . . . . . . . . . 4–1
FRUs . . . . . . . . . . . . . . . . . . . . . . . . . . . . . . . . . . . . . . . . . . . . . . . . . . . . . . . . . . . . 4–1
Procedural Notes . . . . . . . . . . . . . . . . . . . . . . . . . . . . . . . . . . . . . . . . . . . . . . . . . . . 4–2
RRP: SFP Transceiver . . . . . . . . . . . . . . . . . . . . . . . . . . . . . . . . . . . . . . . . . . . . . . . . . . 4–2
Removal . . . . . . . . . . . . . . . . . . . . . . . . . . . . . . . . . . . . . . . . . . . . . . . . . . . . . . . . . . 4–2
Replacement. . . . . . . . . . . . . . . . . . . . . . . . . . . . . . . . . . . . . . . . . . . . . . . . . . . . . . . 4–3
RRP: Power Supply . . . . . . . . . . . . . . . . . . . . . . . . . . . . . . . . . . . . . . . . . . . . . . . . . . . . 4–4
Removal . . . . . . . . . . . . . . . . . . . . . . . . . . . . . . . . . . . . . . . . . . . . . . . . . . . . . . . . . . 4–4
Replacement. . . . . . . . . . . . . . . . . . . . . . . . . . . . . . . . . . . . . . . . . . . . . . . . . . . . . . . 4–5

Contents
edge switch 2/16 installation guide vii
RRP: Cooling Fan . . . . . . . . . . . . . . . . . . . . . . . . . . . . . . . . . . . . . . . . . . . . . . . . . . . . . 4–6
Removal. . . . . . . . . . . . . . . . . . . . . . . . . . . . . . . . . . . . . . . . . . . . . . . . . . . . . . . . . . 4–6
Replacement . . . . . . . . . . . . . . . . . . . . . . . . . . . . . . . . . . . . . . . . . . . . . . . . . . . . . . 4–7
RRP: CTP Card - Switch Replacement . . . . . . . . . . . . . . . . . . . . . . . . . . . . . . . . . . . . . 4–8
Replacing a Failed Switch . . . . . . . . . . . . . . . . . . . . . . . . . . . . . . . . . . . . . . . . . . . . 4–8
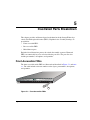
Illustrated Parts Breakdown
Front-Accessible FRUs . . . . . . . . . . . . . . . . . . . . . . . . . . . . . . . . . . . . . . . . . . . . . . . . . 5–1
Rear-Accessible FRUs . . . . . . . . . . . . . . . . . . . . . . . . . . . . . . . . . . . . . . . . . . . . . . . . . . 5–2
Miscellaneous Parts . . . . . . . . . . . . . . . . . . . . . . . . . . . . . . . . . . . . . . . . . . . . . . . . . . . . 5–3
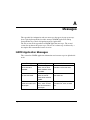
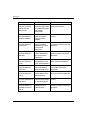
Messages
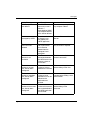
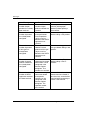
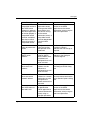
HAFM Application Messages . . . . . . . . . . . . . . . . . . . . . . . . . . . . . . . . . . . . . . . . . . . . A–1
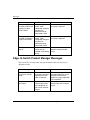
Edge-16 Switch Product Manager Messages. . . . . . . . . . . . . . . . . . . . . . . . . . . . . . . . A–18
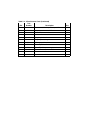
Event Codes
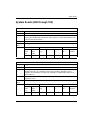
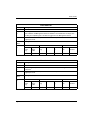
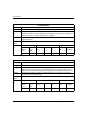
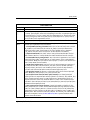
System Events (000 through 199) . . . . . . . . . . . . . . . . . . . . . . . . . . . . . . . . . . . . . . . . . B–3
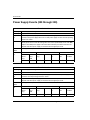
Power Supply Events (200 through 299) . . . . . . . . . . . . . . . . . . . . . . . . . . . . . . . . . . . B–11
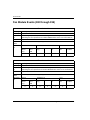
Fan Module Events (300 through 399) . . . . . . . . . . . . . . . . . . . . . . . . . . . . . . . . . . . . B–15
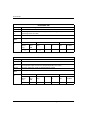
CTP2 Card Events (400 through 499) . . . . . . . . . . . . . . . . . . . . . . . . . . . . . . . . . . . . . B–21
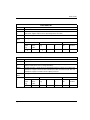
Port Events (500 through 599). . . . . . . . . . . . . . . . . . . . . . . . . . . . . . . . . . . . . . . . . . . B–29
SBAR Events (600 through 699) . . . . . . . . . . . . . . . . . . . . . . . . . . . . . . . . . . . . . . . . . B–34
Thermal Events (800 through 899) . . . . . . . . . . . . . . . . . . . . . . . . . . . . . . . . . . . . . . . B–35
Glossary
Index
Figures
1–1 Switch, HAFM server, and Ethernet Hub. . . . . . . . . . . . . . . . . . . . . . . . . . . . . 1–2
1–2 Out-of-Band Product Management. . . . . . . . . . . . . . . . . . . . . . . . . . . . . . . . . . 1–4
1–3 Inband Product Management . . . . . . . . . . . . . . . . . . . . . . . . . . . . . . . . . . . . . . 1–5
1–4 HAFM Server . . . . . . . . . . . . . . . . . . . . . . . . . . . . . . . . . . . . . . . . . . . . . . . . . 1–12
1–5 12-Port Ethernet Hub . . . . . . . . . . . . . . . . . . . . . . . . . . . . . . . . . . . . . . . . . . . 1–13
1–6 Typical Network Configuration (One Ethernet Connection) . . . . . . . . . . . . . 1–15
1–7 Typical Network Configuration (Two Ethernet Connections) . . . . . . . . . . . . 1–16
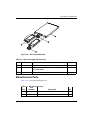
1–8 Edge Switch 2/16 (front view) . . . . . . . . . . . . . . . . . . . . . . . . . . . . . . . . . . . . 1–18
1–9 Edge Switch 2/16 (rear view) . . . . . . . . . . . . . . . . . . . . . . . . . . . . . . . . . . . . . 1–18

1–10 Product View. . . . . . . . . . . . . . . . . . . . . . . . . . . . . . . . . . . . . . . . . . . . . . . . . . 1–23
1–11 Hardware View . . . . . . . . . . . . . . . . . . . . . . . . . . . . . . . . . . . . . . . . . . . . . . . . 1–25
1–12 Hardware View . . . . . . . . . . . . . . . . . . . . . . . . . . . . . . . . . . . . . . . . . . . . . . . . 1–29
1–13 Port List View . . . . . . . . . . . . . . . . . . . . . . . . . . . . . . . . . . . . . . . . . . . . . . . . . 1–31
1–14 FRU List View. . . . . . . . . . . . . . . . . . . . . . . . . . . . . . . . . . . . . . . . . . . . . . . . . 1–32
1–15 Node List View . . . . . . . . . . . . . . . . . . . . . . . . . . . . . . . . . . . . . . . . . . . . . . . . 1–33
1–16 Performance View . . . . . . . . . . . . . . . . . . . . . . . . . . . . . . . . . . . . . . . . . . . . . . 1–34
1–17 Fabrics View - Topology Tab . . . . . . . . . . . . . . . . . . . . . . . . . . . . . . . . . . . . . 1–37
1–18 Fabrics View - Zone Sets Tab . . . . . . . . . . . . . . . . . . . . . . . . . . . . . . . . . . . . . 1–38
1–19 HAFM Services Window . . . . . . . . . . . . . . . . . . . . . . . . . . . . . . . . . . . . . . . . 1–39
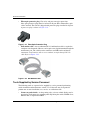
1–20 Multi-mode and Single-mode Loopback Plugs. . . . . . . . . . . . . . . . . . . . . . . . 1–43
1–21 Fiber-Optic Protective Plug. . . . . . . . . . . . . . . . . . . . . . . . . . . . . . . . . . . . . . . 1–44
1–22 Null Modem Cable . . . . . . . . . . . . . . . . . . . . . . . . . . . . . . . . . . . . . . . . . . . . . 1–44
3–1 HAFM Event Log . . . . . . . . . . . . . . . . . . . . . . . . . . . . . . . . . . . . . . . . . . . . . . . 3–4
3–2 Product Status Log. . . . . . . . . . . . . . . . . . . . . . . . . . . . . . . . . . . . . . . . . . . . . . . 3–5
3–3 Switch Event Log . . . . . . . . . . . . . . . . . . . . . . . . . . . . . . . . . . . . . . . . . . . . . . . 3–6
3–4 Hardware Log . . . . . . . . . . . . . . . . . . . . . . . . . . . . . . . . . . . . . . . . . . . . . . . . . . 3–8
3–5 Link Incident Log . . . . . . . . . . . . . . . . . . . . . . . . . . . . . . . . . . . . . . . . . . . . . . . 3–9
3–6 Threshold Alert Log . . . . . . . . . . . . . . . . . . . . . . . . . . . . . . . . . . . . . . . . . . . . 3–11
3–7 Port List View . . . . . . . . . . . . . . . . . . . . . . . . . . . . . . . . . . . . . . . . . . . . . . . . . 3–13
3–8 FRU List View. . . . . . . . . . . . . . . . . . . . . . . . . . . . . . . . . . . . . . . . . . . . . . . . . 3–15
3–9 Node List View . . . . . . . . . . . . . . . . . . . . . . . . . . . . . . . . . . . . . . . . . . . . . . . . 3–16
3–10 Zone Sets View . . . . . . . . . . . . . . . . . . . . . . . . . . . . . . . . . . . . . . . . . . . . . . . . 3–18
3–11 Hardware View . . . . . . . . . . . . . . . . . . . . . . . . . . . . . . . . . . . . . . . . . . . . . . . . 3–20
3–12 Port Properties Dialog Box . . . . . . . . . . . . . . . . . . . . . . . . . . . . . . . . . . . . . . . 3–21
3–13 Performance View . . . . . . . . . . . . . . . . . . . . . . . . . . . . . . . . . . . . . . . . . . . . . . 3–24
3–14 Port Diagnostics Dialog Box. . . . . . . . . . . . . . . . . . . . . . . . . . . . . . . . . . . . . . 3–27
3–15 Channel Wrap On for Port n Dialog Box . . . . . . . . . . . . . . . . . . . . . . . . . . . . 3–30
3–16 Swap Ports Dialog Box . . . . . . . . . . . . . . . . . . . . . . . . . . . . . . . . . . . . . . . . . . 3–31
3–17 Save Data Collection Dialog Box . . . . . . . . . . . . . . . . . . . . . . . . . . . . . . . . . . 3–32
3–18 Data Collection Dialog Box . . . . . . . . . . . . . . . . . . . . . . . . . . . . . . . . . . . . . . 3–33
3–19 Clean Fiber-Optic Components. . . . . . . . . . . . . . . . . . . . . . . . . . . . . . . . . . . . 3–34
5–1 Front-Accessible FRUs . . . . . . . . . . . . . . . . . . . . . . . . . . . . . . . . . . . . . . . . . . . 5–1
5–2 Rear-Accessible FRUs. . . . . . . . . . . . . . . . . . . . . . . . . . . . . . . . . . . . . . . . . . . . 5–3

Contents
edge switch 2/16 installation guide ix
Tables
1–1 Status Symbols . . . . . . . . . . . . . . . . . . . . . . . . . . . . . . . . . . . . . . . . . . . . . . . . 1–24
1–2 Operating Status - Status Bar and Switch Status Table . . . . . . . . . . . . . . . . . 1–36
1–3 HAFM Services Status Symbols. . . . . . . . . . . . . . . . . . . . . . . . . . . . . . . . . . . 1–40
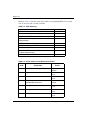
2–1 Factory-Set Defaults . . . . . . . . . . . . . . . . . . . . . . . . . . . . . . . . . . . . . . . . . . . . . 2–1
2–2 MAP Summary . . . . . . . . . . . . . . . . . . . . . . . . . . . . . . . . . . . . . . . . . . . . . . . . . 2–2
2–3 Event Codes versus Maintenance Action . . . . . . . . . . . . . . . . . . . . . . . . . . . . . 2–2
3–1 Factory-Set Defaults . . . . . . . . . . . . . . . . . . . . . . . . . . . . . . . . . . . . . . . . . . . . . 3–2
4–1 ESD Requirements . . . . . . . . . . . . . . . . . . . . . . . . . . . . . . . . . . . . . . . . . . . . . . 4–1
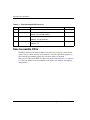
5–1 Front-Accessible FRU Parts List . . . . . . . . . . . . . . . . . . . . . . . . . . . . . . . . . . . 5–2
5–2 Rear-Accessible FRU Parts List . . . . . . . . . . . . . . . . . . . . . . . . . . . . . . . . . . . . 5–3
5–3 Miscellaneous Parts. . . . . . . . . . . . . . . . . . . . . . . . . . . . . . . . . . . . . . . . . . . . . . 5–3


xiiiedge switch 2/16 service manual
About this Guide
This manual describes the service procedures for the hp StorageWorks edge
switch 2/16.
Intended Audience
This publication is intended for service personnel, and any individuals who monitor,
configure, and repair the edge switch 2/16.
Related Documentation
In addition to this guide, HP provides corresponding information:
• hp StorageWorks product in a SAN environment - planning guide for director
2/64, edge switch 2/16, and edge switch 2/32, A6534-96025/AA-RS2DA-TE
• hp StorageWorks SNMP reference guide for director 2/64, edge switch 2/16, and
edge switch 2/32, A6534-96026/AA-RQ7BB-TE
• hp StorageWorks CLI reference guide for director 2/64, edge switch 2/16, and
edge switch 2/32, A6534-96027/AA-RQ7AB-TE
• hp StorageWorks edge switch 2/32 installation guide,
A7283-96001/AA-RSTZA-TE
• hp StorageWorks edge switch 2/32 service manual, A7283-96002/AA-RS2GA-TE
• hp StorageWorks edge switch 2/32 product manager user guide,
A7283-96003/AA-RS2HA-TE
• hp StorageWorks edge switch 2/32 release notes, A7283-96004/AV-RSU0A-TE
• hp StorageWorks edge switch 2/32 flexport upgrade instructions,
A7290-96001/AA-RS33A-TE
• hp StorageWorks edge switch 2/16 installation guide,
A7284-96001/AA-RSU2A-TE

About this Guide
xiv edge switch 2/16 service manual
• hp StorageWorks edge switch 2/16 product manager user guide,
A7284-96003/AA-RS2KA-TE
• hp StorageWorks edge switch 2/16 release notes, A7284-96004/AV-RSU3A-TE
• hp StorageWorks edge switch rack mount installation instructions,
A7283-96004/AA-RT4MA-TE
• hp StorageWorks HAFM server installation guide, A6582-96001/AA-RT4KA-TE
• hp StorageWorks ha-fabric manager user guide, A6534-96024/AA-RS2CA-TE
• hp StorageWorks ha-fabric manager release notes, A6575-96004/AV-RQZJC-TE
• hp StorageWorks SFP transceiver installation instructions,
A6534-96030/AA-RSS3A-TE
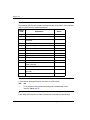
Document Conventions
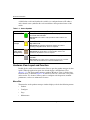
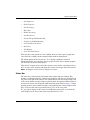
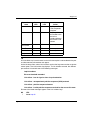
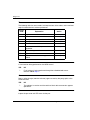
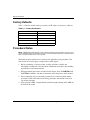
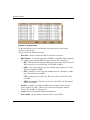
The conventions included in Table 1 apply.
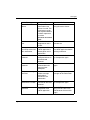
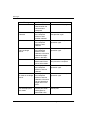
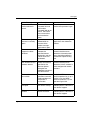
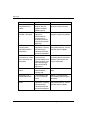
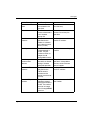
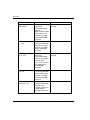
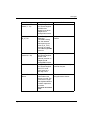
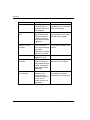
Table 1: Document Conventions
Element Convention
Cross-reference links Blue text: Figure 1
Key names, menu items, buttons, and
dialog box titles
Bold
File names, application names, and text
emphasis
Italics
User input, command names, system
responses (output and messages)
Monospace font
COMMAND NAMES
are uppercase
unless they are case sensitive
Variables
Monospace, italic font
Website addresses Sans serif font (http://thenew.hp.com)

About this Guide
xvedge switch 2/16 service manual
Symbols in Text
These symbols may be found in the text of this manual. They have the following
meanings.
WARNING: Text set off in this manner indicates that failure to follow directions
in the warning could result in bodily harm or loss of life.
CAUTION: Text set off in this manner indicates that failure to follow directions could
result in damage to equipment or data.
IMPORTANT: Text set off in this manner presents clarifying information or specific instructions.
NOTE: Text set off in this manner presents commentary, sidelights, or interesting points of
information.
Symbols on Equipment
Any enclosed surface or area of the equipment marked with these
symbols indicates the presence of electrical shock hazards. Enclosed
area contains no operator serviceable parts.
WARNING: To reduce the risk of injury from electrical shock hazards, do
not open this enclosure.
Any RJ-45 receptacle marked with these symbols indicates a network
interface connection.
WARNING: To reduce the risk of electrical shock, fire, or damage to the
equipment, do not plug telephone or telecommunications connectors into
this receptacle.

About this Guide
xvi edge switch 2/16 service manual
Any surface or area of the equipment marked with these symbols
indicates the presence of a hot surface or hot component. Contact with
this surface could result in injury.
WARNING: To reduce the risk of injury from a hot component, allow the
surface to cool before touching.
Power supplies or systems marked with these symbols indicate the
presence of multiple sources of power.
WARNING: To reduce the risk of injury from electrical shock,
remove all power cords to completely disconnect power from the
power supplies and systems.
Any product or assembly marked with these symbols indicates that the
component exceeds the recommended weight for one individual to
handle safely.
WARNING: To reduce the risk of personal injury or damage to the
equipment, observe local occupational health and safety requirements
and guidelines for manually handling material.
Rack Stability
WARNING: To reduce the risk of personal injury or damage to the equipment, be
sure that:
• The leveling jacks are extended to the floor.
• The full weight of the rack rests on the leveling jacks.
• In single rack installations, the stabilizing feet are attached to the rack.
• In multiple rack installations, the racks are coupled.
• Only one rack component is extended at any time. A rack may become
unstable if more than one rack component is extended for any reason.

About this Guide
xviiedge switch 2/16 service manual
Getting Help
If you still have a question after reading this manual, contact an HP authorized service
provider or access our website: http://thenew.hp.com.
HP Technical Support
In North America, call technical support at 1-800-652-6672, available 24 hours a day,
7 days a week.
NOTE: For continuous quality improvement, calls may be recorded or monitored.
Outside North America, call technical support at the nearest location. Telephone
numbers for worldwide technical support are listed on the HP website under support:
http://thenew.hp.com/country/us/eng/support.html
.
Be sure to have the following information available before calling:
• Technical support registration number (if applicable)
• Product serial numbers
• Product model names and numbers
• Applicable error messages
• Operating system type and revision level
• Detailed, specific questions
HP Website
The HP website has the latest information on this product, as well as the latest drivers.
Access storage at: http://thenew.hp.com/country/us/eng/prodserv/storage.html
. From this
website, select the appropriate product or solution.
HP Authorized Reseller
For the name of your nearest HP Authorized Reseller:
• In the United States, call 1-800-345-1518
• In Canada, call 1-800-263-5868
• Elsewhere, see the HP website for locations and telephone numbers:
http://thenew.hp.com.


edge switch 2/16 service manual 1–1
1
General InformationI
The hp StorageWorks edge switch 2/16 provides dynamic switched connections
between Fibre Channel servers and devices in a storage area network (SAN)
environment. SANs introduce the concept of server-to-device networking and
multi-switch fabrics, eliminate requirements for dedicated connections, and enable the
enterprise to become data centric.
A SAN provides speed, high capacity, and flexibility for the enterprise, and is
primarily based upon Fibre Channel architecture. The switch implements Fibre
Channel technology that provides a bandwidth of 2.125 gigabits per second,
redundant switched data paths, a scalable number of active ports, and long
transmission distances (up to 35 kilometers).
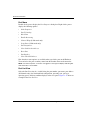
This chapter describes the switch and attached hp StorageWorks ha-fabric manager
(HAFM) server. The chapter specifically discusses:
• Switch management, error-detection and reporting features, serviceability
features, zoning, multi-switch fabrics, and specifications.
• The HAFM server and minimum hardware specifications.
• Remote workstation configurations and hardware specifications.
• Maintenance approach.
• Field-replaceable units (FRUs).
• Connectors and indicators.
• Software diagnostic features.
• Tools and test equipment.
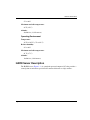
Switch Description
The switch can be installed on a table or desk top, or mounted in an equipment cabinet
or in any standard equipment rack.

1–2 edge switch 2/16 service manual
General InformationI
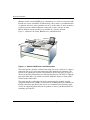
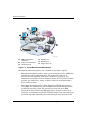
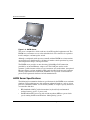
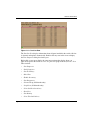
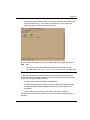
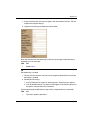
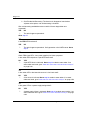
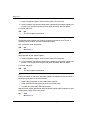
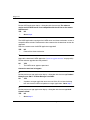
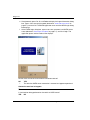
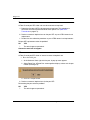
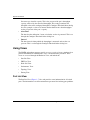
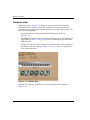
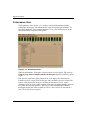
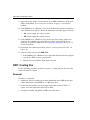
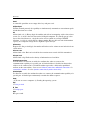
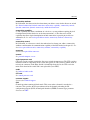
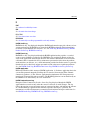
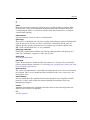
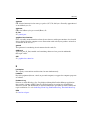
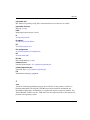
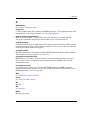
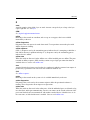
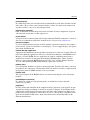
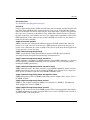
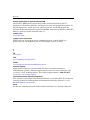
Multiple switches and the HAFM server communicate on a local area network (LAN)
through one or more 10/100Base-T Ethernet hubs. One or more 12-port Ethernet hubs
are optional and can be ordered with the switch. Up to three hubs are daisy-chained as
required to provide additional Ethernet connections as more switches (or other
Hewlett Packard managed products) are installed on a customer network.
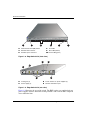
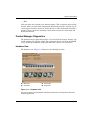
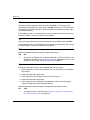
Figure 1–1 illustrates the switch, HAFM server, and Ethernet hub.
Figure 1–1: Switch, HAFM server, and Ethernet Hub
The switch provides dynamic switched connections for servers and devices, supports
mainframe and open-systems interconnection (OSI) computing environments, and
provides data transmission and flow control between device node ports (N_Ports) as
dictated by the Fibre Channel Physical and Signaling Interface (FC-PH 4.3). Through
interswitch links (ISLs), the switch can connect additional switches to form a Fibre
Channel multi-switch fabric.
The switch provides connectivity for devices manufactured by multiple original
equipment manufacturers (OEMs). To determine if an OEM product can communicate
through connections provided by the switch, or if communication restrictions apply,
refer to the supporting publications for the product or contact your Hewlett Packard
marketing representative
Switch
1
7
X
2
X
8X
3X
9X
4X
10X
5X
11
X
6
X
12X
A
c
tCol
H
P
J
3
2
9
4
A
P
ro
C
u
rv
e
10
/
100H
u
b1
2
Re
s
et
Po
r
t
1
O
n
l
y
Lin
k
Link
100
100
1
7
2
8
3
9
4
10
5
11
6
12
M
DI-X
MDI
(out
)(in)
Fault
P
o
we
r
E
R
R
P
W
R
R
S
T
1
0
/
1
0
0
S
t
o
r
a
g
e
W
o
r
k
s
d
i
r
e
c
t
o
r
2
/
6
4
HP Hub
HAFM Server

edge switch 2/16 service manual 1–3
General InformationI
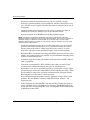
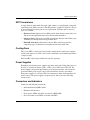
Switch Management
Out-of-band (non-Fibre Channel) management access to HP products is provided
through an Ethernet LAN connection to a switch front panel. The following
out-of-band management access methods are provided:
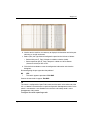
• Management through the HAFM application. The HAFM application includes the
edge switch 2/16 Product Manager application. This GUI resides on the HAFM
server and provides a single point of management for all directors and switches.
Operators at remote workstations can connect to the HAFM server through the
local HAFM application and associated Product Manager applications to manage
and monitor switches controlled by the HAFM server. A maximum of nine
concurrent users (including a local user) can log in to the HAFM application.
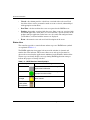
• Management using simple network management protocol (SNMP). An SNMP
agent is implemented through the HAFM application that allows administrators
on SNMP management workstations to access product management information
using any standard network management tool. Administrators can assign Internet
Protocol (IP) addresses and corresponding community names for up to six SNMP
workstations functioning as SNMP trap message recipients.
• Management through the Internet using the EWS interface installed on the switch.
This interface supports configuration, statistics monitoring, and basic operation of
the product, but does not offer all the capabilities of the corresponding Product
Manager application. Administrators launch the web server interface from a
remote PC by entering the product’s IP address as the Internet uniform resource
locator (URL), then entering a user name and password at a login screen. The PC
browser then becomes a management console.
• Management through a customer-supplied remote workstation communicating
with the HAFM server through a corporate intranet.
• Management through the command line interface (CLI). The CLI allows you to
access many HAFM and Product Manager applications while entering commands
during a telnet session with the switch. The primary purpose of the CLI is to
automate management of a large number of switches using scripts. The CLI is not
an interactive interface; no checking is done for pre-existing conditions and no
prompts display to guide users through tasks. Refer to the hp StorageWorks CLI
reference guide for director 2/64, edge switch 2/16, and edge switch 2/32
(A6534-96027/AA-RQ7AB-TE).
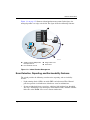
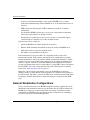
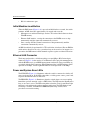
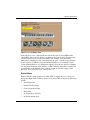
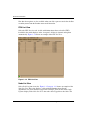
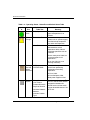
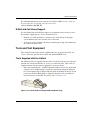
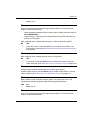
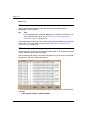
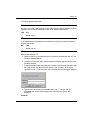
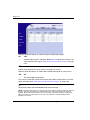
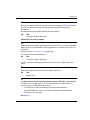
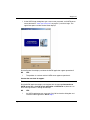
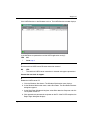
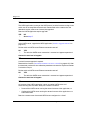
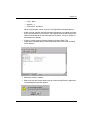
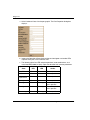
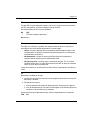
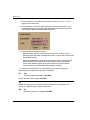
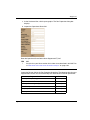
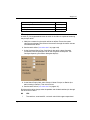
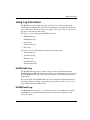
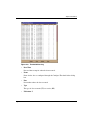
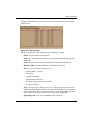
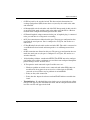
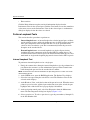
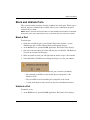
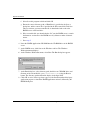
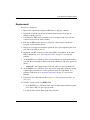
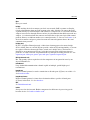
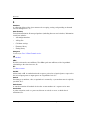
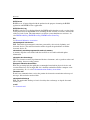
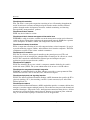
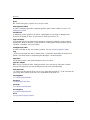
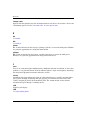
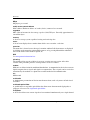
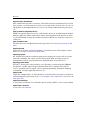
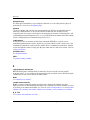
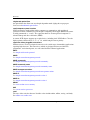
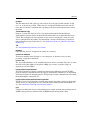
Figure 1–2 illustrates an example of out-of-band product management. In the figure,
the managed product is an edge switch 2/16.

1–4 edge switch 2/16 service manual
General InformationI
Figure 1–2: Out-of-Band Product Management
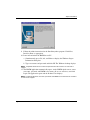
The following inband management access methods are provided as options:
• Management through the product’s open-system management server (OSMS) that
communicates with an application client. The application resides on an
open-systems interconnection (OSI) device attached to a switch port, and
communicates using Fibre Channel common transport (FC-CT) protocol. Product
operation, port connectivity, zoning, and fabric control are managed through a
device-attached console.
• Management through the product’s Fibre Connection (FICON) management
server (FMS) that communicates with the IBM System Automation for OS/390
(SA OS/390) operating system. The operating system resides on an IBM
System/390
or zSeries 900 Parallel Enterprise Server attached to a director or
switch port, and communicates through a FICON channel. Control of connectivity
and statistical product monitoring are provided through a host-attached console.
1 SNMP management
workstation
2 Remote user workstation
3 HP Ethernet hub
4 HAFM server
5 Web browser
6 Edge switch 2/16
1
7X
2X
8X
3X
9X
4X
10X
5X
11X
6X
12X
Act
C
ol
HPJ3
2
94A
ProCurve
1
0/100
H
ub
1
2
Reset
Port
1
O
nly
Link
L
ink
100
100
1
7
2
8
3
9
4
10
5
11
6
1
2
MDI-X
MDI
(out)
(in)
Fault
Power
10/100 Mbps
Corporate LAN
10/100 Mbps
Corporate LAN
Internet
Connection
E
R
R
P
W
R
R
S
T
1
0/100
SHR-2314d
1
3
4
5
6
2
S
t
o
ra
g
e
W
o
rk
s
d
ir
e
c
t
o
r
2
/
6
4
Page is loading ...
Page is loading ...
Page is loading ...
Page is loading ...
Page is loading ...
Page is loading ...
Page is loading ...
Page is loading ...
Page is loading ...
Page is loading ...
Page is loading ...
Page is loading ...
Page is loading ...
Page is loading ...
Page is loading ...
Page is loading ...
Page is loading ...
Page is loading ...
Page is loading ...
Page is loading ...
Page is loading ...
Page is loading ...
Page is loading ...
Page is loading ...
Page is loading ...
Page is loading ...
Page is loading ...
Page is loading ...
Page is loading ...
Page is loading ...
Page is loading ...
Page is loading ...
Page is loading ...
Page is loading ...
Page is loading ...
Page is loading ...
Page is loading ...
Page is loading ...
Page is loading ...
Page is loading ...
Page is loading ...
Page is loading ...
Page is loading ...
Page is loading ...
Page is loading ...
Page is loading ...
Page is loading ...
Page is loading ...
Page is loading ...
Page is loading ...
Page is loading ...
Page is loading ...
Page is loading ...
Page is loading ...
Page is loading ...
Page is loading ...
Page is loading ...
Page is loading ...
Page is loading ...
Page is loading ...
Page is loading ...
Page is loading ...
Page is loading ...
Page is loading ...
Page is loading ...
Page is loading ...
Page is loading ...
Page is loading ...
Page is loading ...
Page is loading ...
Page is loading ...
Page is loading ...
Page is loading ...
Page is loading ...
Page is loading ...
Page is loading ...
Page is loading ...
Page is loading ...
Page is loading ...
Page is loading ...
Page is loading ...
Page is loading ...
Page is loading ...
Page is loading ...
Page is loading ...
Page is loading ...
Page is loading ...
Page is loading ...
Page is loading ...
Page is loading ...
Page is loading ...
Page is loading ...
Page is loading ...
Page is loading ...
Page is loading ...
Page is loading ...
Page is loading ...
Page is loading ...
Page is loading ...
Page is loading ...
Page is loading ...
Page is loading ...
Page is loading ...
Page is loading ...
Page is loading ...
Page is loading ...
Page is loading ...
Page is loading ...
Page is loading ...
Page is loading ...
Page is loading ...
Page is loading ...
Page is loading ...
Page is loading ...
Page is loading ...
Page is loading ...
Page is loading ...
Page is loading ...
Page is loading ...
Page is loading ...
Page is loading ...
Page is loading ...
Page is loading ...
Page is loading ...
Page is loading ...
Page is loading ...
Page is loading ...
Page is loading ...
Page is loading ...
Page is loading ...
Page is loading ...
Page is loading ...
Page is loading ...
Page is loading ...
Page is loading ...
Page is loading ...
Page is loading ...
Page is loading ...
Page is loading ...
Page is loading ...
Page is loading ...
Page is loading ...
Page is loading ...
Page is loading ...
Page is loading ...
Page is loading ...
Page is loading ...
Page is loading ...
Page is loading ...
Page is loading ...
Page is loading ...
Page is loading ...
Page is loading ...
Page is loading ...
Page is loading ...
Page is loading ...
Page is loading ...
Page is loading ...
Page is loading ...
Page is loading ...
Page is loading ...
Page is loading ...
Page is loading ...
Page is loading ...
Page is loading ...
Page is loading ...
Page is loading ...
Page is loading ...
Page is loading ...
Page is loading ...
Page is loading ...
Page is loading ...
Page is loading ...
Page is loading ...
Page is loading ...
Page is loading ...
Page is loading ...
Page is loading ...
Page is loading ...
Page is loading ...
Page is loading ...
Page is loading ...
Page is loading ...
Page is loading ...
Page is loading ...
Page is loading ...
Page is loading ...
Page is loading ...
Page is loading ...
Page is loading ...
Page is loading ...
Page is loading ...
Page is loading ...
Page is loading ...
Page is loading ...
Page is loading ...
Page is loading ...
Page is loading ...
Page is loading ...
Page is loading ...
Page is loading ...
Page is loading ...
Page is loading ...
Page is loading ...
Page is loading ...
Page is loading ...
Page is loading ...
Page is loading ...
Page is loading ...
Page is loading ...
Page is loading ...
Page is loading ...
Page is loading ...
Page is loading ...
Page is loading ...
Page is loading ...
Page is loading ...
Page is loading ...
Page is loading ...
Page is loading ...
Page is loading ...
Page is loading ...
Page is loading ...
Page is loading ...
Page is loading ...
Page is loading ...
Page is loading ...
Page is loading ...
Page is loading ...
Page is loading ...
Page is loading ...
Page is loading ...
Page is loading ...
Page is loading ...
Page is loading ...
Page is loading ...
Page is loading ...
Page is loading ...
Page is loading ...
Page is loading ...
Page is loading ...
Page is loading ...
Page is loading ...
Page is loading ...
Page is loading ...
Page is loading ...
Page is loading ...
Page is loading ...
Page is loading ...
Page is loading ...
Page is loading ...
Page is loading ...
Page is loading ...
Page is loading ...
Page is loading ...
Page is loading ...
Page is loading ...
Page is loading ...
Page is loading ...
Page is loading ...
Page is loading ...
Page is loading ...
Page is loading ...
Page is loading ...
Page is loading ...
Page is loading ...
Page is loading ...
Page is loading ...
Page is loading ...
Page is loading ...
Page is loading ...
Page is loading ...
Page is loading ...
Page is loading ...
Page is loading ...
Page is loading ...
Page is loading ...
Page is loading ...
Page is loading ...
Page is loading ...
Page is loading ...
Page is loading ...
Page is loading ...
Page is loading ...
Page is loading ...
Page is loading ...
Page is loading ...
Page is loading ...
Page is loading ...
Page is loading ...
Page is loading ...
Page is loading ...
Page is loading ...
Page is loading ...
Page is loading ...
Page is loading ...
Page is loading ...
Page is loading ...
Page is loading ...
Page is loading ...
Page is loading ...
Page is loading ...
Page is loading ...
Page is loading ...
Page is loading ...
Page is loading ...
Page is loading ...
Page is loading ...
Page is loading ...
Page is loading ...
Page is loading ...
Page is loading ...
Page is loading ...
Page is loading ...
Page is loading ...
Page is loading ...
Page is loading ...
Page is loading ...
Page is loading ...
Page is loading ...
Page is loading ...
Page is loading ...
Page is loading ...
Page is loading ...
Page is loading ...
Page is loading ...
Page is loading ...
Page is loading ...
Page is loading ...
Page is loading ...
Page is loading ...
Page is loading ...
Page is loading ...
Page is loading ...
Page is loading ...
Page is loading ...
Page is loading ...
Page is loading ...
Page is loading ...
Page is loading ...
-
 1
1
-
 2
2
-
 3
3
-
 4
4
-
 5
5
-
 6
6
-
 7
7
-
 8
8
-
 9
9
-
 10
10
-
 11
11
-
 12
12
-
 13
13
-
 14
14
-
 15
15
-
 16
16
-
 17
17
-
 18
18
-
 19
19
-
 20
20
-
 21
21
-
 22
22
-
 23
23
-
 24
24
-
 25
25
-
 26
26
-
 27
27
-
 28
28
-
 29
29
-
 30
30
-
 31
31
-
 32
32
-
 33
33
-
 34
34
-
 35
35
-
 36
36
-
 37
37
-
 38
38
-
 39
39
-
 40
40
-
 41
41
-
 42
42
-
 43
43
-
 44
44
-
 45
45
-
 46
46
-
 47
47
-
 48
48
-
 49
49
-
 50
50
-
 51
51
-
 52
52
-
 53
53
-
 54
54
-
 55
55
-
 56
56
-
 57
57
-
 58
58
-
 59
59
-
 60
60
-
 61
61
-
 62
62
-
 63
63
-
 64
64
-
 65
65
-
 66
66
-
 67
67
-
 68
68
-
 69
69
-
 70
70
-
 71
71
-
 72
72
-
 73
73
-
 74
74
-
 75
75
-
 76
76
-
 77
77
-
 78
78
-
 79
79
-
 80
80
-
 81
81
-
 82
82
-
 83
83
-
 84
84
-
 85
85
-
 86
86
-
 87
87
-
 88
88
-
 89
89
-
 90
90
-
 91
91
-
 92
92
-
 93
93
-
 94
94
-
 95
95
-
 96
96
-
 97
97
-
 98
98
-
 99
99
-
 100
100
-
 101
101
-
 102
102
-
 103
103
-
 104
104
-
 105
105
-
 106
106
-
 107
107
-
 108
108
-
 109
109
-
 110
110
-
 111
111
-
 112
112
-
 113
113
-
 114
114
-
 115
115
-
 116
116
-
 117
117
-
 118
118
-
 119
119
-
 120
120
-
 121
121
-
 122
122
-
 123
123
-
 124
124
-
 125
125
-
 126
126
-
 127
127
-
 128
128
-
 129
129
-
 130
130
-
 131
131
-
 132
132
-
 133
133
-
 134
134
-
 135
135
-
 136
136
-
 137
137
-
 138
138
-
 139
139
-
 140
140
-
 141
141
-
 142
142
-
 143
143
-
 144
144
-
 145
145
-
 146
146
-
 147
147
-
 148
148
-
 149
149
-
 150
150
-
 151
151
-
 152
152
-
 153
153
-
 154
154
-
 155
155
-
 156
156
-
 157
157
-
 158
158
-
 159
159
-
 160
160
-
 161
161
-
 162
162
-
 163
163
-
 164
164
-
 165
165
-
 166
166
-
 167
167
-
 168
168
-
 169
169
-
 170
170
-
 171
171
-
 172
172
-
 173
173
-
 174
174
-
 175
175
-
 176
176
-
 177
177
-
 178
178
-
 179
179
-
 180
180
-
 181
181
-
 182
182
-
 183
183
-
 184
184
-
 185
185
-
 186
186
-
 187
187
-
 188
188
-
 189
189
-
 190
190
-
 191
191
-
 192
192
-
 193
193
-
 194
194
-
 195
195
-
 196
196
-
 197
197
-
 198
198
-
 199
199
-
 200
200
-
 201
201
-
 202
202
-
 203
203
-
 204
204
-
 205
205
-
 206
206
-
 207
207
-
 208
208
-
 209
209
-
 210
210
-
 211
211
-
 212
212
-
 213
213
-
 214
214
-
 215
215
-
 216
216
-
 217
217
-
 218
218
-
 219
219
-
 220
220
-
 221
221
-
 222
222
-
 223
223
-
 224
224
-
 225
225
-
 226
226
-
 227
227
-
 228
228
-
 229
229
-
 230
230
-
 231
231
-
 232
232
-
 233
233
-
 234
234
-
 235
235
-
 236
236
-
 237
237
-
 238
238
-
 239
239
-
 240
240
-
 241
241
-
 242
242
-
 243
243
-
 244
244
-
 245
245
-
 246
246
-
 247
247
-
 248
248
-
 249
249
-
 250
250
-
 251
251
-
 252
252
-
 253
253
-
 254
254
-
 255
255
-
 256
256
-
 257
257
-
 258
258
-
 259
259
-
 260
260
-
 261
261
-
 262
262
-
 263
263
-
 264
264
-
 265
265
-
 266
266
-
 267
267
-
 268
268
-
 269
269
-
 270
270
-
 271
271
-
 272
272
-
 273
273
-
 274
274
-
 275
275
-
 276
276
-
 277
277
-
 278
278
-
 279
279
-
 280
280
-
 281
281
-
 282
282
-
 283
283
-
 284
284
-
 285
285
-
 286
286
-
 287
287
-
 288
288
-
 289
289
-
 290
290
-
 291
291
-
 292
292
-
 293
293
-
 294
294
-
 295
295
-
 296
296
-
 297
297
-
 298
298
-
 299
299
-
 300
300
-
 301
301
-
 302
302
-
 303
303
-
 304
304
-
 305
305
-
 306
306
-
 307
307
-
 308
308
-
 309
309
-
 310
310
-
 311
311
-
 312
312
-
 313
313
-
 314
314
-
 315
315
-
 316
316
-
 317
317
-
 318
318
-
 319
319
-
 320
320
-
 321
321
-
 322
322
-
 323
323
-
 324
324
-
 325
325
-
 326
326
-
 327
327
-
 328
328
-
 329
329
-
 330
330
-
 331
331
-
 332
332
-
 333
333
-
 334
334
-
 335
335
-
 336
336
-
 337
337
-
 338
338
-
 339
339
-
 340
340
-
 341
341
-
 342
342
-
 343
343
-
 344
344
-
 345
345
-
 346
346
-
 347
347
-
 348
348
-
 349
349
-
 350
350
-
 351
351
-
 352
352
-
 353
353
-
 354
354
-
 355
355
-
 356
356
-
 357
357
-
 358
358
-
 359
359
-
 360
360


HP AA-RS2JA-TE User manual
- Category
- Network switches
- Type
- User manual
- This manual is also suitable for
Ask a question and I''ll find the answer in the document
Finding information in a document is now easier with AI
Related papers
-
HP StorageWorks Edge Switch 2/32 User manual
-
-
-
-
-
-
-
-
-
Other documents
-
Compaq StorageWorks 2/24 - Edge Switch User manual
-
Cobra SL3 User manual
-
EnGenius EWS2910P Quick start guide
-
Terra OAD518 F Owner's manual
-
PS Audio Power Director 4.7 Owner's manual
-
-
-
IBM SAN32M1 Installation and Service Manual
-
Alarm Lock NEW KEY LOGGING FEATURE Addendum User manual
-
Edge-Core EWS1000 User manual