Page is loading ...

Before attempting to connect or operate this product,
please read these instructions carefully and save this manual for future use.
The model number is abbreviated in some descriptions in this manual.
Operating Instructions
Color CCTV Camera
Model No.
WV-CW590/G
WV-CW594E
WV-CS580/G
WV-CS584E
WV-CS580/G
WV-CS584E
WV-CW590/G
WV-CW594E

2
CONTENTS
Preface ..................................................................3
RS485 setup ..............................................................4
About the setup menus ......................................................5
n Displaying the Setup Menu ................................................5
n Camera ID Settings ......................................................5
n Scene Select Settings ....................................................6
n Preset Position Settings ...................................................6
n Language Setting .......................................................8
n Advanced Menu Settings..................................................8
Camera settings ............................................................9
n Using the Camera Setup Menu .............................................9
Pan/tilt settings ............................................................14
n Using the Pan/Tilt Setup Menu . . . . . . . . . . . . . . . . . . . . . . . . . . . . . . . . . . . . . . . . . . . . 14
Alarm settings ............................................................22
n Using the Alarm Setup Menu .............................................22
Special settings ...........................................................25
n Using the Special Setup Menu ............................................25
Password settings .........................................................27
n Password Lock Settings .................................................27
Shortcuts ................................................................29

3
About the user manuals
There are 2 sets of operating instructions for the WV-CW590/G, WV-CW594E, WV-CS580/G, WV-CS584E as follows.
• InstallationGuide:Explainshowtoinstallandconnectdevices.
• OperatingInstructions(PDF):Explainshowtoperformthesettingsandhowtooperatethiscamera.
Adobe
®
Reader
®
isrequiredtoreadtheseoperatinginstructions(PDF)ontheprovidedCD-ROM.
When the Adobe
®
Reader
®
is not installed on the PC, download the latest Adobe
®
Reader
®
from the Adobe web site
and install it.
The model number is abbreviated in some descriptions in this manual.
The screens used in these operating instructions show the case of WV-CW590/G.
About notations
The following notations are used when describing the functions limited for specified models.
The functions without the notations are supported by all models.
WV-CW590
:ThefunctionswiththisnotationareavailablewhenusingthemodelWV-CW590/G,WV-CW594E.
WV-CS580
:ThefunctionswiththisnotationareavailablewhenusingthemodelWV-CS580/G,WV-CS584E.
Preface

4
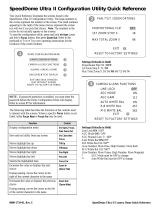
RS485 setup
The following procedure is to configure the RS485
setup when using the system controller to control the
camera(pan,tilt,etc.)viathecamera'sdataport.
1. Display theadvancedsetup menu(page 8),move
thecursortoCOMMUNICATION
, and then press
theCAM(SET)button.
This will display the RS485 setup menu.
2. Checktheunitnumber.(InstallationGuide)
The UNIT NUMBER item shows the unit number
specified by DIP Switch 1.
The factory default unit number is 1.
If DIP Switch 1 specifies 1 to 96 as the unit number,
movethecursortoUNITNUMBERandthentiltthe
joystickleftorrighttoselectaunitnumber(1to96).
Note:
•ItisnotnecessarytoconfiguretheRS485SETUP
menu SUB ADDRESS setting.
•Turn on the power and use DIP Switch 1 to
configure RS485 communication parameters.
When PELCO D is set using DIP SW, ----P is
displayed for SUB ADDRESS. In addition, to set
the PELCO D Unit Number to 32-254 using DIP
SW, tilt the joystick left or right to change Unit
Numberfromthemenu.
3. Move the cursor to BAUD RATE, and then tilt the
joystick left or right to select a baud rate setting.
Tilting the joystick cycles through the baud rate
(transmission speed) display in the sequence
shownbelow.(unit:bits/s)
The factory default setting is 19200.
4. Move the cursor to DATA BIT, and then tilt the
joystickleftorrighttoselectadatabitsetting(7or
8).
The factory default setting is 8.
5. Move the cursor to PARITY CHECK, and then tilt the
joystick left or right to select a parity bit setting
(NONE,ODD,EVEN).
ThefactorydefaultsettingisNONE.
6. Move the cursor to STOP BIT, and then tilt the
joystickleftorrighttoselectastopbitsetting(1or
2).
The factory default setting is 1.
7. Move the cursor to XON/XOFF, and then tilt the
joystickleftorrighttoselectanXON/XOFFsetting.
NOT USE :DisablesXON/XOFFdataflowcontrol.
USE :EnablesXON/XOFFdataflowcontrol.
ThefactorydefaultsettingisNOTUSE.
8. Move the cursor to WAIT TIME, and then tilt the
joystick left or right to select a wait time setting.
The wait time is the time that the camera should
wait before resending data when no receive
acknowledgement (ACK) is returned after data is
sent.
Tilting the joystick cycles through the wait time
display in the sequence shown below. (unit: ms)
ThefactorydefaultsettingisOFF.
9. Move the cursor to ALARM DATA, and then tilt the
joystick left or right to select an alarm data send
mode setting.
POLLING : Sends alarm data in response to a
request by the system controller.
AUTO1 : Sends alarm data each time an alarm
signal is input.
AUTO2 : Sends alarm data at five-second intervals.
ThefactorydefaultsettingisAUTO2.
10. Move the cursor to DELAY TIME, and then tilt the
joystick left or right to select a delay time setting.
The delay time is the time the camera should wait
beforesendinga receiveacknowledge(ACK).The
delay time display changes in the sequence shown
below.(unit:ms)
ThefactorydefaultsettingisOFF.
This setting can be configured only when 2-line
configuration is selected by DIP Switch 2.
(InstallationGuide)
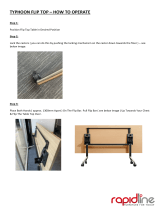
**RS485 SETUP**
UNIT NUMBER
SUB ADDRESS
BAUD RATE
DATA BIT
PARITY CHECK
STOP BIT
XON/XOFF
WAIT TIME
ALARM DATA
DELAY TIME
RET TOP
1
-----
19200
8
NONE
1
NOT USE
OFF
AUTO2
---
2400 4800 9600 19200
OFF ↔ 100MS ↔ 200MS ↔ 400MS ↔ 1000MS
OFF ↔ 100MS
** RS485 SETUP **
UNIT NUMBER
SUB ADDRESS
BAUD RATE
DATA BIT
PARITY CHECK
STOP BIT
XON/XOFF
WAIT TIME
ALARM DATA
DELAY TIME
RET TOP
P1 D32
----P
19200
8
NONE
1
NOT USE
OFF
AUTO2
OFF
[RS485 SETUP] Menu
Using a joystick,
etc., set the unit
number(32to254).
(Theillustration
shows that the unit
numberissetto32.)

5
About the setup menus
This manual describe procedures for operating system
controller WV-CU650.
All setting configuration procedures start from the setup
menu. This section explains how to display the setup
menu and provides details about the menu items that it
contains.
n Displaying the Setup Menu
l When using the WV-CU650
(1) Select the camera (this camera), and the
monitor where displays the setup menu.
(2) Press the MENU button to display LCD MENU
CAM 101.
(3) PresstheENTERbuttonorCAM(SET)buttonto
display CAMERA SETUP.
(4) Press the F1button.
Refer to the pages below for details.
1 CAMERA ID Camera ID Settings This page
2 SCENESELECT SceneSelectSettingsPage6
3 PRESETPOSITION PresetPositionSettingsPage6
4 LANGUAGE LanguageSettingPage8
5 ADVANCEDSETUP AdvancedMenuSettingsPage8
Note:
•Thesetupmenusherearequicksetupmenus.
n Camera ID Settings
The camera ID is a series of alphanumeric
characters that indicate the location of the camera.
This item can be used to turn display of the camera
ID on the monitor screen on or off, and to input the
camera ID.
1. Move the cursor to CAMERA ID, and then tilt the
joystickleftorrighttotogglecameraIDdisplayON
andOFF.
2. SelectONorOFF,andthenpresstheCAM(SET)
button.
ThefactorydefaultsettingisOFF.
3. Use the joystick to move the cursor the character
you want to input, and then press the CAM (SET)
button.
This will cause the selected character to appear in
the camera ID input area. Repeat step 3 as many
times as necessary to input all of the characters for
thecameraID.(Example:DOOR)
To input a blank space
Move the cursor to SPACE, and then press the CAM
(SET)button.
To delete all previously input characters
Move the cursor to RESET, and then press the CAM
(SET)button.
To change previously input characters
Use the joystick to move the cursor to the camera
IDinput area.Next,tiltthe joystickleft andrightto
move the ↑ pointer to the character you want to
change.Finally, usestep3above toinputthe new
character.
4. Move thecursorto POSI,and thenpresstheCAM
(SET)button.
This will display the ID position setting menu.
5. Use the joystick to select a camera ID display
position,andthenpresstheMON(ESC)button.
This registers the camera ID display position and
returns to the camera setting menu.
1
3
5
2
4
MODEL WV-CW590 SERIES
CAMERA ID OFF
SCENE SELECT
PRESET POSITION
LANGUAGE
→
ADVANCED SETUP
DOOR
CAMERA ID. ---
0123456789
ABCDEFGHIJKLM
NOPQRSTUVWXYZ
().,'":;&#!?=
+-
*
/%$
SPACE
---- POSI RET RESET
DOOR............
Camera ID Input area

6
n Scene Select Settings
Display the scene select setting menu from the setup
menutoconfigurescene selectsettings.First, display
the scene select setting menu.
1. Display the advancedsetup menu (page8), move
thecursortoSCENESELECT
, and then press the
CAM(SET)button.
This will display the scene select setting menu.
l Scene Select Settings
Use the following procedure to configure scene select
settings.
1. MovethecursortoSCENE,andthentiltthejoystick
left or right to change the scene setup.
INDOOR (L) :Indoor setting (picture quality
priority)
INDOOR (H) :Indoor setti ng ( s ensitivity
priority)
OUTDOOR (L) :O u t d o or s et t i n g ( p i c t ur e
qualitypriority)
OUTDOOR (H) :Outdoor setting (sensitivity
priority)
Settings related to the picture switch depending on
the scene settings. Scene select settings and
relationship to other settings are shown in the table
below.
Defaultvalues:
INDOOR (L) :
WV-CS580
OUTDOOR (L):
WV-CW590
2. MovethecursortoLOAD,andthenpresstheCAM
(SET)button.
ThiswillcausethesetupyouselectedforSCENEin
step 1 to be applied to the image.
n Preset Position Settings
l Position Number Selection (MAP)
You could use the MAP item on the pan/tilt setup menu
instead of the PRESET item to select a position number.
The preset position number 1-4 can also be linked
withalarmfunction(page23).
1. MovethecursortoPRESETPOSITION
, and then
presstheCAM(SET)button.
2. Move the cursor to the number you want to select,
andthenpresstheCAM(SET)button.
This registers the position number setting and
displaysthepresetsettingmenu.(thispage)
To select a position number in the range of 033 to
064, move the cursor to 33-64 in the lower left corner
ofthemenu, andthenpressthe CAM(SET)button.
Preset numbers set subsequently are the same.
Notes:
•An asterisk (*) to the right of a position number
indicates that it already has a preset position
assigned to it.
The home position number is indicated by the
letterHnexttotheasterisk(*).
•When the cursor is located at a position number
thathasapositionID,thepositionIDtextappears
nexttoID:onthemenuscreen.
l Position Setting (POSITION SET)
The position setting can be used to specify the camera
position (pan and tilt), the lens zoom setting, and the
focus setting.
1.Movethe cursor to POSITIONSET
and press the
CAM(SET)buttontodisplaythepositionsettingmenu.
**SCENE SELECT**
SCENE OUTDOOR(L)
LOAD
RET TOP
**PRESET POSITION**
2
6
10
14
18
22
26
30
1*
5
9
13
17
21
25
29
ID:
033-064 225-256
RET TOP
3
7
11
15
19
23
27
31
4
8
12
16
20
24
28
32
**PRESET POSITION**
34
38
42
46
50
54
58
62
33
37
41
45
49
53
57
61
ID:
065-096 001-032
RET TOP
35
39
43
47
51
55
59
63
36
40
44
48
52
56
60
64
PRESET NO. 1*
POSITION SET
PRESET ID
RET TOP DEL
ON
BW DNR WHITEBAL
INDOOR(L) OFF LOW ATW1
INDOOR(H) OFF HIGH ATW1
OUTDOOR(L) AUTO LOW ATW2
OUTDOOR(H) AUTO HIGH ATW2
AGC SENSUP SHUTTER
INDOOR(L) MID OFF OFF
INDOOR(H) HIGH ×2AUTO OFF
OUTDOOR(L) MID OFF AUTO
OUTDOOR(H) HIGH ×2AUTO AUTO

7
2. Move the cursor to →PUSHSETtotherightofPAN/
TILT, and then press the CAM (SET) button to
displaythePAN/TILTsettingmenu.
3. Use the joystick to position the camera, and then
presstheCAM(SET)button.
4. Move the cursor to → PUSH SET to the right of
ZOOM/FOCUS, and then press the CAM (SET)
buttontodisplaytheZOOM/FOCUSsettingmenu.
5. Move the joystick left, right, up and down to adjust
the position of the lens focus, and then press the
CAM(SET)button.
l Adjusting Camera Position When
Changing Cameras (PAN OFFSET SET)
The system controller etc. has a function for
downloading (saving) and uploading (recovering)
setting information for the camera. This function allows
you to upload (recover)original setting information that
hasbeendownloaded(saved)beforesomeunforeseen
damage or malfunction causes setting information in the
camera to be lost. However, there may be some slight
differences inimages fromthose uploaded (recovered)
when the camera is changed. The "PAN OFFSET SET"
function is for adjusting these differences.
1. Alignthecursorwith"PANOFFSETSET"withthe← or
→arrow,and pressthe CAM(SET) buttonto set the
offset value.
Set the offset value to 0.0, or in a range of -10.0 to
+10.0.Allpresetpositionsforthecamera'sposition
are adjusted according to the offset value.
Important:
•Data is not compatible with existing cameras.
Uploading setting information from existing
cameras will damage data in the camera. If data
in the camera is damaged, download camera
setting information from a camera that still has the
factory settings and then upload it to the camera
with the damaged data.
l Preset ID Setting (PRESET ID)
The preset ID is a series of alphanumeric characters
that indicate the location of the camera.
1. Move the cursor to PRESET ID, and then tilt the
joystickleft orright to togglepresetID displayON
andOFF.
2. Select ON or OFF, and then press the CAM (SET)
button.
ThefactorydefaultsettingisON.
This will display the preset ID setting menu.
Please see page 15 for details on DEL.
→
PUSH SET
→
PUSH SET
**POSITION
1*
**
PAN/TILT
ZOOM/FOCUS
TILT / PAN
PAN OFFSET SET
←
0.0
→
RET TOP
PRESET NO. 1
POSITION SET
PRESET ID
RET TOP DEL
ON
→
PUSH SET
→
PUSH SET
**POSITION
1*
**
PAN/TILT
ZOOM/FOCUS
PAN OFFSET SET
←
0.0
→
RET TOP
ZOOM / FOCUS
→PUSH SET
**POSITION 1* **
PAN/TILT
ZOOM/FOCUS
PAN OFFSET SET
←
0.0
→
RET TOP
→PUSH SET
Notes:
• Focusingmaybedifficult,becauseofthedistortion
caused by the curve of the dome cover, when the
cameraisatananglethatisclosetohorizontal.
• Adifferentpositionnumbercanbeselectedby
moving the cursor to the position number at the top
of the position setting menu and tilting the joystick
leftandright.PressingtheCAM(SET)buttonwill
change to the setting screen for the newly selected
position number.
→PUSH SET
→PUSH SET
**POSITION 1* **
PAN/TILT
ZOOM/FOCUS
PAN OFFSET SET ← 0.0 →
RET TOP
Align the cursor here
• ThecurrentlyregisteredcameraIDandpresetID
appear at the bottom of the position setting menu.
• WhenusingasystemdeviceotherthantheWV-CU650/
CU950*, WJ-HD309A/HD316A over 65 position
numberscannotbeset.(asofSeptember2005)
*Operation proceduremay vary depending on the
version of the system controllers software.
For Ver.1.xx or earlier: only camera function
operations are supported
For Ver.2.xx or later: preset/PGM preset button is
also supported.

8
3. Use the joystick to move the cursor the character you
wanttoinput,andthenpresstheCAM(SET)button.
The text input procedure is the same as that for
camera ID input.
See steps 3 through 5 under “Camera ID Settings”
onpage5forinformationaboutinputtingthetextfor
the preset ID and specifying its position on the
display.
To copy the preset ID of another position number
MovethecursortoCOPY,andthenpresstheCAM
(SET) button. This displays the preset ID of the
position number preceding the one you are
currentlyconfiguring.EachpressoftheCAM(SET)
button scrolls back to the next sequential position
number and displays its preset ID.
Notes:
•WhensettingthepresetID,thecameraIDwillbe
displayed above the preset ID. The preset ID
position has priority over other positions.
•Whether the camera ID is set to Open or Close,
camera ID will be displayed.
Whether or not the camera ID is set, when preset
ID is displayed, the camera ID will also be
displayed, but this only applies within the present
channel.
n Language Setting
1. MovethecursortoLANGUAGE , and then press
theCAM(SET)button.
2. On the 8-language selection menu that appears,
select the language you want to use.
The factory default setting is English.
*All of the example screens in these Operating
Instructions show English display messages.
3. Move the cursor to SET, and then press the CAM
(SET)button.
*The item that was set flashes when the language is
being changed and stops flashing when the
language has been changed. Do not operate the
system controller when changing settings.
*The “LANGUAGE” display remains in English even
when the language setting is changed.
n Advanced Menu Settings
The advanced setup menu can be displayed from the
setup menu.
1. Displaythe setupmenu(page 5),movethe cursor
to → ADVANCED SETUP, andthenpressthe CAM
(SET)button.
This will display the advanced setup menu.
ALL items can be set on the advanced setup menu.
To switch back to the quick setup menu from the
detailed menu, move the cursor to →QUICK SET
UP,andthenpresstheCAM(SET)button.
Refer to the pages below for details of setup menu
items.
1 CAMERA Camera settings Page 9
2 PAN/TILT Pan/tiltsettings Page14
3 ALARM Alarm settings Page 22
4 SPECIAL Special settings Page 25
5 COMMUNICATION* RS485setup Page4
6 SCENESELECT Sceneselectsettings
Page 6
7 LANGUAGE Languagesetting
This page
8 QUICK SETUP About the setup menus
Page 5
9 PASSWORDLOCK Passwordsettings
Page 27
* This item appears only when RS485 settings are
configured with the DIP switches.
PRESET NO. 1*
0123456789
ABCDEFGHIJKLM
NOPQRSTUVWXYZ
().,'":;&#!?=
+-
*
/%$
SPACE
COPY POSI RET RESET
FLOOR..........
MODEL WV-CW590 SERIES
CAMERA
PAN/TILT
ALARM
SPECIAL
COMMUNICATION
SCENE SELECT
LANGUAGE
→ QUICK SETUP
PASSWORD LOCK OFF
1
3
5
7
9
2
4
6
8

9
Camera settings
n Using the Camera Setup Menu
Display the camera setup menu from the setup
menu (Advanced Menu) to configure camera
settings(page8).
1.
Display the advanced setup menu
(page 8)
, move
the cursor to CAMERA
, and then press the CAM
(SET)button.
This will display the camera setup menu.
* The following sections numbered 1 to A explain
how to use each of the camera setup menu items.
1 Camera ID (CAMERA ID)
See page 5 for information on the camera ID
settingsmethod.ThefactorydefaultsettingisOFF.
2 Light Control (ALC/MANUAL)
1. Movethe cursortoALC/MANUAL, andthentilt the
joystick left or right to toggle between ALC and
MANUAL.
ALC : Enables automatic lens iris adjustment in
accordance with subject brightness.
Select this ALC when using SUPER-D6.
This is the factory default setting.
MANUAL :
Adjust the lens iris with the IRIS button on
the system controller.
Fixesthelensiris.
2. IfALCissetinstep1,presstheCAM(SET)button
to set SUPER-D6.
SUPER-D6 (Super Dynamic 6)
When there is wide variation between the illumination of
light and dark areas of the location being monitored,
the camera adjusts the lens iris in accordance with the
bright areas. This causes loss of detail in dark areas.
Conversely, adjusting lens brightness for the dark
areas cause brighter area to become washed out.
SUPER-D6 digitally combines an image that is set up
for a clear view of bright areas with an image that is set
up for a clear view of dark areas, creating a final image
that preserves overall detail.
Notes:
•SUPER-D6 is supported only when ALC is
selectedforlightcontrol(ALC/MANUAL).
•Camerasettingsarelimitedtothefollowingwhen
SUPER-D6 is turned on.
SHUTTER :OFF,AUTO(page10)
SENS UP :OFF,AUTO(page10)
•Iflighting conditionscause either ofthe following
phenomena, turn off SUPER-D6.
(1) Screenflickeringorabnormalcolor
(2) Digitalnoiseinthebrightareasofthescreen
3. Move the cursor to SUPER-D6, and then tilt the
joystickleftorrighttotogglebetweenONandOFF.
ON : Turns on SUPER-D6.(GotoStep6)
OFF : Turns off SUPER-D6.(GotoStep4)
This is the factory default setting.
4. Move the cursor to MASK SET
, and then press
theCAM(SET)button.
This will display the mask area screen, with the
cursor in the upper left cell.
5. Mask the cells in the area where background
lighting is bright. Masking an area will cause its
brightness level to be ignored.
**CAMERA SETUP** 1/2
CAMERA ID OFF
ALC/MANUAL ALC
SHUTTER AUTO
AGC ON(MID)
SENS UP OFF
WHITE BAL ATW1
DNR LOW
BW MODE
AF MODE AUTO L
1
3
5
4
**CAMERA SETUP** 2/2
ZOOM LIMIT X36
STABILIZER OFF
RET TOP
0
A
9
8
6
7
2
Loss of detail
in dark areas
Wash out of
bright areas
Tw o images
digitally combined
to create a clear
final image
**ALC CONT**
BACK LIGHT COMP
SUPER-D6
MASK SET
LEVEL
RET TOP
OFF
•I•••••0
- +

10
AUTO : This setting, by moving the shutter automatical-
ly when necessary, provides a clearer picture
ofextremelybrightobjectsoutdoors,etc.
OFF :
Fixedat1/50seconds.
ThefactorydefaultsettingisAUTO.
Notes:
•When AUTO is selected for the shutter setting,
fluorescent lighting may cause flickering of the
picture.Ifthishappens,selectOFFfortheshutter
speed setting.
•AUTO is disabled when MANUAL is selected for
lightcontrol(ALC/MANUAL)andFIXisselectedfor
electronicsensitivityenhancement(SENSUP).
4 Gain Control (AGC)
1. Move the cursor to AGC, and then tilt the joystick
left or right to select a gain control setting.
ON (LOW) : Low gain
ON (MID) : Medium gain. This is the factory default
setting.
ON (HIGH) : High gain
OFF : Does not increase the gain
Note:
•When AGC is turned on, the noise reduction
function automatically activates under low
illumination to reduce digital noise. This also,
however, can cause afterimages to be generated
by moving objects, and by panning and tilting the
camera. For more information, see the DNR
setting(page11).
5 Electronic Sensitivity Enhancement (SENS UP)
1. Move the cursor to SENS UP, and then tilt the
joystick left or right to select an electronic sensitivity
enhancement setting.
The electronic sensitivity enhancement setting can
bechangedonlywhenOFForAUTOisselectedfor
the shutter speed (SHUTTER) setting. Tilting the
joystick cycles through the settings display in the
sequence shown below.
When SUPER-D6 is turned off
When setting MANUAL of ALC/MANUAL
When SUPER-D6 is turned on
ThefactorydefaultsettingisOFF.
Use the following steps to perform masking
(1) Tilt thejoystickupanddown, andleftandright
to move the cursor to a cell you want to mask.
(2) PresstheCAM(SET)buttontomaskthecell.
Moving the cursor to a cell that is already
masked causes the blinking pattern of the
cursor to alternate between horizontal stripes
and white.
PressingtheCAM(SET)buttonwhilethecursor
is located at a masked cell cancels the masking
of the cell.
To cancel all masking areas, press the F3
button.
(3) Aftermaskingallofthecellsyouwant,pressthe
MON (ESC) button to return to the ALC CONT
menu in step 1.
6. Move the cursor to LEVEL, and then tilt the joystick
left and right to adjust the picture output level
(picturecontrast).
IfyouselectedONinstep3ofthisprocedure,best
results can be obtained by setting a contrast level
that is somewhat high. A contrast level that is too
high, however, may increase the tendency of
afterimages and noise.
3 Shutter Speed (SHUTTER)
1. Move the cursor to SHUTTER, and then tilt the
joystick left or right to select a shutter speed
setting.
Tilting the joystick cycles through the shutter speed
settings display in the sequence shown below.
When SUPER-D6 is turned off
When setting MANUAL of ALC/MANUAL
When SUPER-D6 is turned on
OFF ↔ AUTO ↔ 1/120 ↔ 1/250 ↔ 1/500 ↔ 1/1000
1/10000 ↔ 1/4000 ↔ 1/2000
OFF
↔
AUTO
OFF ↔ X2 AUTO ↔ X4 AUTO ↔ X6 AUTO
X32 AUTO ↔ X16 AUTO ↔ X10 AUTO
OFF
X2 AUTO X4 AUTO X6 AUTO X10 AUTO X16 AUTO
X64 FIX X32 FIX X16 FIX X10 FIX X6 FIX X4 FIX
X256 FIX
X128 FIX
OFF
X2 FIX
X32 AUTO
X512 FIX
Note:
•Ifoperationof thesystem controller'sIRIS(OPEN,
CLOSE) button during operation is done after the
menu is closed, the LEVEL on the CAMERA menu
is reflected and stored for these settings. However,
if the camera is in a preset position, it is reflected
as a parameter of the preset position. To return to
theinitialfactorydefault level, executethesystem
controller’s iris reset.

11
Note:
•The following are the differences between AUTO
andFIX.
AUTO :Selecting X32 AUTO, for example,
automatically increases sensitivity, up to
amaximumof32times.
FIX :Selecting X32 FIX, for example,
increases sensitivity 32 times.
•TurningonSENSUPcancausedigitalnoise
andwhitespots(blemish)toappearinthepicture.
6 White Balance (WHITE BAL)
1. Move the cursor to WHITE BAL, and then tilt the
joystick left or right to select a white balance mode
(ATW1/ATW2/AWC).
(1)Auto-TracingWhiteBalanceMode(ATW1/ATW2)
In this mode, the camera continually monitors
the color temperature of the light source and
automatically adjusts white balance.
ATW1: 2,700 K to 6,000 K.
This is the factory default setting.
ATW2:2,000Kto6,000K(Moderecommended
forsodiumlighting)
Proper white balance may not be possible under
the following conditions. In such cases, use the
AWC while balance mode.
• Whenthesubjectcontainsmostlydarkcolors
• When the light source is a deep blue sky or
twilight
• Whenilluminationofthesubjectislow
(2) Auto-TracingWhiteBalanceControl(AWC)
In this mode, the supported color temperature
rangeisapprox.2,000Kto10,000K.Thismode
is best in locations where the light source is
constant.
(a) To select AWC, tilt the joystick left and select
AWC→PUSH SET.
(b) Press the CAM (SET) button to start white
balance adjustment. PUSH SET is highlighted
on the display while white balance adjustment is
being performed.
• PUSH SET becomes unhighlighted again when
white balance adjustment is complete. Tilt the
joystick right to display AWC.
• Ifwhitebalanceadjustmentcannotbecompleted
for some reason, PUSH SET will remain
highlighted on the display. If this happens, it could
mean that the color temperature is outside the
supported range, or that illumination is too low.
2. Select ATW1, ATW2, and AWC, then press the CAM
(SET)button,eithertheATWsettingmenuortheAWC
setting menu appears, and you can fine tune the
white balance.
Move the cursor to R or B, and then tilt the joystick left
or right to fine tune the level. The R is red and the B is
blue, moving in the + direction makes the colors
darker, moving in the - direction makes them lighter.
Note:
•White balance is adjusted in accordance with
on-screen color temperature, which the camera
detects automatically. Correct adjustment may not
be possible if a strong light source is shining on
the screen.
7 Digital Noise Reduction (DNR)
1. Move the cursor to DNR, and then tilt the joystick
leftorrighttoselectadigitalnoisereduction(DNR)
setting.
LOW :LowDNR,Lowafterimage.
HIGH : HighDNR,Highafterimage
ThefactorydefaultsettingisLOW.
8 Black and White Mode (BW MODE)
MovingthecursortoBWMODEandpressingtheCAM
(SET)buttondisplaysaBWMODEsettingmenu.
Use the BW MODE setting menu to configure black
and white mode settings.
1. Move the cursor to BW, and then tilt the joystick left
or right to select a black and white control setting.
AUTO : T he cam er a aut om at i ca ll y swi tc he s
between the color mode and the black and
white mode in accordance with picture
brightness(illuminance).
The black and white mode is selected
when lighting is low, while the color mode is
selected for bright lighting.
ON : Selects the black and white mode.
OFF : Selects the color mode.
This is the factory default setting.
**BW MODE**
BW
LEVEL
DURATION TIME
BURST(BW)
RET TOP
AUTO
HIGH
•I••
S L
ON
**ATW1**
R
B
RET TOP
•••I•••0
- +
•••I•••0
- +
Note:
•The above setting cannot be configured when
BW is selected for the ALARM IN 4 setting
(page24).

12
Note:
•With some monitors and VTR models, output of a
camera images in the black and white mode will
not display a proper image unless a burst signal is
provided.SelectONforthissettingwhenusing
equipment that requires a burst signal.
9 Auto Focus (AF MODE)
1. Move the cursor to AF MODE, and then tilt the
joystick left or right to select an auto-focus mode
setting.
MANUAL S.M.L: Auto focus does not operate after
moving to a preset position, when
PAN, TILT or ZOOM are used in
manual operation.
AUTO S.M.L : Auto focus is used automatically
when PAN, TILT or ZOOM are
used in manual operation.
The letters S (Small), M (Medium), and L (Large)
indicate the size of the auto-focus sensing area.
ThefactorydefaultsettingisAUTOL.
Notes:
•ZoomingupfromWIDEcancausetheimageto
go out of focus.
•Auto-focusmaynotbepossiblewiththetypesof
objectslistedbelow.Forsuchobjects,focus
manually.
Example:
• Shinyorhighintensityobjects
• Objectsshotthroughwetordirtyglass
• Pictures that are a mixture of distant and
nearby objects
• Whitewallsandothersingle-colorobjects
• Venetian blinds and other vertically striped
objects
• Slantedobjects
• Objectsilluminatedwithlowlighting
Auto-focus focuses on the object in the centre of
the picture, so objects around the outside
periphery of the picture will not be in focus.
: Zoom Limit (ZOOM LIMIT)
1. Move the cursor to ZOOM LIMIT, and then tilt the
joystick left or right to select a zoom limit setting.
When doing manual operation, zoom operation
cannotgobeyondthezoomlimit.
Optical zoom ranges from 1 to 36 magnifications,
whiledigitalzoomisusedforhighermagnifications
(upto720).
The factory default setting is x36 (36x optical
zoom).
2. IfyouselectedAUTOinstep1,movethecursorto
LEVEL and then tilt the joystick left to select the
threshold illuminace level for switching between the
color mode and the black and white mode.
The illuminace shown below is based on the
assumption that the camera is used in an area lit by
halogen lamps, and that AGC on the menu is set to
MID.
LOW : Switches to the black and white mode when
illuminance around the camera is approx.
1.5lxor lower(whenAGCON (MID),SENS
UPOFFisset).
HIGH : Switches to the black and white mode when
illuminancearoundthecameraisapprox.3lx
or lower (when AGC ON (MID), SENS UP
OFFisset).
The factory default setting is HIGH.
Note:
•Toobtaincolorimages,asufficientlevelof
illuminance(approx.30lxormore)isrequired.
•Theswitchingilluminancelevelvarieswith
subjects, light sources, and lenses.
•Theswitchingilluminancelevelvariesin
accordancewithAGCsetting(page10).
•Theswitchingilluminancesdescribedaboveare
reference values. The switching illuminance shall
be decided based on the actual installation
environment.
•When near-infrared lamps are used, the image may
be displayed out of focus and mode switching
may not perform automatically.
3. IfyouselectedAUTOinstep1,movethecursorto
DURATION TIME and then tilt the joystick left to
select the time the camera should wait before
switching between the color mode and the black
and white mode after there is a change in the
illuminance level.
Available Settings : 2 s - 10 s - 30 s - 60 s
(S)(L)
Default Setting : 10 s
Note:
•WhenAUTOisselected,switchingbetweenthe
color mode and the balck and white mode is not
performedwhilepan,tilt,zoom,orfocusisbeing
performed.
4. Move the cursor to BURST (BW), and then tilt the
joystick left or right to turn burst signal output on or
off.
This setting is for black and white mode display.
ON : Turn on burst signal output.
OFF : Turn off burst signal output.
ThefactorydefaultsettingisON.

13
Notes:
•Ifzoomlimitissettomorethan36x,thenzoom
operationpausesat36xmagnification.
•Increasingthezoomtoover36xmagnification
(digitalzoom)decreasestheresolution.
•Youcannotsetazoommagnificationofgreater
than36xasapresetposition.
A Auto Image Stabilizer (STABILIZER)
This function electronically compensates for an
unstable camera image due to movement of a
mounting pole or bracket.
1. Move the cursor to STABILIZER, and then tilt the
joystickleftorrighttoturnthestabilizeronoroff.
ON : Automatically compensates for an unstable
image.
OFF :Image stabilizer will not operate. This is the
factory default setting.
ThefactorydefaultsettingisOFF.
Notes:
•Thestabilizermaynotbeeffectiveforthe
following subjects.
Example:•Objectsilluminatedwithlowlighting
•Single-colorobjects
(whitewallsetc)
•Fastmovingperiodicaction,suchasmechanical
vibration, may not be tracked.
•ThestabilizerdoesnotworkduringPAN/TILT/
ZOOM/FOCUSorwhenthecamerasetupmenuis
open.
•WhensettoON,someeffectivepixelsonthe
edgeoftheCCDareusedbythestabilization
function. This may result in a small reduction in
resolution and a narrower angle of view. After
activatingtheimagestabilizerfunction,checkthat
the field of view is correct.
•Imagestabilizationmaynotfunctionwherethereis
excessivecameramovementorwhenthesceneis
low light or low contrast objects.

14
Pan/tilt settings
n Using the Pan/Tilt Setup Menu
Display the pan/tilt setup menu from the setup menu to
configure pan and tilt settings.
First,displaythepan/tiltsetupmenu.
1. Display the advancedsetup menu (page8), move
thecursortoPAN/TILT
, and then press the CAM
(SET)button.
This will display the pan/tilt setup menu.
* The following sections numbered 1 to D explain
how to use each of the pan/tilt setup menu items.
1 Position Number Selection (PRESET)
Positions can be assigned numbers, each of which can
be configured with a m onitoring position a nd
monitoring conditions.
You can use either the PRESET item or the MAP item on
the pan/tilt setup menu to select a position number.
Position numbers 1 through 4 are used for alarm
functions(pages23and24)andoperatingthem.
1. Move thecursor tothe 1next tothe PRESETitem,
and then tilt the joystick left or right to change the
position number to the one you want.
2. PresstheCAM(SET)button.
This registers the position number setting and
displaysthepresetsettingmenu(thispage).
2 Position Number Selection (MAP)
You could use the MAP item on the pan/tilt setup menu
instead of the PRESET item to select a position number.
1. Move the cursor to MAP
, and then press the
CAM(SET)button.
2. Move the cursor to the number you want to select,
andthenpresstheCAM(SET)button.
This registers the position number setting and
displaysthepresetsettingmenu.(thispage)
To select a position number in the range of 033 to
064, move the cursor to 33-64 in the lower left corner
ofthemenu, andthenpressthe CAM(SET)button.
Preset numbers set subsequently are the same.
l Position Setting (POSITION SET)
See pages 6 and 7 for information on the setting
method.
l Adjusting Camera Position When
Changing Cameras (PAN OFFSET SET)
See page 7 for information on the setting method.
l Preset ID Setting (PRESET ID)
See pages 7 and 8 for information on the setting
method.
l Light Control (ALC/MANUAL)
See pages 9 and 10 for information on the setting
method.
You can adjust the lens iris setting on the detailed
menuwhenMANUALisset.
**PAN/TILT SETUP**1/2
PRESET 1
MAP
HOME POSITION OFF
SELF RETURN OFF
AUTO MODE OFF
AUTOPAN KEY AUTOPAN
PATROL
PRIVACY ZONE OFF
IMAGE HOLD OFF
DIGITAL FLIP ON
PROPO.P/T ON
1
3
5
7
9
A
2
4
6
8
>
**PAN/TILT SETUP**2/2
AREA TITLE OFF
TILT ANGLE 0˚
CLEANING OFF
RET TOP
B
C
D
**PRESET POSITION**
2
6
10
14
18
22
26
30
1*
5
9
13
17
21
25
29
ID:
033-064 225-256
RET TOP
3
7
11
15
19
23
27
31
4
8
12
16
20
24
28
32
**PRESET POSITION**
34
38
42
46
50
54
58
62
33
37
41
45
49
53
57
61
ID:
065-096 001-032
RET TOP
35
39
43
47
51
55
59
63
36
40
44
48
52
56
60
64
PRESET NO. 1*
POSITION SET
PRESET ID
ALC/MANUAL
AF MODE
DWELL TIME
SCENE FILE
PRESET SPEED
RET TOP DEL
ON
ALC
MANUAL L
10S
OFF
••••••I255
L H
Notes:
•An asterisk (*) to the right of a position number
indicates that it already has a preset position
assigned to it.
The home position number is indicated by the letter
Hnexttotheasterisk(*).
•When the cursor is located at a position number
thathasapositionID,thepositionIDtextappears
nexttoID:onthemenuscreen.

15
2. PresstheCAM(SET)button.
This will display the scene file setting menu.
The following items can be set on the Scene file
settings menu. See camera settings for details on
each setting.
• SHUTTER(page10)
• AGC(page10)
• SENSUP(page10)
• WHITEBAL(page11)
• VMD(page22)
l Preset Speed Setting (PRESET SPEED)
Set the speed the camera moves to the various preset
positions for the sequence and sort operations (page
16).
1. Move the cursor to PRESET SPEED, and then tilt the
joystick left or right to change the speed setting.
Shifting the setting towards the L side decreases the
speed, while shifting towards the H side increase it.
The factory default setting is 255.
l Deleting a Preset Position (DEL)
1. Move the cursor to DEL, and then press the CAM
(SET)button.
This deletes the contents of the currently selected
position number and displays the position selection
menu.
l Auto Focus (AF MODE)
1. Move the cursor to AF MODE, and then tilt the
joystick left or right to select an auto-focus function
setting.
MANUAL S.M.L : Auto focus does not operate
after moving to a preset position.
AUTO S.M.L : Auto focus operates after
moving to a preset position.
ThefactorydefaultsettingisMANUALL.
l
Sequence/Sort DWELL Time (DWELL TIME)
Thissectionexplainshowtosetthelengthoftime the
camera stops (time it stops rotating) and tapes the
scene while in the various preset positions for the
sequenceandsortoperations(page16).
1. Move the cursor to DWELL TIME, and then tilt the
joystick left or right to select a DWELL time setting.
Tilting the joystick cycles through the stop time
displayinthesequenceshownbelow.(unit:sec,min)
The factory default setting is 10S.
l Scene File Setting (SCENE FILE)
Up to 10 scene files, each of which contains camera
settings for a specificlocation (scene), can be stored
in memory. Scene files are managed using scene file
numbers from 1 through 10 (scene file number), and
can be selected when configuring preset position
settings.
The following procedures explain how to select a
scene file and how to configure scene file settings.
(1)SelectingaSceneFile
Use this procedure when you want to apply the
settings of a previously stored scene file when you are
configuring the settings of a preset position.
1. MovethecursortoSCENE FILE,andthentiltitleft
and right to select the number of the scene file you
want to select.
ThefactorydefaultsettingisOFF.
(2)ConfiguringSceneFileSettings
1. MovethecursortoSCENE FILE,andthentiltitleft
and right to select the number of the scene file
whosesettingsyouwanttoconfigure(1to10).
PRESET NO. 1
POSITION SET
PRESET ID
ALC/MANUAL
AF MODE
DWELL TIME
SCENE FILE
PRESET SPEED
RET TOP DEL
ON
ALC
MANUAL L
10S
1
••••••I255
L H
**SCENE FILE 1**
SHUTTER
AGC
SENS UP
WHITE BAL
VMD
RET TOP
AUTO
ON(MID)
OFF
ATW1
OFF
PRESET NO. 1
POSITION SET
PRESET ID
ALC/MANUAL
AF MODE
DWELL TIME
SCENE FILE
PRESET SPEED
RET TOP DEL
ON
ALC
MANUAL L
10S
OFF
••••••I255
L H
2S ↔ 3S ↔ 5S ↔ 10S ↔ 30S ↔ 1MIN
4MIN ↔ 3MIN ↔ 2MIN
PRESET NO. 1
POSITION SET
PRESET ID
ALC/MANUAL
AF MODE
DWELL TIME
SCENE FILE
PRESET SPEED
RET TOP DEL
ON
ALC
MANUAL L
10S
OFF
••••••I255
L H
PRESET NO. 1
POSITION SET
PRESET ID
ALC/MANUAL
AF MODE
DWELL TIME
SCENE FILE
PRESET SPEED
RET TOP DEL
ON
ALC
MANUAL L
10S
OFF
••••••I255
L H
**PRESET POSITION**
2*
6*
10*
14*
18*
22*
26*
30*
3*
7*
11*
15*
19*
23*
27*
31*
4*
8*
12*
16*
20*
24*
28*
32*
1
5*
9*
13*
17*
21*
25*
29*
ID:
033-064 225-256
RET TOP

16
Notes:
•The HOME setting should be selected when you
want to normally leave the camera in the home
position and occasionally perform pan and tilt, or
when you want to activate SEQ.
•PTR1-4 displays only the set number of patrol
routines(page17).
5 Auto Mode Setting (AUTO MODE)
Use the auto mode setting to specify the camera
movement mode (OFF, SEQ, SORT, AUTOPAN,
PATROL1~4,AUTOTRACK).
Afterselecting AUTOPAN, youcan usethe AUTOPAN
setting menu to configure detailed settings.
1. Move the cursor to AUTO MODE, and then tilt the
joystick left or right to select a camera movement
mode setting.
OFF : Manual movement only
SEQ : Sequentially switches between preset
positions in position number sequence.
(sequentialmovement)
SORT : Sequentially switches between preset
positions counterclockwise, starting from the
camerahomeposition.(sortmovement)
AUTOPAN :
Camera pans automatically within the
range specified by PAN. Selecting AUTOPAN
andpressingtheCAM(SET)buttonwilldisplay
theAUTOPANsettingmenu,whichcanbeused
forconfiguringdetailedsettings.(page17)
PATROL 1 to 4 : Operates the camera in
accordance with patrol function settings.
AUTOTRACK : Auto tracking is done for moving
objects under the following conditions.
The moving object must be larger than one
ofthescreenblocks(1/48ofscreenarea),it
must have 5 % comparative contrast with
the background image.
ThefactorydefaultsettingisOFF.
Tilting the joystick cycles through settings in the
sequence shown below.
3 Home Position Setting (HOME POSITION)
A currently configured preset position can be
designated as the home position.
PressingtheHOMEbuttonofthesystemcontrollerwill
cause the camera to move to the currently specified
home position. Use the following procedure to make a
preset position the home position.
ThefactorydefaultsettingisOFF.
1. Move the cursor to HOME POSITION, and then tilt
the joystick left or right to select the position
number of the preset position you want to make the
home position.
This causes the preset position whose position
number you select to become the home position. If
you do not want to use the home position function,
selectOFFfortheHOMEPOSITIONsetting.
4 Self Return Setting (SELF RETURN)
The self return setting can be used to specify automatic
return to a particular mode if a certain amount of time
elapses without any operation being performed.
1. Move the cursor toSELF RETURN,andthentilt the
joystick left or right to select a self return trigger setting.
Tilting the joystick cycles through the self return
displayinthesequenceshownbelow.(unit:sec,min)
ThefactorydefaultsettingisOFF.
2. IfyouselectedanysettingotherthanOFFinstep1,
presstheCAM(SET)buttonandthentiltthejoystick
left or right to select a self return mode.
OFF : Intheauto mode,exitsthe automode
when the trigger time elapses.
AUTO : Auto mode setting not OFF, returns to
the auto mode when the trigger time
elapses, auto mode setting OFF,
returns to the home position when the
trigger time elapses.
HOME : Returns to the home position when the
trigger time elapses.
APAN : Activates autopan when the trigger
time elapses.
SEQ : Activates the sequence function when
the trigger time elapses.
SORT : Activates the sort function when the
trigger time elapses.
PTR 1 to 4 : Activates the patrol function when the
trigger time elapses.
TRK : After the trigger time elapses, the
camera returns to the home position
and then automatic tracking starts.
Following that, after a set time, the
camera returns to the home position
and starts to continue automatic
tracking.
ThefactorydefaultsettingisAUTO.
30MIN ↔ 20MIN ↔ 10MIN ↔ 5MIN ↔ 3MIN ↔ 2MIN ↔ 1MIN
OFF ↔ 1S ↔ 2S ↔ 3S ↔
.......
↔ 10S ↔ 20S ↔ 30S ↔ 40S
60MIN
50S
↔ ↔
↔ ↔
OFF ↔ AUTO ↔ HOME ↔ APAN ↔ SEQ ↔ SORT
TRK ↔ PTR4 ↔ PTR3 ↔ PTR2 ↔ PTR1
Notes:
•Automatictrackingcoversarangefromhorizontalto
directly below the camera. The digital flip function
(page20)doesnotoperate.Also,thepanrangecan
belimitedbyusingthePANLIMITsetting(page17).
•Theautomatictrackingfunctionincorporatedinthis
system easily tracks moving objects on screen.
Moving subjects are not automatically tracked in the
following situations.
•Whenmultiplemovingsubjectsareonscreen
•Whenthesubjectsaremovingveryfast
•Whentheimageisdark
•Whenthesubjecthaslittlecontrast
•Whenmovingobjectsareeitherlargeorsmall
•Whentheimageflickers
•Auto mode is the mode currently in operation.
Auto mode is automatically adjusted when
changes are made to the operation or other
settings using the system controller.
•
AUTOMODE:Shouldbethemodecurrentlyinoperation.
•PressingtheAUTOPANbuttonfromthecontroller
should change AUTO MODE to the value of
AUTOPANKEY.
OFF ↔ SEQ ↔ SORT ↔ AUTOPAN ↔ PAT ROL1 ↔ PAT ROL2
AUTOTRACK ↔ PAT ROL4 ↔ PAT ROL3

17
4. Move the cursor to DWELL TIME, and then tilt the
joystick left or right to select the start point and end
point dwell time setting.
Tilting the joystick cycles through the stop time
displayinthesequenceshownbelow.(unit:sec)
The factory default setting is 1S.
5. Move the cursor to PAN LIMIT, and then tilt the
joystickleftorrighttotoggleitONandOFF.
ON :Limits manual panning to the zone between
the start point and the end point. The TILT
range is from horizontal to straight down.
Select OFF for the ENDLESS setting (step 3)
when using this setting.
OFF :Allows manual panning outside the zone
between the start point and the end point.
ThefactorydefaultsettingisOFF.
PAN LIMIT
PAN LIMIT allows panning in the area fromthe start
point to the end point specified in step 1, but not in the
area from the end point to the start point.
6 AUTOPAN Key Setting (AUTOPAN KEY)
Set the operations of the camera when AUTOPAN is
executedfromthesystemcontroller.(page16)
1. MovethecursortoAUTOPANKEY,andthentiltthe
joystick left or right to select a camera movement
mode setting.
Tilting the joystick cycles through settings in the
sequence shown below.
ThefactorydefaultsettingisAUTOPAN.
Notes:
•Auto Mode can be started, but not stopped, with
theAUTOPANkey.
•PATROL1-4displaysonlythesetnumberofpatrol
routines(thispage).
7 Patrol Function Setting (PATROL)
The patrol function remembers manual operations for
later automatic playback when they are needed.
1. Aim the camera, with the menu closed, at the start
point of the routine you want it to remember.
2. MovethecursortoNUMBER,andthentiltthejoystick
left or right to specify the number of patrol routines.
Tilting the joystick cycles through settings in the
sequence shown below. The amount of storage
time available depends on the number of routines.
The storage time display changes in the sequence
shownbelow.(unit:sec,min)
Thefactorydefaultsettingis1(2MIN).
Notes:
•The auto mode is exited automatically whenever
manualPAN/TILTor ZOOM/FOCUS isperformed if
AUTOPAN is operating and PAN/TILT does SEQ,
SORT, PATROL, or AUTOTRACK movement. Note,
however, that that the contents of the setting menu
do not change. To return to the auto mode, open the
setup menu and then close it again. The auto mode
will also activate when the self return trigger time
(page16)elapses.
•During operation, the lens may enter the refresh
mode.
•PATROL1-4 displaysonly thesetnumberof
patrolroutines(thispage).
l Configuring AUTOPAN Detailed
Settings
1. Perform the following steps to set the PAN start
point and end point.
(1) Move the cursor to POSITION, press the CAM
(SET) button, and then move the cursor to
START.
(2) Use the joystick to move the camera to the
desiredPANstartpoint,andthenpresstheCAM
(SET)button.
This defines the start point and moves the
cursortoEND.
(3) Use the joystick to move the camera to the
desiredPANendpoint,andthenpresstheCAM
(SET)button.
This defines the start point and moves the
cursortoPOSITION.
2. Move the cursor to SPEED and then tilt the joystick
left or right to select a panning speed setting.
Shifting the setting towards the “H” (right) side
increases the speed, while shifting towards the “L”
(left)sidedecreasesit.
The factory default setting is 128.
3. MovethecursortoENDLESS,andthentiltthejoystick
left or right to turn endless panning on or off.
ON : Pans from the start point to the end point,
and then continues to pan in the same
direction from the end point to the start point.
SelectOFFforthePANLIMITsetting(step5)
when using this setting. Panning will be
repeated endlessly.
OFF : Pans from the start point to the end point,
and then reverses direction to pan from the
end point to the start point. Panning is
repeated endlessly.
ThefactorydefaultsettingisOFF.
Start point
End point
AUTOPA N
zone
PAN LIMIT
zone
Camera
**AUTOPAN**
POSITION
SPEED
ENDLESS
DWELL TIME
PAN LIMIT
RET TOP
START
END
•••I•••128
L H
OFF
1S
OFF
0S ↔ 1S ↔ 2S ↔ 3S ↔ 5S ↔ 10S ↔ 20S ↔ 30S
AUTOPAN ↔ SEQ ↔ SORT ↔ PAT ROL1 ↔ PAT ROL2
AUTOTRACK ↔ PAT ROL4 ↔ PAT ROL3

18
Notethatthetotalpatroltimeistwominutes,andthe
time allowed for each routine depends on the number
of patrol routines that are configured. The values in
parentheses indicate the time of each patrol routine
(twominutesforonepattern,oneminuteeachfortwo
patterns,30secondseachforfourpatterns).
If you want to change the number of patrol routines
from a previous setting, first delete all of the
currently store patrol routines. To delete everything,
move the cursor to RESET, and press the CAM
(SET)button.
3. Move the cursor to a PATROL number (PATROL 1
through 4), and then tilt the joystick left or right to
select a patrol setting.
--- : Disables the selected patrol routine.
PLAY : Performstheselectedpatrolroutine.(see
thispage)
LEARN : Select this option to teach the camera a
series of movements (patrol routine). (An
asterisk(*)totherightofaPATROLnumber
indicates that it already has a patrol routine
assignedtoit.)(seethispage)
DEL → PUSH SET : PresstheCAM(SET)buttonto
de l et e an e x is t in g pa t rol
routine.
<When PLAY is selected>
(1) Pressthesystemcontroller’sF2buttontoclose
the menu.
The orientation of the camera moves to the
stored start position, and the camera starts to
playback the stored movement.
(2) When the playback is finished, manually pan,
tilt,zoomandfocus.
<When LEARN is selected>
(1) Pressthesystemcontroller’sF2buttontoclose
the menu.
The start position is stored, and the camera’s
movements can be stored.
(2) Operatethecameratostorethemovements.
“LEARNING(***S)”isdisplayedinthecentreof
the screen when the movements are being
stored.(unit:sec)
* “(***S)” indicates the amount of time that
remains for storing movements.
(3) Thesetupmenuisdisplayedandteachingstops.
Storing movements stops when the remaining
time reaches “0S”.
Notes:
•Selecting LEARN to teach the camera a patrol
routine causes the following parameters to be
stored along with the camera movements.
(1) ParametersattheBeginningoftheRoutine
• PAN,TILT,ZOOM,andFOCUSpositions
• IRIS level
• Shutterspeed(SHUTTER)
• Gain(AGC)setting
• Electronic sensitivity enhancement (SENS
UP)setting
• Whitebalance(WHITEBAL)setting
(2)DuringCameraMovement
• PAN,TILT,ZOOM,andFOCUSpositions
• IRIS operation
• Preset positioning
• The auto-focus function does not work during
patrol operations. The image goes out of focus
when the camera zooms in from a wide angle
(WI DE ), t his is c aus ed b y t h e z oom len s
mechanism. The fuzziness in the image can be
reducedbystartingfromatelephotoangle(TELE)
whenregisteringazoomoperation.
• In the patrol play mode, black and white
automatic switching does not work.
•
In the patrol play mode, when the power of the
system controller is turned on or off, the patrol play
stops. In this case, press the PATROL PLAY button
again.(IfSELFRETURNissettoON,thepatrolplay
willstartagainafterelapsingthesettingreturntime.)
•Patrolmovementcoversarangefromhorizontalto
directly below the camera. The digital flip function
(page20)doesnotoperate.
• When you want to stop before the patrol memory
is finished, either click "STOP" when the system
controllerisinLEARNmodeoropenthemenu.
8 Privacy Zone Setting (PRIVACY ZONE)
The privacy zone function makes it possible to mask
specific areas of the scene (screen) from view. Up to
eightprivacyzonescanbeconfigured.
Notes:
•Certain camera orientations can cause privacy
zonemaskedareatobecomevisible.
•The privacy zone function does not mask scene
areas during the initialisation routine performed
immediately after camera power is turned on.
•The zone position may shift if the stabilizer
settingsarechangeaftersettingtheprivacyzone.
1(2MIN) ↔ 2(1MIN) ↔ 4(30S)
**PATROL**
NUMBER
PATROL1*
PATROL2
PATROL3
PATROL4
RESET
RET TOP
4(30S)
PLAY
----
----
----

19
7. Use the joystick to point the camera at the location to
bemasked,andthenpresstheCAM(SET)button.
This registers the camera position and returns to
thezonesettingmenu.
8. Move the cursor to →PUSHSETtotherightofZOOM/
FOCUS,andthenpresstheCAM(SET)button.
ThiswilldisplaytheZOOM/FOCUSsettingmenu.
9. Move the joystick left, right, up and down to adjust
the position of the lens focus, and then press the
CAM(SET)button.
This completes the adjustment procedure and
returnstothezonesettingmenu.
Privacyzoneshouldbesetunderlowmagnification.If
theprivacyzoneissetunderhighmagnification,it
may shift.
10.Movethe cursorto ZONE SCALE,and then tiltthe
joystickleft or rightto change thesize of thezone
frame.
Shifting the setting towards the - side makes zone
frame smaller, while shifting towards the + side
makes it larger. Note, that the aspect ratio of the
zoneframeisalways3:4.Also,thesizeofthezone
frame that can be set changes according to the
zoomratio.
11. Move the cursor to SET, and then press the CAM
(SET)button.
This completesthe privacyzonesetting procedure
andreturnstothezonenumberselectionmenu.
SelectingDELinsteadofSETdeletesthezonesettings
andreturnstothezonenumberselectionmenu.
9 Image Hold Setting (IMAGE HOLD)
Imageholdcausesthecurrentpicturetobefrozenuntil
the camera finishes moving to a preset position. This
function comes in handy when using a network interface
unit for monitoring of camera images over a network.
1. Move thecursor toIMAGE HOLD,and thentilt the
joystickleftorrighttotoggleitONandOFF.
ON : Maintains the last image until the camera
finishes moving to a preset position.
1. MovethecursortoPRIVACYZONE,andthentiltthe
joystickleftorrighttoselectaprivacyzonesetting.
ON (1) : Turnsontheprivacyzonefunction.(Grey)
ON (2) :Turnsontheprivacyzonefunction.(Mosaic)
OFF :Turnsofftheprivacyzonefunction.
ThefactorydefaultsettingisOFF.
Usethefollowingstepstoconfigureprivacyzones.
2. Whenthecameraissetto"ON(2)",afteraccessing
thezonesetting menubyfollowing theinstructions
instep3to5,movethecursortoZONELEVEL,and
then tilt the joystick left or right to change the
concentrationoftheprivatezone.
Tosetprivatezonebyoperatingstepsafterstep3.
3. WhenPRIVACYZONEissetto"ON(1)"or"ON(2)",
movethecursortoPRIVACYZONE,andthenpress
theCAM(SET)button.
ThiswilldisplaytheZONENUMBERselectionmenu.
The picture will be wide angle (WIDE) if there is no
privacyzonedefinedforthecurrentzonenumber.
4. Move the cursor to ZONE NUMBER, and then tilt
thejoystickleftorrighttoselectthezonenumber(1
to8)youwanttoconfigure.
Anasterisk(*)totherightoftheanumberindicates
thatitalreadyhas aprivacyzoneconfiguredfor it.
Selectingsuchazonenumberzoomsthepictureto
thezoomsettingthatwasineffectwhenitsprivacy
zonesettingswereconfigured.
5. PresstheCAM(SET)button.
This will display the zone setting menu. The
appearanceofthemenudependsonzonesettings.
The currently configuredzone frame will appearin
the centre of the picture.
Performing the remaining steps of this procedure
will delete the current zone frame and replace it
withthenewzoneframethatyouconfigure.
6. Move the cursor to →PUSHSETtotherightofPAN/
TILT,andthenpresstheCAM(SET)button.
ThiswilldisplaythePAN/TILTsettingmenu.
**ZONE NUMBER 1 /8**
RET TOP
→
PUSH SET
→
PUSH SET
•••I
•
•••128
- +
PAN/TILT
ZOOM/FOCUS
ZONE SCALE
••I •••2
ZONE LEVEL
SET DEL
RET TOP
**ZONE NUMBER 1 /8**
ZOOM / FOCUS
→
PUSH SET
→
PUSH SET
•••I•••128
- +
PAN/TILT
ZOOM/FOCUS
ZONE SCALE
••I••••2
ZONE LEVEL
SET DEL
RET TOP
**ZONE NUMBER 1 /8**
TILT / PAN
→
PUSH SET
→
PUSH SET
••I••••2
•••I•••128
- +
PAN/TILT
ZOOM/FOCUS
ZONE LEVEL
ZONE SCALE
SET DEL
RET TOP
**ZONE NUMBER 1 /8**

20
ThedirectionindicatorsareN(north),NE(northeast),E
(east), SE (southeast), S (south), SW (southwest), W
(west),andNW(northwest).
1. Move the cursor to AREA TITLE, and then tilt the
joystick left or right to turn the area title display
function on or off.
ON (NESW) : Displays direction indicators.
Selecting ON (NESW) and pressing the
CAM (SET) button will display the position
(NESW)settingmenu,whichyoucanusefor
configuringdetailedsettings.(thispage)
ON (USER) : Displaysuserinputtext.
SelectingON(USER)andpressingtheCAM
(SET) button will display the area title
(USER)selection menu, which youcan use
forconfiguringdetailedsettings.(page21)
OFF : Turns off display of area title direction
indicatorsandtext.
ThefactorydefaultsettingisOFF.
(1)WhenON(NESW)isselected
After selecting ON (NESW), you can use the position
(NESW)settingmenutoconfiguredetailedsettings.
Onceyousetthenortherly(N)directionforthecamera,
all other directions are displayed automatically.
1. Move the cursor to →PUSHSETtotherightofPAN/
TILT,andthenpresstheCAM(SET)button.
ThiswilldisplaythePAN/TILTsettingmenu.
2. Use the joystick to point the camera north, and then
presstheCAM(SET)button.
3. Move the cursor to →PUSHSETtotherightofZOOM/
FOCUS,andthenpresstheCAM(SET)button.
ThiswilldisplaytheZOOM/FOCUSsettingmenu.
4. Move the joystick left, right, up and down to adjust
the position of the lens focus, and then press the
CAM(SET)button.
→
PUSH SET
→
PUSH SET
**DIRECTION(NESW)**
PAN/TILT
ZOOM/FOCUS
POSI
+
N
RET TOP
ZOOM / FOCUS
OFF : Picture being picked up by the camera
continues to be displayed as the camera
moves to a preset position.
ThefactorydefaultsettingisOFF.
> Digital Flip Setting (DIGITAL FLIP)
Normally, a camera needs to stop when it points
straight down during tilt. With digital flip, however, the
camera is able to tilt from 0° to 180° in a single motion.
This makes it possible to track objects passing directly
under the camera more smoothly. The picture is
flipped vertically and horizontally when the camera is
at an angle of around 135°.
1. Move the cursor to DIGITAL FLIP, and then tilt the
joystickleftorrighttotoggleitONandOFF.
ON :Turns on digital flip. Note that the tilt range
becomes 0
° to 90° whenON is selectedfor
thePANLIMITsetting.
OFF : Turns off digital flip. With this setting, the tilt
range is 0
° to 90°.
ThefactorydefaultsettingisON.
Notes:
•Digitalflipisperformedwhenthejoystickisheld
straight downwards only. It is not performed when
the joystick is tilted in any other direction.
•When OFF is selected for DIGITAL FLIP, the
following steps need to be performed in order to
tilt the camera 180
°.
(1) Tilt the joystick downwards to point the
camera straight down.
(2)Tiltthejoystickleftorrighttopanthecamera
180
°.
(3)Tiltthejoystickupwards.
•
MomentarilyturnoffDIGITALFLIPandsetthezoom
limit to 36x magnification or less before setting a
preset position directly from the WV-CU360C System
Controller. You can turn these functions back on
again after setting the preset position.
Note that digital flip cannot be specified for the
90
° to 180° tilt range.
A Proportional Pan/Tilt Setting (PROPO. P/T)
This function optimizes the image by automatically
adjusting the PAN/TILT (horizontal/vertical rotation)
speedaccordingtothezoomratio.
1. Move the cursor to PROPO.P/T, and then tilt the
joystickleftorrighttotoggleitONandOFF.
ON : Pan/tilt speed is in inverse proportion to the
zoomratio.
OFF : The speed is constant at the fastest level
regardlessofthezoomratio.
ThefactorydefaultsettingisON.
B Area Title Setting (AREA TITLE)
The area title function lets you display a direction
indicator that appears in the picture to indicate the
direction of the location being shown on the screen.
Text can also be displayed in place of the direction
indicators, if desired.
→
PUSH SET
**DIRECTION(NESW)**
PAN/TILT
ZOOM/FOCUS
POSI
+
N
RET TOP
→
PUSH SET
→
PUSH SET
→
PUSH SET
**DIRECTION(NESW)**
PAN/TILT
ZOOM/FOCUS
POSI
+
N
RET TOP
TILT / PAN
/