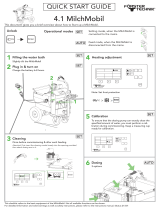
Zodiac pH perfect User manual

Type
User manual

Zodiac pH Perfect automatically measures and adjusts your pool's pH level, ensuring it stays balanced without manual intervention. Using a pH sensor and dosing pump, it analyzes and maintains the ideal pH level by injecting the required amount of corrective liquid. Whether you prefer acidic or alkaline products, the device adapts to your preference.

Zodiac pH Perfect automatically measures and adjusts your pool's pH level, ensuring it stays balanced without manual intervention. Using a pH sensor and dosing pump, it analyzes and maintains the ideal pH level by injecting the required amount of corrective liquid. Whether you prefer acidic or alkaline products, the device adapts to your preference.

Congratulations, you have just acquired a Zodiac pH Perfect which will allow you
to balance your pool water without constraints.
pH perfect measures the water’s pH (from 0,0 to 14,0) using a pH sensor placed
on the ltering circuit which permanently analyses the pool water.
Depending on the pH value, pH Perfect will inject the quantity of liquid corrective
product needed to maintain the water balance using its dosing pump.
pH Perfect could work either with acid or alcaline corrective products.
Contents
Description of your pH Perfect page 2
1.1 Identifi cation of parts ................................................................................................................................................................................................................................. 2
1.2 The Control Panel .......................................................................................................................................................................................................................................... 3
Installation page 4
2.1 Recommendations ........................................................................................................................................................................................................................................4
2.2 Technical details ...........................................................................................................................................................................................................................................4
2.3 Installation diagram ..................................................................................................................................................................................................................................4
2.4 Installing the control unit and electrical connections .......................................................................................................................................... 5
2.5 Installing the sensor and the injection point .................................................................................................................................................................. 5
Starting up and operating page 6
3.1 Calibration procedure ................................................................................................................................................................................................................................ 6
3.2 Rule for injecting pH Perfect ...........................................................................................................................................................................................................8
3.3 Adjusting the dosage depending on alkalinity...............................................................................................................................................................8
Adjustments: “Settings” menu page 9
4.1 Language................................................................................................................................................................................................................................................................ 9
4.2 “Settings” menu - Default parameters ................................................................................................................................................................................. 9
4.3 Set point ............................................................................................................................................................................................................................................................... 9
4.4 Type of dosage .............................................................................................................................................................................................................................................10
4.5 Alkalinity level ..............................................................................................................................................................................................................................................10
4.6 “OFA” over-feed protection ............................................................................................................................................................................................................10
4.7 Type of calibration ......................................................................................................................................................................................................................................11
4.8 Detection that fi ltration is in progress .................................................................................................................................................................................11
4.9 Resetting the appliance ........................................................................................................................................................................................................................11
Care and maintenance of your pH Perfect page 12
5.1 Changing the peristaltic pipe .......................................................................................................................................................................................................... 12
5.2 Winterizing the pH Perfect .............................................................................................................................................................................................................. 12
Water quality page 13
Alarms page 13
Problem solving page 14
Warranty page 15
Online registration page 16
1
2
3
4
5
6
7
8
9
10
1
Enregistrement en ligne
Enregistrez votre Produit sur notre site Internet : www.zodiac-poolcare.com
Soyez les premiers à être informé des nouveautés Zodiac et de nos promotions
Aidez-nous à améliorer sans cesse la qualité de nos produits
Recyclage
Votre appareil est en fi n de vie. Vous souhaitez vous en débarrasser ou le remplacer.
Ne le jetez pas à la poubelle ni dans les bacs de tri sélectif de votre commune.
Ce symbole, sur un appareil neuf, signifi e que l’équipement ne doit pas être jeté et qu’il
fera l’objet d’une collecte sélective en vue de sa réutilisation, de son recyclage ou de sa
valorisation. S’il contient des substances potentiellement dangereuses pour l’environnement,
celles-ci seront éliminées ou neutralisées.
Renseignez-vous auprès de votre revendeur sur les modalités de recyclage et les organismes
pouvant recycler votre appareil.
10
16
18 19
EN
The symbol indicates important information that must imperatively be taken
into account in order to avoid risk of injury to persons or damage to the appliance.
The symbol indicates useful information.
Description of your pH Perfect
1.1 Identifi cation of parts
The pack contains the items shown and required to install your pH Perfect:
1 pH Perfect controller
2 Wall bracket
3 Wall fi xture kit (2 plugs & 2 screws)
4 Polyethylene inlet tube (5 meters)
5 Intake pipe with 2-meter PVC tube and 3-meter cable
6 FPM lipped injection fl ap valve (3/8”)
7 pH Sensor model Z35H1P-17 with 5-meter shielded cable
8 Injection fl ap 1/2” to 3/8” valve reducer
9 Sensor holder, model PSS3 (1/2”)
10 - 11 Collar for fi xing the injection valve and sensor holder (DN 50 mm)
12 Buffer solution kit pH 4, pH 7, H2O (tap water only)
1
1
2
3
4
5
6
7
89
10 11
12
2
1.2 The Control Panel
1
2
3
4
56 7
8
9
10
11
12
13
1 Blue Backlighted LCD 1 line 16 white character screen.
Left side warning zone (alarms) / Right side pH display
2 Peristaltic pump.
3 Connection for linking polyethylene inlet tube.
4 Connection for linking the PVC intake pipe to the suction cane.
5 Cable gland: for passing the control cable directly to the fi lter (220-240V AC only when fi ltration is in
progress).
6 Cable gland: for passing the cable linking the unit to the intake pipe sensor.
7 Cable gland: for passing the 220-240V AC power cable.
8 BNC socket for connecting the pH sensor: The sensor cable is connected to the regulator unit with
this connector.
9 Master switch: for powering the control unit.
10 Navigation button “q”: for navigating in the “Settings” menu.
11 “SET/Esc” button: button for exiting from the “Settings” menu; also for displaying the pH set point
when pressed continuously.
12 Navigation button “p”for navigating in the “Settings” menu.
13 “CAL/Enter” button: button for enabling the sensor calibration mode (the button must be pressed
for 5 seconds). This is also used for accepting changes in the “Settings” menu.
3
20 21
EN
Installation
2.1 Recommendations
WARNING: THE PH PERFECT MUST BE INSTALLED BY AN EXPERIENCED POOL
PROFESSIONAL.
> SHOULD PH PERFECT REQUIRE ANY ELECTRICAL MAINTENANCE ALWAYS DISCONNECT
THE APPLIANCE FROM THE POWER SUPPLY.
> Before installing the pH Perfect controller, make sure that you have all the components required and
that you have read the instruction manual carefully.
> Failure to comply with the instructions contained in this manual can be dangerous, cause damage to
the appliance and may void the warranty.
> While installing the pH Perfect controller, make sure of the following:
The supply voltage is as indicated on the label attached to the side of the appliance
The electric installation is compliant with NF C15-100 standards (or equivalent for other European
countries).
The pressure at the injection point is less than 1.5 bar
The protective housing on the pump is properly clipped into position
The suction tube is immersed with the intake pipe in the container of corrective solution to be
injected and is connected to the pump (on the left). Then retighten the nut on the connector
The inlet tube will then be connected to both the pump (on the right), and the inlet pipe to the
pool through the injection fl ap valve.
> Do not use hydrochloric acid, use pH corrective products as recommended by your pool specialist.
Zodiac Pool Care Europe cannot be held liable if unsuitable products are used.
2.2 Technical details
Dimension (L - W - H) 240 x 200 x 90 mm
Weight (appliance, sensor, tube and pipes) 1.7 kg
Power feed 50Hz 220-240 V AC/50 Hz
Consumption 12W
Pump fl ow rate 1.5 l/hr
Maximum backpressure 1.5 bar
pH control range 0.0 pH-14.0 pH
Appliance accuracy +/- 0.1 pH
Calibration of the sensor Semi-automatic in 2 points (1 point possible)
2.3 Installation diagram
Installation of the pH Perfect on the fi ltration system:
THE DISTANCE BETWEEN THE
SENSOR AND THE INJECTION POINT
MUST NOT BE LESS THAN 60 CM.
The injection point must be the last
element on the return line before the
pool.
Keep the sensor cable away from other
power cables and large pump supply
cables in order to prevent electrical
interference.
The maximum pressure in the pipes must
not exceed 1.5 bar.
To increase the life span of the peristaltic
pipe, the pressure should not exceed
1 bar.
If the pool has a heating system or any
other equipment, they must be situated
after the pH sensor but before the liquid
chlorine injection point.
2
60 cm mini
4
OPTION: NOT INCLUDED I N THE PACKAGING: POD KIT
The “POD Kit” is an accessory used to group together the measurement
sensors when jointly using a pH Perfect and a Zodiac Chlor Perfect (or
other regulation with a 12 mm diameter sensor).
The “POD Kit” includes a multi-diameter fi xing collar (DN 50 mm or DN
63 mm) and a measurement chamber in order to obtain more reliable
results (+ assembly accessories).
The “POD Kit” is available from your reseller.
2.4 Installing the control unit and electrical connections
Install the pH Perfect controller on a rigid support (vertical wall) in an easily accessible place.
The electrical connections for the pH Perfect must be done by an experienced pool professional.
“Standard” pH Perfect electric connection:
2.5 Installing the sensor and the injection point
The sensor must be vertical or up to 45° maximum, and always above the rigid pipe. It must NEVER be
located horizontally or below the rigid pipe.
Correct positions Incorrect positions
Drill a hole between 16 and 22 mm on the pipe at the location selected for the pH sensor and for the
injection point (see diagram in paragraph 2.3). Next fi t the fi xing collars by aligning them opposite the
drilled holes.
Use the Tefl on® tape to make sure that the threads of the sensor holder, injection valve and adapter
are watertight.
CT
220-240 V AC
50 Hz
L
30 mA
N
220-240 V AC
50 Hz
220-240 V AC
50 Hz
5
22 23
EN
Starting up and operating
Remark: see paragraph 4.1 to modify the display language.
3.1 Calibration procedure
The sensor must be calibrated when your pH Perfect is fi rst installed and ideally every two months
there after to obtain the best operating conditions.
- Calibration must be done each time your pool is restarted at the beginning of the season.
- The calibration procedure is carried out when fi ltration is stopped thanks to its double supply (the
appliance remains powered on). Before calibrating, stop fi ltration and close the valves so as to isolate
the pH sensor holder from fl owing water.
Procedure:
1. Fill fl ask n°2 with
clean water
(tap water).
2. Undo the sensor
holder and remove
the sensor from the
pipe.
3. Rinse the sensor in
ask n°2 (water).
Then shake gently
to remove excess
water.
4. Immerse the sensor
in fl ask n°1 (pH 7).
(5a) (5c)(5b)
5. Keep the “CAL/Enter”
button pressed for more
than 5 seconds until
“Calibration” appears on the
LCD screen (5a).
Press the “CAL/Enter” button
again as indicated on the
screen for calibration on pH7
(5b).
an automatic progression bar
then appears (5c). Keep the
sensor immersed in the buffer
solution for 30 seconds.
6. After 30 seconds, the
appliance indicates the
measurement reliability of
the sensor expressed as a
percentage.
7. After 30 seconds, the
appliance indicates the
measurement reliability of
the sensor expressed as a
percentage.
8. Immerse the sensor in fl ask
n°3 (pH 4).
3
(2) (3) (4)
(1)
(6) (7) (8)
6
9. Press the “CAL/Enter”
button to go to calibration
on pH4. Press the “CAL/
Enter” button again as
indicated on the screen (9a).
an automatic progression bar
then appears (9b).
Keep the sensor immersed
in the buffer solution for 30
seconds.
10. After 30 seconds, the
appliance indicates the
measurement reliability of
the sensor expressed as a
percentage.
E.g.: 100% with a new sensor;
if < 25%, see chapter 8.
11. Rinse the sensor in clean
water, then shake gently
to remove excess water
and replace it in its sensor
holder (it must not touch the
pipe).
12. To fi nish calibration, press
the “CAL” button.
The instrument will return
to measuring mode.
Once the calibration is complete, your pH Perfect is ready to regulate your pool automatically.
If the pool pH is very far from the appliance set point (7.4 pH by default), pause the overdose safety
for 24 or 48 hours (see paragraph 4.6).
> The pH Perfect peristaltic pump is self-starting. However, it is possible to operate it manually by
keeping the ”p“ Navigation button pressed.
The peristaltic pump will then inject corrective solution as long as the button is pressed.
(9a) (9b) (10)
(11) (12)
7
24 25
EN
3.2 Rule for injecting pH Perfect
Proportional cyclic dosing - exclusive to Zodiac
To reach the set point in the best possible conditions (the quickest, but with the least possible
corrective solution), your pH Perfect automatically detects the difference of the pH value measured in
the pool compared with the desired set point (default value = 7.4 pH).
This proportional injection is cyclic and the cycle time is 10 minutes.
What will change in dosing is the different times of injection and pause.
The proportions are adjusted automatically and the different dosages are distributed in steps of
0.15 pH.
E.g.: For 4 cycles with a set point of 7.4 pH and acid regulation (standard alkalinity levels):
pH 7,55: 20% injection (2 minutes) & 80% pause (8 minutes)
pH 7,70: 50% injection (5 minutes) & 50% pause (5 minutes)
pH 7,85: 75% injection (7 minutes 30 secondes) & 25% pause (2 minutes 30 secondes)
pH < 7,90: 100% injection (10 minutes, continuous)
pH
+
8,20
8,15
8,10
8,05
8,00
7,95
7,90
7,85
7,80
7,75
7,70
7,65
7,60
7,55
7,50
7,45
7,4 0
7, 35
7, 30
-
Evolution of pH in the pool
Dosage
cycle times
100%
75%
50%
20%
Set point = 7.4 pH
10 min 10 min 10 min 10 min
The injection rule is, of course, inversed if alkaline dosing is chosen.
3.3 Adjusting the dosage depending on alkalinity
Water’s pH is potentially unstable. Its stability depends on the alkalinity of the water (also called total
alkalinity). If the total water hardness is low (< 100 ppm), the pH will be potentially unstable and it will be
the opposite if the total water hardness is high (> 150 ppm).
In order to always have an optimal balance, the pH Perfect has a function making it possible to adjust
the quantities of potentially injected corrector product depending on the total water hardness (see
paragraph 4.5).
8
Adjustments: “Settings” menu
4.1 Language
The default language displayed on the pH Perfect is French (A).
You can choose between 6 languages for the LCD display: French, English,
German, Spanish, Italian and Dutch.
To change language when in the “Settings” menu, enable the option list by
pressing the “CAL/Enter” button (a small arrow appears on the right of the
screen and the language message fl ashes). Then select the language using the
p” and “q” navigation buttons.
Accept the choice by pressing the “CAL/Enter” button.
4.2 “Settings” menu - Default parameters
The pH Perfect is factory preset with the following settings (suitable for most cases):
a. Language: French
b. Set point: pH = 7.4
c. Dosage = acid (injection when the pH is higher than the set point)
d. Alkalinity level = standard
e. “OFA” over-feed protection: 4 hours
f. Calibration = enabled in 2 points (pH7 & pH4)
g. Detection that fi ltration is in progress: enabled
Pour To access the “Settings” menu, the appliance must be ON. Simultaneously
press the “CAL/Enter” and “SET/Esc” buttons for about 5 seconds until the LCD
screen displays “Settings” (B).
This “settings” menu gives access to the following adjustments:
o Language
o Set point
o Type of dosage
o Alkalinity level
o Time before triggering the “OFA” over-feed protection
o Type of calibration
o Detection that fi ltration is in progress
Pour To exit the “Settings” menu, press the “SET/Esc” button and select “Yes”
or “No”, using the “p” and “q” navigation buttons to save the new settings or
not. Accept the choice by pressing the “CAL/Enter” button (C).
4.3 Set point
The default set point on the pH Perfect is 7.4 pH (D)
To change it when in the “Settings” menu, enable the option list by pressing the
“CAL/Enter” button (the pH value fl ashes). Then select the value chosen using
the “p” and “q” navigation buttons. The adjustment is made in increments of
10 mV.
Accept the choice by pressing the “CAL/Enter” button.
It is also possible to directly access the set point by holding down the “SET/Esc” button (keep pressing
while changing the setting using the “p and q” navigation buttons).
4
(A)
(B)
(C)
(D)
9
26 27
EN
4.4 Type of dosage
The default dosage on the pH Perfect is acid (injection of pH minus) (E).
To change it when in the “Settings” menu, enable the option list by pressing the
“CAL/Enter” button (a small arrow appears on the right of the screen and the
type of dosage fl ashes). Then select the dosage using the “p and “q” navigation
buttons.
Accept the choice by pressing the “CAL/Enter” button.
4.5 Alkalinity level
The quantity of corrective fl uid potentially injected can be modifi ed to take into account the alkalinity
of the water (total water hardness).
To change the value of total water hardness, from the « Settings » menu, activate the choice list by
pressing the “CAL/Enter” key (a small arrow appears on the right of the screen) then select the level
using the “p” and “q” navigation keys.
Validate by pressing the “CAL/Enter” key.
Indication of the choice of alkalinity level:
- TAC < 100 ppm = Low
- 100 < TAC < 150 ppm = Std (Standard = default setting)
- TAC > 150 ppm = High
4.6 “OFA” over-feed protection
Your pH Perfect is equipped with protection to prevent over-feeding with
liquid chlorine in the event of a problem on the pH sensor, for example.
The purpose of this protection, called “OFA” (Over Feed Alarm), is to pause the
appliance if it has not reached the set point at the end of the time; set by default
at 4 hours (F).
The “OFA” over-feed protection functions in 2 steps:
#1: “OFA alarm” fl ashes on the LCD screen after 70% of the OFA programmed
time has been used without reaching the set point. However, the appliance
continues running.
#2: “Stop OFA” is displayed on the LCD screen after reaching 100% of
the OFA programmed time (4 hours in the original setting). The appliance
is then safe.
To cancel this protection and start your pH Perfect, press the “CAL/Enter” button (possible on the 2
steps of the OFA alarm).
Make sure that the pH sensor is in good condition. If necessary, clean and/or recalibrate it.
The over-feed protection is set by default for a maximum time of 4 hours.
It is possible to adjust it from “OFF” (disabled) to “6 hours” by intervals of 1 hour.
A fairly high setting is strongly recommended to avoid any inopportune and/or unjustifi ed start.
To regulate the OFA when in the “Settings” menu, enable the option list by pressing the “CAL/Enter”
button (the value in hours fl ashes). Then select the value chosen using the “p” and “q” navigation
buttons.
The adjustment is made by intervals of 1 hours.
Accept the choice by pressing the “CAL/Enter” button.
(E)
(F)
10
Special functions of the OFA
To prevent “false” alarms just after installing a pH Perfect (if the pH is poorly balanced and the chlorine
needed therefore high), the OFA may be temporarily disabled for 24 or 48 hours:
Presser Press “p” & “q” & “CAL”: OFA disabled for 24 hours (automatically
re-enabled).
PresserPress “p” & “q” & “SET”: OFA disabled for 48 hours (automatically
re-enabled).
4.7 Type of calibration
Your pH Perfect is calibrated by default in 2 steps: pH7 and pH4 (G).
This can be done in a single step on pH7 (faster but with lower measurement
reliability over time). It is also possible to remove it (strongly recommended to
avoid doing so, except for pools with a maintenance contract).
To change it when in the “Settings” menu, enable the option list by pressing the
“CAL/Enter” button (a small arrow appears on the right of the screen and the
type of calibration fl ashes). Then select the type chosen using the “p” and “q
navigation buttons.
Accept the choice by pressing the “CAL/Enter” button.
If calibration is done in one step, the procedure described in paragraph 3.1. will automatically stop at
the end of calibration with solution 7.
4.8 Detection that fi ltration is in progress
Your pH Perfect is equipped by default with a double power feed for keeping the appliance live in order
to calibrate the pH sensor when fi ltration is stopped.
However, it is possible to disable this function if the electrical connection is different (work done by a
professional).
The pH Perfect no longer takes into account whether fi ltration is in progress and is likely to inject
corrective solution when there is no fl ow in the
pipes. Disabling is only possible if the mains power cable is controlled by the fi ltration.
To change this function when in the “Settings” menu, enable the option list by
pressing the “CAL/Enter” button (a small arrow appears on the right of the
screen and the status of detection of fi ltration fl ashes). Then select “ON” or
“OFF” using the “p” and “q” navigation buttons (H).
Accept the choice by pressing the “CAL/Enter” button.
4.9 Resetting the appliance
In the event of incorrect manipulation, it is possible to restore all the original pH Perfect functional
settings.
Procedure for resetting the pH:
Switch OFF the appliance.
> Switch ON the appliance by pressing simultaneously on the two “p” and “q” navigation
buttons (keep the buttons pressed until the message appears on the screen).
Select “Yes” or “No” using the navigation buttons, then accept using the “CAL/Enter”
button.
All the factory settings will then be restored.
(G)
(H)
11
28 29
EN
Care and maintenance of your pH Perfect
5.1 Changing the peristaltic pipe
1. Remove the protective cover
carefully drawing it towards
you.
2. Position the tablet holder on
10:20” turning clockwise.
3. Fully release the left-hand
connection keeping it
stretched outwards, then
turn the tablet holder
clockwise in order to free
the tube up to the right-hand
connection.
4. Position the tablet holder on “10:20” turning
clockwise. Insert the left-hand connection in
its housing, then pass the tube under the
guide of the tablet holder.
Turn the tablet holder clockwise and at the
same time put the tube into the pump head
up to the right-hand connection.
5. Replace the protective cover (place the pin in
the attachment hole).
5.2 Winterizing the pH Perfect
When the regulator has to be winterized, it is advisable to pump clean
water through it in order to rinse the peristaltic pipe using the self-priming
function and pressing the navigation button “p” (see paragraph 3.1).
Next turn the tablet holder to “6:00”.
These two precautions will make it easier to restart the appliance.
Remove the pH sensor from its holder. Store it in its original fl ask or a cup
lled with tap water. If necessary plug sensor holder.
Never leave the end of the sensor out of water!
5
(1) (2) (3)
(5)
(4)
12
Water quality
Even if pH Perfect is an automated regulation system, it is essential to regularly check the
different water quality settings (measurements to be carried out before installing and regularly
during the bathing season).
Zodiac Pool Care Europe cannot be held liable if these rules are not followed.
To fi t your pool with a global automated water treatment system, we recommend that you use a Zodiac
pH Perfect regulation combined with your pH Perfect to permanently check the water’s pH.
pH
Free
Chlorine
mg/L or ppm
TA
(alkalinity or
buffer effect)
°f (ppm)
CH
(level of calcium
carbonate
°f (ppm)
Cyanuric
acid
(stabiliser)
mg/L or ppm
Metals
(Cu, Fe, Mn…)
mg/L or ppm
Recommended
values 7.2 – 7.4 0.5 – 2.0 8 – 15
(80 – 150)
10 – 30
(100 – 300) < 30 0
To increase
Use pH Perfect
in “alkaline”
dosage and/
or increase
setpoint
Add chlorine
(manually or
with an ORP
regulation)
Add alkaline
corrector
("TA +")
Add calcium
chloride
Add cyanuric
acid (only if
necessary)
/
To reduce
Use pH perfect
in “acid”
dosage and/
or decrease
setpoint
Stop chlorine
production
Add diluted
hydrochloric
acid
Add a scale
x e r
or carry out
decarbonata-
tion
Partially
empty the pool
and refi ll it
again
Add a metal
x e r
Test frequency
(in the season) Weekly Weekly Monthly Monthly Quarterly Quarterly
Alarms
Alarm Cause(s) Solutions
The container of corrective solution
is empty
Replace the container
Make sure that the white fl oat on the
intake functions correctly
First OFA step enabled
(time > 70%)
Check pH value
Press “CAL/Enter” to stop the alarm
Second OFA step enabled
(time = 100%)t
Check pH value
Press “CAL/Enter” to stop the alarm
Filtration stopped Start fi ltration
Check the connection
Buffer solution ineffective
PH sensor defective
Replace the buffer solutions
Clean and/or replace the pH sensor
Parameter error Press “CAL/Enter” to cancel the fault
Call your local pool professional
6
7
13
30 31
EN
Problem solving
Problem Cause Remedy
The pH Perfect
always displays
a pH near to 7.0
Problem with cable and/or connector
Make sure that the sensor-pH Perfect connection is
not short-circuited (between the central core of the
cable and the exterior sheathing)
Make sure that there is no moisture and/or
condensation around the BNC socket
The appliance always
displays a high value
or the measurement
is constantly unstable
The electrode connection cable is
damaged Check the cable and/or the BNC socket
The pH sensor has an air bubble in
the bulb
Put the sensor into upright position and shake gently
so that the air bubble rises back up to the top
Note
: The sensor should be fi tted in a vertical
position or at an angle no greater than 45°
The pH sensor is worn Replace the pH sensor
The sensor cable is too close to a
power cable causing interference
Reduce the distance between the appliance and the
sensor and/or place the cable elsewhere
Impossible to
calibrate on pH 7
(error message)
Quality of calibration
of the pH
sensor < 25%
Buffer solution is ineffective
Make sure that the solution used is pH 7
Check the pH buffer solution with a pH electronic
meter
Check the pH buffer solution with a pH electronic
meter
Problem with the sensor’s porous
element, dirt deposits
Make sure that the electrode bulb is in good
condition, that it has not been allowed to dry out
of the water. As a last resort, clean by soaking the
electrode in a 10% hydrochloric acid solution
Check that the porosity of the sensor is in good
condition (wash the sensor in an acid solution).
The pH sensor is worn Replace the pH sensor
Impossible to
calibrate on pH 4
(error message)
Quality of calibration
of the pH
sensor < 25%
Buffer solution is ineffective
Make sure that the solution used is pH 4
Check the pH buffer solution with a pH electronic
meter
Purchase a new pH 4 buffer solution and recalibrate
again
Problem with the sensor’s porous
element, dirt deposits
Make sure that the electrode bulb is in good
condition, that it has not been allowed to dry out
of the water. As a last resort, clean by soaking the
electrode in a 10% hydrochloric acid solution
Check that the porosity of the sensor is in good
condition (wash the sensor in an acid solution).
The pH sensor is worn Replace the pH sensor
Slow response
from the pH sensor Static electricity on the pH sensor
During the calibration phase DO NOT WIPE the pH
sensor with a cloth or paper, but after rinsing, shake
it gently
8
14
Warranty
Principle
Unless otherwise stated, we contractually guarantee the correct operation of our new Products. We guaran-
tee that our products correspond to their technical specifi cations and are free from material or manufactur-
ing defects.
In all cases, this warranty is limited, at our discretion, either to the repair or the exchange for a new or refur-
bished product, or to the refund of the products we agree are defective. Postage and packing costs for the
repaired or replaced product delivered to the customer are at our expense, excluding labour, travel and/or
accommodation costs for repairs carried out outside continental France, and exclude the payment of com-
pensation.
All product returns must have our prior acceptance. No de facto returns on the initiative of the customer will
be accepted.
More specifi cally, the warranty on spare parts shall only be effective after an analysis and expertise by our
company of the returned parts followed by the decision to replace them.
In all cases the legal vendor warranty continues to apply.
In order to benefi t from the warranty, our Customer undertakes to respect the water balance parameters in
the pool as follows:
- pH : 6.8 < pH < 7.6
- free chlorine: < 3.0 mg/L
- stabiliser (if used): < 75 mg/L
- total dissolved metals (iron, manganese, copper, zinc…): < 0.1 mg/L
Remark: The use of water from a bore hole or a well is prohibited.
General limitations
This warranty does not apply to apparent defects, i.e. visible defects not declared by our customer on delivery of
the products.
Are also excluded the defects or deteriorations caused by the unsuitability of the product to the needs of the end
user, by normal wear and tear, by an incorrect installation or use not compliant with the recommendations on the
product instructions, by insuf cient maintenance and/or accidental bad handling, by incorrect storage, and/or by
studies, instructions and/or specifi cations by the customer.
All modifi cations carried out on the Products by our customer, by the end user or by a third party automatically void
the complete warranty. The same applies to the case where original parts are replaced by spare parts not sold by us.
Our Customer shall further check the compatibility of our Products with the other pool equipment with the other
manufacturers, as well as the installation and commissioning rules to respect for the correct operation of the entire
system.
If the Product is returned to our workshops, the outgoing shipping costs are at the end user’s expense except for
the cases mentioned in paragraph 1.
The immobilisation or impossibility to use an appliance in the case of an eventual repair cannot entitle to indemni-
ties.
This warranty will also be voided in the event of a failure to pay or a late payment for the product by our customer.
Duration
The date defi ning the start of the contractual warranty is the date on the sale invoice of the new product from
our customer to the end user.
The invoice is required and conditions the acceptance of the warranty.
Failing this, our Customer will assume all the damaging consequences for our company, for all claims from an
end user under the contractual warranty after its expiry date.
The repairs and/or replacements carried out under this warranty cannot in any way extend or renew its dura-
tion.
Special terms for the Automatic Regulation Line
We guarantee that all Products correspond to their technical specifi cations and are free from material or
manufacturing defects and that they correspond to the technical progresses and state of the art at their time
of being placed on the market.
Later modifi cations made to our products (improvements or modifi cations which are part of the product’s
technical evolution) cannot be the cause of an intervention by our company.
Are excluded from the warranty:
• Normal wear of parts such as the sensor, the peristaltic tube, the buffer solution(s) or the check valve.
• Electrical damage caused by lightning or an incorrect electric connection.
• Damage due to shocks, incorrect use or bad maintenance.
The duration of the warranty is of 2 years from the date the new Product is invoiced by our customer to the
end user for the entire line.
All requests for coverage by the warranty should be sent to your retailer. We recommend that you
keep your purchase invoice for all support of your Product.
9
15
32 33
EN
  • Page 1 1
  • Page 2 2
  • Page 3 3
  • Page 4 4
  • Page 5 5
  • Page 6 6
  • Page 7 7
  • Page 8 8

Zodiac pH perfect User manual

Type
User manual

Zodiac pH Perfect automatically measures and adjusts your pool's pH level, ensuring it stays balanced without manual intervention. Using a pH sensor and dosing pump, it analyzes and maintains the ideal pH level by injecting the required amount of corrective liquid. Whether you prefer acidic or alkaline products, the device adapts to your preference.

Ask a question and I''ll find the answer in the document

Finding information in a document is now easier with AI