Page is loading ...

PG450 IM Issue 3 © 2017 Page 1
INSTRUCTION MANUAL
Introduction
GENERAL SAFETY
POWERGUN
Important Information
The Macnaught Lithium-ion PG450 Battery
operated grease gun is a portable high pressure,
high volume grease gun, supplied complete with
2 x Lithium-ion batteries, battery charger, 1m
long flexible extension and carry case.
Lithium-ion Battery Operated Grease Gun
Failure to follow all instructions listed below may
result in electric shock, fire and/or serious injury. The
term “power tool” in all of the warnings listed refers to
your battery operated (cordless) power tool.
IMPORTANT INFORMATION
Please read this information carefully before use.
Make sure all operators have adequate access to the
following instructions.
Keep work area clean and well lit.
DO NOT operate power tools in explosive areas,
e.g; close to flammable liquids, gases or dust.
ELECTRICAL SAFETY
Never modify electrical connections.
DO NOT expose power tool to rain or wet conditions.
Keep cord away from heat, oil, sharp edges or
moving parts.
PERSONAL SAFETY
POWER TOOL USE AND CARE
DO NOT force the power tool.
DO NOT use power tool if the power tool is damaged
or the switch does not turn the gun on and off.
Only use this power tool in accordance with the
instructions provided.
‘Cautions’ are listed throughout this manual to advise
of actions to which may cause damage to your
equipment.
WARNING
If battery-pack case is damaged DO NOT charge.
Danger of electric shock or electrocution
Battery and Charger Safety Information
DO NOT probe the unit - Danger of electric shock or
electrocution.
The battery charger MUST NOT be used for any
other use than for charging the rechargeable
batteries supplied with the PG450
DO NOT operate charger with a damaged power
cord or plug, replace immediately.
DO NOT operate charger if it has received a sharp
blow, or has been dropped. Take it to an authorized
service centre.
DO NOT disassemble charger.
DO NOT store or use the tool and battery pack in
locations where the temperature may reach or
exceed 40°C/104°F.
DO NOT use charger on any other voltage than
designated on the charger. 120/230/240 volts
present at charging terminal
Visually inspect grease gun, charger and battery
prior to use for any signs of damage, loose or
missing parts. If equipment is worn or damaged,
remove it from service. Contact an authorized
service centre or distributor
WARNING
™ (PG450)
Never allow any part of the human body to come
in front of, or in direct contact with a material
outlet. Never point the nozzle of the gun at
yourself or anyone else.
WARNING

PG450 IM Issue 3 © 2017 Page 2
Battery Disposal
Grease Gun Operation
Installing Grease Cartridge
WARNING
DO NOT attempt to open the battery pack.
ONLY charge the battery with the charger provided.
NOTE: Dispose of depleted batteries
Properly. The battery contains
rechargeable Lithium-ion and must be
recycled or disposed of properly. Please
refer to the local authorities for the
correct method of battery disposal.
DO NOT incinerate the battery pack. The battery can
explode in a fire
DO NOT attempt to disassemble any battery.
Charge Battery
NOTE: Charger is a fast recharge type charger.
Insert the small plug on the end of the charger lead
into the pug hole on back of the battery. A red light
indicates the battery is charging. When the battery is
fully charged the red light turns yellow.
The battery can be charged:
a) Attached to the grease gun
b) Removed from the grease gun.
To remove battery from the grease gun, press the
blue button on back of battery and slide battery out
of the rear of the gun.
DO NOT force battery if fitting or removing from gun.
Replace battery into grease gun, by carefully aligning
the battery to the cavity on the gun, slide battery in,
until the battery locks into place.
Visually inspect the Grease Gun prior to use for
damaged, loose, or missing parts. If equipment is
worn or damaged, contact an authorized service
center for damage assessment and repair.
2) Pull the follower rod back until the rod groove can
be pulled into the barrel slot.
3) Remove the large end cap from the cartridge.
4) Slide the large open end first into the barrel.
5) Remove the small end cap from the cartridge.
6) Screw the barrel onto the gun body assembly.
7) Unlock the follower rod from the barrel.
8) Lock follower rod (Fig 2), and apply light pressure
on the pull handle (Fig 3), at the same time press the
top of the bleeder valve.
9) Pull the trigger. If grease does not appear at the
coupler repeat step 8.
Note: Rotate the barrel
counter clockwise to re-
move. Turn clockwise to
tighten.
1) Unscrew and remove barrel
from grease gun head
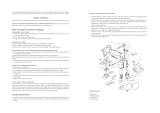
How to Select Follower Position
( Fig 1 )
HOW TO BULK FILL BY SUCTION
Note: Select the correct follower position (see Fig 1)
1) Lock follower (Fig 2)
2) Unscrew the barrel from the gun body 2 to 3 turns.
3) Pull the rod back and retain in barrel slot (Fig.4)
4) Unscrew the barrel from the gun body.
5) Release the follower rod from the barrel slot.
6) Insert the open end of the barrel into the grease, pull the
rod back slowly, and at same time push the barrel into the
grease, until the groove in the rod appears then push the
rod into the barrel.
( Fig 2 )
Note: When replacing cartridge or bulk filling,
ensure the high pressure/high volume
switch is positioned on “H”

PG450 IM Issue 3 © 2017 Page 3
Gun Operation
Priming the Gun
7) Wipe clean and screw the
barrel to the gun body
assembly.
8) Repeat steps (7), (8), (9)
“How to install a cartridge”
( Fig 4 )
Pressure Adjustable Switch
Pressure Relief Valve
Air Bleed Valve
Note: If there is still air in the system or gun
does not deliver grease,
a) Remove the flexible extension.
b) Press the trigger on the gun until grease flows
from the gun outlet.
c) Refit the hose assembly to gun.
1) Press the air bleed valve to
expel the air.
2) Press the trigger on the gun
in short bursts until grease
starts to flow from the grease
coupler.
Pressure Relief Valve
Note: The pressure relief valve located at the front of
the gun and is factory set.
If higher grease pressures are required, the pressure
valve can be adjusted with the adjusting screw
located on the front of the pressure relief valve.
High Pressure / High Volume Switch
b) Switch positioned at “L” (Low volume),
(Flowrate up to 35g/min / Pressure to 9,000psi)
Note: manual adjustment of the pressure relief valve
required for pressures above 6,000psi
a) Switch positioned at “H” (High volume),
(Flowrate up to 120g/min / Pressure to 6,000psi)
Overload Protection
The PG450 is fitted with overload protection
If the motor exceeds the maximum current, the motor
will stop. The motor to resume when safe to do so. .
1) Charge battery ( ref Charge Battery)
2) Insert battery into grease gun
3) Install grease cartridge as described
( ref Installing Grease Cartridge)
4) Prime gun (ref Priming the gun)
5) Insert coupler onto the
grease nipple as shown.
6) Press the trigger on the
gun to dispense grease as
required.
7) When finished greasing, remove coupler as
pictured below
Important: The gun is designed such that the switch
always be positioned at “H” for normal greasing.
The only time the “L” position is used, is when higher
greasing pressures are required. The pressure relief
valve will require manual adjustment.

PG450 IM Issue 3 © 2017 Page 4
TROUBLE SHOOTING GUIDE
Specifications
Gun fails to deliver grease. a) Dirt under check valve ball
b) Air lock
a) Battery under charged
b) Electrical fault
TROUBLE CAUSE REMEDY
Motor does not run when trigger is
pressed
Continual loss of prime
Grease leaking from pressure
relief valve during operation
a) Clean dirt from check valve
b) Bleed air from system
a) Fully charge batteries
b) Take gun to closest service centre
a) Air pockets in the grease
b) Follower sticking in cartridge
c) Faulty outlet check valve
Faulty or incorrectly adjusted
pressure valve
Adjust pressure relief valve.
(Replace if found to be faulty)
For Warranty Terms and Conditions see macnaught.com.au
For a list of Australian Service Centres see macnaught.com.au
a) Bleed air from system (ref priming gun)
b) Check follower for damage (replace if required)
c) Clean check valve (replace if required)
Voltage DC 18 Volt
High Volume / Low Pressure 6.000 PSI (413 Bar), 150 g/min
Low Volume / High Pressure 9.000 PSI (620 Bar), 35 g/min
Grease Reservoir Capacity, 450g
Lubricant (Grease) Up to NLGI#2
Working Temperature, 32°
F~104°
F(0°
C~40°
C)
Battery Capacity, 1.500 mAh
Quick Charge, 1 Hour
Input Voltage, 220 Volt~240 Volt (50 Hz)
Oil Hose Length, 30 in. (76 cm)
Note:
This product should be disposed of according to all applicable local
and national government environment regulations and guidelines.
/