Page is loading ...


PREFACE
THE STRONG TrussTrouper 1.2 Type 41080 is a high intensity, lightweight follow
spotlight designed for high performance and ease of operation and portability. The light source is an
OSRAM 1200 watt HMI Metal Halide bulb mounted transversly in a fixed, deep ellipse type metal
reflector. The bulb is warranted for (500) hours of operation, and it is advisable to have a spare bulb
available for each unit.
THE SPOTLIGHT is shipped with a yoke adaptable for truss mounting. An optional
folding floor stand assembly, and overhead Hanger Kit, are available from Strong International. Lens
mechanisms are available in Long, Medium and Short throw configurations, and are readily mounted
to the TrussTrouper as the application or venue require.
THE SOLID STATE POWER SUPPLY is mounted below the head assembly. The
power supply and lamphouse are forced-air cooled by built-in blowers. Lamphouse and power supply
are controlled by means of fixture-mounted pushbutton switches at the rear of the base pan.
POWER REQUIREMENT for the TrussTrouper is 120 V.AC, 15 amperes, 60 Hertz.
Approximate line draw is 12 amperes. A 220 V.AC, 50/60 Hertz model is available under Type
Number 41080-03 or -04. A 12 foot, three-wire power cord is mounted to the power supply.
THE OPTICAL SYSTEM, designed for left- or right-hand operation, includes a vari-
able focus lens mechanism which intensifies light output as the spot size is reduced from flood to spot.
The (2) rear mounted controls operate the fade out/douser and the iris. Control levers for the six color
self-cancelling boomerang are located on the top of the housing. A pattern slot for gobos is accessible
in front of the iris.
REPLACEMENT BULBS are available through authorized Strong International and
OSRAM Dealers. Use only the OSRAM 1200W HMI in this unit. Bulbs returned for warranty
adjustment must be returned through the original supplier, shipped prepaid, with all relevant warranty
papers completed and enclosed.
IF AT ANY TIME you have a suggestion, or desire aid in securing anticipated results,
write directly to STRONG INTERNATIONAL, 4350 McKinley Street, Omaha, Nebraska 68112.
TT/01

INSTALLATION - OPERATION
INSPECT THE UNIT upon receipt. Any damage must be reported to the freight
carrier immediately. It is the responsibility of the consignee, not the shipper, to file damage claims.
THE HMI BULB is included in the accessory kit packed with the spotlight. DO NOT
touch the quartz envelope when handling the bulb; fingermarks will burn into the vessel, reducing
light, and contributing to premature bulb failure. Handle the bulb by the metal base caps only. The
HMI bulb is not polarized, and the iginter lead can attach to either end.
DISMOUNT THE LAMPHOUSE COVER from the rear of the lamphouse by loosen-
ing the (4) captive screws. Loosen the top bulb mounting bracket and remove the threaded nuts from
the ends of the HMI bulb. Pull the upper bulb mount clear of the reflector and insert the bulb through
the reflector holes. Slide the lower bulb end cap through the lower mounting opening; attach the
igniter lead and secure using the knurled nut. Swing the top bulb mounting bracket over the upper end
cap; attach the upper lead, and secure using the knurled nut. Tighten the top mounting bracket.
IF USING THE OPTIONAL FLOOR STAND ASSEMBLY, drop the legs to the hori-
zontal position and pin in place. The floor stand may then be moved on its casters to desired location.
IMPORTANT: Once the floor stand has been positioned, lower the leveling feet to transfer the weight
of the unit from the casters to the leveling feet. If the unit is to be permanently installed, it is advisable
to remove both casters and leveling feet, and bolt the stand to the floor.
INSERT THE POST of the yoke assembly into the nylon bushing at the top of the floor
stand tube. Position the yoke for right- or left-hand operation (as desired). Place the spotlight head on
the yoke assembly, making certain that the friction plate of the spotlight saddle is between the yoke
and the brake clamping plate. Tighten the (2) handwheel knobs on each side of the yoke allowing
adequate end play for free operation, and tighten the (2) lock knobs. Vertical movement of the spot-
light head can be adjusted by the amount of torque applied to the spring-loaded clamping knob against
the friction plate.
SET THE BALANCE of the head assembly. Loosen the (2) hex nuts on each side
securing the saddle brackets to the spotlight base rail. Slide the spotlight head inside the slots until the
proper balance is achieved, and retighten the hex nuts.
THE SPOTLIGHT YOKE, as supplied, is designed for use with standard truss fix-
tures. Truss mounting the TrussTrouper will depend largely on its application in any given venue.
TT/02

THE TRUSSTROUPER SPOTLIGHT may be suspended from a ceiling or overhead
truss by means of an optional Hanger Kit. This kit is available through your authorized Strong Inter-
national Dealer.
ELECTRICAL CONNECTION for the 41080-01 or -02 (120 V.AC, 60 Hz.) requires
a 120 V.AC, three prong 15 ampere grounded outlet. The Type 41080-03 or -04 (240 V.AC, 50/60
Hz.) may be fitted with a plug acceptable for the local electrical supply. Cooling fans are either 120
V.AC or 240 V.AC and not interchangeable; see Data Plate on unit for correct voltage. Sustaining line
draw of the TrussTrouper is (12) amperes; observe local electrical codes.
ENERGIZE THE AC LINE as required. When the power switch at the rear of the
spotlight head is closed, the bulb will ignite, and the cooling fans will operate. Allow one to five
minutes for the bulb to reach full intensity. Rotate thethree adjusting screws below the lamphouse
base pan to center and focus the bulb inside the reflector. Alternate adjustments until the light field is
as flat as possible at highest intensity.
WHENEVER THE SPOTLIGHT is moved, either from one position to another, or
one show site to another, the bulb mount should be inspected at the new installation site to determine
that the bulb is firmly seated in its socket. The above bulb alignment procedure must then be repeated
after the bulb mount assembly is replaced.
MAINTENANCE
THE TrussTrouper requires very little maintenance to keep it in good working order.
Cleanliness is the most important factor. Clean the surface of the reflector regularly using a clean, dry
cloth. If excessively soiled, a good, spray-on commercial glass cleaner may be used. The bulb enve-
lope may be cleaned with alcohol, and rinsed with distilled water on a clean cloth.
THE COOLING FANS are permanently lubricated, and require no oil. Fan impeller
blades and intake grilles must be cleaned regularly to prevent restriction of air flow, particularly after
events such as tractor pulls or rodeos.
OPTICAL SYSTEM LENSES may be cleaned with an optical grade lens cleaner and
Roscoe Lens Tissue. Light lubrication of the lens carriage slide rods using WD-40® or equivalent may
be desirable; do not use graphite lubricants, and do not lubricate the iris assembly.
TT/03

OPERATION OF OPTICAL SYSTEM
THE OPTICAL SYSTEM of the TrussTrouper consists of a spot size selector, an iris
assembly to reduce the size of the spot aperture, and a fade-out chopper assembly to permit reducing
light output from full intensity to complete douse. The iris and chopper controls are mounted on the
back of the lamphouse and are fully accessible from either side of the unit. The spot size is selected by
setting and locking a control knob located on the right side (as viewed from rear) of the unit.
INSTALL A LENS MECHANISM compatible with the desired throw. The three lens
mechanisms are designated as Short, Medium, and Long Throw. The throw specifications listed
below may serve as a guideline when first setting up the TrussTrouper, but optimal performance at a
given throw distance may vary with ambient light levels, projection angles, and other variables unique
to the venue.
Short Throw 20 - 50 feet (6.0 - 15.2 m)
Medium Throw 40-100 feet (12.2 - 30.5 m)
Long Throw 50-130 feet (15.2 - 39.6 m)
IGNITE THE LAMPHOUSE and allow the bulb to stabilize. Open the iris to project
the largest aperture by rotating the iris control (left) fully counterclockwise. Open the chopper blades
by rotating the chopper control (right) fully clockwise. Rotate the spot size control knob (right side)
counterclockwise to unlock, and slide the knob forward or back to set the desired spot size. Lock the
spot size control at the desired point.
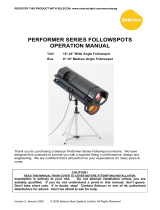
TO REDUCE SPOT SIZE, or to project a “head”
spot, rotate the iris control clockwise to the desired spot size.
The spot cannot be doused by means of the iris control; do not
force the control beyond its stop.
ROTATING THE FADE-OUT CONTROL will
decrease the light output, and dim the spot to complete douse-
out. It is adviseable to use the dousing capability of this control
to cut off the light between cues instead of extinguishing the
bulb. The HMI bulb requires a relatively long warmup period,
and repeated ignitions decrease bulb life.
Iris Control
Fade-Out
Control
Friction
Brake
Color
Arms
Spot Size
Control
TT/04

OPERATION OF COLOR BOOMERANG
THE COLOR BOOMERANG is equipped with six color holders. Additional filter
holders can be supplied by an authorized Strong International Dealer.
TO OPERATE INDIVIDUAL COLOR FILTERS, engage the desired filter selector
lever. A rocker catch located in the color disc housing holds the filter in position.
TO RELEASE A COLOR, push the filter release button or engage another color, thus
releasing the previous color automatically.
NOTE: WHEN PLACING COLOR FILTERS in the boomerang, the less dense col-
ors (pink, amber) should be placed in the holders toward the rear of the boomerang (toward arc), and
those of greater density (red, green) should be placed in the holders toward the front of the boomer-
ang (away from the arc). Use high temperature filter material (RoscoLux® or equivalent).
COLOR TEMPERATURE REDUCTION FILTERS, required for use with televi-
sion and videotape, are available from theatrical supply dealers.
TT/05


WIRING DIAGRAM
Parts List
Ref.
Desig. Part No. Description
B1,2 61-98002 Blower, 115 V.AC, 50/60 Hz.
- 88253 Blower Power Cord & Plug
DS1 21-61216 POWER Indicator Light; Red; 115 V.AC
- 21-61217 Switch Cap, “POWER”
DS2 21-61193 ON Indicator Light, Green (with S2)
DS3 41103 HMI Bulb, 1200 Watt
M1 81-32007 Elapsed Time Meter, 115 V.AC 60 Hz.
S1 39260 Interlock Switch, Pushbutton
S2 21-61193 Lighted Pushbutton Switch, ON/OFF
EXPORT
Ref.
Desig. Part No. Description
B1,2 81272 Blower, 230 V.AC, 50/60 Hz.
- 88253 Blower Power Cord & Plug
DS1 21-61216 POWER Indicator Light; Red; 230 V.AC
- 21-61217 Switch Cap, “POWER”
DS2 21-61193 ON Indicator Light, Green (with S2)
DS3 41103 HMI Bulb, 1200 Watt
M1 81-32003 Elapsed Time Meter, 115 V.AC 50 Hz.
S1 39260 Interlock Switch, Pushbutton
S2 21-61193 Lighted Pushbutton Switch, ON/OFF (with DS2)
TT/07


FIGURE 1
Parts List
Item Part No. Description
1 25396 Screw, 10-32 Captive
2 81-28002 Hand Rail
3 41-70004 Washer, Hand Rail
4 41908 Rear Panel (Welded to Item 6)
5 41-35023 Hand Rail Fastening Nut, 1/4-28 Hex
6 41908 Lamphouse Cover, Welded Assembly (incl. Item 4)
7 41315 Bottom Cover, Welded Assembly
8 11-40037 AC Power Cord
9 41330 Captive Screw
10 41292 Lens Housing, Welded Assembly
11 41-51030 Screw, 6-32 x 3/16" Pan Head
12 41304 Long Throw Lens
13 41289 Lens Ring
14 81-28002 Hand Rail
- 41326 Lens Assembly, Long Throw (Items 10-14)
15 41294 Lens Ring
16 41305 Medium Throw Lens
17 81-28002 Hand Rail
18 41296 Lens Housing, Welded Assembly
19 41-51030 Screw, 6-32 x 3/16" Pan Head
- 41327 Lens Assembly, Medium Throw (Items 15-19)
20 Lens Ring
21 Short Throw Lens
22 Lens Housing, Welded Assembly
23 41-51030 Screw, 6-32 x 3/16" Pan Head
- Lens Assembly, Short Throw (Items 20-23)
24 41-51281 Mounting Screw, 1/4-20 x 1/2" Button Head
TT/09


FIGURE 2
Parts List
Item Part No. Description
1 41257 Bulb Contact
2 41255 Upper Bulb Retainer
3 41300 Reflector
- 41-51075 Mounting Screw, 8-32 x 1" Bind Head
- 41-35008 Spacer
4 41907 Bulb Mounting Pedestal
5 41-51490 Mounting Screw, 6-32 x 3/8" Pan Head
6 41103 HMI Bulb, 1200 Watt Double-Ended
- 01304 Mounting Screw, 8-32 x 5/16" Pan Head
7 11-58013 Compression Spring (3 req’d.)
8 41337 Adjusting Shaft, Bulb Positioning (3 req’d.)
9 41254 Lower Bulb Retainer
10 41242 Reflector Mounting Plate
11 41250 Chopper Mounting Plate
12 41248 Chopper Slide Rod (2 req’d.)
13 41278 Upper Chopper Blade Assembly
14 41279 Lower Chopper Blade Assembly
15 41253 Actuator Arm, Choppers
16 41-51122 Mounting Screw, Iris Plate; 1/4-20 x 3/4" Hex Head
17 41312 Pull Rod, Short
- 41310 Ball Joint Elbow (2 req’d.)
18 41-51629 Gobo Channel Mounting Screw, 8-32 x 5/8" Phil. Head
19 41310 Ball Joint Elbow (2 req’d.)
- 41311 Pull Rod, Long
20 41276 Spacer Rod
21 31-61030 Top Cover Interlock Switch (S1)
22 65322 Switch Mounting Bracket
- 00167 Mounting Screw, 6-32 x 1/2" Flat Head
23 41242 Iris Mounting Plate
24 41301 Gobo Slide Channel (2 req’d.)
25 41263 Iris Back Plate
26 24374 Iris
27 41261 Iris Actuator Collar
28 41237 Iris Actuator Arm
29 25386 Iris Clamp (2 req’d.)
TT/11

Item Part No. Description
30 41264 Iris Spacer Plate
31 41265 Lens Retaining Ring
32 41302 Condensor Lens
32 41281 Condensor Lens Mounting Ring
34 41277 Lens Ring Guide Rod
35 41271 Phenolic Bushing
36 48103 Knob, Red Plastic
- 41370 Threaded Shaft
- 41-70004 Flatwasher, 1/4"
37 41229 Slide Bar
38 41275 Slide Bar Transfer Bracket
39 31-07003 Bushing
40 41252 Optical System Front Plate
41 41284 Saddle Bracket & Brake Quadrent, Welded Assembly
42 41-70008 Flatwasher, 1/2" Steel
43 45153 Clamping Knob, Cast Aluminum
44 81-32007 Elapsed Time Meter (M1), 60 Hz.
- Elapsed Time Meter (M1), 50 Hz.. (Export)
45 41228 Meter Mounting Bracket
46 25389 Stud Plate, Balance Slide
47 41317 Igniter Retaining Strap (2 req’d.)
48 25415 Igniter Mounting Plate
49 25447 Igniter Assembly (incl. Item 48)
50 41330 Captive Screw
51 41-51540 Screw, 8-32 x 3/8" Phillips Head
52 41308 Base Rail Front Plate
53 41226 Base Rail
54 61-98002 Blower (B1,B2), 115 V.AC, 50/60 Hz.
- 81272 Blower (B1,B2), 230 V.AC, 50/60 Hz. (Export)
55 11-40037 Cable Clamp (incl. with Figure 1, Item 10 Cord)
56 83131 Blower Grille
57 25417 Mounting Bracket, Power Supply
FIGURE 2 Parts List (continued)
TT/12

Item Part No. Description
58 25446 HMI Power Supply Assembly
59 51168 Knurled Knob, Bulb Positioning Control (3 req’d.)
60 41336 Spacer, Bulb Adjustment (3 req’d.)
61 25387 Balance Slide Bracket (2 req’d.)
62 41227 Switch Mounting Bracket
63 21-61193 Lighted Switch (S3 & DS2), ON/OFF
64 21-61216 Indicator Light (DS1), POWER
65 41283 Saddle Bracket, Welded Assembly
66 00809 Hexnut, Balance Slide Lock; 3/8-16 (4 req’d.)
67 41319 Control Rod (2 req’d.)
68 41320 Locking Collar (2 req’d.)
69 51-58017 Compression Spring (2 req’d.)
70 41318 Control Handle (2 req’d.)
71 41309 Back Plate
FIGURE 2 Parts List (continued)
TT/13

12
34
58
69
10
11
12
14
13
15
16
7
16 17
5
18
19
20
21
22
23
22
24 25 26 27 28 29
30
FIGURE 3
Item Part No. Description
1 45308 Color Release Pushbutton
2 41239 Boomerang Cover Plate
3 45306 Pivot Stud Bushing
4 01743 Pivot Stud Bolt, 1/4-20 x 3-1/2"
5 01704 Hitch Pin (4 req’d.)
6 41-70002 Washer (12 req’d.)
7 Retainer Plate, Rear
8 51-58029 Compression Spring
9 41240 Color Release Guide Bracket
10 00919 Cotter Pin
11 41234 Color Release Plunger
12 45310 Torsion Spring, Release Arm
13 45309 Color Arm Catch Bracket
14 41260 Trip Lever
15 41-51012 Screw, 4-40 x 1/4" Button Head
16 45304 Stop Pin, Color Arm Travel
COLOR BOOMERANG
Assembly No. 41904
TT/14

Item Part No. Description
17 18121 Retainer Plate, Front
18 01754 Nylon Hexnut, 1/4-20 (2 req’d.)
- 00889 Shakeproof Lockwasher, 1/4"
19 45308 Hook (early models only)
20 46150 Clip (3 req’d. per Color Holder)
21 01515 Screw, 4-40 x 1/4" (2 req’d. per Color Holder)
22 18118 Color Frame (2 req’d. per Color Holder)
23* 47215 Color Gel, Light Red (RoscoLux #26)
- 47216 Color Gel, Primary Blue (RoscoLux #80)
- 47217 Color Gel, Sky Blue (RoscoLux #68)
- 47218 Color Gel, Daylight Blue (RoscoLux #65)
- 47219 Color Gel, Flesh Pink (RoscoLux #34)
- 47220 Color Gel, Golden Amber (RoscoLux #21)
24 25412 Color Selector Arm
25 25408 Color Selector Arm
26 25407 Color Selector Arm
27 25411 Color Selector Arm
28 25410 Color Selector Arm
29 25409 Color Selector Arm
30 45303 Torsion Spring (6 req’d.)
NOT SHOWN
25396 Boomerang Mounting Screw, Captive (4 req’d.)
* Install less dense colors (pink, amber) closest to light source
FIGURE 3 Parts List (continued)
TT/15
/