Page is loading ...

3. - - – Two dashes indicate the temperature,
although still displayed, is above the range of
the unit.
MOUNTING THE UNIT
1. To allow for different mounting positions, the white
unit holder ts securely over the top or bottom of
the unit.
2. Select the position and location where the unit will
be mounted.
3. Make sure the surface of the location is clean
and smooth.
4. Attach the unit to the selected location by remov-
ing the paper covering from the adhesive tape on
the back of the unit holder and pressing the unit
rmly in place.
5. The unit can be more permanently mounted by
utilizing the two small screw holes on the unit
holder. (Screws are not included.)
BENCH STAND
1. The bench stand is part of the BATTERY
COMPARTMENT DOOR.
2. Locate the small rectangular opening at the bot-
tom of the BATTERY COMPARTMENT DOOR.
3. Insert paper clip into opening and gently turn ⅛” in
either direction. Stand will ip open.
4. To close, snap the stand closed.
ALL OPERATIONAL DIFFICULTIES
If this unit does not function properly for any reason,
please replace the batteries with two new AAA
alkaline batteries. (See “Battery Replacement”
below.) Low battery power can occasionally cause
any number of “apparent” operational difculties.
Replacing the batteries with fresh ones will solve
most difculties. Equivalent battery replacements are
any AAA alkaline batteries.
BATTERY REPLACEMENT
1. To open battery compartment, slide BATTERY
COMPARTMENT DOOR on the back of unit in
direction of arrow.
2. Remove depleted batteries. Insert two fresh AAA
alkaline batteries in appropriate positions to agree
with the polarity symbols (+ and -) in the battery
compartment.
3. Replace BATTERY COMPARTMENT DOOR.
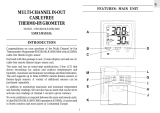
TRACEABLE
HUMIDITY/
TEMPERATURE
METER WITH
DUAL MIN/MAX
MEMORIES
INSTRUCTIONS
®
©2017 92-4096-40 Rev. 0 072617

SPECIFICATIONS
Display: ¾”-High LCD
Accuracy: ±1°C (0 to 40°C) otherwise ±2°C
±2%RH mid-range otherwise ±4%RH
Resolution: 1°F or °C 1%RH
Temperature Range: 32 to 122°F (0 to 50°C)
Humidity Range: 25 to 95%RH
Memory: Stores and recalls minimum/ maximum
temperature and humidity readings.
Display up-dated every second
Functions: Temperature and relative humidity
Attachments: Wall mount, bench stand
Size: 3¾” x 2½” x ½”
Weight: 3 oz.
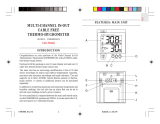
Figure 1:
Description
1. Display
2. MAX-HYGRO
3. MIN-HYGRO
4. Memory/Clear
5. MAX-THERMO
6. MIN-THERMO
Change Temperature Reading to Fahrenheit
(F°) or Celsius (C°)
1. Open BATTERY COMPARTMENT DOOR.
2. Locate switch in upper right corner of battery
compartment.
3. Slide switch to left for Celsius (C°). Slide switch to
right for Fahrenheit (F°).
4. Replace BATTERY COMPARTMENT DOOR.
Thermometer Operation
1. Press the THERMO-MIN button once to recall the
minimum temperature stored in the memory. “MIN”
will appear on the display.
2. Press the THERMO-MIN button once again to
display the current temperature. “MIN” will no longer
appear on the display.
3. Press the THERMO-MAX button once to recall the
maximum temperature stored in the memory. “MAX”
will appear on the display.
4. Press the THERMO-MAX button once again to
display the current temperature. “MAX” will no
longer appear on the display.
Reset the Thermometer Memory
1. Press the THERMO-MIN button once to recall the
minimum temperature stored in the memory. “MIN”
will appear on the display.
2. Press the MEMORY/CLEAR button once to reset
the minimum temperature to the
current temperature.
3. Press the THERMO-MIN button once again to
display the current temperature. “MIN” will no
longer appear on the display.
4. Press the THERMO-MAX button once to recall
the maximum temperature stored in the memory.
“MAX” will appear on the display.
5. Press the MEMORY/CLEAR button once to reset
the maximum temperature to the
current temperature.
6. Press the THERMO-MAX button once again to
display the current temperature. “MAX” will no
longer appear on the display.
Hygrometer Operation
1. Press the HYGRO-MIN button once to recall the
minimum relative humidity stored in the memory.
“MIN” will appear on the display.
2. Press the HYGRO-MIN button once again to
return to the current relative humidity. “MIN” will no
longer appear on the display.
3. Press the HYGRO-MAX button once to recall the
maximum relative humidity stored in the memory.
“MAX” will appear on the display.
4. Press the HYGRO-MAX button once again to
return to the current relative humidity. “MAX” will
no longer appear on the display.
Reset the Hygrometer Memory
1. Press the HYGRO-MIN button once to recall the
minimum relative humidity stored in the memory.
“MIN” will appear on the display.
2. Press the MEMORY/CLEAR button once to reset
the minimum relative humidity to the current
relative humidity.
3. Press the HYGRO-MIN button once again to
display the current relative humidity. “MIN” will no
longer appear on the display.
4. Press the HYGRO-MAX button once to recall the
maximum relative humidity stored in the memory.
“MAX” will appear on the display.
5. Press the MEMORY/CLEAR button once to reset
the maximum relative humidity to the current
relative humidity.
6. Press the HYGO-MAX button once again to
display the current relative humidity. “MAX” will no
longer appear on the display.
DISPLAY MESSAGES
1. HHH – Three Hs ashing indicate the relative
humidity being measured is above the range of
the unit.
2. LL – Two Ls ashing indicate the relative humidity
being measured is below the range of the unit.
/