Page is loading ...

Instructions Liberty Accessories
28-Apr-23 PN 23160 REV D 1
Introduction
Satellite portable restrooms and accessories must be assembled according to approved assembly
procedures. Variations in assembly could adversely affect product life and warranty.
●3 Part number options of Pro-22 handwash station with pro-mount board & different soap
dispensers.
23410 Pro 22 w/Foam Promount (Promount board with foaming soap dispenser)
23412 Pro 22 w/1000ml Promount (Promount board with 1000ml soap dispenser)
23414 Pro 22 w/800ml Promount (Promount board with 800ml soap dispenser)
23623 Kit- Hdwe Pro-22/Promount Lib (hardware to install Pro-22 Handwash w/Pro-mount
board in Liberty unit) *NOTE: 23623 must be added along with any option selected of the 3
part numbers above.
Pro-22 handwash installation in Liberty / 35 gallon blow mold tank: TOOLS: ●Drill ●#2 Phillips
driver bit ●1/4” Drill Bit ●7/8” Hole saw ●7/16” wrench ●Marker (Same tools for Large 68 gal tank)
PARTS: [Hardware used per single unit installation in Liberty with 35 gallon tank or Large tank “68 gallon”]
Part number Description Qty
1124-699
Decal: Not For Drinking Or
1
1140-699
Sink Bracket Floor
1
1712-699
Washer
: Fender 1/4 x 1 SS 2
1713-699
"Washer: 1/4" Stainless Flat"
2
1751-699
Nut: Acorn 1/4
-20 4
1776-699
"Spacer: Nylon 1/2OD x 1/4""ID
1
1937-699
"Screw: 6" x 1/2" SS Phillip
2
1947-699
Screw: Phillips Head 1/4
-20 x 1-1/4” 2
PARTS: Kit- 22702 (comes with each of the 3 options Pro-22 w/ Pro-mount
board) NOTE: Not all hardware in kit will be used.
Part number Description Qty
1776-699
"Spacer: Nylon 1/2OD x 1/4""ID
1
1929-699
"Screw 1/4
-20 x 2.50" Pan Head 1
1947-699
Screw: Phillips Head 1/4
-20 x 1-1/4” 1
PARTS: Kit-23623 NOTE: all hardware in this kit will be used.
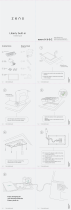
Pro-22 handwash installation in Liberty:
2530 Xenium Lane North, Minneapolis, MN 55441
Telephone: 763-553-1900 Fax: 763-553-1905
800-328-3332 / www.satelliteindustries.com

28-Apr-23 PN 23160 REV D 2
2) Mark right side of 35 gal. tank. Up
from part line on side of tank 3-3/4” &
out from rear panel of unit 2.00” Drill
at mark using 7/8” hole saw.
Pro-22 handwash installation in Liberty / 35 gallon blow mold tank cont:
2 Washers #1713-699 &
2 Acorn Nuts #1751-699
1) Attach Promount Board to Pro-22 handwash. Insert (2)
bolts #1947-699 holes in the back of Promount-board at
bottom of Pro-mount board, through holes in top of Pro-
22 handwash. Install (2) washers #1713-699 and (2)
acorn nuts #1751-699 on bolts & tighten with 7/16”
wrench & #2 Phillips driver bit or screwdriver, do not
overtighten nut on screw.
2 Bolts #1947-699
back of Pro-mount
Board
3-3/4”
2.00”
3) Position Pro-22 handwash up against rear
panel of unit, 6.00” from right side of 35 gal.
tank.
6.00”
4) Place sink floor bracket #1140-699 at
bottom of Pro-22 handwash as shown, with
holes in bracket down on floor of unit &
pushed under bottom of Pro-22 handwash
until vertical leg of bracket up against the front
edge of Pro-22 handwash. Mark on around
outside of bracket on unit floor.
Bracket #1140-699

28-Apr-23 PN 23160 REV D 3
Pro-22 handwash installation in Liberty / 35 gallon blow mold tank cont:
5) Move Pro-22 handwash away from
panel & place bracket where it was
marked on unit floor. Install (2) screws
#1937-699 through holes in bracket into
floor using Phillips driver bit or
screwdriver.
6) Re-position Pro-22 handwash up against rear panel of unit
over sink floor bracket on unit floor. Make sure hose is in
channel on back of Pro-22 handwash. Transfer drill through
hole at top in middle of Pro-mount board & in bottom left
corner of Pro-mount board through rear panel using 1/4” Drill
Bit.
2 Screws #1937-699
7) Install screw #1929-699 top in
bottom left corner of Pro-mount
board inside unit. Install (2)
spacers #1776-699 onto screw
on back of Pro-mount plate.
Insert screw in hole drilled in
rear panel.
Screw
#1929-699
2 Spacers
#1929-699
8) Outside of unit on rear panel
place washer #1712-699 on
screw Item #1929-699. Start nut
#1751-699 on screw. Tighten
nut using 7/16” wrench & Phillips
driver bit or screwdriver, do not
overtighten nut on screw.
9) Insert screw #1947-699 top hole in
middle of Pro-mount board inside unit.
Screw
#1947-699
Washer
#1712-699
Nut #1751-699

28-Apr-23 PN 23160 REV D 4
Pro-22 handwash installation in Liberty / 35 gallon blow mold tank cont:
10) Outside of unit on rear panel
place washer #1712-699 on
screw Item #1929-699. Start nut
#1751-699 on screw. Tighten nut
using 7/16” wrench & Phillips
driver bit or screwdriver, do not
overtighten nut on screw.
11) Insert drain hose from back of
Pro-22 handwash into hole drilled
on right side of 35 gal tank.
12) Install Decal #1124-699 on
front of Pro-22 handwash where it
can easily be seen.
Pro-22 handwash installation in Liberty / Large 68 gallon tank:
1) Attach Pro-mount Board to
Pro-22 handwash, same as Step
1) with 35 gal tank.
2) Mark right top corner on
front of large 68 gal tank.
Down 1-1/2” from top of tank
& in 1-1/2” from right side of
tank. Drill at mark using 7/8”
hole saw.
3) Position Pro-22 handwash up
against right panel of unit, 6.00” from
right front corner of large 68 gal tank.
Follow steps 4) through 10) for
installation of 35 gal tank to secure
Pro-22 to Liberty unit, it will be the
same for large 68 gal tank.
Washer
#1712-699
Nut #1751-699
6.00”
1-1/2”
1-1/2”

28-Apr-23 PN 23160 REV D 5
Pro-22 handwash installation in Liberty / Large 68 gallon tank cont:
11) Insert drain hose from back of Pro-22
handwash into hole drilled in right top
corner of large 68 gal tank.
12) Install Decal #1124-699 on front of
Pro-22 handwash where it can easily be
seen.
Solar fan (PN 10018) : Drill in at location shown below using 3-1/4” hole saw. Remove plastic nut
from threads on fan. Insert fan in top of roof with threaded end into hole drilled in roof. Rubber o-
ring needs to be at the top of the threads of light (to create a seal on outside of roof when light is
installed). Turn plastic nut on fan threaded end inside unit “flat side up” & hand tighten until snug.
TOOLS: ●Drill ●3-1/4” Hole saw
Top solar panel of
fan outside on roof
Plastic nut
Bottom threaded end of
fan inside on roof
7”
7”
Rear of roof
7”

28-Apr-23 PN 23160 REV D 6
Solar light (PN 10019) : Drill at location shown below using 1-1/2” hole saw. Remove clear cover
at bottom of light, then remove plastic nut from threads on light. Insert light in top of roof with
threaded end into hole drilled in roof. Rubber o-ring needs to be at the top of the threads of light (to
create a seal on outside of roof when light is installed). Make sure white button is depressed on
inside of top housing to activate light in dark condition. Tip: before installing light in roof,
charge light in sunlight for at least 15 minutes & cover solar panel on top of housing, light
should activate . Turn plastic nut on light threaded end inside unit flat side up & hand tighten until
snug. Turn clear cover onto bottom of threads on light. TOOLS: ●Drill ●1-1/2” Hole saw
Plastic nut / clear
cover
Turn plastic nut & clear cover
on threads inside of roof
Switch

28-Apr-23 PN 23160 REV D 7
2 Rivets in top 2
holes of mirror
2 Rivets in bottom
2 holes of mirror
Large mirror kit (PN 23139): Position mirror #1041-699 on inside of door. Centered on door
down from spring tube 1.00” Transfer drill in top holes in mirror into door using #10 Drill bit
(through inside wall only on front). Fasten mirror to door using (2) rivets #17436. Transfer
drill in bottom holes in mirror into door using #10 Drill bit. Fasten mirror to door using (2)
rivets #17436. TOOLS: ●Drill ●#10 Drill bit ●Rivet gun ●Tape measure
1.00”

28-Apr-23 PN 23160 REV D 8
Drill at 4 marks
Hold shelf level in left front corner
of unit. Down 1-1/4” from this
feature on inside of door frame Mark through 4 holes in shelf
Install 2 Rivets #17436 in holes
in shelf into front facing
Front facing
Shelf kit Liberty (PN 23141): Mounting shelf #20845 in front left corner on inside of unit (looking at
front of unit from outside of unit). Holding shelf level, with shelf tight against the front facing (Note:
shelf will not be tight up against the panel on the inside hole, washers will be used as spacers when
riveting shelf to panel). Mark through 4 holes shown onto front facing & left panel. Drill at 4 marks
using #10 Drill bit (through inside wall only on front). Fasten shelf to front facing using (2) rivets
#17436. “Repeat above steps to install shelf in Right Front Corner of Liberty unit”. NOTE: if unit has
Baby Change Station on right panel, see installation steps following page. TOOLS: ●Drill ●#10 Drill bit
●Rivet gun ●Tape measure ●Marker

28-Apr-23 PN 23160 REV D 9
1 Rivet #11054
outside on panel
1 Rivet #11030
outside on panel
3 Washers #11315 inside
on #11054 rivet
Front of unit
Washer #11315 on #11054
rivet from outside of panel
through hole in self
Washer #11315 on #11030
rivet from outside of panel
through hole in self
Shelf kit Liberty (PN 23141) (continued): Fasten shelf to panel using (1) rivet #11054 in hole closest to
front of unit, rivet from outside of unit. Place (3) washers #11315 rivet on inside of panel holding shelf
down below rivet to place washers on rivet, then move shelf back into position so rivet is through hole in
shelf. Then place (1) washer #11315 on rivet that is through hole in shelf on inside of unit& set rivet. (1)
rivet #11030 outside on panel furthest from front of unit & (1) washer #11315 on rivet that is through hole
in shelf on inside of unit & set rivet. “Repeat above steps to install shelf in Right Front Corner of Liberty
unit”.

28-Apr-23 PN 23160 REV D 10
Shelf kit Liberty (PN 23141) (continued): Mounting shelf in right front corner on inside of unit IF UNIT HAS BABY
CHANGE STATION: Hold shelf tight against the front facing as shown onto front facing. Mark on shelf so it is
centered on shelf vertical wall & center of vertical aluminum tube (part of Baby Station assy). Remove shelf & drill
at mark on shelf using #10 Drill bit. Again hold shelf tight against the front facing & mark through 2 holes on front
facing & 1 hole over aluminum tube. Drill at marks door using #10 Drill bit (through inside wall only on front) &
aluminum tube (1st wall of tube only). Fasten shelf to front facing using (2) rivets #17436. Fasten shelf to aluminum
tube using (1) rivet #11030 in shelf hole to vertical tube.
Mark shelf center
on Aluminum tube
Drill at mark on
shelf center on
Aluminum tube
Hold shelf level in left front corner
of unit. Down 1-1/4” from this
feature on inside of door frame
Note: with Baby change
station left side of shelf
is over aluminum tube.
Mark through 3 holes in shelf

28-Apr-23 PN 23160 REV D 11
Shelf kit Liberty (PN 23141) (continued): Mounting shelf in right front corner of unit IF UNIT HAS BABY
CHANGE STATION: Drill at marks front facing & aluminum tube using #10 Drill bit (through inside wall only on
front) & aluminum tube (1st wall of tube only). Fasten shelf to front facing using (2) rivets #17436. Fasten shelf to
aluminum tube using (1) rivet #11030 in shelf hole to aluminum tube.
Drill at 3 marks
Install 2 Rivets #17436 in holes
in shelf into front facing
Front facing
Rivet #11030 in shelf
into aluminum tube

28-Apr-23 PN 23160 REV D 12
Coat hooks kit (PN 23140): COAT HOOK ON INSIDE OF SIDE PANELS: Position coat hook
#10891 on inside of right side panel. Centered in square area between vent screens. Down
1.00” from top of square area on panel. Mark through hole in coat hook. Drill at mark on panel
using #10 Drill bit. Fasten coat hook to panel using rivet #11030 outside on panel & washer
11315 inside unit. Repeat for installing coat hook in left side panel. TOOLS: ●Drill ●#10 Drill bit
●Rivet gun ●Tape measure ●Marker
1.00”
Rivet #11030
inside panel
Washer #11315
outside panel

28-Apr-23 PN 23160 REV D 13
Coat hooks kit (PN 23140) (continued): COAT HOOK ON INSIDE OF DOOR: Position coat
hook on inside of door in recess, centered at top of the door, down 1/2” from inside of rib. Mark
through hole in coat hook. Drill at mark on door using #10 Drill bit (through inside wall only on
door). Fasten coat hook to front facing using rivet #17436. TOOLS: ●Drill ●#10 Drill bit ●Rivet
gun ●Tape measure ●Marker
1/2”
Centered in line
with white
feature on
inside of door 4
Rivet #17436

28-Apr-23 PN 23160 REV D 14
Trash Can kit (PN 23622): TOOLS:●Drill ●#10 Drill bit ●Rivet gun ●Tape measure ●Marker
1) Position Bracket #22756 in right front corner of
Liberty unit as shown. Bottom of bracket up 16-
1/4” from floor with bracket level & over 1/2”
from the edge of washers on inside of panel
(washers from riveting the lift handle as seen in
pic. 2 washers in line vertically approximately
10.50” from outside edge to inside of Liberty
front). Mark through 2 holes in bracket onto
panel. Drill at marks using #10 drill bit.
2) Rivet bracket to panel with rivets #11030 on
outside of panel & washers #11315 on inside of
panel.
16-1/4”
1/2”
Rivets
#11030
Washers
#11315
3) Place Trash Can #8005-602 in right from
corner of Liberty unit with Trash can lip under
bracket.
3) Place Trash Can Lid #8005-605-L on Trash
can.

28-Apr-23 PN 23160 REV D 15
Kit- Recircirculating Hand/Flush No/Flapper (PN 15643): See instructions 15644 Instr- Recir
H/Flsh No/Flap
Kit- Baby change station (PN 22786): See instructions 22785 Instr- Lib/Frdm4 Baby Change
NOTE: THE BABY CHANGE STATION SHOULD BE INSTALLED 1ST BEFORE ANY OTHER
ACCESSORIES ARE ADDED TO UNIT & PRO-22 HANDWASH WILL NOT FIT IN UNIT WITH
BABY CHANGE STATION
2530 Xenium Lane North, Minneapolis, MN 55441
Telephone: 763-553-1900 Fax: 763-553-1905
800-328-3332 / www.satelliteindustries.com
/