
ERB121SDS
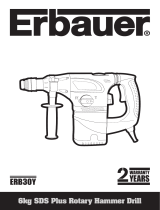
6 kg SDS-MAX ROTARY HAMMER


6 kg SDS-MAX ROTARY HAMMER
Congratulations on your purchase of a quality power tool. This product
should give you reliable service but for your peace of mind this .
power tool does carry a 24-month guarantee, the terms of which are de-
tailed below.
If this product develops a fault within the guarantee period contact your
retailer.
Please retain this handbook in case you need to refer to safety, care or
guarantee information in the future.
GUARANTEE
This product carries a guarantee of 24 months. If your product develops a
fault within this period, you should, in the first instance contact the retailer where the
item was purchased.
This guarantee specifically excludes losses caused due to:
- Fair wear and tear
- Misuse or abuse
- Lack of routine maintenance
- Failure of consumable items (such as batteries) -Accidental damage
- Cosmetic damage
- Failure to follow manufacturer’s guidelines
- Loss of use of the goods
This guarantee does not affect your statutory rights. This guarantee is only valid in
the UK.
For further technical advice and spare parts, please contact the customer helpline
number on 0870 205 2945.

2
SAFETY INSTRUCTIONS
WARNING! Read all instructions. Failure to follow all instructions listed be-
low may result in electric shock, fire and/or serious injury.
SAVE THESE INSTRUCTIONS
1. Work area
a. Keep work area clean and well lit. Cluttered and dark areas invite acci-
dents.
b. Do not operate power tools in explosive atmospheres, such as in the
presence of flammable liquids, gases or dust. Power tools create sparks
which may ignite the dust or fumes.
c. Keep children and bystanders away while operating a power tool.
Distractions can cause you to lose control.
2. Electrical safety
a. Power tool plugs must match the outlet. Never modify the plug in
any way. Do not use any adapter plugs with earthed (grounded) power
tools. Unmodified plugs and matching outlets will reduce risk of electric shock.
b. Avoid body contact with earthed or grounded surfaces such as pipes,
radiators, ranges and refrigerators. There is an increased risk of electric
shock if your body is earthed or grounded.
c. Do not expose power tools to rain or wet conditions. Water entering a
power tool will increase the risk of electric shock.
d. Do not abuse the cord. Never use the cord for carrying, pulling or un-
plugging the power tool. Keep cord away from heat, oil, sharp edges or
moving parts. Damaged or entangled cords increase the risk of electric shock.
e. When operating a power tool outdoors, use an extension cord suit-
able for outdoor use. Use of a cord suitable for outdoor use reduces the risk of
electric shock.
f. Use a Residual Circuit Breaker on all 230V Power tools. This can help
minimise the risk of an electrical shock if an earth fault or short circuits occurs.
g. If using a power cable extension ensure that the cable is fully un-
wound and that its length is less than 30 m. Lengths over 30 m will effect
the tools performance as a result of voltage drop.
3. Personal safety
a. Stay alert, watch what you are doing and use common sense when
operating a power tool. Do not use a power tool while you are tired or
under the influence of drugs, alcohol or medication. A moment of inatten-
tion while operating power tools may result in serious personal injury.
b. Use safety equipment. Always wear eye protection. Safety equipment
such as dust mask, non-skid safety shoes, hard hat, or hearing protection used
for appropriate conditions will reduce personal injuries.
c. Avoid accidental starting. Ensure the switch is in the off-position
before plugging in. Carrying power tools with your finger on the switch or
plugging in power tools that have the switch on invites accidents.

6 kg SDS-MAX ROTARY HAMMER
d. Remove any adjusting key or wrench before turning the power tool
on. A wrench or a key left attached to a rotating part of the power tool may result
in personal injury.
e. Do not overreach. Keep proper footing and balance at all times. This
enables better control of the power tool in unexpected situations.
f. Dress properly. Do not wear loose clothing or jewellery. Keep your
hair, clothing and gloves away from moving parts. Loose clothes, jewel-
lery or long hair can be caught in moving parts.
g. If devices are provided for the connection of dust extraction and col-
lection facilities, ensure these are connected and properly used. Use of
these devices can reduce dust related hazards.
4. Power tool use and care
a. Do not force the power tool. Use the correct power tool for your ap-
plication. The correct power tool will do the job better and safer at the rate for
which it was designed.
b. Do not use the power tool if the switch does not turn it on and off.
Any power tool that cannot be controlled with the switch is dangerous and must
be repaired.
c. Disconnect the plug from the power source before making any ad-
justments, changing accessories, or storing power tools. Such preven-
tive safety measures reduce the risk of starting the power tool accidentally.
d. Store idle power tools out of the reach of children and do not allow
persons unfamiliar with the power tool or these instructions to operate
the power tool. Power tools are dangerous in the hands of untrained users.
e. Maintain power tools. Check for misalignment or binding of moving
parts, breakage of parts and any other condition that may affect the
power tools operation. If damaged, have the power tool repaired be-
fore use. Many accidents are caused by poorly maintained power tools.
f. Keep cutting tools sharp and clean. Properly maintained cutting tools
with sharp cutting edges are less likely to bind and are easier to control.
g. Use the power tool, accessories and tool bits etc., in accordance
with these instructions and in the manner intended for the particular
type of power tool, taking into account the working conditions and the
work to be performed. Use of the power tool for operations different from
intended could result in a hazardous situation.
5. Service
a. Have your power tool serviced by a qualified repair person using only
Safety Instructions identical replacement parts. This will ensure that the
safety of the power tool is maintained.
HEALTH ADVICE
WARNING! When drilling, sanding, sawing or grinding, dust particles will be
produced. In some instances, depending on the materials you are working
with, this dust can be particularly harmful to you (e.g. lead from old gloss paint).
You are advised to consider the risks associated with the materials you are working

4
with and to reduce the risk of exposure. You should:
- Work in a well-ventilated area.
- Work with approved safety equipment, such as those dust masks that are specially
designed to filter microscopic particles.
ADDITIONAL SAFETY RULES FOR YOUR ROTARY HAMMER
This is a powerful rotary hammer. Caution needs to be observed when operating.
1. If the supply cord is damaged have it replaced by a qualified person.
2. Always wear a dust mask.
3. Dress in suitable overalls.
4. Safety boots are recommended at all times especially when using the chisel
action.
5. Proper safety gloves are also recommended.
6. When using chisel a dust mask is necessary because of the dust created by the
action.
7. Wear ear protectors. Exposure to noise can cause hearing loss.
8. This heavy duty high torque machine should not be used, while standing on a
ladder.
9. Watch out for the initial torque reaction of the drill, especially when drill bit is
tight.
10. Do not use damaged or worn drills.
11. Do not run the machine with any part of the casing missing or damaged.
12. Check walls for hidden electric cable, gas and electric pipe before you start any
drilling task.
13. Chisel bits and drill bits may be flung out of the machine accidentally and cause
serious injury.
14. Before starting to work, always check that the chisel or drill bit is properly locked
in the chuck.
15. Vibrations can injure the hand-arm system. Keep exposure to vibrations as short
as possible.
16. When carrying out work, always hold the drill with both hands and ensure that you
have a stable standing position.
17. In cold weather or when the tool has not been used for a long time, let the tool
warm up for a while by operating it under no load. This will loosen up the lubrica-
tion. Without proper warm up, hammering operation is difficult.
18. This Rotary Hammer has an Overload Clutch. If the drill becomes jammed or
caught, the drive to the drill spindle is interrupted. Because of the forces that oc-
cur as result, always hold the machine securely with both hands and take a firm
stance.
19. Always use the appropriate safety equipment that is required for the product e.g.
goggles/safety spectacles, ear defenders (essential with tools with a noise rating
of over 85 dB (A), gloves and face masks. In all cases ensure that the safety equip-
ment is in good condition.

6 kg SDS-MAX ROTARY HAMMER
20. Ensure that if a side handle or stabilising handle is provided with the power tool
then these are adjusted into a comfortable position and that both handles are used
to securely grip the power tool when in use.
21. This Drill is not suitable for drilling with ANY core drills above 90 mm. Only core
drills that can used used with hammer action can be used with this machine this
normally excludes diamond core drills.
Double insulation:
The tool is double insulated. This means that all the external metal parts are electri-
cally insulated from the mains power supply. This is done by placing insulation bar-
riers between the electrical and mechanical components making it unnecessary for
the tool to be earthed.
Important note
Be sure the supply is the same as the voltage given on the rating plate. The tool is fit-
ted with a two-core cable and plug.
Remove the mains plug from socket before carrying out any adjustment or
servicing.
SYMbOLS
Read the manual Warning
Wear gloves
Wear dust mask, eye & ear protection
Conforms to relevant European safety standards

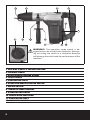
WARNING! The operation mode switch is de-
signed only to be rotated anti-clockwise. Attempt-
ing or turning the switch in a clockwise direction
will damage the switch and the performance of the
machine.
6
1. SDS-MAX CHUCK & PROTECTION RING
2. LOCKING SLEEVE
3. DEPTH GAUGE LOCKING SCREW
4. DEPTH GAUGE
5. VENTILATION SLOTS
6. OPERATION MODE SELECTOR SWITCH
7. ON/OFF SWITCH
8. VARIABLE SPEED CONTROL
9. OVERLOAD INDICATOR
10. BRUSH WEAR INDICATOR
11. VENTILATION SLOTS
12. AUXILIARY HANDLE
4 3
21
6
7
5
6
6
11
8
12
9 10

6 kg SDS-MAX ROTARY HAMMER
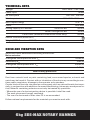
TECHNICAL DATA
Voltage 230V~50Hz / 110V~50Hz
Power input 1010W
No load speed 200–325 / 350 min
-1
Max. impact rate 1900–3050 / 3300 min
-1
Max. Impact Energy 4–9 / 11 J
Chuck SDS-Max
Drilling capacity in Concrete: Twist Drill Bit: 40 mm
Break Through Drill Bit: 55 mm
Core Cutter: (Hammer suitable core cutter only): 90 mm
Double insulation (EN 60745-1)
Weight (EPTA Procedure 01/2003) 6 kg
NOISE AND VIbRATION DATA
Measured values determined according to EN 60745.
Noise emission:
A-weighted sound pressure level L
pA
95 dB (A)
Uncertainty K
pA
3 dB (A)
A-weighted sound power level L
wA
106 dB (A)
Uncertainty K
wA
3 dB (A)
Wear hearing protection!
Dust from material such as paint containing lead, some wood species, minerals and
metal may be harmful. Contact with or inhalation of the dust may cause allergic reac-
tions and/or respiratory diseases to the operator or bystanders.
Certain kinds of dust are classified as carcinogenic such as oak and beech dust espe-
cially in conjunction with additives for wood conditioning (chromate, wood preserva-
tive). Material containing asbestos must only be treated by specialists.
- Where the use of a dust extraction device is possible it shall be used.
- The work place must be well ventilated.
- The use of a dust mask of filter class P2 is recommended.
Follow national requirements for the materials you want to work with.

8
VIbRATION
The European Physical Agents (Vibration) Directive sets out minimum requirements
applying across Europe for prevention of risk from vibration including hand arm vi-
bration syndrome injuries to power tool users. Indicative vibration test results quoted
below enable users to make informed decisions as to the period of time a power tool
can be used safely on a daily basis and the choice of tool.
Further Advice on managing risks from vibration can be found at
www.hse.gov.uk/vibration
Vibration total values (triax vector sum) determined according to EN 60745:
Work mode description 1
(if required by the relevant Part 2)
Hammer drilling in concrete
Vibration emission value a
h,HD
= 13,5 m/s
2
Uncertainty K
KHD
= 1,5 m/s
2
Work mode description 2
(if required by the relevant Part 2)
Hammering
Vibration emission value a
h,CHeq
= 11,5 m/s
2
Uncertainty K
CHeq
= 1,5 m/s
2
The declared vibration emission been measured in accordance with a standardised
test stated above and may be used to compare one tool with another
The declared vibration emission value may also be used in a preliminary assessment
of exposure.
Calculating the actual period of use can be difficult and the HSE website has a spread-
sheet to help calculate exposures from multiple tool use, to help establish the need to
limit the duration of tool use, etc.
WARNING: The vibration emission value during actual use of the power tool
can differ from the declared value depending on the ways in which the tool is
used dependant on the following examples and other variations on how the tool is
used:
- How the tool is used and the materials being cut or drilled.
- The tool being in good condition and well maintained
- The use of the correct accessory for the tool and ensuring it is sharp and in good
condition.
- The tightness of the grip on the handles.
- And the tool is being used as intended by its design and these instructions.
This tool may cause hand-arm vibration syndrome if its use is not adequately
managed.
WARNING: identify safety measures to protect the operator that are based on
an estimation of exposure in the actual conditions of use (taking account of all
parts of the operating cycle such as the times when the tool is switched off and when
it is running idle in addition to the trigger time).

6 kg SDS-MAX ROTARY HAMMER
Note. The use of other tools will reduce the users’ total working period on this tool.
Helping to minimise your vibration exposure risk
ALWAYS use sharp chisels, drills and blades.
Maintain this tool in accordance with these instructions and keep well lubricated
(where appropriate)
Avoid using tools in temperatures of 10°C or less (or where operation at low tempera-
tures is unavoidable use appropriate clothing and gloves to keep warm and dry.)
Plan your work schedule to spread any high vibration tool use across a number of
days.
Health Surveillance
All employees required to make regular and routine use of powered had-tools should
be part of an employers health surveillance scheme to help identity any vibration
related diseases at an early stage, prevent disease progression and help employees
stay in work.
ACCESSORIES
Auxiliary handle 1pc
Depth gauge 1pc
Tube of grease 1pc
Cleaning cloth 1pc

10
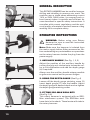
GENERAL DESCRIPTION
This ROTARY HAMMER can be used for hammer
drilling and chiselling in masonry etc. work. The
machine uses a single phase alternating current
110V or 230V, 50Hz motor, its compact and ro-
bust format makes it versatile and efficient for
uses described in specific safety instructions. It
complies with current regulations and the opti-
mum quality of materials used will ensure a long
working life in complete safety.
OPERATION INSTRUCTIONS
WARNING: Before using your Rotary
Hammer be sure to read the instruction
manual carefully.
Note: Make sure the hammer is isolated from
the mains supply before fitting accessories. Be-
fore undertaking any maintenance or operations
on the rotary hammer isolate the plug from the
power supply.
1. AUXILIARY HANDLE (See Fig. 1, 2, 3)
Adjust the position of the auxiliary handle by
turning the grip anti-clockwise to loosen the col-
lar to suit application and add the depth gauge
(4) if required.
Always use the auxiliary handle where possible
to gain extra control and to prevent fatigue.
2. USING THE DEPTH GAUGE (See Fig. 4)
Loosen off the depth gauge retaining screw (3)
insert depth gauge (11) into the handle. Adjust
the depth gauge to desired depth and re-tighten
the depth gauge retaining screw.
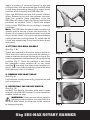
3. FITTING SDS-MAX DRILL BITS
(See Fig. 5, 6)
This rotary hammer is equipped with an SDS-
Max attachment system. The SDS-Max tools
have slots in the shank. These locate with tabs in
the rotary hammer.
Fig. 1
Fig. 2
Fig. 3
Fig. 4

6 kg SDS-MAX ROTARY HAMMER
Apply a coating of universal grease to the end
of the bit that is to be inserted into the SDS-Max
chuck. Keep the locking sleeve (2) in upper (front)
position while inserting the SDS-Max bit.
Place the SDS-Max bit into the spindle without
effort. Rotate the bit until the grooves coincide.
After the grooves have coincided, push the
SDS-Max bit down (until the fixing mechanism
produces an audible “click”). Check the proper
fixing of the SDS-Max bit by pulling it strongly
outwards.
Note: The SDS-Max bit needs to be inserted in a
specific way to ensure it locks into the chuck. To
check if it is properly inserted attempt to pull the
bit out of the chuck. If it can be removed without
pulling back the locking sleeve (2), rotate the bit
a little and repeat step 3 until the bit locks firmly
into place.
4. FITTING SDS-MAX CHISELS
(See Fig. 7, 8)
These are inserted in the same way as drill bits.
Once the bit is locked in place the bit can be ro-
tated to the best position for the job in hand. Ro-
tate the operation mode selector (6) to adjusting
position (Fig 7). Once the position is set rotate
the operation mode selector (6) to the chisel
position , ensuring that the button latches cor-
rectly. Then turn the bit slightly by hand left wise
and right wise until it is locked.
5. REMOVE SDS-MAX TOOLS
(See Fig. 9)
Pull back the locking sleeve (2), grasp the bit and
pull straight out.
6. OPERATING THE ON/OFF SWITCH
(See Fig. 10)
Holding the Rotary Hammer with both hands
and press the ON/OFF switch (7) in for operation,
release switch to stop.
WARNING: If the hammer/chisel selector
cannot go into position, turn the drill bit in
the SDS-Max chuck to allow the mode selector
to engage properly.
Fig. 5
Fig. 7
Fig. 6
Fig. 8

12
Before operating, select required mode by align-
ing symbol on switch with arrow. Ensure selec-
tor is locked in position. It could cause a hazard if
the selector switch is not firmly locked.
Note: In cold weather or when the tool has not
been used for a long time, operate the rotary
hammer for approximately 3 mins. under no
load before Hammer Drilling or Chiselling.
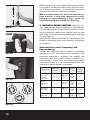
7. VARIABLE SPEED CONTROL (See Fig. 11)
The speed of the Rotary Hammer is adjusted by
the variable speed control (8) this sets the maxi-
mum/minimum speed and impact rate for the
drill, with ‘A’ at the lowest speed/impact rate and
‘G’ the highest.
High Power Mode (position 8) should only be
used for chiselling concrete or when using break
through bit.
Selecting the speed, frequency and
impact energy
Rotate the regulator (8) to choose a position
appropriate for the processed material. The
constant electronics maintain the speed, the
frequency and the impact energy constant, in-
dependently of the load, thus ensuring steady
operation mode. It is recommended to use the
operation modes listed in the table.
Application
Regulator
position
Rotation
speed
Impact
rate
Single
impact
energy
Render /
Light con-
struction
materials
A – B
200–225
min
-1
1900–
2100
min
-1
4 J
Bricks/
Chiselling
tiles
C – D
250–275
min
-1
2350–
2600
min
-1
6–7 J
Drilling in
concrete
E – F
300–325
min
-1
2850–
3050
min
-1
8–9 J
Chiselling
concrete
G
3300
min
-1
11 J
Fig. 10
Fig. 11
Fig. 12
1) 2)
3)
Fig. 9

6 kg SDS-MAX ROTARY HAMMER
8. OPERATION MODE SELECTION
(See Fig. 12)
This must only be adjusted when the ON/OFF
switch (7) has been released and the drill is not
rotating.
Rotate mode selector switch (6) and rotate the
switch to select
1) Hammer drilling – hammer drilling in con-
crete, stone etc.
2) Chiselling – chiselling/breaking in concrete
and masonry.
3) Central Adjusting Position – adjusting the
chisel position. Insert and fix the chisel in the
best position for the job in hand and then re-
set mode switch (6) to Chisel Position.
Note. During each switching between opera-
tion modes turn the bit slightly by hand left
wise and right wise until it is locked.
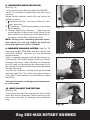
9. HAMMER DRILLING ACTION (See Fig. 13)
Use good quality SDS-Max drill bits. Select the
‘Hammer drilling’ position on the operation
mode selector.
Apply moderate pressure during operation (ap-
proximately 100-150N)! Higher pressure will not
increase efficiency when drilling or chiselling,
but will lead to decreasing the operation life of
the machine and shortening the period between
routine servicing.
This Rotary Hammer is fitted with an overload
warning light (Fig. 14), which will glow continu-
ously red, if the machine is overloaded by more
than 30%.
The machine must not be operated continuous-
ly in this mode.
10. BUILT-IN DUST PROTECTION
(See Fig. 15)
The protective ring (1) preserves the tool socket
from dirt during operation. While inserting tool
bits, take care not to damage the protective
ring.
Fig. 15
Fig. 16
Fig. 13
Fig. 14

14
11. REPLACE A DAMAGED PROTECTIVE
RING IMMEDIATELY!
(See Fig. 16)
To replace the protective ring, pull back the lock-
ing sleeve (2) grasp the protective ring and pull
it towards you at an angle. Place the new protec-
tive ring onto the spindle and press home hard.
12. SERVICE INDICATOR (MAINTENANCE
REQUIRED) (See Fig. 17)
When the red light-emitting diode (10) begins to
blink while the machine operates normally, re-
placement brushes will be needed.
After approximately 8 hours further operation,
the brushes are worn out completely and the
safety switch actuates. The Machine will stop
and the red diode light will blink constantly. Take
the machine to an authorised repair agent for
new brushes and preventative maintenance.
If the machine does not work before the 8-hour
warning period is over and the warning Red light-
emitting diode (10) keeps blinking, this probably
indicates the motor is damaged. If there is no
light indicator showing and the machine does
not operate, this could mean that there is no
power supply to the switch and either the auto-
matic switch or the power cord is faulty.
13. PREVENTIVE MAINTENANCE
This Power tool should be sent periodically to a
ERBAUER authorised service agent for preven-
tive maintenance, which will lengthen the life of
the machine.
Check 1
After approximately 70 hrs use, the machine
should be evaluated and if necessary repaired.
Check 2
After approximately 140 hrs use or the brushes
wearing out. The machine shall be cleaned thor-
oughly evaluated for potential and ascertained
faults repaired (brushes and O ring seals should
be replaced).
Check 3
After approximately 250 hrs use or the brushes
Fig. 17

6 kg SDS-MAX ROTARY HAMMER
wearing out. The machine shall be cleaned thor-
oughly evaluated for potential and ascertained
faults repaired (brushes and O ring seals should
be replaced).
Check 4
After approximately 350 hrs use or the brushes
wearing out. The machine shall be cleaned thor-
oughly evaluated for potential and ascertained
faults repaired (brushes and O ring seals should
be replaced).
14. CHISELLING ACTION
Use good quality SDS MAX chisels. Select the
‘Chiselling’ position on the operation mode se-
lector. This Rotary Hammer is suitable for chisel-
ling and demolishing.
CAUTION! Care should be taken if asbes-
tos is suspected of being drilled or chis-
elled. This is highly dangerous to the user and
people in the vicinity and professional help
should be sought for its removal and disposal.
15. OVERLOAD CLUTCH
The overload clutch will actuate when a certain
torque level is reached. The motor will disen-
gage from the output shaft. When this happens,
the bit will stop turning. As soon as the overload
clutch actuates, switch off the tool immediately.
This will help prevent premature wear of the
tool.
Once the drill bit has jammed the drill must be
removed from the material before restarting.
16. CHISEL AND DRILL BITS
Do not use damaged/chipped/blunt drill bits. In-
spect drill bits and chisel bits regularly for sign
of damage and sharpness and replace where
necessary.
17. SAFETY PRECAUTION FOR USING THE
ROTARY HAMMER
T hi s is a p ow e r fu l r ot ar y h a m me r. C au tio n sh oul d
be observed when operating. Dress in suitable
overalls. Safety boots are recommended at all

16
times especially when using the chisel actions.
Proper safety gloves are also recommended.
When using chisel a dust mask is necessary be-
cause of the cement dust created by the action.
Note: If you see some sparks flashing in the
ventilation slots do not panic, this is normal and
will not damage the tool.
Working hints for your
rotary hammer
• Always use sharp good quality drillbits and
chisels. The performance of the machine is de-
pendant on the quality of the bits used. Reduce
the pressure on the drill bit when it is about to
break through. This will prevent the drill from
jamming.
• Whendrillingalargehole,rstdrillapilothole
using a smaller drill bit.
• Always apply pressure to your drill bit in a
straight line, and if possible at right angles to
the work piece.
• When drillingholes intowalls,oors etc., al-
ways make sure that there are no live electrical
wires, or pipe work in the path of the bit. Al-
ways operate your drill using both the handle
and the front handle.
• Never change the operating mode whilst the
drill is running.
• When usingthe productinthe hammeronly
mode, or when chiselling masonry, make sure
that you wear safety glasses and protective
gloves.
• Do not apply excessive pressure to the tool
when chiselling. Excessive force does not
speed up the work.

6 kg SDS-MAX ROTARY HAMMER
MAINTENANCE
There are no user serviceable parts in your
power tool. Never use water or chemical clean-
ers to clean your power tool. Wipe clean with a
dry cloth. Always store your power tool in a dry
place. Keep motor ventilation slots clean. If you
see some sparks flashing in the ventilation slots,
this is normal and will not damage your power
tool.
If the supply cord is damaged, it must be re-
placed by a special cord or assembly available
from the manufacturer or its service agent.
TROUbLESHOOTING
If your rotary hammer will not operate, check the
power at the mains plug.
If the drill is not drilling properly, check the drill
bit for sharpness, replace drill bit if worn.
If a fault cannot be rectified return the rotary
hammer to an authorized dealer for repair.
ENVIRONMENTAL PROTECTION
Waste electrical products should not be
disposed of with household waste. Please
recycle where facilities exist.
For further information visit
www.recycle-more.co.uk

18
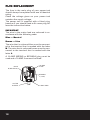
PLUG REPLACEMENT
The fuse in the main plug of your power tool
should always be replaced with one of identical
rating.
Check the voltage given on your power tool
matches the supply voltage.
The power tool is supplied with a fitted plug,
however if you should need to fit a new plug fol-
lows the instruction below.
IMPORTANT
The wire in the mains lead are coloured in ac-
cordance with the following code:
Blue — Neutral
Brown — Live
The wire that is coloured blue must be connect-
ed to the terminal that is marked with the letter
N. The wire that is coloured brown must be con-
nected to the terminal that is marked with the
letter L.
A 10 AMP (BS1363 or BS1363/A) plug must be
used and a 10 AMP fuse must be fitted.
CABLE GRIP
BROWN
L (LIVE)
10 AMP
FUSE
BLUE
N (NEUTRAL)
OUTER
SLEEVE
Page is loading ...
Page is loading ...
Page is loading ...
Page is loading ...
-
 1
1
-
 2
2
-
 3
3
-
 4
4
-
 5
5
-
 6
6
-
 7
7
-
 8
8
-
 9
9
-
 10
10
-
 11
11
-
 12
12
-
 13
13
-
 14
14
-
 15
15
-
 16
16
-
 17
17
-
 18
18
-
 19
19
-
 20
20
-
 21
21
-
 22
22
-
 23
23
-
 24
24


Ask a question and I''ll find the answer in the document
Finding information in a document is now easier with AI
Related papers
-
 Erbauer ERF437SDS Original Instructions Manual
-
 Erbauer ERB30Y User manual
-
 Erbauer ERB385DRL Original Instructions Manual
-
 Erbauer ERB567DRH User manual
-
 Erbauer ERB575DRH Original Instructions Manual
-
 Erbauer ERB30Y User manual
-
 Erbauer ERB565DRL Original Instructions Manual
-
 Erbauer ERA563DRL Original Instructions Manual
-
 Erbauer ERB474HT User manual
-
 Erbauer ERB015SDS Owner's manual


Other documents
-
Ryobi ERH710RG Owner's Operating Manual
-
Worx WX333 Safety And Operating Manual
-
 Total TH110286 Owner's manual
-
Makita HR5211C Datasheet
-
Rockwell Shop Series User manual
-
-
Ronix 2732 User manual
-
-
-
Parkside PBH 1500 F6 Original Instructions Manual
