Uniden G455 Owner's manual

Category
Security cameras
Type
Owner's manual

This manual is also suitable for

1
Video Surveillance System
G766 Users Guide
CUSTOMER CARE
At Uniden®, we care about you!
If you need assistance, please do NOT return this product to your place of purchase. Our customer
care specialists are available to serve you.
Quickly find answers to your questions by:
1. Reading your owner’s manual, included with this product.
2. Visiting our customer support website at www.uniden.com.
3. Calling our customer care specialists at 1-817-858-2900 or 1-800-658-8068.
CONTENTS
Customer Care .............................................................................................2
GETTING STARTED ......................................................................4
Using This Manual ......................................................................................4
What’s Included ...........................................................................................5
Getting to Know the Receiver and Cameras .....................................6
What the lights mean ...........................................................................6
Setting Up the Equipment ......................................................................7
Set Up the Receiver ...............................................................................7
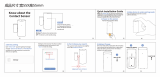
Mount the Camera Stand ....................................................................7
Attach the camera .................................................................................9
Setting Up Your System ........................................................................ 10
Camera Settings .................................................................................. 10
System Settings ................................................................................... 10
Recording Settings ............................................................................. 10
Uniden Guardian Software Operation Overview .................. 11
Live Screen ................................................................................................. 11
What the icons Mean ......................................................................... 12
Changing How the Live Screen Displays .................................... 13
Using the PentaZoom™ Feature .................................................... 14
Using Your System .................................................................................. 15
Recording Live Video ......................................................................... 15
Playing Back Recorded Video ......................................................... 15
Adding New Cameras ........................................................................ 16
Uniden Guardian Screen Descriptions ................................... 18
Overview ..................................................................................................... 18
Uniden Guardian Settings Screen...................................................... 18
Camera Setup Screen ............................................................................. 20
Pairing ..................................................................................................... 20
Camera On ............................................................................................. 21
Recorder Setup Screen ...................................................................... 22
Network Setup Screen ....................................................................... 24
Alarm Setup Screen ............................................................................ 27
System Setup Screen .............................................................................. 29
System Upgrade .................................................................................. 34
Language ............................................................................................... 34
Quick Tips ................................................................................................... 35
Remote Access ......................................................................... 36
Overview ..................................................................................................... 36
System Requirements ........................................................................ 36
Connecting to the Internet .............................................................. 36
Connecting to the Intranet (Home network) ............................ 37
Setting up a Portal Account ................................................................. 37
Enter the UID Code ............................................................................. 39
Enter Security Code ............................................................................ 39
Record Video ......................................................................................... 40
Take A Snapshot .................................................................................. 40
Downloading Apps ................................................................................. 40
Android
TM
............................................................................................... 40
iPhone® ................................................................................................... 42
Maintaining Your System ....................................................... 45
Upgrading your Uniden Guardian Firmware ................................. 45
Taking Care of Your Hardware ............................................................ 45
Receiver .................................................................................................. 45
Cameras .................................................................................................. 45
Additional Information ........................................................... 48
Product Specications ........................................................................... 48
Lithium-Polymer Battery Warning ......................................... 49
Recycling and Disposal Information ...................................... 49
FCC Compliance Information ................................................. 50
Part 15 Compliance Statement ...................................................... 50
RF Exposure Information .................................................................. 50
IC Compliance Information ..................................................... 51
Radio Equipment Notice .................................................................. 51
CE Compliance Information .................................................... 51
One-year Limited Warranty .................................................... 51
Uniden surveillance products are not manufactured and/or sold with the intent to be used for illegal purposes. Uniden
expects consumer’s use of these products to be in compliance with all local, state and federal law. For further information
on video surveillance and audio recording legal requirements, please consult your local, state and federal law.
© 2012. All rights allowed by law are hereby reserved.
4
GETTING STARTED
USING THIS MANUAL
This manual is set up in six main sections:
Getting Started. This section describes your hardware and how to physically set it up.
Uniden Guardian™ Software Operations Overview. This section lists basic operations in an
abbreviated format. It references screen details in the third section.
Uniden Guardian Screen Descriptions. Here you will find detailed descriptions of each screen
and how it is used.
Remote Access. This section tells you how to connect your surveillance system to the internet
and access it from your PC or other devices.
Maintaining Your System
Solving Problems
5
WHAT’S INCLUDED
You should have the following items:
G7 Receiver and Cradle GC45 Camera (2) Stand (2)
AC Adapter (3)
Antenna (2)
Not Shown: Mounting screws, Ethernet cable, 2 extension cords, and SD Card.
If any items are missing or damaged, contact our Customer Care Line immediately.
Never use damaged products!
6
GETTING TO KNOW THE RECEIVER AND CAMERAS
Receiver
Power Dock
Data Cable
Connection
AC Power
Connection
Power
On/O
SD slot
AC Power
Connection
Receiver
(back/side)
Cradle
Pull-Out
Stand
Reset
Antenna
Front view Back view
Power status
Link status
Light sensor
Antenna
connector
Power
pigtail
Power/Pair
button
Microphone
WHAT THE LIGHTS MEAN
Light State What it means
Power
status
On
(Red)
The camera is on.
Off The camera is off.
7
Light State What it means
Link
status
Flashing The camera is in pairing mode.
On
(Green)
The camera is connected to the receiver.
Off The camera is in standby.
SETTING UP THE EQUIPMENT
SET UP THE RECEIVER
1. If you are using the receiver as a stand-alone unit, flip out the stand on the back of the receiver,
and extend the antenna. Connect an AC adapter to the power input on the side of the receiver.
If you are using the receiver in the cradle, insert the receiver into the cradle and connect an AC
adapter to the input on the back of the cradle.
2. Connect the other end of the adapter to a 120 volt AC (standard indoor) power outlet.
3. Press and hold the
POWER
button on the top of the receiver for 3 - 4 seconds to power it up.
4. The receiver displays the Uniden
Welcome
screen for a few seconds and then transitions to the
LIVE view.
The screen remains dark until the cameras are powered up.
MOUNT THE CAMERA STAND
GENERAL GUIDELINES
The Uniden Guardian GC45 cameras included with your receiver are weatherproof and have an
IP66 rating. Water can be sprayed on them and they will still work; however, the cameras cannot be
submerged underwater.
Although the cameras can be exposed directly to the rain, it is recommended that, if they are used
outdoors, they be mounted under some type of cover like a patio overhang or eave. As rainwater
drops start to dry on the camera glass, it can create spots that will reflect the light from the infrared
LEDs used for night vision, thus causing lower quality video.
8
Also, as dust, grime, and cobwebs accumulate on the camera glass, they can reflect light from the
infrared LED and might lower video quality. Periodically clean the lens glass with a soft cloth.
PLACEMENT CONSIDERATIONS
Consider the following when placing cameras:
The clearest line-of-sight between the camera and monitor is best.
Walls, especially brick and concrete, shorten the transmission distance.
Placement next to windows allows better transmission.
Optimized motion detection range is 6 - 18 feet for the GC45 camera. The farther away an object
is, the less accurate the motion detection.
Avoid having a direct light source in the view of the camera, including street lights, ceiling or
floor lamps, spotlights in the driveway, etc.
Rainfall, pool water ripples/reflections, tree/shrub leaves blowing in the wind - and the shadows
they create - can generate motion detection false alarms.
You can mount the camera with the stand on the bottom (on a wall or table-top) or on the top (on
the ceiling). When you are positioning the camera, you might want to bring the receiver along; it’s
much easier to get the camera into the right position when you have the display handy.
1. Hold the base of the camera stand where you want to mount it and mark the location of the
screw holes.
2. Use the included screws and anchors to attach the base to the wall or ceiling.
3. Before attaching the camera, tug gently on the stand to make sure it is securely in place.
9
ATTACH THE CAMERA
1. For each camera,
attach the camera
bracket to the
mounting screw.
You can attach the
stand to the top or
the bottom of the
camera as needed.
Tighten it a few
turns, then turn
the camera to face
the direction you
want.
2. Tighten the camera brace up against the camera to secure it into place.
3. Unlock the mounting post by turning the wingnut to the left a few turns.
4. Set the mounting post to the correct angle, then tighten the wingnut until the post is locked
into place.
5. Attach the antenna to the rear of the camera.
6. Connect one end of an AC adapter to the camera’s
power pigtail and plug the other end into a 120 volt
AC (standard indoor) power outlet. (If necessary,
connect the extension cord to the camera’s pigtail
and connect the AC adapter to the extension cord.)
Be sure the power plug and the connector are
tightly twisted together to avoid water leaking in.
7. Make sure the
Power status
light turns on. If it doesn’t, try reconnecting the AC adapter, and
make sure the power outlet isn’t controlled by a wall switch.
1
2
4
3
Loosen the
wingnut to
unlock the
mounting
post.
Attach the camera
to the mounting
screw and turn it
to the desired
direction.
Adjust the post to
the correct angle,
then tighten the
wingnut to lock the
post into place.
Tighten the brace against
the camera to
secure it
in place.
Antenna
Power/
Pair button
10
8. You should now have video on your Live screen.
SETTING UP YOUR SYSTEM
You can now set your cameras and system to your preferred settings.
CAMERA SETTINGS
Brightness (“Uniden Guardian Settings Screen” on page 18)
Motion Detection (“Uniden Guardian Settings Screen” on page 18)
Schedule Recordings (“Schedule Record” on page 23)
SYSTEM SETTINGS
Power Saving (“Power Saving” on page 29)
Screen Auto Lock (“Screen Auto Lock” on page 30)
Time (“Time” on page 31)
Security code (“Security Code” on page 25)
Language (default language is English; “Changing the Language” on page 34)
RECORDING SETTINGS
Motion Detection (“Motion Detection” on page 22)
Schedule Recordings (“Schedule Record” on page 23)
11
UNIDEN GUARDIAN SOFTWARE OPERATION OVERVIEW
Your receiver’s Uniden Guardian software operates through a series of screens that let you choose
groups of operations. For example, when you tap on the camera icon in the Pop-up menus, you
can set how you want the main viewing screen - called the Live screen - to display images from the
paired cameras. You can scan between cameras, show all cameras on a single screen (Quad view),
or only display a specific camera.
The Live screen lets you view the camera transmissions. It also lets you set up your screen display
and make adjustments to it. Icons on the screen itself let you monitor power and camera status.
The Uniden Guardian system always defaults to the Live screen in Quad mode after being
idle for 2 minutes while in any other system screen. This default ensures that the system is
ready to record video even if you forget to return to the Live screen. The system can only
start a recording while in Live screen mode.
LIVE SCREEN
SD card
status
Battery
status
Record
status
Camera number/
Signal strength
Pop up
menus
Pop up
menu tab
12
WHAT THE ICONS MEAN
Icon What it does
CAMERA MODE
Select how you want the Live screen to display camera input:
•Scan between cameras (5 seconds)
•Quad view (all paired cameras display)
•Full view (1 camera displays on full screen)
VOLUME
Adjust the volume level.
UNIDEN GUARDIAN
SYSTEM SETTINGS
Access the Uniden Guardian Software Operation screens or view recorded
events.
SD CAPACITY
Indicates memory capacity remaining.
BATTERY CAPACITY
Displays battery capacity. This graphic shows battery at nearly full.
CAMERA NUMBER
Displays the camera number and signal strength through the status lines to
the left of the number.
RECORD STATUS
Tap to start or stop recording for that camera
•Steady on - Not recording
•Flashing - Recording
13
Icon What it does
INTERNET
Connects your system to the Internet.
MOTION
System indicates motion detection recording in progress.
SCHEDULED
System indicates scheduled recording in progress.
POP UP MENU TAB
Opens and closes the pop up menu display.
NO SD CARD
INDICATOR
Displays red when the SD card is not present or is damaged.
CHANGING HOW THE LIVE SCREEN DISPLAYS
The Live screen displays in 2 views - Quad View or Full View. Quad View divides the screen’s image
area into 4 quadrants and displays camera video in each quadrant. If less than 4 cameras are on,
only those cameras’ video will display on the Live screen.
14
Full view displays a single camera’s video on the entire screen. If you are in Quad View, tap on the
camera quadrant you want to expand to Full View. Tap on that image to return to Quad View.
USING THE PENTAZOOM™ FEATURE
While in any camera’s full screen view, selecting the + icon on the right side of the screen enables
the PentaZoom feature. PentaZoom lets you select from 5 sections of the video image. Tap on a
section and it will digitally zoom to full screen. Tap on the video to return to full screen mode or to
go back to the PentaZoom screen, tap
.
15
USING YOUR SYSTEM
RECORDING LIVE VIDEO
1. On the Live screen, tap
for the camera to begin recording.
2. Tap it again to stop recording.
You can record from all cameras at the same time.
PLAYING BACK RECORDED VIDEO
From the pop-up menus, tap
the following icons as they
appear on the screens:
The Record List screen displays.
1. Tap on the highlighted day containing the recording you want to view or on a specific camera
to only view that camera’s recordings. The
Record List
screen displays those recordings listed in
a folder.
If you tap on a day that is not highlighted, a folder displays with no recordings listed.
2. Tap on the recording you want to view. It displays on the screen.
3. Tap on any area of the screen that does not have control icons to bring up the playback
progress bar. Tap that area again to close it.
4. While playback progress is visible, you can fast forward/rewind by dragging the playback bar
forwards or backwards.
5. When playback ends, tap to return to the Record List.
You can press the double arrow to move to the next or previous video.
16
ADDING NEW CAMERAS
Your receiver supports a total of four active cameras at a time. When you add a camera, you
have to pair it to the receiver (that is, you have “introduce” the camera and receiver so they can
communicate).
SOME THINGS TO KNOW ABOUT PAIRING CAMERAS
If a camera is already assigned to the selected channel, the receiver overwrites that camera link
with the new one.
Only pair one camera at a time! The receiver links to the first camera it detects. If two or more
cameras are in pairing mode, you can’t control which camera the receiver will detect first.
PAIR CAMERA
1. From the
Pairing Camera
screen (see “Pairing” on page 20), tap the camera image you want to
pair. A processing icon displays for a 60 second countdown.
2. During the 60 second countdown, quickly press and release the Pairing button on that
camera’s power cord (see ”Pairing” on page 20).
3. The system automatically adjusts the
Camera On
screen accordingly.
4. If you have any trouble, consult the the table on page 17.
17
TROUBLESHOOTING CAMERA PAIRING
Consult the following table for camera pairing troubleshooting suggestions:
If... Try...
the camera’s signal status icon shows no bars
•making sure the camera is plugged in and the red
LED is on.
•making sure that the camera’s antenna is
attached and the receiver’s antenna is extended.
•making sure the camera is paired to the correct
channel.
•re-pairing the camera and receiver.
the camera’s signal status icon shows one or
two bars or the video quality is poor
See “General Guidelines” on page 7 for tips on
improving video quality.
the camera won’t pair with the receiver
•making sure the camera is plugged in and the red
LED is on.
•pressing and releasing the pairing button quickly.
Do not press and hold the pairing button.
18
UNIDEN GUARDIAN SCREEN DESCRIPTIONS
OVERVIEW
This section describes the Uniden Guardian screens in detail. It provides a path to the screen being
viewed.
UNIDEN GUARDIAN SETTINGS SCREEN
From the pop-up menu, tap the
following icons as they appear
on the screens:
This screen should display:
The Uniden Guardian Settings screen highlights the Camera Setup option as the default.
Main Screen Sub Screens What it Does
Camera Setup Pairing Pairs new cameras to the receiver.
Camera on Makes the cameras visible to the monitor.
Brightness Brightens or darkens the video of that camera.
Recorder Setup Motion Detection Records when something moves in front of the
camera. Continues recording for 2 minutes. Motion
detection is on by default.
Schedule Record Set up a schedule for pre-determined recording times
and lengths.
19
Main Screen Sub Screens What it Does
Network Setup Internet Setup Select the type of internet connection to be used. (DHCP
is most common.)
Security Code Set a security code for remote access.
Network Information Displays information about your network and the receiver’s
unique UID number.
Alarm Setup Period Set a length of time for the alarm to sound.
Melody Select a melody to play for the alarm.
System Setup Power Saving Temporarily turns off the LCD after the system is idle for 2
minutes to conserve power.
Screen Auto Lock Locks the screen from further activity until the screen is
unlocked.
Time •Clock Alarm. Set an alarm.
•Time Setting. Set the current time.
•Timer. Time countdown.
Format Storage Formats/erases all the data on the SD card.
System Upgrade Upgrades the receiver firmware.
Language Changes default language setting for the receiver (English,
French or Spanish).
Quick Tips NA Provides a list of 10 common questions.
20
CAMERA SETUP SCREEN
PAIRING
Your cameras are paired to the receiver at the factory to channels 1 and 2. When you add a new
camera to your system, you have to pair it to the receiver (that is, you have “introduce” the camera
and receiver so they can communicate).
SOME THINGS TO KNOW ABOUT PAIRING CAMERAS:
If a camera is already assigned to the selected channel, the receiver overwrites that camera link
with the new one.
Only pair one camera at a time! The receiver links to the first camera it detects. If two or more
cameras are in pairing mode, you can’t control which camera the receiver will detect first.
From the pop-up menus, tap
the following icons as they
appear on the screens:
This screen should display:
1. Tap the camera image you want to pair. A processing icon displays for a 60 second countdown.
2. Press and release the Pairing button on that camera’s power cord. The 60 second countdown
will end when the pairing process is complete.
3. The system will automatically adjust the
Camera On
screen.
Use this procedure to move a camera from one channel to a different channel.
  • Page 1 1
  • Page 2 2
  • Page 3 3
  • Page 4 4
  • Page 5 5
  • Page 6 6
  • Page 7 7
  • Page 8 8
  • Page 9 9
  • Page 10 10
  • Page 11 11
  • Page 12 12
  • Page 13 13
  • Page 14 14
  • Page 15 15
  • Page 16 16
  • Page 17 17
  • Page 18 18
  • Page 19 19
  • Page 20 20
  • Page 21 21
  • Page 22 22
  • Page 23 23
  • Page 24 24
  • Page 25 25
  • Page 26 26
  • Page 27 27
  • Page 28 28
  • Page 29 29
  • Page 30 30
  • Page 31 31
  • Page 32 32
  • Page 33 33
  • Page 34 34
  • Page 35 35
  • Page 36 36
  • Page 37 37
  • Page 38 38
  • Page 39 39
  • Page 40 40
  • Page 41 41
  • Page 42 42
  • Page 43 43
  • Page 44 44
  • Page 45 45
  • Page 46 46
  • Page 47 47
  • Page 48 48
  • Page 49 49
  • Page 50 50
  • Page 51 51
  • Page 52 52

Uniden G455 Owner's manual

Category
Security cameras
Type
Owner's manual
This manual is also suitable for

Ask a question and I''ll find the answer in the document

Finding information in a document is now easier with AI