
TechGuard
®
Charging Lockers
User Guide
ver. L15TGUGV1
About Your Product
What's in the Box
1-Bay
TechGuard Charging Locker 1-Bay
Region-specific power cord(s)
2 Administration keycards, programmed for this TechGuard Charging Locker
1 user-applied instruction decal
1 Warranty hang-tag
1 Bretford Warranty Statement
"What's in the Box" page
5-Bay
TechGuard Charging Locker 5-Bay
Region-specific power cord(s)
2 Administration keycards, programmed for this TechGuard Charging Locker
1 user-applied instruction decal
1 Warranty hang-tag
1 Bretford Warranty Statement
"What's in the Box" page
10-Bay
2 TechGuard Charging Locker 5-Bay
1 locker stacking bracket
1 24-inch mounting pedestal with assembly instructions
2 IEC to IEC power cables
1 IEC Y-Plug power adapter
Region-specific power cord(s)
2 Administration keycards, programmed for this TechGuard Charging Locker
1 user-applied instruction decal
1 Warranty hang-tag
1 Bretford Warranty Statement
"What's in the Box" page
Before You Begin
Important Safety Notice
Each TechGuard Charging Locker 10-Bay unit includes a floor mounting kit and wall anchor. The
equipment is to be secured to the building structure before operation.
Additional safety information can be found in the Safety section of this User Guide.
Administration Keycards
Included with the TechGuard Locker are two administration keycards, one (1) access and one (1)
reset. These cards only allow access to the TechGuard Locker in which they are included.
Please pay close attention to the location of these keycards and keep them in a secure location.
For additional information view the Administration Keycard section of this User Guide.
Product Registration
Please take a few minutes to register your product with Bretford. With registration, you will be
able to:
Order additional sets of administration cards. (One additional set of administration cards is
available at no cost with product registration.)
Order mounting hardware for 1-bay and 5-bay models.
Receive product updates and support.
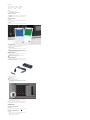
Product Overview
About Your New TechGuard Charging Locker
Available in 1-Bay, 5-Bay, and 10-Bay models, the Bretford
®
TechGuard Charging Locker
provides individual locking storage and charging for your mobile devices. Each bay of the locker
can accommodate up to two (2) USB devices and one (1) AC device.
1. TechGuard Charging Locker (5-Bay Unit Pictured)
2. Digital Keypad
3. Charging Bay
4. JumpStart access
Mounting TechGuard Lockers
TechGuard Charging Lockers can be mounted or anchored to a floor, wall, counter, or under a
counter.
1-Bay
Surface Mount, Under-Counter Mount
Surface and under-counter mounting hardware
available at no charge by contacting Bretford.
If you have registered your product , you can
make this request online.
5-Bay
Surface Mount, Wall Mount
Surface and wall mounting hardware available
at no charge by contacting Bretford.
If you have registered your product , you can
make this request online.
10-Bay
Floor Mount, Wall Anchor
The 10-Bay TechGuard Locker models
includes a floor mounting and wall anchor kit.
WARN ING:The equipment is to be secured to
the building structure before operation.

Technical Specifications
Size and Weight
Model 1-Bay 5-Bay 10-Bay
Dimensions
19 x 19 x 4.75 in
48.3 x 48.3 x 12.x cm
19 x 19 x 21 in
48.3 x 48.3 x 53.4 cm
19 x 19 x 67 in
48.3 x 48.3 x 53.4 cm
Weight
25 lbs
11.3 kg
86 lbs
39.0 kg
217 lbs
98.4 kg
Charging
Each bay of the TechGuard Locker offers:
One (1) AC outlet, supports up to a 100 W power adapter.
Two (2) USB charging ports, up to 2.4 A each.
Electrical and Operating Requirements
The TechGuard Locker has been engineered to charge all connected devices from a single
15 A AC circuit.
Maintenance-free keypad locks are powered by the internal system power supply. No
batteries required.
Administration Keycards
Access Keycard
The Access Card will open a bay but keep the current unlock code, allowing facilities personnel
to inspect contents of an in-use locker.
Reset Keycard
The Reset Card will open a bay and reset the current unlock code, in the event of a forgotten
code.
Using An Administration Keycard
1. Hold the appropriate card up to the keypad next to the locker bay you wish to access or
reset.
2. The keypad will unlock and respond with an audible confirmation.
Important Keycard Information
Each TechGuard locker includes two administration keycards, one (1) access and one (1)
reset.
Each pair of cards will only allow access to the TechGuard Locker in which they are
included. They cannot be shared with multiple 1-Bay, 5-Bay or 10-Bay units.
Always keep your keycards in a secure location.
TechGuard Accessories
The following accessories are available from Bretford for TechGuard Charging Lockers:
Lightning cable with retaining clip (1-pack / 5-pack)
Micro-USB cable with retaining clip (1-pack / 5-pack)
Jump Starter Kit, used to power Keypad and door lock during power outages
JumpStarter Accessory Kit
The optional JumpStarter Accessory Kit provides temporary power to a TechGuard Charging
Locker during a power outage, allowing users and administrators to open locker bays with the
user’s passcode, or the administrator keycards.
The JumpStarter Accessory Kit includes:
JumpStarter port opener tool
Battery pack
JumpStarter connection cable
To use the JumpStarter Accessory Kit to open a locker:
1. Use the JumpStarter port opener tool to pry open the JumpStarter port cover. Slide the
keyed end of the tool into the notch on the bottom edge of the port cover until it clicks, and
gently pry open the cover.
2. Plug the JumpStarter connection cable into the battery pack and connect to the JumpStarter
Accessory Port.
3. The battery will begin providing power to the keypads so they can be opened normally,
using the user’s passcode or an administrator keycard.
The JumpStarter Accessory Kit does not provide charging power to connected devices in each
bay.
More information about the JumpStarter Accessory Kit is available at bretford.com/techguard.
Getting Started
Installing Your TechGuard Locker
Where To Install
Before installing your TechGuard Charging Locker please read the Safety section of this User
Guide.
Powering Your TechGuard Locker
Step-By-Step
1. Locate and unwrap the region specific AC power cord provided with your TechGuard
Locker.
2. Connect the power cord to the rear side of the TechGuard Locker.
3. Connect the power cord to a dedicated 15 A circuit.

Important
Each 10-Bay TechGuard Locker requires a dedicated 15 A circuit.
Understanding the Keypad and LEDs
The Digital Keypad
To the left of each TechGuard Locker bay, you'll find the digital keypad. Each keypad offers
buttons 0-9, a Lock button and an Unlock button.
The Lock button and Unlock buttons also include LEDs to indicate the current status of an
individual bay.
The Unlock Button LED
The Unlock LED will illuminate solid green when it is available for use.
The Unlock button's LED will continue to blink for sixty (60) seconds after being pressed or
until locked with a four-digit code.
When Locked, while entering a four-digit code, the corners of the Unlock LED will
illuminate green as each number is pressed.
The Lock Button LED
While entering a four-digit code to lock a bay, the corners of the Lock LED will illuminate
red as each number is pressed.
After entering a four-digit code, the Lock LED will blink red until the Lock button is pressed
to register the code and lock the bay.
The Lock LED will illuminate solid red when devices are locked in a bay.
Courtesy Light Settings
Step-By-Step
1. Remove any connected USB cables and retention clips from the frontmost USB port.
2. Insert and press a paperclip into the top screw hole (A) above the USB port.
3. The interior LED will flash one of three patterns, wait one (1) second and then flash the next
pattern.
LED Flash Patterns
1. 1 Flash - The light will turn on only when the door is opened.
2. 2 Flashes - The light will always be on.
3. 3 Flashes - The light will always be off.
Opening a TechGuard Locker Bay
Step-By-Step
1. Press the Unlock button for the bay you wish to open. You will hear a click sound.
2. Open the door to the corresponding bay.
Important
The door will remain unlocked for five (5) seconds after pressing the Unlock button.
The Unlock button's LED will continue to blink for sixty (60) seconds after being pressed or
until locked with a four-digit code.
Charging Your Devices
Step-By-Step
1. Open a TechGuard Locker bay.
2. Place your devices into the bay and connect them to the appropriate AC outlet or USB port
located along the inside left wall.
3. Close the door.
4. Lock the Techguard Locker Bay.
Important
Each bay of a TechGuard Locker can accommodate charging of one (1) AC device and two
(2) USB devices at the same time.
Each AC outlet can accommodate up to a 100 W charging adapter.
Each USB port offers a maximum 2.4 A charge.
Locking A TechGuard Locker Bay
Step-By-Step
Your browser does not support the video tag.
1. Close the TechGuard Locker bay door.
2. Using the Keypad, enter a four-digit code.
3. Press the Lock button.
Important
As you press each digit, a corresponding corner of the Lock button LED will light up.
Once you enter a four-digit code, the Lock button will blink.
You must press the Lock button after entering a four-digit code to lock your devices.
The red Lock button LED will remain illuminated to show it is locked and in use.
Unlocking A TechGuard Locker Bay
Step-By-Step
Your browser does not support the video tag.
1. Enter your personal four-digit code.
2. Press the unlock button.
3. Open the door and remove your devices.
4. Close the door.
Important
As you press each digit, a corresponding corner of the Unlock button LED will light up.
Once you enter a four-digit code, the Unlock button will blink.
You must press the Unlock button after entering a four-digit code to unlock your devices.

Important Information
Safety
Safe Use Instructions
To Reduce the Risk of Electric Shock - User Only Indoors.
WARNING: The equipment is to be secured to the building structure before operation.
(TechGuard Charging Locker 10-Bay Unit only)
The socket-outlet shall be installed near the equipment and shall be easily accessible.
The appliance inlet or power strip is used as the disconnect device, the disconnect device
must remain readily operable.
Elevated Operating Ambient - Consideration should be given to installing the equipment
in an environment compatible with the maximum ambient temperature (Tma) of 40°C.
Reduced Air Flow - Do not block the ventilation openings so proper air flow required for
safe operation of the equipment is not compromised.
Mechanical Loading - Mounting of the equipment in the locker should be such that a
hazardous condition is not achieved due to uneven mechanical loading.
Installation Recommendations
For added safety and ease of installation, use a qualified professional to properly install the
correct hardware. Failure to secure the unit properly will void the warranty.
Only use the region specific power cable provided with your TechGuard Locker.
Never connect your TechGuard Locker to an extension cord or external surge protector.
Product Warranty
Bretford Manufacturing, Inc. ("Bretford") designs and manufactures its products to provide
dependable operation. Therefore, Bretford warrants that all products it manufactures are at date
of shipment — free from defects in material or workmanship. Any product which under normal
use fails to function within the time periods specified below, and found defective in material or
workmanship by Bretford's inspection, will, at Bretford's option be either repaired or replaced with
the same or functionally equivalent product, without charge to you, the end customer.
This warranty is inapplicable where, in the judgement of Bretford, the defect is attributable to
abnormal wear, misapplication, abuse, accident, misuse, modification or damage after shipment
from Bretford's facility, including damage caused by your failure to properly maintain the item.
TO THE EXTENT PERMITTED BY APPLICABLE LAW: (A) BRETFORD IS NOT LIABLE FOR
ANY DIRECT, INDIRECT, INCIDENTAL OR CONSEQUENTIAL DAMAGES ARISING OUT OF
THE USE OR SERVICE OF THE PRODUCT; (B) THE WARRANTY AND REMEDIES
DESCRIBED ABOVE ARE EXCLUSIVE AND IN LIEU OF ALL OTHER WARRANTIES,
EXPRESS OR IMPLIED. TO THE EXTENT PERMITTED BY LAW, BRETFORD DISCLAIMS
ALL IMPLIED AND STATUTORY WARRANTIES, INCLUDING THE IMPLIED WARRANTIES
OF MERCHANTABILITY AND FITNESS FOR A PARTICULAR PURPOSE. IF IMPLIED
WARRANTIES CANNOT BE DISCLAIMED UNDER APPLICABLE LAW, THEN SUCH
WARRANTIES ARE LIMITED IN DURATION TO THE APPLICABLE DURATION OF THIS
WARRANTY. NOTE THAT YOU MAY HAVE OTHER RIGHTS PROVIDED BY LAW.
Freight and Delivery Damage
Damaged, lost or shorted shipments are the responsibility of the motor carrier. Please
inspect all shipments promptly and report damage to the delivery carrier immediately.
Carriers require such reports within 15 days of delivery. Losses due to the failure to timely
report damage or loss is your responsibility.
Product leaving an Apple Inc. warehouse en route to the end customer is not the
responsibility of Bretford. Apple shall assume full responsibility for filing all such claims.
Making Warranty Claims
Warranty claims should be processed by the end customer contacting the Bretford
Customer Support Team. Prior to contacting Bretford, please have ready the model
number, serial number, and date of manufacture of the unit you are making the claim on.
Model number, serial number, and date of manufacture can all be found on the Bretford
label inside the product.
Bretford's Customer Support Team can be contacted by one of the following ways:
Hours of Operation: M-F, 8:00 AM - 4:30 PM CST
Telephone: 866-866-4758
Email: cst[email protected]
Certifications
Certification 1-Bay 5-Bay
10-
Bay
UL Listed
CE
C-Tick
Do Not Recycle
RoHS
Regulatory
TechGuard Locker 1-Bay Unit
TechGuard Locker 5-Bay Unit

TechGuard Locker 10-Bay Unit
UL Listing
The TechGuard Lockers have been LISTED to UL 60950-1 Safety of Information Technology
Equipment. Please contact Bretford Customer Care for a copy of our Certificate of Compliance.
FCC Compliance
This device complies with Part 15 of the FCC Rules. Operation is subject to the following two
conditions: (1) this device may not cause harmful interference, and (2) this device must accept
any interference received, including interference that may cause undesired operation.
THE MANUFACTURER IS NOT RESPONSIBLE FOR ANY RADIO OR TV INTERFERENCE
CAUSED BY UNAUTHORIZED MODIFICATIONS OR CHANGE TO THIS EQUIPMENT. ANY
CHANGES OR MODIFICATIONS MADE TO THIS DEVICE THAT ARE NOT EXPRESSLY
APPROVED BY THE MANUFACTURER MAY VOID THE USER'S AUTHORITY TO
OPERATE THE EQUIPMENT.
This equipment has been tested and found to comply with the limits for a Class A digital device,
pursuant to part 15 of the FCC Rules. These limits are designed to provide reasonable protection
against harmful interference in a commercial or business environment. This equipment
generates, uses and can radiate radio frequency energy and, if not installed and used in
accordance with the instructions, may cause harmful interference to radio communications.
However, there is no guarantee that interference will not occur in a particular installation. If this
equipment does cause harmful interference to radio or television reception, which can be
determined by turning the equipment off and on, the user is encouraged to try to correct the
interference by one or more of the following measures:
Reorient or relocate the receiving antenna
Increase the separation between the equipment and receiver
Connect the equipment into an outlet on a circuit different from that to which the receiver is
connected
Consult the dealer or an experienced radio/TV technician for help
Additional Resources
Technical Support
Contact Support
Support for TechGuard Lockers is available online via this website (registration required) or by
calling Bretford Customer Care at +1-800-521-9614.
Hours of Operation: M-F, 8:00 AM - 4:30 PM CST (-0600 GMT)
Telephone: +1-800-521-9614
Email: customerser[email protected]
Bretford, TechGuard, and the B design are trademarks or registered marks of Bretford
Manufacturing, Inc. Patents pending. All rights reserved. ©2015 Bretford Manufacturing, Inc. All
rights reserved. All other referenced product names and logos are trademarks of their respective

owners.
-
 1
1
-
 2
2
-
 3
3
-
 4
4
-
 5
5
-
 6
6


Ask a question and I''ll find the answer in the document
Finding information in a document is now easier with AI
Related papers
-
Bretford TL10C-K-US-RED User guide
-
-
-
-
-
-
-
-
-
Other documents
-
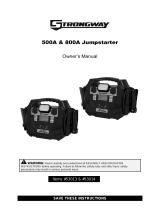 Strongway Battery Jump Starter and Portable Power Pack Owner's manual
-
Projecta PJ-IS920-2 Owner's manual
-
Chicago Electric 91045 Assembly And Operating Instructions Manual
-
-
Blaupunkt Frankfurt C70 User manual
-
-
Freecom Mobile Drive Secure User manual
-
-
ACO Familio PRO Operating Instructions Manual
-
