Page is loading ...

Instruction Manual
16", 20" RCX400™Advanced Ritchey-Chrétien Telescopes
with The Max Mount
MEADE.COM

DANGER
Read this manual carefully before
attempting to assemble the MAX
mount and attaching the OTA.
Follow steps as outlined in this
manual in order to assemble the
telescope safely.
Failure to follow steps may result
in injury or death, and/or damage
to the telescope and mount.

Telescope Features ...................................................... 4
Autostar II Features ........................................................11
Assembly ........................................................................14
Tripod Assembly........................................................14
Pedestal Assembly and Adjusting Latitude ..............14
RA Assembly ............................................................16
Dec Saddle Assembly ..............................................16
Attach Counterweights..............................................18
Low Latitude Counterweights....................................18
Attach OTA to Dec Saddle ........................................20
Attach Autostar II ......................................................21
Align Viewfinder with OTA ........................................21
Home Position and Balancing the OTA ..........................22
Balance RA Axis ......................................................20
Balance Dec Axis......................................................21
Getting Started ..............................................................24
Attach Handbox Holder ............................................24
Mounting, Focusing & Aligning the Viewfinder..........24
Focusing the Telescope ............................................24
To Change Focus Speed ....................................24
To Focus the Eyepiece ........................................25
Presets ................................................................25
To Define a Preset ............................................25
To Focus with a Microfocuser ............................25
To Focus with an RCX and a Microfocuser ......25
To Select a Preset ............................................26
To Sync on a Preset ..........................................26
Slew Speeds ..................................................................26
To Align for the First Time ..............................................27
Automatic Alignment ................................................27
Drift Align ..................................................................28
Collimation ................................................................28
Align the OTA ............................................................29
Calibrate Home ........................................................30
Basic Autostar II Operation ............................................31
Autostar II Menus ........................................................33
Menu Tree ................................................................33
Objects Menu............................................................34
Event Menu..............................................................35
Glossary Menu, Utilities Menu ..................................35
Setup Menu ..............................................................37
Hot Button Menus ....................................................40
Advanced Autostar II Features ......................................41
Adding Observing Sites ............................................41
Creating User Objects ..............................................42
Observing Satellites ..................................................43
Identify ......................................................................43
Browse ......................................................................44
Alternate Polar Alignment Methods ..........................45
To Download the Latest Autostar II Software............45
Periodic Error Correction ..........................................46
Optional Accessories......................................................47
Maintenance ..................................................................50
Specifications ................................................................51
Meade Consumer Solutions ..........................................52
Appendix A: Latitude Chart ............................................53
Appendix B: The Moon ..................................................54
Appendix C: Smart Mount ..............................................55
CONTENTS
WARNING!
Never use a Meade®
RCX400™Telescope to
look at the Sun! Looking at
or near the Sun will cause
instant and irreversible
damage to your eye. Eye
damage is often painless,
so there is no warning to
the observer that damage
has occurred until it is too
late. Do not point the tele-
scope or its viewfinder at or
near the Sun. Do not look
through the telescope or its
viewfinder as it is moving.
Children should always have
adult supervision while
observing.
® The names "Autostar," "Meade" and the Meade logo are
trademarks registered with the U.S. Patent and Trademark
Office and in principal countries throughout the world.
"RCX400 " is a trademark of Meade Instruments
Corporation.
Patents:
US 6,304,376
US 6,392,799
US 6,563,636
D 422,610
Patent Pending.
© 2006 Meade Instruments Corporation.
If you have never focused an
RCX telescope before, go to
pages 24 to 26 for detailed
information.

4
Looking at or near the Sun will cause irreversible damage to your eye. Do not point this telescope at or near the
Sun. Do not look through the telescope as it is moving.
TELESCOPE FEATURES
Components of MAX
MAX features a unique modular design that allows a couple of
individuals to assemble, either permanently or transportably, a
mount twice the size of any other commercially available mount.
The mount breaks down into a Portable Pier (tripod), Pedestal,
RA Housing Assembly, and DEC Housing assembly. Together all
of the components and an OTA assembly fit easily into a station
wagon, SUV, minivan or small truck. When assembled, quick
release, but rock solid, dovetail plates allow OTA and instrument
packages up to 250 lbs to be quickly mounted and de-mounted.
Tripod
Counterweight
Assembly
Low Latitude
Counterweight
Assembly
[Optional:
Required if within
20°of the
Equator]
Declination
Housing
Assembly
RA
Housing
Assembly
Eyepiece
Assembly
Pedestal
Assembly
Viewfinder
Assembly
Optical Tube
Assembly
(OTA)
Note:
Your telescope and
mount may look
slightly different
from the one shown
in some of the
images in this
manual. However,
your telescope will
still operate as the
one described in
this manual.

5
Looking at or near the Sun will cause irreversible damage to your eye. Do not point this telescope at or near the
Sun. Do not look through the telescope as it is moving.
Pedestal Assembly
MAX's Pedestal assembly can be configured to
cover three latitude ranges without the need of
disassembly. Together, the three ranges allow
the mount to operate anywhere on the planet.
PEDESTAL
(WEDGE)
ASSEMBLY
RA Lock
Knob
Latitude
Lock
Knobs (x4)
Dovetail
Ejector
Knob
Azimuth
Lock
Knobs (x5)
Azimuth
Adjustment
Knob
Latitude
Range
Bolts (8x)
Latitude
Scale
Azimuth
Adjust
Knob
Latitude
Adjust
Knob
Dovetail
Ejector
Knobs (2)
RA Female
Dovetail
Tripod/Pier
Interface
Plate

6
Looking at or near the Sun will cause irreversible damage to your eye. Do not point this telescope at or near the
Sun. Do not look through the telescope as it is moving.
Right Ascension Housing Assembly
The RA Housing mates to the Pedestal easily,
sliding firmly into a dovetail block that measures
over 100 square inches. When locked in place,
this broad footprint assures that your mount will
operate as a single rigid block delivering accu-
rate and repeatable pointing and tracking per-
formance. The RA Housing contains Meade's
patented Autostar II telescope control system, a
massive 13.625" pitch diameter worm gear
attached to a 3.84” diameter 6061-T6511 alu-
minum alloy main shaft supported by one 6020
Ball bearing (5.9055 OD x 3.9370 ID x 0.9449
wide) & one 6013 ball bearing (3.9370 OD x
2.5591 ID x 0.7090 wide) .
THE RA
ASSEMBLY
Declination
Lock
Knobs
Declination
Safety
Lock
Declination
Female
Dovetail
(not visible, on bottom side)
DB-25 connector
RA Male Dovetail
Control Panel
(see page 10)
Low Latitude
Counterweight plug

7
Looking at or near the Sun will cause irreversible damage to your eye. Do not point this telescope at or near the
Sun. Do not look through the telescope as it is moving.
Declination Housing Assembly
The Dec Housing mates to the RA Housing
using another huge dovetail block. The RA
Housing, DEC Housing and Pedestal are all
designed to allow you to track more than 6
degrees past meridian without interference.
This mount will let you cover the whole sky. In
addition to accepting quick change dovetail
plates, MAX has two generous wing mount plat-
forms that will allow you to attach guide scopes,
piggy back cameras, short focal length refractors
and a wide variety of secondary instruments
without interfering with Max's "all sky" design.
DEC
ASSEMBLY
DB-25 connector
Accessory
Wings (2x)
OTA Lock
Knobs (2x)
OTA Safety Lock
OTA
Female
Dovetail
Dec
Balance
Hard Stop
Bolt
Saddle
Panel

8
Looking at or near the Sun will cause irreversible damage to your eye. Do not point this telescope at or near the
Sun. Do not look through the telescope as it is moving.
Counterweights
The MAX counterweights are beautifully
crafted with sure locking, but quick
release, buttons.They allow you to quick-
ly locate balance so you can get back to
work.
MAX Tripod
The MAX mount tripod can be transported or permanently installed. It provides a wide stance
to assure that it can safely carry MAX's massive payload in all orientations, but still collapses
down to a size that is easy to handle. Its design assures that despite its wide stance, it will not
interfere with optical systems observing on the meridian. Like Max, it sets up, knocks down,
and adjusts without the need of tools.
THE TRIPOD
THE COUNTER-
WEIGHTS
course adjustment
lock lever
Safety Cap
Adjustable
Counterweights
Fixed
Counterweights
(2)
Matching
Slots
Fixed
Counterweight
Knobs (8)
Counterweight
Shaft
Counterweight
Quick Release
Buttons
fine adjustment
turnbuckle
pedestal attachment lever

9
Optical Tube Assembly
MAX is sold stand alone, or it is available bundled with Meade's 16”
RCX400™ or 20” RCX400™ Optical Tube Assemblies. RCX OTA's
integrate seamlessly with MAX. Together you get pinpoint stars from
Meade's unique Advanced Ritchey-Chrétien optical system:
• Zero expansion carbon fiber body
• Advanced Ritchey-Chrétien optics
•Electronic Collimation
• Integrated Dew Heater
• OTA fan for quick cool down
• Digital Electronic Focus with Presets
THE OTA
Looking at or near the Sun will cause irreversible damage to your eye. Do not point this telescope at or near the
Sun. Do not look through the telescope as it is moving.
Dust Cover
2"
Star
Diagonal
2"
Eyepiece
2"
Accessory
Adapter
OT
A Alignment
Bolts
(concentric)
Visual
Back
OTA
Panel
OTA
Male
Dovetail
Viewfinder
Optical
T
ube
Assembly
(OTA)

10
Looking at or near the Sun will cause irreversible damage to your eye. Do not point this telescope at or near the
Sun. Do not look through the telescope as it is moving.
Off/On USB Port AUX port
12vDC In
12VDC
Switched
12VDC
Switched
Out
HBX port
(Handbox
port)
Serial port
USB Ports
Reticle Port Focuser
HBX port
Auto Guider
Smart Accessory Ports
CONTROL
PANELS
AND PORTS
RA ASSEMBLY
CONTROL
PANEL
SADDLE
CONTROL
PANEL
RA TO DEC
JUMPER CABLE
JUMPER CABLE
BETWEEN OTA
AND SADDLE
PANEL
(use one of the
Saddle panel Smart
Accessory ports)

Fig. 2: The Autostar II Handbox.
Tour the Cosmos with Just the Push of a Button
Control of Max and RCX400 telescope models is through the operation of the standard
Autostar II system. Nearly all functions of the telescope are accomplished with just a
few pushes of Autostar II’s buttons.
Because the Autostar II system uses flash (rewritable) memory, your system will be
able to grow when new features and enhancements become available. Download the
latest satellite data, star and object catalogs, tours, serial commands list, and software
revisions, directly from the Meade website (www.meade.com).
Some of the major features of the Autostar II system are:
JAutomatically move the telescope to any of the more than 180,000 objects stored
in the object library, including:
Library # of Objects
New General Catalog (NGC): 7,840
Index Catalog (IC): 5,386
Messier Catalog (M): 110
Caldwell Catalog: 109
Named Objects: 227
Herschel Catalog: 400
Abell Catalog of Galaxy Clusters: 2,712
Arp Catalog of Irregular Galaxies: 645
Uppsala Galaxy Catalog: 12,940
Morphological Catalog of Galaxies: 12,939
General Catalog of Variable Stars: 28,484
SAO: 17,191
Hipparcos Star Catalog: 17,325
....plus more than 10,000 other objects from the Lunar 100, the Washington Star,
Gliese, Hickson, PK, Landolt, Lunar Features, and other catalogs!
AUTOSTAR II FEATURES
1
24
7
9
J
8
3
5
6
K
11
Looking at or near the Sun will cause irreversible damage to your eye. Do not point this telescope at or near the
Sun. Do not look through the telescope as it is moving.

12
Looking at or near the Sun will cause irreversible damage to your eye. Do not point this telescope at or near the
Sun. Do not look through the telescope as it is moving.
The Autostar II system provides control of virtually every telescope function. The
Autostar II handbox has soft-touch keys designed to have a positive feel. The LCD
(Liquid Crystal Display) is backlit with red LEDs (Light Emitting Diodes) for easy view-
ing in the dark. The backlit display, key arrangement, and sequential menu structure
make Autostar II extremely user friendly.
B2-Line LCD Display: This screen displays Autostar II's menus and information
about the telescope.
•Top line: Lists the primary menu.
•Bottom line: Displays other menus that may be chosen, menu options,
telescope status, or information about a function that is being per-
formed.
cENTER Key: Press to go to the next menu level or to choose an option in a menu.
The ENTER key is similar to the RETURN or ENTER key on a computer.
dMODE Key: Press to return to the previous menu or data level. The top menu
level is “Select Item." The MODE key is similar to the ESCAPE key on a comput-
er.
Note: Pressing MODE repeatedly while in the “Select Item” level moves
Autostar II to the topmost screen: “Select Item: Object.”
Note: If MODE is pressed and held for two seconds or more, information
about the telescope's status displays. When the status displays, press the
Scroll keys (7, Fig. 2) to display the following information:
• Right Ascension and Declination (astronomical) coordinates
• Altitude (vertical) and Azimuth (horizontal) coordinates
• Local Time and Local Sidereal Time (LST)
• Timer and Alarm Status
• Date
• Site coordinates
• Battery status
Press MODE again to return to the previous menu.
eGO TO Key: Press to slew (move) the telescope to the coordinates of the cur-
rently selected object. While the telescope is slewing, the operation may be abort-
ed at any time by pressing any key except GO TO. Pressing GO TO again
resumes the slew to the object. Also, press during the alignment or GO TO pro-
cedures to activate a "spiral search."
fArrow Keys: The Arrow keys have several functions. Press an Arrow key to slew
the telescope in a specific direction (up, down, left, and right), at any one of nine
different speeds. See SLEW SPEEDS, page 26. Use the Up and Down Arrow keys
to move the telescope vertically up and down. The Left Arrow key rotates the tele-
scope horizontally counterclockwise, while the Right Arrow key rotates it clockwise
(unless reversed for Southern Hemisphere use).
Also, use the Arrow keys to scroll through numbers 0 through 9 and the alphabet.
The Down Arrow key begins with the letter "A;" the Up Arrow key begins with digit
"9."
Additionally, use the Arrow keys to move the cursor across the display: Use the
Right or Left Arrow key (5, Fig. 2) to move the cursor from one number to the next
in the display.
gNumber Keys: Press to input digits 0 to 9. Each Number key also has a specif-
ic function, which is printed on each key (these are commonly known as "hot but-
tons"—see page 40):
1 SPEED: Changes the slew speeds. To operate, press Speed and then a
Number key (1 is the slowest speed, 9 is highest speed).
2 CALD (Caldwell): Press to display the Caldwell catalog on the Autostar II
handbox.
3 M (Messier): Press to display the Messier catalog library.

4 FOCUS: Toggles between two functions. The first press allows you to
change the focus and focus speed. The next press allows you to create
presets that tell the telescope where to focus.
5 SS: Press to display the Solar System library.
6 STAR: Press to display the Star library.
7 RET (Reticle): Press to display the Reticle Control menu.
8 IC: Press to display the Index Catalog library.
9 NGC (New General Catalog): Press to display the NGC catalog library.
0 LIGHT: Press to turn on and off the red utility light on the top of the hand-
box.
hScroll Keys: Press to access options within a selected menu. The menu is dis-
played on the first line of the screen. Options in the menu are displayed, one at a
time, on the second line. Press the Scroll keys to move through the options. Press
and hold a Scroll key to move quickly through the options.
The Scroll keys also control the speed of text scrolling on the Autostar II display.
When text is scrolling, press and hold the Up Scroll key for a faster display speed
and the Down Scroll key for a slower display speed.
i? Key:Press to access the "Help" file. "Help" provides on-screen information on
how to accomplish whatever task is currently active.
Press the ? key and then follow the prompts on the display to access details of
Autostar II functions in the Help feature. The Help system is essentially an on-
screen instruction manual.
If you have a question about an Autostar II operation, e.g., INITIALIZATION,
ALIGNMENT, etc., press the ? key and follow the directions that scroll on the sec-
ond line. When satisfied with the Help provided, press MODE to return to the orig-
inal screen and continue with the chosen procedure.
jCoil Cord Port: Plug one end of the Autostar II coil cord (10, Fig. 2) into this port
located at the bottom of the Autostar II handbox.
1) Coil Cord:Plug one end of the Autostar II coil cord into the HBX port (F, Fig. 1d)
of the computer control panel of the telescope and the other end into the Autostar
II coil cord port. See jabove.
1! Utility Light: Use this built-in red light to illuminate star charts and accessories
without disturbing your eye's adaptation to darkness. Press "0" to turn the light on
and off.
13
Looking at or near the Sun will cause irreversible damage to your eye. Do not point this telescope at or near the
Sun. Do not look through the telescope as it is moving.

14
Looking at or near the Sun will cause irreversible damage to your eye. Do not point this telescope at or near the
Sun. Do not look through the telescope as it is moving.
5
4
3
2
1
A Phillips screwdriver will be useful during assembly.
Refer to images pages 4 to 10 for location of various
telescope features.
Tripod Assembly
Before you pull legs out of collapsed tripod, notice the
pattern of the pins on top of the tripod (photo). Set the
legs so the leg opposite the single pin is pointing North.
Above 20° latitude (or South in Southern hemisphere)—
if less than 20°, use the Low Latitude kit; see step #24.
Set up on a surface of concrete, or if on the ground,
must be a solid surface (such as granite).
CAUTION: AVOID GRASS AND DIRT. THE MAX
ASSEMBLY WILL SINK INTO GROUND, NOT REMAIN
LEVEL AND TIP OVER, CAUSING SERIOUS INJURY
TO THE ASSEMBLY AND OBSERVERS.
Extend the legs outward.
Pedestal Assembly and Adjusting Latitude Position
Mount Pedestal onto the tripod...
CAUTION: THE PEDESTAL REQUIRES TWO PEOPLE TO
LIFT THE ASSEMBLY.
...Place the Pedestal over three Pedestal lock pins. Note
that these pins are spring-loaded and are self-locating.
ASSEMBLY
Pointing to ± 5°
of the pole

Looking at or near the Sun will cause irreversible damage to your eye. Do not point this telescope at or near the
Sun. Do not look through the telescope as it is moving.
15
9
10
11
A
7
8
Tighten (rotate) the lock knobs below the Pedestal to a
"tight" feel.
Back off the ejector knobs on the Pedestal.
Adjust legs until they are level. Adjust the turnbuckle for
fine adjustment of level.
The bubble levels will assist you.
The telescope comes set for mid-range latitudes (30° to
60°). If you need to set for low range or high range,
remove the 4 latitude bolts from each side of the
pedestal (8 total) using a supplied hex wrench (see
photo above). The pedestal should now be able to
swing freely.
Swing the pedestal so that the bolt portholes match up
with another set of bolt holes on the underneath plate
(there are three sets of bolt holes, one for each latitude
range).
Move the pedestal until it lines up your latitude tick
mark with the indicator on the latitude scale.
Replace and tighten the latitude bolts. Note: If you are
setting for low-range latitude, you will need to replace
only three bolts on each side.There isn't a fourth hole
on either side.
Latitude Range Bolts
"Porthole"
Move and line up
latitude tick mark
with indicator

12
13
14
15
A
16
THE RA ASSEMBLY
Slide the RA assembly onto the Pedestal dovetail.
CAUTION: MAKE SURE THAT YOUR FINGERS ARE
CLEAR OF THE TRACK BEFORE YOU SLIDE THE RA
ASSEMBLY INTO THE PEDESTAL TRACK. THE RA
ASSEMBLY REQUIRES TWO PEOPLE TO LIFT.
Tighten the RA assembly lock knob..
THE DEC SADDLE ASSEMBLY
Back off Dec clamp knob. Note, in the photos, the Dec
assembly is already shown as attached. However, back
off this knob before you attach the assembly.
Slide the DEC assembly in from the top......
Looking at or near the Sun will cause irreversible damage to your eye. Do not point this telescope at or near the
Sun. Do not look through the telescope as it is moving.
Fine tune the latitude adjustment using the Latitude
Adjust knob.
11
B
Latitude
Adjust
Knob

17
Looking at or near the Sun will cause irreversible damage to your eye. Do not point this telescope at or near the
Sun. Do not look through the telescope as it is moving.
15
B
16
17
18
...Slide down to the hard stop.
Slide safety pin into the hole.
Retighten the Dec clamp knob.
Plug in the RA to Dec jumper cable. Hint: You may
wish to plug into the RA connector before attaching the
DEC Assembly. Then attach the jumper cable to the
Dec assembly after it is attached. Some users may find
it difficult to reach in below the Dec assembly.

18
19
21
20
A
20
B
ATTACH COUNTERWEIGHTS
Line up a fixed counterweight's 4 bolts with the four
threaded holes in the Dec assembly base. The weights
can only be positioned with indentations lined up in a
vertical orientation.
Slide the bolts into the threaded holes and tighten each
securing knob by hand until it reaches the top. Then use
a 1/4" shaft, such as a Phillips screwdriver to turn the
knob very tight.
Screw in counterweight shaft until it reaches the hard
stop.
Using a Phillips screwdriver, tighten the screw in the
head of counterweight shaft to secure it in place.
Looking at or near the Sun will cause irreversible damage to your eye. Do not point this telescope at or near the
Sun. Do not look through the telescope as it is moving.

23
24
22
A
22
B
19
Looking at or near the Sun will cause irreversible damage to your eye. Do not point this telescope at or near the
Sun. Do not look through the telescope as it is moving.
Put on adjustable counterweights (three for 20 inch
models, two for 16 inch models). The weights can be
attached more easily if you make this a two person job.
One person holds weight and holds in button. Other
person pushes the weight up the shaft-slide up to within
one inch of the end of travel. Push counterweights up
against one another.
CAUTION: PAY ATTENTION TO YOUR HANDS AS YOU
ATTACH THE COUNTERWEIGHTS SO NOT TO PINCH
THEM DURING ASSEMBLY. ALSO TAKE CARE NOT TO
DROP COUNTERWEIGHTS. THE COUNTERWEIGHTS
CAN CAUSE SERIOUS INJURY IF DROPPED, ESPECIAL-
LY ON THE FOOT.
Screw the safety cap on the end of the shaft after the
counterweights are attached.
CAUTION: IF THE COUNTERWEIGHT(S) EVER SLIP,
THE SAFETY CAP PREVENTS THE COUNTERWEIGHT
FROM SLIDING ENTIRELY OFF THE SHAFT. ALWAYS
LEAVE THE SAFETY CAP IN PLACE WHEN THERE ARE
COUNTERWEIGHTS ON THE SHAFT.
ATTACH LOW LATITUDE COUNTERWEIGHTS
(OPTIONAL)
If your observing site is within 20° of the equator, you
must attach the optional counterweight kit. See page 4
to see overview of the assembly.
Attach the adjustable weight shaft and safety cap in the
same manner just described .

20
25
26
A
26
B
26
C
26
D
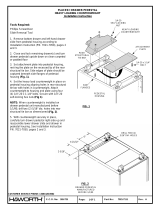
ATTACH OPTICAL TUBE TO THE DEC SADDLE
Adjust the clamps so that there is NOT a gap.
The OTA should have its dust cover attached when left
stored on the ground in an upright position.
A minimum of four people are needed to lift the optical
tube.
DANGER!: MAKE SURE THAT THE COUNTERWEIGHTS
ARE ATTACHED BEFORE PROCEEDING WITH THIS
STEP. SEE STEPS 17 THROUGH 22.
IMPORTANT! DANGER!: DUE TO THE WEIGHT AND
SIZE OF THE 16" AND 20" OPTICAL TUBES, PLEASE
USE EXTREME CAUTION WHENEVER ASSEMBLING,
DISASSEMBLING, LIFTING, TRANSPORTING OR STOR-
ING THIS PRODUCT. FOUR OR MORE PERSONS (TWO
ON EACH SIDE) SHOULD ALWAYS BE USED WHEN
ASSEMBLING OR DISASSEMBLING THE TUBE TO THE
DEC SADDLE. DISREGARD FOR THE ABOVE WARNING
COULD RESULT IN SERIOUS INJURY OR DEATH.
The tube should be lifted up over the low end (the rear)
of the assembly and slid into the dec assembly track. If
the dovetail clamps were loosened as described in step
25, you will only need to lift the tube halfway over the
track in order to slide it in, that is, the tube will fit into the
track about halfway down, instead of having to slide it in
from the high end.
Looking at or near the Sun will cause irreversible damage to your eye. Do not point this telescope at or near the
Sun. Do not look through the telescope as it is moving.
no gap
/