Page is loading ...

It is the owner and/or operator’s responsibility to study all WARNINGS, operating, and maintenance instructions
contained on the product label and instruction manual prior to operation of this unit.The owner/operator shall retain
product instructions for future reference.
#540020
Air Nailer/Stapler Operation Manual
#691164
#691165

The owner and/or operator is responsible for maintenance, maintaining all decals or warning labels and
while in use, maintaining the unit in good working order. If the owner and/or operator is not fluent in
English, French or Spanish, the product warnings and instructions shall be read and discussed with the
operator’s native language by the purchaser/owner or his designee. Make sure that
the operator comprehends its contents. Safety information shall be emphasized and
understood prior to usage.The air nailer/stapler shall be inspected per the operating
instructions.
Users of this air nailer/stapler must fully understand these instructions. Each person
operating this air nailer/stapler must also be of sound mind and body and must not be
under the influence of any substance that might impair their vision, dexterity, or judg-
ment.
Protect yourself and others by observing all safety information.
Failure to comply with instructions could result in personal injury and/or property damage!
If you encounter any problems or difficulties,
please contact our customer service department at:
1-800-423-3598
1-310-522-9008
1-310-522-9066 Fax
SAFETY ALERT
Read and understand this entire instruction manual
before attempting to assemble, install, operate or maintain this air
nailer/stapler. Failure to comply with the instructions may result in serious
personal injury and/or property damage!
The following signal words are used to emphasize safety warn-
ings that must be followed when using this air nailer/stapler:
Indicates an imminently hazardous situation that, if not avoided, WILL result
in death or serious injury.
Indicates a potentially hazardous situation that, if not avoided, COULD
result in death or serious injury.
Indicates a potentially hazardous situation that, if not avoided, MAY result
in minor or moderate injury.
Indicates important information, which if not followed, MAY cause damage
to equipment.
NOTICE
CAUTION
WARNING
DANGER
WARNING
2

3
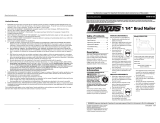
NAILER/STAPLER SPECIFICATIONS
Compressed Air:
Maximum permissible operating pressure: 120PSI (0.8 MPa)
Recommended operating pressure range: 60-100PSI (0.4-0.7 MPa)
Magazine Capacity: Approx.100 Brad Nails/Staples
Rotatable
Exhaust Cap
Work Contact
Element (WCE)
Discharge Area
Nail/Staple Loading Area
Magazine
Trigger
Air and
Oil Inlet
Quick
Release
Latch

4
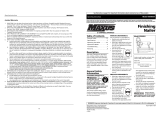
NAIL/STAPLE INFORMATION
Fastener Gauge 18 Gauge Brad Nails 18 Gauge Crown Staples
Fastener Lengths 5/8"-2" 3/8"-1"
Quick
Plug
Quick Plug
(Optional)
Oiler
Air
Hose
Filter
Quick
Coupler
(Optional)
Regulator
Quick
Coupler
Air Hose
Recommended Hookup
NAILS:
Can use brad nails from the following branded air-powered brad nailers: Bostitch
®
BT125sk-2, Campbell Hausfeld
®
NB0030, Paslode
®
T125-F18, Porter Cable
®
BN125 and Senco
®
Finish Pro
®
15.
STAPLES:
Can use staples from the following branded air-powered staplers: Porter Cable
®
NS100A and Senco
®
SLS18.
Bostitch
®
is a registered trademark of The Stanley Works
Campbell Hausfeld
®
is a registered trademark of Campbell Hausfeld/Scott Fetzer Co.
DeWalt
®
is a registered trademark of Black & Decker Corp.
Paslode
®
is a registered trademark of Illinois Tool Works Inc.
Porter Cable
®
is a registered trademark of Porter-Cable Corp.
Senco
®
is a registered trademark of Senco Products, Inc.
Finish Pro™ is a trademark of Senco Products, Inc.

UNPACKING & INSPECTION
Do not operate this air nailer/stapler if damaged during shipment, handling or mis-
use. Damage may result in bursting, which can cause serious injury or property damage.
All damaged parts must be repaired or replaced as needed prior to operating this air nailer/stapler.
If you have any questions, or require assistance with damaged or missing parts,
please contact our
customer service department at:
1-800-423-3598
1-310-522-9008
1-310-522-9066 Fax
Please have the serial number, model number, date of purchase, and parts list, (with missing parts
indentified), available for reference when calling
SAFETY WARNINGS
READ ALL SAFETY WARNINGS BEFORE
USING AIR NAILER/STAPLER
General Safety Warnings:
• Keep work area clean. Messy areas and cluttered workbenches invite personal injury, and/or property
damage.
• Keep children and visitors away. All children should be kept away from the work area. DO NOT let chil-
dren handle the air nailer/stapler. Maintain a safe distance for any person near the work area.
• Operating any tools or equipment under the influence of drugs, alcohol, or medication can cause per-
sonal injury to yourself and others.
• Wear proper apparel. Remove your jewelry before using air nailer/stapler. Do not wear loose clothing,
necklaces, rings, bracelets, or other jewelry, which may get caught in moving parts. Nonskid footwear
and electrically conductive gloves are highly suggested while working.Wear protective hair covering to
contain long hair.
• Protect your eyes.The operation of any air tool can result in foreign objects being thrown into the eyes,
which can result in severe eye damage. Always wear eye protection with side shields that meets ANSI
Z28.1 specifications during air nailer/stapler operation. Eyeglasses are not always safety glasses.
• Be responsible for your hearing. Wear hearing protection during use.
• Do not overreach. Proper footing and balance is a must
at all times while using tools. Unstable support may lead
to personal injury.
OPERATOR AND OTHERS IN THE
WORK AREA MUST WEAR SAFETY GLASSES WITH
SIDE SHIELDS.THESE SAFETY GLASSES MUST CON-
FORM TO LOCAL REGULATIONS.
• Keep fingers AWAY from the trigger when not driving fasteners to avoid acciden-
tal firing.
• Never use near oxygen or other bottled gasses. Explosion may occur. NEVER
WARNING
WARNING
5

USE COMBUSTIBLE GASSES OR ANY OTHER REACTIVE GAS AS A POWER
SOURCE FOR THIS NAILER/STAPLER. Explosion and serious personal injury
could occur.
• Use clean, dry, regulated, compressed air at 60 to 100 PSI (0.4 to 0.7 MPA). Do
not connect the nailer/stapler to any pressure source that may exceed 120 PSI
(0.8 MPA).
• Only use air hose that is rated for a maximum working pressure of at least 150
PSI (1.0 MPA) or 150% of the maximum system pressure, whichever is greater.
• Always disconnect the nailer/stapler to the air supply before loading fasteners.
• Disconnect nailer/stapler from the air supply hose before unloading fasteners, performing nailer/stapler
maintenance, clearing a jammed fastener, leaving work area, moving nailer/stapler to another location,
or handing the nailer/stapler to another person.
• Always assume that the air nailer/stapler is loaded with fasteners. Never point air nailer/stapler at any
part of your body or at others in the work area.
• Never use nailer/stapler if safety, trigger or springs are inoperable, missing or damaged. DO NOT alter
or remove safety, trigger or springs. Make sure that there is free movement of the trigger and safety
mechanism before each use.
• Do not load fasteners with trigger or safety depressed to prevent unintentional firing of a fastener.
• Do not drive fasteners close to the edge of the work piece.The work piece is likely to split allowing fas-
teners to fly free or ricochet causing personal injury.
• Fire fasteners into work surface only. Never fire into materials that are too hard
to penetrate. DO NOT drive fasteners in on top of other fasteners or with the
nailer/stapler at too steep an angle as the fasteners may ricochet causing per-
sonal injury.
• Always carry a fastener-driving nailer/stapler by the handgrip and never by the
trigger or with the trigger activated. Never carry the nailer/stapler by the hose or
pull the hose to move the nailer/stapler.
OPERATING INSTRUCTIONS
READ ALL OPERATING INSTRUCTIONS BEFORE
USING AIR NAILER/STAPLER
Preparing the Nailer/stapler for Operation:
• This air nailer/stapler requires lubrication for proper operation and service life. Failure to lubricate nail-
er/stapler properly will result in damage to the nailer/stapler and void your warranty.
• Lubricate before first use and before each work session thereafter.
• Disconnect the air supply from the nailer/stapler before lubricating.
• Add a few drops of nailer/stapler 30W non-detergent oil into the inlet.Wipe off excessive oil at the
exhaust. Excessive oil will damage the o-rings of the nailer/stapler. Never use detergent oil, or oil
additives. Do not use air oi, as it contains solvents which will damage the nailer/stapler’s internal com-
ponents.
• Note: If an in-line oiler is used, manual lubrication through the air inlet is not required on a daily basis.
6

7
Checking the Nailer/Stapler for Proper Operation:
BEFORE EACH USE, YOU MUST CHECK FOR THE PROPER OPERATION OF
THE WORK CONTACT ELEMENT (WCE).
• The WCE is the mechanism on the nailer/stapler that is pressed into the work piece prior to pulling the
trigger. It must work properly to prevent accidental discharge of fasteners.
• The WCE on the nailer/stapler is held in place by a latch. Ensure latch is properly closed and locked
before proceeding.
• Disconnect the nailer/stapler from the air supply.
• Remove all fasteners from the nailer/stapler.
• Make sure the WCE moves up and down without sticking or binding. If sticking or binding occurs, dis-
continue use of the nailer/stapler until proper service and/or repairs are performed
• Connect the air supply to the nailer/stapler.
• Press the WCE against the work piece without pulling the trigger.The nailer/stapler must not operate.
• Hold the nailer/stapler clear of the work piece.The work contact element should return to its original
down position. Pull the trigger.The nailer/stapler must not cycle.
NEVER USE THE NAILER/STAPLER IF IT OPERATES WITHOUT PULLING THE
TRIGGER
Loading the Nailer/Stapler:
CONNECT NAILER/STAPLER TO AIR SUPPLY BEFORE LOADING FASTENERS.
DO NOT LOAD FASTENERS WITH TRIGGER OR SAFETY DEPRESSED TO PREVENT UNINTEN-
TIONAL DISCHARGE OF A FASTENER.
• Attach a high flow quick connector fitting to the nailer/stapler.
• Use clean, dry, regulated, compressed air at 60 to 100 PSI (0.4 to 0.7 MPA). Do not connect the nail-
er/stapler to any pressure source that may exceed 120 PSI (0.8 MPA).
• Only use air hose that is rated for a maximum working pressure of at least 150 PSI (1.0 MPA) or 150%
of the maximum system pressure, whichever is greater.
• Press the magazine latch. Pull back the magazine cover.
• Insert fasteners into magazine. Make sure the pointed ends of the fasteners are loaded with the sharp
points facing points downward. Make sure the fasteners are not dirty or damaged.
• Push the magazine cover forward until the latch catches.
Operating the Nailer/Stapler:
DO NOT DRIVE FASTENERS CLOSE TO THE EDGE OF THE WORK PIECE.
THE WORK PIECE IS LIKELY TO SPLIT ALLOWING FASTENERS TO FLY FREE OR RICOCHET
CAUSING PERSONAL INJURY.
FIRE FASTENERS INTO WORK SURFACE ONLY. NEVER FIRE INTO MATERI-
ALS THAT ARE TOO HARD TO PENETRATE. DO NOT DRIVE FASTENERS IN ON TOP OF OTHER
FASTENERS OR WITH THE NAILER/STAPLER AT TOO STEEP AN ANGLE AS THE FASTENERS
MAY RICOCHET CAUSING PERSONAL INJURY.
WARNING
WARNING
WARNING
WARNING
WARNING

• For the nailer/stapler to operate, your finger must first be off the trigger and the work contact element
of the nailer/stapler then pressed against the work piece. Once the work contact element is pressed
against the work piece, pull the trigger to drive the fastener into the work piece.
• Release the trigger after each fastener is driven.
• Move the nailer/stapler to the next location and repeat the procedure above.
• Test for proper fastener penetration by driving nails into a sample piece of wood. If the fasteners do not
achieve the desired penetration, adjust the air pressure to a higher setting until the desired penetration
is achieved.
Clearing a Jam from the Nailer/Stapler:
FASTENER JAMMED IN FASTENER DISCHARGE AREA:
• Disconnect air nailer/stapler from air hose.
• Open the nozzle, grab jammed fastener with pliers and remove.
FASTENER JAM INSIDE THE MAGAZINE:
• Disconnect air nailer/stapler from air hose.
• Pull back on the magazine cover.
• Open the nozzle and remove jammed fastener.
• Push the magazine cover forward until the latch catches.
Cleaning the Nailer/Stapler:
DISCONNECT THE NAILER/STAPLER BEFORE CLEANING AND INSPECTION.
CORRECT ALL PROBLEMS BEFORE PLACING NAILER/STAPLER BACK IN USE.
NEVER USE GASOLINE OR OTHER FLAMMABLE LIQUIDS TO CLEAN THE
NAILER/STAPLER.VAPORS IN THE NAILER/STAPLER WILL IGNITE WHEN NAILER/STAPLER IS IN
USE AND CAUSE THE NAILER/STAPLER TO EXPLODE, WHICH WILL RESULT IN DEATH OR SERI-
OUS PERSONAL INJURY.
• Disconnect air nailer/stapler from air hose.
• Remove tar buildup with kerosene #2 fuel oil. Dry off nailer/stapler completely before use.
• NOTE: DO NOT SOAK nailer/stapler in cleaning solutions or damage may occur.
Service and Repairs:
• All quality nailers will eventually require servicing or replacement of parts due to wear from normal use.
These operations should only be performed by a licensed professional technician. Never try to repair
the nailer/stapler by yourself. For service, call 1-800-423-3598.
TROUBLESHOOTING GUIDE
DISCONNECT NAILER/STAPLER FROM AIR SUPPLY BEFORE PERFORMING
ANY SERVICE PROCEDURE.
WARNING
DANGER
WARNING
8

9
Problem Solutions
Loose screws. Tighten screws.
Worn or damaged o-rings or seals Contact factory for service. 1-800-423-3598
Symptom: Air leak near top of nailer/stapler or in trigger area.
Problem Solutions
Inadequate air supply. Check compressor settings Check air hose/filters
Inadequate lubrication. for kinks or blockage. Oil nailer/stapler per instruc-
tions.
Worn or damaged o-rings or seals. Contact factory for service. 1-800-423-3598
Symptom: Nailer/stapler does nothing or operates sluggishly.
Symptom: Nailer/stapler jams frequently.
Symptom: Other
Problem Solutions
Other Contact factory for service. 1-800-423-3598
Troubleshooting, continued
Symptom: Air leak near bottom of nailer/stapler.
Problem Solutions
Loose screws. Tighten screws.
Worn or damaged o-rings or bumper. Contact factory for service. 1-800-423-3598
Problem Solutions
Incorrect fasteners. Verify fasteners are the correct size.
Damaged fasteners. Replace with undamaged fasteners
Magazine or nose screw loose. Tighten screws.
Magazine is dirty. Clean magazine
Driver is worn or damaged. Contact factory for service. 1-800-423-3598
1 A0304-0301 Exhaust Valve Collar
2 A0200-1261 O-Ring
3 A0000-0341 Screw
4 A0005-0031 Washer
5 A0301-0151 Cylinder Cap
6 A0311-0121 Air Seal
7 B0300-0671 Exhaust Valve Site Set
8 A0100-0221 Spring
9 A0200-0231 O-Ring
10 A0200-0071 O-Ring
No. Part No. Description
NAILER PARTS LISTING

10
11 A0308-0241 Firing Valve Piston
12 A0200-0251 O-Ring
13 A0200-0081 O-Ring
14 A0205-0111 Gasket
15 A0200-0721 O-Ring
16 A0602-0171 Piston Head
17 A0011-0051 Driver Blade Pin
18 A0011-0051 Outer Spring Pin
19 A0011-0061 Inner Spring Pin
20 A0600-0771 Driver Blade
21 A0305-0071 Collar
22 A0200-0301 O-Ring
23 A0303-0141 Cylinder
24 A0309-0011 Bumper
25 A0200-0911 O-Ring
26 A0800-0381 Spacer
27 A0401-0441 Body
28 A0310-0151 Nozzle
29 A0200-1091 O-Ring
30 A0503-0221 Upper Remote Housing
31 A0200-1081 O-Ring
32 A0104-0041 Conical Spring
33 A0200-0431 O-Ring
34 A0504-0071 Remote Core
35 A0503-0121 Remote Housing
36 A0200-0331 Trigger Valve Stem
37 A0005-0041 E-Ring
38 A0006-0271 Step Pin
39 A0101-0031 Extension Spring
40 A0502-0031 Trigger Guide
41 A0710-0211 Pin Bushing
42 A0500-0191 Trigger
43 A0006-0281 Pin
44 A0712-0051 Catch Guide Plate
45 A0011-0241 Spring Pin
46 A0200-0131 O-Ring
47 A0306-0231 Tail Cover
48 QA236-0041 Air Plug
49 A0800-0022 Spacer
50 A0719-0031 Spring Holder
51 A0000-0101 Screws
52 A0100-0211 Compression Spring
53 A0711-0491 Release Catch
54 A0801-0511 Driver Guide
55 A0000-0021 Screw
56 A0800-0331 Spacer
57 F32-57 Inner Magazine
58 F32-58 Tail cover
No. Part No. Description
NAILER PARTS LISTING

59 A0000-0211 Screw
60 A0000-0011 Screw
61 A0005-0051 Washer
62 A0004-0001 Hex Nut
63 A0709-0081 Click Lever
64 A0103-0061 Spring
65 A0706-0201 Spring Holder
66 A0006-0041 Step Pin
67 A0000-0091 Screw
68 A0200-0241 O-Ring
69 QA276-0021 Steel Bar
70 A0100-0031 Compression Spring
71 A0314-0141 Exhaust Valve Site
72 A0716-0171 End Stopper
73 A0707-0451 Pusher
74 A0706-0691 Spring Holder
75 A0011-0231 Spring Pin
76 B0300-0621 Firing Valve Piston Set
77 B0600-0321 Driver Blade Set
78 B0300-0261 Cylinder Set
79 B0500-0181 Trigger Valve Set
80 B0500-0161 Trigger Set
81 B0700-0761 Click Lever Set
82 B0700-0521 Magazine Assembly
11
NAILER PARTS LISTING
No. Part No. Description

12
NAILER PARTS DIAGRAM

13
1 A0304-0301 Exhaust Valve Collar
2 A0200-1261 O-Ring
3 A0000-0101 Screw
4 A0005-0031 Washer
5 A0301-0141 Cylinder Cap
6 A0311-0121 Air Seal
7 B0300-0671 Exhaust Valve Assembly
8 A0100-0221 Spring
9 A0200-0231 O-Ring
10 A0200-0071 O-Ring
11 A0308-0241 Firing Valve Piston
12 A0200-0251 O-Ring
13 A0205-0111 Gasket
14 A0305-0071 Collar
15 A0303-0011 Cylinder
16 A0309-0011 Bumper
17 A0200-0911 O-Ring
18 A0800-0381 Spacer
19 A0401-XXX1 Body
20 A0310-0121 Nozzle
21 A0200-1091 O-Ring
22 A0200-1081 O-Ring
23 A0503-0221 Upper Remote Housing
24 A0104-0041 Conical Spring
25 A0200-0431 O-Ring
26 A0504-0071 Remote Core
27 A0503-0121 Remote Housing
28 A0504-0051 Trigger Valve Stem
29 A0005-0041 E-Ring
30 A0006-0271 Step Pin
31 A0101-0031 Extension Spring
32 A0502-0031 Trigger Guide
33 A0710-0211 Pin Bushing
34 A0500-0191 Trigger
35 A0006-281 Pin
36 A0712-0051 Catch Plate Guide
37 A0011-0241 Spring Pin
38 A0200-0131 O-Ring
39 A0306-0231 Tail Cover
40 A0200-0031 O-Ring
41 A0602-0021 Piston Head
42 A0601-0021 Driver Blade Pin
43 A0011-0051 Outer Spring Pin
44 A0011-0061 Inner Spring Pin
45 A0600-0141 Driver Blade
46 A0800-0022 Spacer
47 A0600-0231 Spacer
48 A0719-0041 Spring Holder
No. Part No. Description
STAPLER PARTS LISTING

14
No. Part No. Description
STAPLER PARTS LISTING
49 A0100-0211 Compression Spring
50 A0711-0463 Release Catch
51 A0801-0901 Driver Guide
52 A0801-1161 Driver Guide Cover
53 A0005-0071 Washer
54 A0000-0001 Screw
55 QA277-0011 Click Lever
56 A0101-0021 Torsion Spring
57 A0004-0001 Hex Nut
58 A0006-0021 Step Pin
59 A0002-0001 Screw
60 B0600-1381 Piston Set
61 A0707-0442 Pusher
62 A0100-0121 Feeder Spring
63 B1100-0161 Magazine Set
64 A0002-0011 Screw
65 A0708-0061 Steel Bar
66 A0200-0241 O-Ring
67 A0314-0141 Exhaust Valve Site
68 A0200-0081 O-Ring
69 B0300-0621 Head Valve Piston Set
70 B0300-0861 Cylinder Set
71 B0500-0181 Trigger Valve Set
72 B0500-0161 Trigger Set
73 A0204-0181 Handle Grip
74 QA236-0041 Air Plug

15
STAPLER PARTS DIAGRAM
/