Page is loading ...

IAN 285615
CORDLESS HAND-HELD &
UPRIGHT VACUUM CLEANER SHAZ 22.2 B2
CORDLESS HAND-HELD &
UPRIGHT VACUUM CLEANER
Operating instructions
AKKU-HAND- UND
-BODENSTAUBSAUGER
Bedienungsanleitung

GB / IE / NI Operating instructions Page 1
DE / AT / CH Bedienungsanleitung Seite 17
Before reading, unfold the page containing the illustrations and familiarise yourself with all functions of
the device.
Klappen Sie vor dem Lesen die Seite mit den Abbildungen aus und machen Sie sich anschließend mit allen
Funktionen des Gerätes vertraut.

4
1
2
q
0
8
7
6
3
5
9
w
r e
tzui
o p
a
s
d
f
g
h

GB
│
IE
│
NI
│
1 ■
SHAZ 22.2 B2
Contents
Introduction ...................................................2
Intended use ..................................................2
Package contents ..............................................2
Appliance description ...........................................3
Technical data .................................................4
Important safety instructions .....................................4
Before first use ................................................8
Fitting the wall bracket ..........................................8
Charging the batteries ..........................................9
Attaching/removing accessories .................................10
Floor nozzle ............................................................10
Large round brush/upholstery nozzle ........................................ 10
Small round brush ....................................................... 10
Crevice tool ............................................................ 10
Operation ...................................................11
ECO mode .............................................................11
Cleaning .....................................................11
Emptying the dirt container and cleaning the filter ..............................11
Cleaning the floor brush .................................................. 12
Cleaning the appliance ...................................................13
Troubleshooting ..............................................13
Disposal .....................................................14
Disposal of the appliance .................................................14
Disposal of the packaging ................................................. 14
Kompernass Handels GmbH warranty ............................15
Service ................................................................16
Importer ............................................................... 16

■ 2
│
GB
│
IE
│
NI
SHAZ 22.2 B2
Introduction
Congratulations on the purchase of your new appliance.
You have selected a high-quality product. The operating instructions are part
of this product. They contain important information about safety, usage and
disposal. Before using the product, please familiarise yourself with all operating
and safety instructions. Use the product only as described and for the range of
applications specified. Please also pass these operating instructions on to any
future owner.
Intended use
This appliance has been designed exclusively for vacuum cleaning dry surfaces
and dry residues in interior rooms. Do not vacuum people or animals with this
appliance. Any other usage or modification of the appliance is deemed to be
improper and carries a significant risk of accidents. The manufacturer accepts
no liability for damages that result from improper use of the appliance or are
caused by the incorrect operation of it. The appliance is not intended for
commercial use.
Package contents
The appliance is supplied with the following components as standard:
▯ Li-ion cordless handheld vacuum cleaner
▯ Floor brush, electric
▯ Large round brush (upholstery nozzle)
▯ Small round brush
▯ Crevice tool
▯ Suction pipe
▯ Wall bracket, including charger
▯ Assembly material (2 screws, 2 wall plugs) for wall bracket
▯ Mains adapter
▯ Operating instructions
NOTE
► Check the package for completeness and signs of visible damage.
► If the delivery is incomplete or damage has occurred as a result of
defective packaging or during transport, contact the Service hotline
(see section Service).

GB
│
IE
│
NI
│
3 ■
SHAZ 22.2 B2
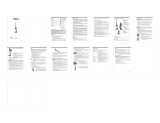
Appliance description
1 Connection for mains adapter (hand element)
2 "ECO" button
3 Indicator lamp (battery charge indicator)
4 Hand element
5 Release button "PUSH" hand element
6 Suction pipe
7 Release button "PUSH" suction pipe
8 Floor nozzle
9 Release switch floor nozzle
0 Floor brush
q On/Off switch
w Dust filter hand element
e Dirt container lid
r Release button "PUSH" dirt container
t Dirt container
z Filter holder
u Release button "MOVE"
i HEPA filter
o Connection for mains adapter, wall bracket
p Small round brush
a Large round brush (upholstery nozzle)
s Crevice tool
d Accessories holder for wall bracket
f Wall bracket
g Mains adapter
h Barrel plug

■ 4
│
GB
│
IE
│
NI
SHAZ 22.2 B2
Technical data
Mains adapter g
Input voltage/current 100–240 V
~
(AC), 50/60 Hz, max. 0.8 A
Output voltage/current: 26.5 V
(DC), 750 mA
Protection class
II /
(double insulation)
Efficiency class
5
Protection type
IP 20: Protected against ingress of solid
foreign objects with a diameter of
≥ 12.5 mm.
Polarity
(positive inside, negative outside)
Type designation ZD024D265075BS
Appliance
Input voltage/current 26.5 V
(DC), 750 mA
Polarity
(positive inside,
negative outside)
Batteries
Capacity 2500 mAh
Rechargeable battery
22.2 V
(DC) (6 x 3.7 V lithium-ion
battery)
Important safety instructions
DANGER – ELECTRIC SHOCK!
► Do not charge or use the appliance outdoors or in damp
rooms.
► Never use the appliance if the cable, plug or casing are
damaged.
► To avoid risks, arrange to have damaged mains adapters
and/or plugs replaced as soon as possible by a qualified
specialist.
► Have all repairs carried out by a specialist workshop. Under
no circumstances should you open the appliance yourself.
Repairs that are not carried out by a specialist workshop
could lead to physical injuries.

GB
│
IE
│
NI
│
5 ■
SHAZ 22.2 B2
DANGER – ELECTRIC SHOCK!
► Before switching on the appliance, make sure that the mains
voltage corresponds to the voltage indicated in the technical
data for the appliance.
► Never touch the mains adapter or the appliance with wet or
damp hands.
► Protect the appliance from moisture and liquids.
► Do not use the mains adapter with an extension cable;
connect the mains adapter directly to a power socket.
WARNING! RISK OF INJURY!
► Always switch off the appliance and pull the mains adapter
out of the power socket before emptying the dirt container,
cleaning the nozzles or changing attachments.
► Do not use the appliance for vacuuming up sharp objects
or broken glass.
► Do not use the appliance for vacuuming up liquids.
► Do not use the appliance for vacuuming up burning matches,
glowing embers or cigarette butts.
► Do not use the appliance for vacuuming up chemical
products, stone dust, gypsum, cement or similar particles.
► This appliance is not suitable for use with inflammable and
explosive substances or chemical and aggressive liquids.
► Always store the appliance indoors. To prevent accidents,
keep the appliance in a dry location when not in use.
► Under extreme conditions, the battery cells may leak.
In the event that battery fluid comes into contact with skin
or eyes, the affected area must be rinsed off with water
immediately. Contact a physician.

■ 6
│
GB
│
IE
│
NI
SHAZ 22.2 B2
WARNING! RISK OF INJURY!
► This appliance may be used by children aged 8 years and
above and by persons with limited physical, sensory or
mental capabilities or lack of experience and knowledge,
provided that they are under supervision or have been told
how to use the appliance safely and are aware of the
potential risks.
► Do not allow children to use the appliance as a toy.
► Cleaning and user maintenance tasks may not be carried
out by children unless they are supervised.
► Take special care when using the appliance on the stairs.
► Never hold the nozzles near body parts or animals during
use and never insert your fingers in the nozzles. You could
be injured or become stuck. Switch the appliance off imme-
diately if the appliance sucks onto any body part or object.
► Keep your hair, loose clothing, fingers and other body parts
away from the suction opening or the moving parts, e.g. the
rotating floor brush.
► Do not use any fragrances or perfumed products on the
filters in this appliance. The chemicals contained in these
products have been demonstrated to be inflammable and
can cause a fire in the appliance.
CAUTION! PROPERTY DAMAGE!
► Use only accessories recommended by the manufacturer.
► The mains adapter may not be used for other purposes.
Never carry the wall bracket or the mains adapter by the cable.
► Always pull directly on the mains adapter itself (not the cable)
to disconnect the appliance from the power supply.
► Do not place the appliance next to radiators, ovens or other
heated devices or surfaces.

GB
│
IE
│
NI
│
7 ■
SHAZ 22.2 B2
CAUTION! PROPERTY DAMAGE!
► Make sure that the ventilation slits are never obstructed.
A blocked ventilation circuit can result in overheating and
damage to the appliance.
► This appliance contains rechargeable batteries. Do not
throw the batteries into a fire and do not subject them to
high temperatures. There is a risk of an explosion.
► Do not use the appliance without the filter inserted.
► Do not use the mains adapter for a different product and do
not attempt to charge this appliance with a different charger.
Use only the mains adapter supplied with this appliance.
► The batteries in this appliance cannot be removed and
replaced.
► Do not vacuum over any cables, fringed materials, etc. as
these can get caught up in the rotating floor brush and be
damaged.

■ 8
│
GB
│
IE
│
NI
SHAZ 22.2 B2
Before first use
♦ Remove all packaging materials and any protective films from the device.
♦ Fit the wall bracket f as described in the section "Fitting the wall bracket".
♦ Press the HEPA filter i and the filter holder z a little way into the dirt
container t. These may have worked loose during transport and thus
not be positioned correctly inside the dirt container t.
♦ Place the dirt container t on the hand element 4:
– Push the plastic tab on the underside of the dirt container t into the
recess on the hand element 4. Allow the "MOVE" u release button
on the upper side of the dirt container t to click audibly into the catch
on the hand element 4.
NOTE
► To remove the dirt container t from the hand element 4, push the
"MOVE" u release button downwards and remove the dirt container t.
♦ Push the suction pipe 6 onto the hand element 4 so that the contact pins
on the suction pipe 6 slide into the socket on the hand element 4.
The "PUSH" 5 release button should click audibly into place.
♦ Attach the floor nozzle 8 onto the suction pipe 6 in the same way.
NOTE
► To remove the suction pipe 6 or the floor nozzle 8 again, press the
respective "PUSH" 5/7 release button and pull the corresponding parts
apart.
♦ Place the appliance onto the wall bracket f and then put it into a corner or
lay it flat on the floor so it cannot tip over.
Fitting the wall bracket
DANGER – ELECTRIC SHOCK!
► Before drilling, ensure that there are no electrical cables or water pipes in the
wall. Drilling into a live electric cable can be potentially fatal!
♦ Push the accessories holder d onto the appropriate slots on the wall
bracket f.

GB
│
IE
│
NI
│
9 ■
SHAZ 22.2 B2
♦ Select a suitable mounting location for the wall bracket f:
You must be able to easily place the handheld vacuum cleaner into the
bracket or remove it, and the mains socket must be easily accessible.
Ensure that the appliance is not exposed to direct sunlight or other heat
sources.
♦ Mark two drill holes on the wall at a distance of approx. 154 mm from each
other. Ensure that there is a mains power socket in the immediate vicinity.
♦ Use a 5 mm drill bit to drill the required holes and insert the wallplugs.
♦ Screw in the screws so that the heads protrude a few millimetres. Hang
the wall bracket fon the two screws using the slotted holes on the rear.
Ensure that the screws slide into the two slots. The wall bracket f should lie
flush against the wall. You can adjust the distance to the wall and compen-
sate for any unevenness in the wall by screwing in or unscrewing the screws.
♦ You can place the nozzles on the accessories holder d on the side.
♦ Now plug the barrel plug h of the mains adapter into the top of the wall
bracket f and the mains adapter g into a wall socket.
Charging the batteries
■ The appliance runs on rechargeable lithium-ion batteries.
■ The indicator lamp 3 shows the charge level of the batteries (25%, 50%,
75%, 100%). If the batteries are empty, all of the bars start to flash for a
few seconds before the appliance switches itself off.
■ There are two ways of charging the batteries.
– Plug the barrel plug h of the mains adapter directly into the connection
1 on the appliance and the mains adapter g into a wall socket.
– Plug the barrel plug h of the mains adapter directly into the connection
on the wall bracket o and the mains adapter g into a wall socket.
Hang the appliance into the wall bracket f so that the plastic tab on
the wall bracket f slides into the recess between the hand element 4
and the dirt container t. The contacts should now be connected to
each other.
NOTE
► The appliance cannot be operated during charging.
■ Depending on the charge level, the current bar on the indicator lamp 3
will flash during charging. The charging process is completed when all four
bars light up.

■ 10
│
GB
│
IE
│
NI
SHAZ 22.2 B2
NOTE
► When charging is complete, which can take around 4 hours with fully
discharged batteries, the appliance automatically switches to a trickle
charge (maintenance function). To avoid possible damage to the batteries,
do not leave the appliance permanentlyconnected to the mains.
■ Do not recharge the batteries until the suction power of the hand vacuum
cleaner has become noticeably weaker or the indicator lamp 3 shows
only 25% capacity (i.e. one bar is lit up).
Attaching/removing accessories
You can fit the attachments directly into the suction opening on the hand ele-
ment 4 as well as the suction pipe 6. If you have not already done so, fit the
suction pipe 6 as described in the section "Before first use".
Push the required attachment into the connection on the hand element 4 or the
suction pipe 6 until it clicks into place. Note that the crevice tool s can only
be fitted in one specific direction and the large round brush a in two specific
directions.
Floor nozzle
Attach the floor nozzle 8 to use the appliance as a floor vacuum cleaner.
It is suitable for carpets as well as smooth flooring.
Large round brush/upholstery nozzle
Use the large round brush a to gently clean upholstery, window sills or uneven
objects such as furniture, lamps, skirting boards, etc.
Small round brush
Use the small round brush p to gently clean smaller objects such as computer
keyboards, electrical appliances, etc.
Crevice tool
The crevice tool s is ideal for cleaning narrow, hard to access areas such as
grooves in furniture or radiator ribs.

GB
│
IE
│
NI
│
11 ■
SHAZ 22.2 B2
Operation
CAUTION!
► The suction opening must always be kept free of blockages. Blockages lead
to overheating and damage to the motor.
NOTE
► If the floor nozzle 8 is blocked so that the floor brush 0 can no longer
rotate, the appliance will switch off. The LEDs start to flash alternately. If
this happens, remove the blockage as described in the section “Cleaning
the floor brush”. Afterwards, you need to push and release the On/Off
switchq once before you can use the appliance again.
♦ If you have not already done so, disconnect the appliance from the mains
adapter gor lift it off the wall bracket f.
♦ Fit the required attachment as necessary. See also the section "Fitting/
removing attachments".
♦ Press the On/Off switch q to switch the appliance on. As long as you hold
down the switch q, the appliance will keep running. The indicator light 3
lights up.
ECO mode
When possible, use the energy-efficient and low-noise ECO mode.
Press the ECO mode button 2 to activate ECO mode permanently.
The button lights up. This also works during operation.
Press the ECO mode button 2 again to deactivate ECO mode.
Cleaning
CAUTION! PROPERTY DAMAGE!
► Do not use aggressive, chemical or abrasive cleaning agents. These could
damage the outer surfaces of the appliance.
Emptying the dirt container and cleaning the filter
NOTE
► To achieve the best results, empty the dirt container t and clean the
HEPA filter i regularly.
♦ If you have not already done so, disconnect the appliance from the mains
adapter gor lift it off the wall bracket f.
♦ Disconnect the dirt container t from the hand element 4 by pushing the
"MOVE" u release button downwards and pulling off the dirt container t.

■ 12
│
GB
│
IE
│
NI
SHAZ 22.2 B2
♦ To empty the dirt container t, hold it over a rubbish bin or similar and
press the "PUSH" r release button. The lid e of the dirt container flips up.
Empty out the dirt container t and flip the lid e closed (it should click into
place).
♦ Pull the HEPA filter i together with the filter holder z out of the dirt
container t.
♦ Remove the HEPA filter i from the filter holder z and tap out both parts
over a rubbish bin. If necessary, you can rinse out the filter holderz and
the HEPA filter i with fresh water. Before replacing the parts ensure that
they are completely dry.
♦ Replace the HEPA filter i in the filter holder z (note the recesses on the
holder).
♦ Push the filter holder z back into the dirt container t. Note the guide rails
on the holder as well as the recesses on the dirt container t.
♦ Replace the dirt container t on the hand element 4.
NOTE
► Clean the two dust filters w on the left and right of the hand element 4
regularly. To remove them, press the release buttons and pull out the filters.
Remove the dust filters w and tap them out. Replace the filters before re-using
the appliance.
Cleaning the floor brush
To achieve the best results, the electric floor brush 0 should be regularly
checked for blockages and any hairs, threads or dirt should be removed.
NOTE
► If the floor nozzle 8 is blocked so that the floor brush 0 can no longer
rotate, the appliance will switch off. The LEDs start to flash alternately. If this
happens, remove the blockage as described below. Afterwards, you need
to push and release the On/Off switchq once before you can use the
appliance again.
To simplify cleaning, the floor brush 0 can be removed:
♦ If you have not already done so, disconnect the appliance from the mains
adapter gor lift it off the wall bracket f.
♦ Remove the floor nozzle 8 from the suction pipe 6 or the hand element 4.
♦ Push the release switch 9 under the floor nozzle 8 as far as the stop.
The floor brush 0 can now be removed.

GB
│
IE
│
NI
│
13 ■
SHAZ 22.2 B2
♦ To replace the floor brush 0 after cleaning, proceed as follows:
– Push the release button 9 back outwards.
Start by pushing one end of the floor brush 0 onto the drive shaft on
the opposite side of the switch 9. Note that only one side of floor
brush 0 fits onto the drive shaft.
– Now push the other end of the floor brush 0 into the appropriate
recess under the release switch 9 and then release this.
♦ Ensure that the floor brush 0 is fitted correctly before using the floor
nozzle 8 again.
Cleaning the appliance
♦ Clean the housing and the attachments with a slightly damp cloth.
For stubborn soiling use a mild detergent on the cloth.
♦ Dry all parts thoroughly before using the appliance again or storing it.
Troubleshooting
Problem Cause The solution
The appliance is
not working.
The battery is empty. Charge the appliance.
The appliance is
defective.
Contact the Customer Service
department.
The suction is
weak.
The battery is almost
flat.
Charge the appliance.
The suction opening
is blocked.
Remove the blockage.
The filters w/i are
too dirty.
Clean the filters w/i.
Dust is escaping
from the appli-
ance.
The dirt container t
is not fitted properly.
Check whether the dirt containert
is correctly fitted or the lid e is
correctly closed.

■ 14
│
GB
│
IE
│
NI
SHAZ 22.2 B2
Disposal
Disposal of the appliance
Never dispose of the appliance in your normal domestic waste.
This product is subject to the provisions of European Directive
2012/19/EU.
Dispose of the appliance via an approved disposal company or your municipal
waste facility. Please observe the currently applicable regulations. Please
contact your waste disposal facility if you are in any doubt.
Your local community or municipal authorities can provide information on how
to dispose of the product.
NOTE
► The appliance contains batteries that cannot be removed by the user. To
prevent risks, the removal or replacement of the batteries may only be
carried out by the manufacturer, manufacturer's customer service depart-
ment or a similarly qualified person. When disposing of the appliance,
indicate that the appliance contains batteries.
Disposal of the packaging
The packaging protects the appliance from damage during transport. The
packaging materials have been selected for their environmental friendliness
and ease of disposal, and are therefore recyclable.
Returning the packaging into the material cycle conserves raw materials and
reduces the amount of waste generated. Dispose of packaging materials that
are no longer needed in accordance with applicable local regulations.
Dispose of the packaging in an environmentally friendly manner.
Note the labelling on the packaging and separate the packaging material
components for disposal if necessary. The packaging material is labelled with
abbreviations (a) and numbers (b) with the following meanings:
1–7: Plastics,
20–22: Paper and cardboard,
80–98: Composites
NOTE
► If possible, keep the original packaging during the warranty period so
that the device can be properly packed for returning in the event of a
warranty claim.

GB
│
IE
│
NI
│
15 ■
SHAZ 22.2 B2
Kompernass Handels GmbH warranty
Dear Customer,
This appliance has a 3-year warranty valid from the date of purchase. If this product
has any faults, you, the buyer, have certain statutory rights. Your statutory rights
are not restricted in any way by the warranty described below.
Warranty conditions
The validity period of the warranty starts from the date of purchase. Please keep
your original receipt in a safe place. This document will be required as proof of
purchase.
If any material or production fault occurs within three years of the date of purchase
of the product, we will either repair or replace the product for you at our discretion.
This warranty service is dependent on you presenting the defective appliance
and the proof of purchase (receipt) and a short written description of the fault
and its time of occurrence.
If the defect is covered by the warranty, your product will either be repaired or
replaced by us. The repair or replacement of a product does not signify the begin-
ning of a new warranty period.
Warranty period and statutory claims for defects
The warranty period is not prolonged by repairs effected under the warranty.
This also applies to replaced and repaired components. Any damage and defects
present at the time of purchase must be reported immediately after unpacking.
Repairs carried out after expiry of the warranty period shall be subject to a fee.
Scope of the warranty
This appliance has been manufactured in accordance with strict quality guidelines
and inspected meticulously prior to delivery.
The warranty covers material faults or production faults. The warranty does not
extend to product parts subject to normal wear and tear or fragile parts such as
switches, batteries, baking moulds or parts made of glass.
The warranty does not apply if the product has been damaged, improperly used
or improperly maintained. The directions in the operating instructions for the product
regarding proper use of the product are to be strictly followed. Uses and actions
that are discouraged in the operating instructions or which are warned against
must be avoided.
This product is intended solely for private use and not for commercial purposes.
The warranty shall be deemed void in cases of misuse or improper handling, use
of force and modifications / repairs which have not been carried out by one of
our authorised Service centres.

■ 16
│
GB
│
IE
│
NI
SHAZ 22.2 B2
Warranty claim procedure
To ensure quick processing of your case, please observe the following instructions:
■ Please have the till receipt and the item number (e.g. IAN 12345) available
as proof of purchase.
■ You will find the item number on the type plate, an engraving on the front
page of the instructions (bottom left), or as a sticker on the rear or bottom of
the appliance.
■ If functional or other defects occur, please contact the service department
listed either by telephone or by e-mail.
■ You can return a defective product to us free of charge to the service address
that will be provided to you. Ensure that you enclose the proof of purchase
(till receipt) and information about what the defect is and when it occurred.
You can download these instructions along with many other manuals,
product videos and software on www.lidl-service.com.
Service
Service Great Britain
Tel.: 0871 5000 720 (£ 0.10/Min.)
E-Mail: kom[email protected]
Service Ireland
Tel.: 1890 930 034
(0,08 EUR/Min., (peak))
(0,06 EUR/Min., (off peak))
E-Mail: kom[email protected]
CY
Service Cyprus
Tel.: 8009 4409
E-Mail: kom[email protected]
IAN 285615
Importer
Please note that the following address is not the service address. Please use the
service address provided in the operating instructions.
KOMPERNASS HANDELS GMBH
BURGSTRASSE 21
DE - 44867 BOCHUM
GERMANY
www.kompernass.com

DE
│
AT
│
CH
│
17 ■
SHAZ 22.2 B2
Inhaltsverzeichnis
Einleitung ....................................................18
Bestimmungsgemäßer Gebrauch ................................18
Lieferumfang .................................................18
Gerätebeschreibung ...........................................19
Technische Daten ..............................................20
Wichtige Sicherheitshinweise ...................................20
Vor der ersten Inbetriebnahme ..................................24
Montage der Wandhalterung ...................................24
Akkus aufladen ...............................................25
Zubehör anbringen und abnehmen ..............................26
Bodendüse .............................................................26
Große Rundbürste/Polsterdüse ............................................. 26
Kleine Rundbürste ....................................................... 26
Fugendüse .............................................................26
Bedienen ....................................................27
ECO-Modus ............................................................27
Reinigen .....................................................27
Schmutzbehälter leeren und Filter reinigen .................................... 27
Bodenbürste reinigen ..................................................... 28
Gerät reinigen ..........................................................29
Fehlerbehebung ..............................................29
Entsorgen ....................................................30
Entsorgung des Geräts ................................................... 30
Entsorgung der Verpackung ............................................... 30
Garantie der Kompernaß Handels GmbH .........................31
Service ................................................................32
Importeur .............................................................. 32
/