Page is loading ...

2 VELUX
®
ENGLISH: Index
Page 2 Installation check list
Pages 3-4 Important installation requirements
Pages 5-7 Important information/Warnings
Pages 9-10 Planning
Pages 11-12 Installing underlayment
Page 13 Flashing
Page 14 Mounting skylight
Page 15 Installing solar panel
ESPAÑOL: Índice
Página 2 Lista de verificación de instalación
Páginas 3-4 Requisitos importantes de instala-
ción
Páginas 5-7 Información importante/Adverten-
cias
Páginas 9-10 Planificación
Páginas 11-12 Instalación de la lámina de soporte
Página 13 Tapajuntas
Página 14 Montaje del tragaluz
Página 15 Instalación del panel solar
FRANÇAIS : Index
Page 2 Liste de vérification préinstallation
Pages 3-4 Spécifications d'installation impor-
tantes
Pages 5-7 Informations importantes/Avertis-
sements
Pages 9-10 Planification
Pages 11-12 Installation de la membrane de
toiture
Page 13 Solin
Page 14 Montage du puits de lumière
Page 15 Installation du panneau à énergie
solaire
ENGLISH: Installation check list
Installer should verify that:
• Curb mounted solar powered skylight VCS is
installed in roof pitches from 0° to 60°.
• Skylight curb is constructed correctly accord-
ing to dimensions in these installation instruc-
tions.
• Skylight/skylight curb is properly wrapped in
VELUX adhesive skylight underlayment accord-
ing to installation instructions supplied with
skylight, flashing or underlayment.
• Proper VELUX flashing for the actual roofing
material is installed according to installation
instructions supplied with the flashing.
• Curb mounted skylight is properly secured
to curb and installed over all flashing on the
skylight curb.
• Skylight and accessories operate properly.
• Customer is informed of the required mainte-
nance of the product as found at
www.velux.com.
• Customer is informed of the warranty claim
procedure. For full VELUX warranty, go to
www.velux.com.
IMPORTANT: Failure to install the skylight,
flashing and blinds in strict accordance with
these VELUX instructions shall void the VELUX
warranty.
ESPAÑOL: Lista de verificación de instalación
El instalador debe verificar que:
• El tragaluz a energía solar VCS montado en
brocal esté instalado en techos con inclinación
de 0° a 60°.
• El brocal del tragaluz esté correctamente
construido según las dimensiones indicadas en
estas instrucciones de instalación.
• El tragaluz/el brocal del tragaluz esté
correctamente envuelto con lámina de soporte
autoadhesiva para tragaluz VELUX según las
instrucciones de instalación provistas con el
tragaluz, el tapajuntas o la lámina de soporte.
• El tapajuntas VELUX indicado para el material
de cubierta correspondiente se instale según
las instrucciones de instalación provistas con el
tapajuntas.
• El tragaluz montado en brocal esté correcta-
mente sujeto al brocal e instalado por encima
del tapajuntas.
• El tragaluz y los accesorios funcionen correcta-
mente.
• El cliente esté informado del mantenimiento
que requiere el producto tal como se describe
en www.velux.com.
• El cliente esté informado del procedimiento de
uso de la garantía. Para obtener información
completa sobre la garantía VELUX, visitar
www.velux.com.
IMPORTANTE: De no instalarse el tragaluz, el
tapajuntas y las persianas en estricto cumpli-
miento con las instrucciones VELUX, la garantía
VELUX será anulada.
FRANÇAIS : Liste de vérification préinstallation
L'installateur devrait vérifier que :
• Le puits de lumière à énergie solaire VCS monté
sur cadre est installé sur une pente de toit de
0° à 60°.
• Le cadre du puits de lumière est construit selon
les dimensions fournies dans ces instructions
d'installation.
• Le puits de lumière/le cadre du puits de lumière
soit adéquatement enveloppé avec la mem-
brane de toiture autocollante pour puits de
lumière VELUX selon les instructions d'installa-
tion fournies avec le puits de lumière, le solin ou
la membrane de toiture.
• Le bon type de solin VELUX choisi en fonction
du type de matériel de toiture soit installé selon
les instructions d'installation fournies avec le
solin.
• Le puits de lumière monté sur cadre soit
proprement fixé au cadre et installé par-dessus
tous les solins du cadre.
• Le puits de lumière et ses accessoires fonc-
tionnent correctement.
• Le client est informé de l'entretien du produit
requis tel que décrit sur le site internet
www.velux.com.
• Le client est informé de la procédure de
réclamation sous la garantie. Pour la garantie
complète VELUX, visitez le www.velux.com.
IMPORTANT : L'omission d'installer le puits de
lumière, le solin et les stores en stricte confor-
mité avec les instructions VELUX annulera la
garantie VELUX.

VELUX
®
3
ENGLISH: Quick start guide
ESPAÑOL: Guía rápida
FRANÇAIS : Guide de démarrage rapide
日 本 語:クイックスタートガ イド
VELUX INTEGRA
®
KLR 200
453558-2015-07_KLR_200_US.indd 1 10-07-2015 10:53:44
B
C D
00
00
00
00
A
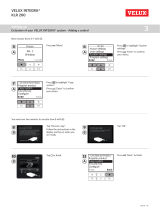
ENGLISH: Control: See enclosed Quick start guide.
ESPAÑOL: Control: Consulte la Guía rápida incluida.
FRANÇAIS : Commande : consultez le Guide de démarrage
rapide inclus.
ENGLISH: Mounting skylight: See pages 4-14
ESPAÑOL: Montaje del tragaluz: Vea las páginas 4-14.
FRANÇAIS : Montage du puits de lumière : voyez pages 4-14.
ENGLISH: Installing solar panel: See page 15.
ESPAÑOL: Instalación del panel solar: Vea la página 15.
FRANÇAIS : Installation du panneau à énergie solaire : voyez
page 15.
ENGLISH: Before mounting the skylight: Turn on power.
ESPAÑOL: Antes de montar el tragaluz: Encienda la alimenta-
ción.
FRANÇAIS : Avant le montage du puits de lumière : allumez sur
la puissance.

4 VELUX
®
ENGLISH: Important installation requirements
Roof pitch
Skylight VCS is designed for roof pitches 0° - 60° (0:12 - 21:12).
VELUX "No Leak" installation warranty applies only to VELUX curb mounted
skylight VCS with VELUX flashing ECL properly installed on roof pitches
10° - 60° or VELUX flashing ECW properly installed on roof pitches 14° - 60°.
Special consideration for applications below roof pitch 15°:
• Any condensation that forms on the glass due to high humidity may drip.
• Standing water and dirt left on the glass over time may cause smudging
and corrosion of the glass.
Neither of the two above stated occurrences are covered under the VELUX
warranty.
Importance of proper installation
Satisfactory product performance depends on proper installation.
Seller accepts no responsibility whatsoever for failure of an installer to install
VELUX
®
roof windows and skylights in accordance with these installation
instructions. Although VELUX roof windows and skylights are designed and
manufactured to the highest standards, severe climatic exposure as well as
adverse indoor conditions (ie high humidity) may produce temperature condi
-
tions which exceed product performance standards. In these cases, special
preventive measures may be necessary.
Seller reserves the right to implement product changes for improvement with
-
out prior notification.
Vapor barrier
Where a vapor barrier is part of the roof construction, this barrier must be
extended and connected to the skylight curb.
Consult local jurisdictions and authorities for recycling and proper dis
-
posal of removed skylights and materials.
NOTICE
Skylights and interior surfaces in older homes may have been painted with
lead-based paint, and removal of the skylights may disturb this paint.
Take proper precautions to minimize exposure to dust and debris.
For more information on the proper removal of lead paint go to
www.epa.gov/lead.
Seller assumes no obligation whatsoever for failure of an architect,
installer or building owner to comply with all applicable laws, ordinances,
building codes and safety requirements.
NOTICE
In rare circumstances, all glass may be subject to unexpected and spontane-
ous breakage due to imperfections in the glass that are undetectable during
the manufacturing and inspection process by the manufacturer of the glass
and the VELUX factory.
Your VELUX sales company offers the choice of laminated or tempered glass
skylights. Laminated glass is a combination of two or more glass sheets with
one or more interlayers of plastic (PVB) or resin. In case of breakage, the
interlayer is designed to hold the fragments together. Tempered glass does
not contain an interlayer to hold the fragments together. Instead, tempered
glass is designed to break into small, pebble-like pieces. When tempered glass
breaks, pieces of glass come loose and may strike an individual.
Consult local regulations and/or building material consultants to
determine which type of glass is right for you or if laminated glass is
required in your application.
ESPAÑOL: Requisitos importantes de instalación
Inclinación del techo
El tragaluz VCS está diseñado para techos con inclinación de 0° - 60°
(0:12 - 21:12).
La garantía de instalación VELUX de "filtración cero" es válida solo para el
tragaluz VCS VELUX montado en brocal con tapajuntas ECL VELUX correc
-
tamente instalado en techos con inclinación de 10° - 60° o tapajuntas ECW
VELUX correctamente instalado en techos con inclinación de 14° - 60°.
Consideraciones especiales para aplicaciones con inclinaciones de menos
de 15°:
• Cualquier condensación que se forme en el cristal debido a la humedad alta
puede gotear.
• El agua estancada y la suciedad que permanecen en el cristal durante un
tiempo pueden causar manchas y corrosión en el cristal.
Ninguno de los dos casos mencionados arriba está cubierto por la garantía
VELUX.
Importancia de una instalación correcta
El rendimiento satisfactorio del producto depende de su correcta instalación.
Las ventanas de tejado y los tragaluces VELUX
®
deben instalarse siguiendo
estas instrucciones. El proveedor no acepta responsabilidad alguna por errores
del instalador. Aunque las ventanas de tejado y los tragaluces VELUX se han
diseñado y fabricado para lograr los niveles de calidad más altos, la exposición
a condiciones climáticas severas e incluso a condiciones interiores adversas
(por ejemplo, humedad muy alta) pueden producir niveles de temperatura que
exceden las condiciones de desempeño del producto. En estos casos puede ser
necesario establecer medidas preventivas.
El proveedor se reserva el derecho a hacer modificaciones a los productos sin
notificación previa con el fin de mejorarlos.
Barrera de vapor
Cuando una barrera de vapor forma parte de la construcción de un techo, debe
extenderse y conectarse al brocal del tragaluz.
Consulte a las autoridades y jurisdicciones locales respecto de las normas
de reciclaje y correcta eliminación de tragaluces y materiales.
AVISO
Los tragaluces y las superficies interiores en las viviendas más antiguas pueden
haberse pintado con pintura que contiene plomo, que puede desprenderse al
retirar los tragaluces. Tenga la debida precaución para minimizar la exposición
al polvo y los residuos.
Para obtener más información acerca de la correcta eliminación de pintura con
plomo, visite el sitio web: www.epa.gov/lead.
El proveedor no asume responsabilidad alguna por el incumplimiento de
leyes, ordenanzas, normas de construcción o requisitos de seguridad por
parte del arquitecto, instalador o propietario del edificio.
AVISO
Bajo ciertas circunstancias, todo cristal está sujeto a romperse de manera
inesperada o espontánea debido a imperfecciones en el cristal no detectadas
durante su manufacturación o durante el proceso de inspección por el fabri
-
cante del cristal y de la fábrica VELUX.
Su distribuidor VELUX ofrece la opción de tragaluces de cristal laminado o
templado: El cristal laminado es una combinación de dos o más hojas de cris
-
tal con una o más capas intercaladas de plástico (pvb) o resina. En caso de
rotura, la capa está diseñada para sostener unidos los fragmentos de cristal.
El cristal templado no contiene capa intercalada para sostener unidos los
fragmentos de cristal. En su lugar, el cristal templado está diseñado para que
se rompa en pedazos bien pequeños. Cuando el cristal templado se rompe,
pedazos de cristal pueden soltarse y golpear a un individuo.
Consulte con los reglamentos locales y/o asesores de material de cons
-
trucción para determinar cual tipo de cristal es el más adecuado para
usted o si se requiere cristal laminado en su aplicación.
FRANÇAIS : Spécifications d'installation importantes
Pente de toit
Le puits de lumière VCS est conçu pour les pentes de toit 0° - 60° (0:12 - 21:12).
La garantie VELUX contre les fuites d'eau ne s'applique qu'au puit de lumière
VCS monté sur cadre avec solin ECL VELUX correctement installé sur toiture
avec pentes variant entre 10° et 60° ou avec solin ECW VELUX correctement
installé sur toiture avec pentes variant entre 14° et 60°.
Attention particulière pour installation sur pente de toit de moins de 15° :
• Dans des conditions très humides, toute condensation se formant sur la
surface vitrée pourra s'écouler.
• Avec le temps, l'eau s'accumulant directement sur la surface vitrée pourra
générer de la corrosion et des taches sur le verre.
Aucunes des deux incidences ci-haut mentionnées sont couvertes sous la
garantie VELUX.
L'importance d'une bonne installation
La qualité de l'installation influence le rendement du produit et, pour cette
raison, l'entreprise.
Le vendeur désire vous informer qu'il n'accepte aucune responsabilité, quelle
qu'elle soit, dans le cas où un installateur ne se conforme pas aux instruc
-
tions recommandées dans ce feuillet pour l'installation d'un puits de lumière
ou d'une fenêtre de toit VELUX
®
. Veuillez aussi remarquer que même si les
fenêtres de toit et puits de lumière VELUX répondent à des normes de fabri
-
cation élevées, il se peut que certaines conditions climatiques particulièrement
sévères, à l'intérieur (ex. humidité) comme à l'extérieur, affectent la perfor
-
mance du produit. Dans ces cas, des mesures préventives s'avèrent nécessaires.
D'autre part, le vendeur se réserve le droit d'apporter, sans préavis, des chan
-
gements à ses produits dans le but de les améliorer.

VELUX
®
5
ENGLISH: Important information/Warnings
Please keep instructions for future reference and hand them over to any new
user.
Safety
• The skylight can be used by persons (aged 8 years and above) with suf
-
ficient experience and knowledge if they have been given instruction
concerning its safe use and understand the hazards involved. Cleaning and
user maintenance must not be made by unsupervised children.
• Children must not play with the skylight and its electrical products. The
remote control should be kept out of reach of children. Do not allow children
near an open skylight.
• Before operating ensure that the skylight with electrical products can be
operated without risk of damage to property or injury to people or animals.
• For personal safety, never have head, hand, arm or any other body part out
of or through the opening of the skylight without first having switched off
power.
• If repair or adjustment work is needed, disconnect power and ensure that it
cannot be reconnected unintentionally.
• It is recommended that a remote control be placed in the room where the
skylight and its electrical products have been installed.
• If the skylight is positioned within reach, the opening of the skylight
operator must be adjusted to reduce the maximum size of the opening (see
section Adjusting the maximum opening in the user manual for the control).
Failure to make such adjustment can result in serious injury or death.
• Make sure that the insect screen is installed before putting the skylight into
use.
• FCC ID: XSG832794 and IC ID: 8642A-832794: Remote control
Certificate of Radio Equipment in Japan: No. 13215185
FCC ID: XSG863765 and IC ID: 8642A-863765: Window operator (skylight
operator)
This device complies with part 15 of the FCC and RSS-210 of the IC rules.
Operation is subject to the following two conditions: (1) This device may not
cause harmful interference, and (2) this device must accept any interference
received, including interference that may cause undesired operation.
• This device has been tested and found to comply with the limits for a
Class B digital device, pursuant to part 15 of the FCC Rules. These limits
are designed to provide reasonable protection against harmful interference
in a residential installation. This device generates, uses and can radiate
radio frequency energy and, if not installed and used in accordance with
the instructions, may cause harmful interference to radio communications.
However, there is no guarantee that interference will not occur in a particu
-
lar installation. If this device does cause harmful interference to radio or
television reception, which can be determined by turning the device off and
on, the user is encouraged to try to correct the interference by one or more
of the following measures:
- Reorient or relocate the receiving antenna.
- Increase the separation between the device and receiver.
- Connect the device into an outlet on a circuit different from that to
which the receiver is connected.
- Consult the dealer or an experienced radio/TV technician for help.
Changes or modifications not expressly approved by the party responsible for
compliance could void the user's authority to operate the device.
• FCC Radiation Exposure Statement: This device complies with FCC RF
radiation exposure limits set forth for an uncontrolled environment.
• The term "IC:" before the device certification number signifies that the
Industry Canada technical specifications were met.
Function
• If the rain sensor gets wet, the skylight automatically closes.
• Disabling the rain sensor while the skylight is open creates a risk of water to
the interior of the building.
• If the rain sensor is activated, the skylight will close within approximately
30 seconds. If the skylight is activated with the remote control or another
control, it will take up to one minute until the skylight is completely closed.
Therefore, in case of sudden rain, water may enter the room before the
skylight is closed.
• In case of snow and/or ice, the operation of the skylight may be blocked
resulting in damage to the skylight.
Product
• The skylight has been designed for use with genuine VELUX products. Con
-
nection to or use with other products may cause damage, malfunction or
injury.
• Electrical products must be disposed of in conformity with all local codes,
ordinances, rules and regulations for electronic waste and not with house
-
hold waste.
• Used batteries have to be disposed of in conformity with the relevant envi
-
ronmental regulations and ordinances.
• Expected lifetime of the remote control batteries: Approx 1 year.
• The packaging can be disposed of with usual household waste.
• Radio frequency band: 2.4 GHz.
• Radio frequency range: 110 yards (100 m) free field. Depending on building
construction, the indoor range is approx 30 ft (10 m). However, construc
-
tions with reinforced concrete, metal ceilings and plaster walls with steel
members may reduce the range.
Maintenance and service
• Disconnect power before carrying out any maintenance, repair, adjustment
or service work to the skylight or products connected to it (including bat
-
tery backup KLB 100, if installed) and ensure that it cannot be reconnected
unintentionally.
• Maintenance and installation must be carried out in consideration of Health
and Safety at Work requirements.
• There are no serviceable parts inside the skylight operator.
• Spare parts are available through your VELUX sales company. Please pro
-
vide information from the data plate.
• If you have any technical questions, please contact your VELUX sales com
-
pany, see telephone list or www.velux.com.
io-homecontrol
®
provides advanced and secure radio technology that is easy to install.
io-homecontrol
®
labelled products communicate with each other, improving comfort,
security and energy savings.
www.io-homecontrol.com
Coupe-vapeur
Lorsque la toiture comprend un coupe-vapeur, ce matériau doit être étendu et
joint au cadre du surface du puits de lumière.
Consultez les juridictions et les autorités locales pour le recyclage et la
disposition adéquate des puits de lumière et des matériaux enlevés.
ATTENTION
Les puits de lumière et les surfaces intérieures dans les vieilles maisons
peuvent avoir été peints avec de la peinture à base de plomb, et l'enlèvement
des puits de lumière risquent de perturber cette peinture. Prenez les précau
-
tions nécessaires pour minimiser l'exposition à la poussière et les débris.
Pour plus d'informations sur le bon enlèvement de la peinture au plomb
rendez-vous à www.epa.gov/lead.
Le vendeur n'assume aucune responsabilité, quelle qu'elle soit, dans le
cas où un architecte, un installateur ou un propriétaire n'observe pas les
règlements de la loi qui sont applicables, les normes du code du bâtiment
et de sécurité.
ATTENTION
Tout thermo/verre pourrait éclater d'une façon brusque et inattendue dans de
rares circonstances dues à des imperfections du thermo/verre qui ne sont pas
détectable lors de la fabrication et de l'inspection suivant la fabrication par le
manufacturier du thermo/verre et à l'usine VELUX.
Votre société de vente VELUX offre une sélection de thermo/verre laminé
ou trempé pour ses puits de lumière. Le thermo/verre laminé représente une
combinaison de deux ou plus unités de verre incluant une ou plusieurs couches
intérieures de plastique (pvb) ou résine. Dans le cas de bris instantané, cette/
ces couches intérieures auront la propriété de retenir les fragments du
thermo/verre ensemble. Par contre, le thermo/verre trempé n'inclus pas cette/
ces couches intérieures pour retenir les fragments du thermo/verre ensemble.
Le thermo/verre trempé est conçu pour s'émietter en de petits fragments de
verre. Lorsque le thermo/verre trempé se casse, les petites pièces de verre
éclatées pourraient dans certaines occasions causées des dommages phy
-
siques ou de légères blessures aux individus se trouvant à proximité.
Consultez votre code du bâtiment et/ou un professionnel-consultant afin
de bien déterminé le thermo/verre recommandé pour votre application ou
si un thermo/verre laminé est nécessaire dans votre cas.

8 VELUX
®
+ PLANNING AND CLEARANCE AROUND
INSTALLATIONS (INSECT SCREEN)?
TOOLS
•
HERRAMIENTAS
•
OUTILS

VELUX
®
9
18" / 450 mm
18" / 450 mm
12"
300 mm
12"
300 mm
24" / 600 mm
24" / 600 mm
12"
300 mm
12"
300 mm
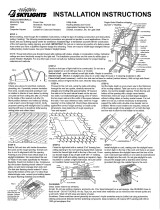
ENGLISH: Maintain illustrated clearances
between skylight frame and critical areas such as
valleys, ridges, slope changes and roof-to-wall-
intersections.
ESPAÑOL: Respete los espacios libres ilustrados
entre el marco del tragaluz y áreas críticas como
limahoyas, cumbreras, cambios de inclinación e
intersecciones de techo y pared.
FRANÇAIS : Respectez le dégagement illustré
entre le cadre du puits de lumière et les endroits
critiques tels que noue, faîtage, variation d'inclinai-
son et intersection de toiture et mur.
ENGLISH: Clearance around installations ESPAÑOL: Espacio libre alrededor de las
instalaciones
FRANÇAIS : Dégagement requis autour
de l'installation
ENGLISH: Light shaft application ESPAÑOL: Aplicación del hueco de luz FRANÇAIS : Pourtour du puits de lumière
Roof rafter
Viga
Chevron
Framing
Armazón
Renforcement
Drywall
Tablaroca
Finition
Vapor barrier
Barrera de vapor
Coupe-vapeur
Insulation
Aislamiento
Isolation

10 VELUX
®
1½"/
38 mm
H
W
min 3½"
min 90 mm
ENGLISH: Build curb according to measurements
in the chart. Use lumber with an actual thickness
of 1½" (38 mm) and a minimum height of 3½"
(90 mm). Curb height and attachment should
comply with building codes and regulations and
be secure enough to transfer the skylight loads to
the framing members.
Note: Skylight VCS cannot be rotated.
The skylight operator has to be installed at the
bottom of skylight curb.
ESPAÑOL: Construya el brocal de acuerdo con
las mediciones de la tabla. Use madera con un
grosor real de 1½" (38 mm) y una altura mínima
de 3½" (90 mm). La altura y sujeción del brocal
deben respetar los códigos y normas de construc-
ción y estar bien fijados para transferir las cargas
del tragaluz a los elementos del armazón.
Nota: El tragaluz VCS no puede rotarse.
El motor de apertura del tragaluz debe instalarse
en la parte inferior del brocal del tragaluz.
FRANÇAIS : Construisez un cadre selon les
dimensions indiquées au diagramme. Utilisez du
bois de 1½" (38 mm) de largeur réelle et d'une
hauteur minimale de 3½" (90 mm).
La hauteur du cadre et les raccordements doivent
respecter les exigences de la réglementation du
Code du bâtiment et être suffisamment sécuri-
taires pour recevoir le poids de la structure du
puits de lumière.
Note : Le puits de lumière VCS ne peut pas être
inversé.
Le moteur d'ouverture doit être installé sur la
partie inférieure du cadre.
1
Skylight size
Tamaño del
tragaluz
Taille du puits
de lumière
Outside curb
dimensions
Dimensiones exte-
riores del brocal
Dimensions exté-
rieures du cadre
W x H
2222
25
1
⁄2" x 25
1
⁄2"
648 mm x 648 mm
2234
25
1
⁄2" x 37
1
⁄2"
648 mm x 952 mm
2246
25
1
⁄2" x 49
1
⁄2"
648 mm x 1257 mm
3030
33
1
⁄2" x 33
1
⁄2"
851 mm x 851 mm
3046
33
1
⁄2" x 49
1
⁄2"
851 mm x 1257 mm
3434
37
1
⁄2" x 37
1
⁄2"
952 mm x 952 mm
4622
49
1
⁄2" x 25
1
⁄2"
1257 mm x 648 mm
4646
49
1
⁄2" x 49
1
⁄2"
1257 mm x 1257 mm
H
W

2
VELUX
®
13
7
ECW
ECW
ECW
ENGLISH: You are now ready to install the flash-
ing. For flashing information, see instructions
supplied with the relevant flashing.
For thin roofing materials, use flashing ECL. ECL is
designed for roof pitches 10° - 60° (2:12 - 21:12).
For profiled roofing materials, use flashing ECW.
ECW is designed for roof pitches 14° - 60°
(3:12 - 21:12).
ESPAÑOL: Ya puede instalar el tapajuntas. Para
obtener información sobre el tapajuntas, consulte
las instrucciones provistas con el tapajuntas
pertinente.
Para materiales de cubierta delgados, use ta-
pajuntas ECL. ECL está diseñado para techos con
inclinación de 10° - 60° (2:12 - 21:12).
Para materiales de cubierta ondulados, use
tapajuntas ECW. ECW está diseñado para techos
con inclinación de 14° - 60° (3:12 - 21:12).
FRANÇAIS : Vous êtes maintenant prêt à installer
les solins. Pour des informations sur les solins,
veuillez vous référer aux instructions fournies
selon les différents types de solins.
En présence de matériel de toiture mince, utilisez
les solins ECL conçus pour inclinaison de toiture de
10° - 60° (2:12 - 21:12).
Pour matériel de toiture profilé, utilisez les solins
ECW conçus pour inclinaison de toiture 14° - 60°
(3:12 - 21:12).

14 VELUX
®
8
ENGLISH: If the flashing is not to be installed im-
mediately, install skylight and connect solar panel.
Center the skylight on top of the curb and secure
with #8 1¾" (4.2 x 45 mm) pan head stainless
steel screws provided. Screws will penetrate the
curb by at least ¾" (19 mm).
Apply downward pressure to the top of the
skylight frame while securing the screws.
Leave these instructions with the skylight
until the flashing has been installed!
ESPAÑOL: Si no va a instalar el tapajuntas
inmediatamente, instale los tragaluz y conecte el
panel solar.
Centre el tragaluz sobre el brocal y fíjelo con los
tornillos de acero inoxidable de cabeza chanfleada
de #8 1¾" (4.2 x 45 mm) suministrados. Los torni-
llos penetrarán el brocal un mínimo de ¾" (19 mm).
Aplique presión sobre el armazón del traga-
luz mientras inserta los tornillos.
¡No retire estas instrucciones del tragaluz
hasta que el tapajuntas haya sido instalado!
FRANÇAIS : Si les solins ne sont pas installés
immédiatement, installez le puits de lumière et
connectez le panneau à énergie solaire.
Centrez le puits de lumière sur le cadre et fixer-le
avec les vis cylindriques en acier inoxydable #8
1¾" (4,2 x 45 mm) fournies. Les vis seront insérées
dans le cadre sur une longueur d'au moins
¾" (19 mm).
Appliquez une pression descendante sur la
partie supérieure du puits de lumière lors de
l'installation des vis.
N'enlevez pas ces instructions du puits de
lumière avant d'avoir installé le solin.

VELUX
®
15
9
10
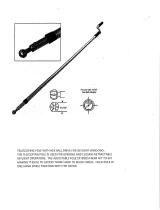
ENGLISH: Connect wire as shown.
ESPAÑOL: Conecte el cable como se indica.
FRANÇAIS : Branchez le fil tel qu'illustré.
ENGLISH: Install solar panel as shown and secure
the screws.
ESPAÑOL: Instale el panel solar como se indica y
apriete los tornillos.
FRANÇAIS : Installez le panneau à énergie solaire
tel qu'illustré et serez les vis.
After installation of flashing, follow steps 9 and 10 to install the solar panel.
Después de instalar el tapajuntas, siga los pasos 9 y 10 para instalar el panel solar.
Après l'installation du solin, suivez les étapes 9 et 10 pour installer le panneau à énergie solaire.

VCS CURB MOUNTED SOLAR POWERED SKYLIGHT INSTALLATION INSTRUCTIONS. ©2013, 2016 VELUX GROUP ®VELUX AND THE VELUX LOGO ARE REGISTERED TRADEMARKS USED UNDER LICENCE BY THE VELUX GROUP
INSTRUCTIONS D'INSTALLATION DU PUITS DE LUMIÈRE À ÉNERGIE SOLAIRE VCS MONTÉ SUR CADRE. ©2013 VELUX GROUP ®VELUX ET LE LOGO VELUX SONT DES MARQUES DE COMMERCE DÉPOSÉES ET EMPLOYÉES SOUS LICENCE DE VELUX GROUP
US: VELUX America LLC
1-800-88-VELUX
CA: VELUX Canada Inc.
1 800 88-VELUX (888-3589)
AU: VELUX Australia Pty. Ltd
(02) 9550 3288
NZ: VELUX New Zealand Ltd.
09-6344 126
www.velux.com
ENGLISH:
Home owner information
Please complete and give to home owner
Date: ...................................................................................................................................................................................................................................................................
Product number: ............................................................................................................................................................................................................................................
(stamped on product exterior)
Quantity: ...........................................................................................................................................................................................................................................................
Flashing: ............................................................................................................................................................................................................................................................
Accessories installed: ...................................................................................................................................................................................................................................
Model ................ Size ............... Variant code ..........................
Roofing material: ...........................................................................................................................................................................................................................................
Installation contractor: ................................................................................................................................................................................................................................
Dealer purchased from: ...............................................................................................................................................................................................................................
ESPAÑOL:
Información del propietario
Completar y entregar al propietario
Fecha: ................................................................................................................................................................................................................................................................
Número de producto: ....................................................................................................................................................................................................................................
(impreso en la parte externa del producto)
Cantidad: ..........................................................................................................................................................................................................................................................
Tapajuntas: ......................................................................................................................................................................................................................................................
Accesorios instalados: ..................................................................................................................................................................................................................................
Modelo ............... Tamaño .............. Código de variante ..........................
Material de cubierta: ..................................................................................................................................................................................................................................
Instalador: ........................................................................................................................................................................................................................................................
Distribuidor al que se compró el producto: ...........................................................................................................................................................................................
FRANÇAIS :
Information pour le propriétaire occupant
Veuillez compléter et remettre au propriétaire occupant
Date : ..................................................................................................................................................................................................................................................................
Numéro de produit : .....................................................................................................................................................................................................................................
(éstampé sur l'extérieure du produit)
Quantité : ..........................................................................................................................................................................................................................................................
Solin : .................................................................................................................................................................................................................................................................
Accessoires installés : ..................................................................................................................................................................................................................................
Modèle ................ Dimension ............... Code ..........................
Matériel de toiture : .....................................................................................................................................................................................................................................
Entrepreneur en installation : ...................................................................................................................................................................................................................
Détaillant : .......................................................................................................................................................................................................................................................
/