Page is loading ...

____________________
M4L Mobile Printer Administrator’s Manual
Thermal Series Printers

READ THIS SOFTWARE LICENSE AGREEMENT BEFORE USING THIS PRINTER
Software License Agreement
CAREFULLY READ THE FOLLOWING TERMS AND
CONDITIONS BEFORE USING THIS PRINTER. USING THIS
PRINTER INDICATES YOUR ACCEPTANCE OF THESE
TERMS AND CONDITIONS. IF YOU DO NOT AGREE TO
THESE TERMS AND CONDITIONS, PROMPTLY RETURN
THE PRINTER AND ALL ACCOMPANYING HARDWARE
AND WRITTEN MATERIALS TO THE PLACE YOU
OBTAINED THEM, AND YOUR MONEY WILL BE
REFUNDED.
Definitions.
“Software” shall mean the digitally encoded, machine-readable
data and program. The term “Software Product” includes the
Software resident in the printer and its documentation. The
Software Product is licensed (not sold) to you, and Printronix
Auto ID Technology, Inc. either owns or licenses from other
vendors who own, all copyright, trade secret, patent and other
proprietary rights in the Software Product.
License.
1.
Authorized Use. You agree to accept a non-exclusive
license to use the Software resident in the printer solely
for your own customary business or personal purposes.
2.
Restrictions.
a.
To protect the proprietary rights of Printronix Auto
ID Technology, Inc., you agree to maintain the
Software Product and other proprietary
information concerning the typefaces in strict
confidence.
b.
You agree not to duplicate or copy the Software
Product.
c.
You shall not sublicense, sell, lease, or otherwise
transfer all or any portion of the Software Product
separate from the printer, without the prior written
consent of Printronix Auto ID Technology, Inc.
d.
You may not modify or prepare derivative works of
the Software Product.
e.
You may not transmit the Software Product over a
network, by telephone, or electronically using any
means; or reverse engineer, decompile or
disassemble the Software.
f.
You agree to keep confidential and use your best
efforts to prevent and protect the contents of the
Software Product from unauthorized disclosure or
use.
3.
Transfer. You may transfer the Software Product with the
printer, but only if the recipient agrees to accept the
terms and conditions of this Agreement. Your license is
automatically terminated if you transfer the Software
Product and printer.
Limited Software Product Warranty
Printronix Auto ID Technology, Inc. warrants that for ninety
(90) days after delivery,
the Software will perform in
accordance with specifications published by Printronix Auto ID
Technology, Inc. Printronix Auto ID Technology, Inc. does not
warrant
that the Software is free from all bugs, errors and
omissions.
Remedy
Your exclusive remedy and the sole liability of Printronix Auto
ID Technology, Inc.
in connection with the Software is
replacement of defective software with a copy of the same
version and revision level.
Disclaimer of Warranties and Limitation of Remedies
1.
THE PARTIES AGREE THAT ALL OTHER
WARRANTIES, EXPRESS OR IMPLIED, INCLUDING
WARRANTIES OF FITNESS FOR A PARTICULAR
PURPOSE AND MERCHANTABILITY ARE EXCLUDED.
Printronix Auto ID Technology, Inc. does not warrant that
the functions contained in the Software will meet your
requirements or that the operation of the Software will be
uninterrupted or error free. Printronix Auto ID Technology,
Inc. reserves the right to make changes and/or
improvements in the Software without
notice at any time.
2.
IN NO EVENT WILL PRINTRONIX AUTO ID
TECHNOLOGY, INC. BE LIABLE FOR LOST PROFITS,
LOST DATA, BUSINESS
INTERRUPTIONS, OR ANY
OTHER DIRECT,
INDIRECT, INCIDENTAL OR
CONSEQUENTIAL
DAMAGES ARISING OUT OF THE
USE OF OR INABILITY TO USE THIS PRODUCT,
EVEN IF
PRINTRONIX AUTO ID TECHNOLOGY, INC.
HAS BEEN ADVISED OF THE POSSIBILITY OF SUCH
DAMAGES, OR ANY DAMAGES CAUSED BY THE
ABUSE OR MANIPULATION OF THE SOFTWARE.
SOME STATES
DO NOT ALLOW THE EXCLUSION OR
LIMITATION OF
LIABILITY FOR CONSEQUENTIAL OR
INCIDENTAL DAMAGES, SO THE ABOVE LIMITATION
MAY NOT
APPLY TO YOU.
3.
Printronix Auto ID Technology, Inc. will not be liable for
any loss or damage caused by delay in furnishing a
Software Product or any other performance under this
Agreement.
4.
Our entire liability and your exclusive remedies for our
liability of any kind (including liability for negligence
except liability for personal injury caused solely by our
negligence) for the Software Product covered by this
Agreement and all other performance or nonperformance
by us under or related to this Agreement are limited to the
remedies specified by this Agreement.
5.
California law governs this Agreement.
Termination of License Agreement
This License shall continue until terminated. This license may
be terminated by agreement between you and Printronix Auto
ID Technology, Inc.
or by Printronix Auto ID Technology, Inc. If
you fail to comply with the terms of this License and such
failure is not corrected within thirty (30) days after notice.
When this License is terminated, you shall return to the place
you obtained them, the printer and all copies of the Software
and documentation.
U.S. Government Restricted Rights
Use, duplication or disclosure by the Government is subject to
restrictions as set forth in the Rights in Technical Data and
Computer Software clause at FAR 242.227-7013, subdivision
1
(3) (ii) or subparagraph (c) (1) (ii), as appropriate.
Further use, duplication or disclosure is subject to
restrictions applicable to restricted rights software as
set forth in FAR 52.227-19 (c) (2).
Acknowledgement of Terms and Conditions
YOU ACKNOWLEDGE THAT YOU HAVE READ THIS
AGREEMENT, UNDERSTAND IT, AND AGREE TO BE
BOUND BY ITS TERMS AND CONDITIONS. NEITHER
PARTY SHALL BE BOUND BY ANY STATEMENT OR
REPRESENTATION NOT CONTAINED IN THIS
AGREEMENT. NO CHANGE IN THIS AGREEMENT IS
EFFECTIVE UNLESS WRITTEN AND SIGNED BY
PROPERLY AUTHORIZED REPRESENTATIVES OF EACH
PARTY. BY USING THIS PRINTER, YOU AGREE TO
ACCEPT THE TERMS AND CONDITIONS OF THIS
AGREEMENT.

Trademark Acknowledgements
CSA is a registered certification mark of the Canadian Standards Association.
EIA is a registered service mark of the Electronic Industries Association.
IEEE is a registered service mark of the Institute of Electrical and Electronics
Engineers, Inc.
TUV is a registered certification mark of TUV Rheinland of North America, Inc.
UL is a registered
certification mark of Underwriters Laboratories, Inc.
CG Triumvirate is a trademark of Agfa Corporation.
CG Triumvirate Bold Condensed font is under license from the Monotype Corporation.
Printronix and M4L are trademarks of Printronix Auto ID Technology, Inc.
ZPL and ZPL II are registered trademarks of Zebra Technologies Corporation.
Windows is a registered trademark of Microsoft Corporation.
All other trademarks are the property of their respective owners
Notice of Copyright
This document contains proprietary information protected by copyright. No
part of this document may be
reproduced, copied, translated, or incorporated
in any other material in any form or by any means,
whether manual, graphic,
electronic, mechanical, or otherwise, without the written consent of Printronix
Auto ID Technology,
Inc.
All non-Printronix registered and/or unregistered trademarks used throughout
this manual are the sole
property of their respective owners.
COPYRIGHT © 2016 PRINTRONIX AUTO ID TECHNOLOGY, INC. All rights reserved.

Table of Contents
Trademark Acknowledgements ............................................................................. 3
Notice of Copyright .............................................................................................. 3
Table of Contents ................................................................................................ 4
1 Introduction .................................................................... 7
Standard Features ........................................................................................ 8
General Specifications ................................................................................ 10
Print Specifications ..................................................................................... 11
Media Specifications ................................................................................... 11
2 Printer Overview .......................................................... 12
Interfaces ........................................................................................................... 13
Recommended Micro SD card specification ............................................... 13
LCD Display ....................................................................................................... 14
3 Printer Setup ................................................................ 16
Installing
the Belt Clip and Battery
................................................................ 16
Charging the Battery
..................................................................................... 16
Loading the Media
........................................................................................ 17
Loading Media in Peel-Off Mode
................................................................... 18
Loading Fan-fold/External Media
................................................................... 19
Connecting the Printer
.................................................................................. 20
Cable Communications
................................................................................. 21
Wireless Communication with Bluetooth
........................................................ 21
Wireless Communication with WiFi
............................................................... 21
4 Power-On Utilities ........................................................ 22
Power-On Utilities
......................................................................................... 22
Media
Sensor Calibration
............................................................................. 22
Self-Test and Dump Mode
............................................................................ 23
Printer Initialization
....................................................................................... 23
Self Test
....................................................................................................... 23
Dump Mode
.................................................................................................. 25
Printer Defaults
............................................................................................. 25
5 Configuration Utility ...................................................... 26
Start the Configuration Utility ...................................................................... 26
Performing a Calibrate Sensor by Configuration Utility .............................. 27
Calibrate Sensor – Auto Calibrate .............................................................. 28
Calibrate Sensor - Manual Setup ................................................................ 28
Configuration Utility ZPL2 Emulation Menu ................................................ 29
Setting AUTO.BAS by Configuration Utility ................................................ 30
CPCL Emulation ......................................................................................... 30

Setting Bluetooth by Configuration Utility ................................................... 30
Setting WiFi by Configuration Utility ........................................................... 31
6 LCD Menu Function ..................................................... 33
Using the LCD to Set the Printer ................................................................ 33
Menu Map ................................................................................................... 35
Print Setup for General ............................................................................... 35
Print Setup for ZPL2 ................................................................................... 36
Sensor ......................................................................................................... 37
Serial Comm. .............................................................................................. 38
Wireless LAN .............................................................................................. 39
Bluetooth ..................................................................................................... 39
Date Time .................................................................................................... 39
Display ........................................................................................................ 40
File Manager ............................................................................................... 40
Diagnostics.................................................................................................. 41
Print Config ................................................................................................. 41
Dump Mode................................................................................................. 41
Battery ......................................................................................................... 41
Printhead ..................................................................................................... 41
Display Languages ..................................................................................... 41
Emulation .................................................................................................... 42
Service ........................................................................................................ 42
7
Trouble Shooting ......................................................... 43
8 Maintenance ................................................................ 46
A Contact Information ..................................................... 47
Printronix Customer Support Center ........................................................... 47
B Notices......................................................................... 49
Communication Statements .............................................................................. 51
Software License Agreement ............................................................................ 54


Introduction
The M4L is a comfortable, light-weight printer capable of working with any mobile receipt printing
application where you need quick, simple receipts on demand. Our M4L is designed for a rough life,
inside the IP54-rated environmental case to resist dust and water and with its rubber over-mold design
prepared to take up to a five foot fall and keep printing. These small and light printers can be worn
comfortably for a full shift, without interfering with the user’s tasks. Use USB, Bluetooth, optional 802.11
b/g/n Wireless or serial to connect to a mobile computer or even a smart phone and produce clear easy-
to-read receipts hour after hour
To print label formats, please refer to the instructions provided with your labeling software; if you need to
write the custom programs, please refer to the ZPL/CPCL programming manual that can be found on on
PRINTRONIX website at
http://www.PrintronixAutoID.com.
Applications
• Portable point of sale
• Retail item marking, markdowns, shelf labeling & shelf talkers
• Labels for shipping & receiving
• Inventory control
• Cross-docking
• Pick, pack & apply operations
• Print pick tickets
• Logistics receipts

Standard Features
Your M4L offers the following standard features:
Standard Feature
Direct thermal printing
Black Mark reflective sensor (center position, black mark in back side)
Gap transmissive sensor (Fixed, center of offset 2.75 mm to right from center) 203 Print Density
203 Print Density
Cover open sensor
Label Taken sensor
LCD Control Panel Display
4 operation buttons (On/off, menu, info, and feed)
2 LEDs for printer status and battery status
USB 2.0 (full speed) interface
Class 2 Bluetooth 2.1 module
32 MB SDRAM memory
16 MB FLASH memory
Micro SD card reader for memory expansion up to SDHC 4G (max.)
DC 7.2V/5800 mAh Li-ion rechargeable battery
Real Time Clock
Powerful 32 bit 200 MHz RISC processor
Zebra® CPCL and Zebra® ZPL emulation languages support
Internal 8 alpha-numeric bitmap fonts
Internal Monotype Imaging® true type font engine with one CG Triumvirate Bold Condensed
scalable font
Fonts and bar codes can be printed in any one of the four directions (0, 90,180, 270 degree)
Downloadable fonts from PC to printer memory. If a font is called out in the print job and does
not exist in the printer, the workaround is to download a similar truetype font and rename in the
file system to match CPCL command font.
Downloadable firmware upgrades
Bar code, Graphics/image Printing
Supported bar code
Supported image
1D bar code
2D bar code
BITMAP
BMP
PCX
Code 128 subsets A, B, C; Code
128UCC; EAN 128; Interleave 2 of
5; Code 39; Code 93; EAN-13;
EAN-8; Codabar; POSTNET;
UPC-A; UPC-E; EAN and UPC
2(5) digits; MSI; PLESSEY; ITF-
14; EAN14; Code 11; PLANET;
LOGMARS
CODABLOCK F mode;
DataMatrix, Maxicode, PDF-417;
Aztec; MicroPDF417; QR code;
RSS Barcode (GS1 Databar);
Code 49

Code page
Codepage 437 (English-US)
Codepage 950 (Traditional
Chinese
ISO-8859-1: Latin-1 (Western
European)
Codepage 737 (Greek)
Codepage 936 (Simplified
Chinese)
ISO-8859-2: Latin-2 (Central
European)
Codepage 850 (Latin-1)
Codepage 932 (Japanese)
ISO-8859-3: Latin-3 (South
European)
Codepage 852 (Latin-2)
Codepage 949 (Korean)
ISO-8859-4: Latin-4 (North
European)
Codepage 857 (Turkish)
Codepage 1250 (Latin-2)
ISO-8859-5: Cyrillic
Codepage 860 (Portuguese)
Codepage 1251 (Cyrillic)
ISO-8859-6: Arabic
Codepage 861 (Icelandic)
Codepage 1252 (Latin-1)
ISO-8859-7: Greek
Codepage 862 Hebrew)
Codepage 1253 (Greek)
ISO-8859-8: Hebrew
Codepage 863 (French Canadian)
Codepage 1254 (Turkish)
ISO-8859-9: Turkish
Codepage 864 (Arabic)
Codepage 1255 (Hebrew)
ISO-8859-10: Nordic
Codepage 865 (Nordic)
Codepage 1256 (Arabic)
ISO-8859-15: Latin-9
Codepage 866 (Russian)
Codepage 1257 (Baltic)
UTF-8
Codepage 869 (Greek 2)
Codepage 1258 (Vietnam)

General Specifications
General Specifications
Physical dimensions
6.3in (160mm) W x 7.54in (191.6mm) H x 3.11in (79mm) D
Mechanism
Plastic with rubber over molded
Weight
2.083lb (0.945kg) w/o Battery; 2.43lb (1.1kg) with Battery
Power
Single Unit Charger (optional)
Input: AC 100-240V
Output: DC 12V 1A
Environmental condition
Operation: 14 to 122˚F (-10 to 50˚C)
Storage: -40 to 140˚F (-40 to 60˚C)
Relative humidity: 10 ~ 90% non-condensing IP54 w/ IP54-rated
environmental case
Drop 5ft (1.5m)
Drop 6.5ft (1.8m) w/ IP54-rated environmental case
Battery Spec
Charging time: ~5 hr (Single Unit Charger), ~2 hr (Bay Charger)
Standby mode (Bluetooth): up to 32 hr
Standby mode (Wi-Fi): up to 18 hr
Printing: one label per 2 minutes,
Condition
Endurance (hr)
4" x 6" Labels
Density 3
26
780
Density 8
21
650
Charging capability
Internal charging capability (battery-in)
Single Unit Charger (optional)
External charging capability (battery-out)
Charging stations (4 bay or single bay) (optional)

Print Specifications
Print Specifications
Printhead resolution
(dots per inch/mm)
203 dots/inch (8 dots/mm)
Printing method
Direct thermal
Dot size
0.125 x 0.125 mm
(width x length)
(1 mm = 8 dots)
Print speed
Max. 4 ips (100 mm/sec)
(inches per second)
2,3 ips for Peel-Off mode
Max. print width
4.09” (104 mm)
Max. print length
90” (2286 mm)
Printout bias
Vertical: 1 mm max.
Horizontal: 1 mm max.
Media Specifications
Media Specifications
Media roll capacity
Max. 2.65” (67.3 mm) OD
Media core diameter
0.5 ~ 1” (12.7 mm ~ 25.4 mm) ID core
Media type
Continuous, die-cut, gap/black mark, External fan- fold,
receipt
Media wound type
Outside wound
Media width
2” ~ 4.41” (50.8 mm ~ 112 mm)
Media thickness
0.0022”~0.0065” (0.055 mm ~ 0.165 mm)
0.5in Hub = 2in to 4.41in (50.8mm to 112mm)
1
0.75in Hub = 2in to 4.34in (50.8mm to 110.3mm)
1.00in Hub = 2in to 4.34in (50.8mm to 110.3mm)
Label length
0.500”~90” (12.7 mm ~ 2286 mm)
Label length (peel mode)
1” ~ 6” (25.4 ~ 152.4 mm)
External fan-fold media
Stack height: 2.75” (70 mm)
Page length: 6” ~ 12” (152 mm ~ 305 mm)
Black Mark
Min. 0.3150” (8 mm) (W) x 0.0785” (2 mm) (H)
Gap height
Min. 0.0785” (2 mm)
Note 1: 0.5in Hub is located under 0.75 to 1.00in Hub adapters. Remove Phillips head
screw and nut from each Media Holder

Printer Overview
1. LCD Display
2. Feed Key
3. Menu Key
4. Power On/Off Key
5. Info Setting Key
6. Battery Status Indicator
7. Error/Power Indicator
8. Media Cover Release Latch
9. Peel-Off Sensor
10. Printhead
11. Media Holder
12. Media Cover
13. Platen Roller
14. Label Peel Cover
15. Tear/Peel Bar
1
3
5
2
4
6
7
8
10
11
12
13
14
15
9

Interfaces
1. Belt Clip
2. Li-ion Battery
3. Battery Open Clasp
4. External Label Entrance Slot
5. Hanger for Shoulder Strap (2)
6. USB Interface
7. Micro SD Card Socket
8. Power Jack (used for Charger)
Recommended Micro SD card specification
SD card spec
SD card
capacity
Approved SD card
manufacturer
V1.0, V1.1
MicroSD 128 MB
Transcend, Panasonic
V1.0, V1.1
MicroSD 256 MB
Transcend, Panasonic
V1.0, V1.1
MicroSD 512 MB
Transcend, Panasonic
V1.0, V1.1
MicroSD 1 GB
Transcend, Panasonic
V2.0 SDHC CLASS 6
MicroSD 4 GB
Transcend
- The DOS FAT file system is supported for the SD card.
- Folders/files stored in the SD card should be in the 8.3 filename format
1
2
5
3
4
6
8
7

LCD Display
Keys
Function
− Display the printer information
− Key for setting LCD configuration menu
− Enter the printer configuration menu
− Key for setting LCD configuration menu
− Press and hold for 2-3 seconds to turn on the printer
− Press and hold for 2-3 seconds to turn off the printer
− Key for setting LCD configuration menu
− Ready status: Feed one label
− Printing status: Pause the print job
− Key for setting LCD configuration menu
LEDs
Status
Indication
Error
Off
Printer is ready
Red (solid)
− Media cover is open
− Out of memory
− Clean data
− Printer is busy
Red (blinking)
− No paper
− Paper jam
Power
Off
Printer power is turned off
Green (solid)
− Printer power is turned on
− Battery is fully charged
Green (blinking)
Low battery
Amber (solid)
Battery is charging
LCD
Indication
Printer has been connected with cable
Bluetooth devices have been paired
Wi-Fi device has been connected
Battery capacity %


Printer Setup
Installing
the Belt Clip and Battery
Insert the Belt Clip first
Insert the left side to install the battery on the underside of the printer, and then push the right side of
the battery down until the clasp locks down in place.
Charging the Battery
IMPORTANT Before using the printer, make sure the battery is fully charged. It takes ~ 5 hours
to charge the battery using the Single Unit Charger (battery installed in printer) or
~ 1 hour using an External Charging Station (4 bay or single bay). The lifetime of
the battery is ~ 300 charge/discharge cycles.
.
Charging Instructions:
• Single Unit Charger only: After installing the battery into the printer, open the interface cover
and plug the Single Unit Charger power cord into the printer power jack.
• Plug the Charger into a compatible AC power outlet.
• Switch OFF printer power prior to plugging the Single Unit Charger power cord into the printer
power jack.
• Do not remove the battery from the printer while it is charging or you will need to re-plug the
charger into the power outlet.
• When the battery is charging, the color of the Power LED Indicator is solid amber.
Battery Safety Warning:
DO NOT throw the battery in fire. DO NOT short circuit the contacts.
DO NOT disassemble the battery. DO NOT throw the battery in municipal waste
CAUTION: Danger of explosion if battery is incorrectly replaced. Replace only with the
same or equivalent type recommended by the manufacturer. Dispose of used batteries
according to the manufacturer’s instructions

• The battery is fully charged when the Power LED Indicator turns from amber to green.
Loading the Media
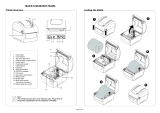
Open the printer media cover by pressing down on the media cover release latch.
Pull the media holders apart far enough to fit the width of the label roll you are installing
Place the roll, printing side face-out, between the media holders and insert hubs into the core. Pull out
enough paper above the printhead.
Press down on both sides of the media cover to ensure it is closed correctly.
NOTE: Calibrate the gap/black mark sensor when changing media using the Configuration Utility –
Printer Function – Calibrate Sensor or the Power-On Utilities.

Loading Media in Peel-Off Mode
Load Media as defined in Loading the Media section on previous page
Remove 1 ~ 2 die cut labels from the liner
Press down on both sides of the media cover to ensure it is closed correctly.
Route the liner under the label peel cover as shown

Pull the liner tightly
Push the label peel cover toward the front of the printer until it covers the plate roller
Press down on the label peel cover to lock it in place
NOTE: Calibrate the gap/black mark sensor when changing media using the Configuration Utility –
Printer Function – Calibrate Sensor or the Power-On Utilities.
Loading Fan-fold/External Media
Open the printer media cover by pressing down on the media cover release latch.
Pull the media holders apart far enough to fit the width of the Fan-fold media you are installing

Install Media Core that is the width of your media to secure the media holders in place
Route the media, printing side out, through the bottom external label slot
Press down on both sides of the media cover to make sure it is closed correctly
NOTE: Calibrate the gap/black mark sensor when changing media using the Configuration Utility –
Printer Function – Calibrate Sensor or the Power-On Utilities.
Connecting the Printer
The printer must establish communication with a host terminal which sends the data to be printed. There
are three ways to connect the M4L series:
• By an USB cable between the printer and its host terminal
• By a Bluetooth short-range radio if Bluetooth is installed and enabled.
• By a Wireless LAN per 802.1 b/g/n (Option)
/