Page is loading ...

CAUTION!
Observe the safety instructions of this installation
and maintenance manual before placing the boiler in ope-
ration.
DANGER!
If installation, adjustment, modification, operation or main-
tenance of the heating system is carried out by an unqua-
lified person, this may result in danger to life and limb or
property damage. The directions of this
installation and maintenance manual must be followed
precisely. Contact a qualified service company,
service provider or the gas company if support or
additional information is needed.
NOTICE!
The operating manual is a component of the technical do-
cumentation and must be handed over to the operator of
the heating system. Discuss the instruction in this manual
with the owner or operator of the heating system to ensu-
re that they are familiar with all information required for
operation of the heating system.
In the Commonwealth of Massachusetts this boiler must
be installed by a licensed plumber and gasfitter.
Installation and Servicing
Instructions
Condensing boiler for
operation with fan-
assisted gas burner
7 747 015 037-00.1RS
Logano plus SB615
7 747 016 908 - 04/2011 US
For heating contractors
Please read carefully before
installing and servicing.

Contents
Logano plus SB615 - Technical specifications are subject to change without prior notice.
2
1 General safety instructions and explanation of symbols . . . . . . . . . . . . . . .3
1.1 Safety instructions . . . . . . . . . . . . . . . . . . . . . . . . . . . . . . . . . . . . . . . . . . . . . .3
1.2 Explanation of symbols . . . . . . . . . . . . . . . . . . . . . . . . . . . . . . . . . . . . . . . . . . .4
2 Intended use . . . . . . . . . . . . . . . . . . . . . . . . . . . . . . . . . . . . . . . . . . . . . . . . . .5
3 Regulations and guidelines . . . . . . . . . . . . . . . . . . . . . . . . . . . . . . . . . . . . . .5
3.1 National regulations . . . . . . . . . . . . . . . . . . . . . . . . . . . . . . . . . . . . . . . . . . . . .5
3.2 Compliance with standards and regulations . . . . . . . . . . . . . . . . . . . . . . . . . . . . . .5
4 Pack contents . . . . . . . . . . . . . . . . . . . . . . . . . . . . . . . . . . . . . . . . . . . . . . . . .7
5 Specifications, dimensions and connections . . . . . . . . . . . . . . . . . . . . . . . .8
6 Boiler Installation . . . . . . . . . . . . . . . . . . . . . . . . . . . . . . . . . . . . . . . . . . . . . 10
7 Installation. . . . . . . . . . . . . . . . . . . . . . . . . . . . . . . . . . . . . . . . . . . . . . . . . . . 11
7.1 Thermal insulation and outer jacket panels . . . . . . . . . . . . . . . . . . . . . . . . . . . . . . 11
7.2 Mounting and wiring the Logamatic controls. . . . . . . . . . . . . . . . . . . . . . . . . . . . . 15
7.3 Burner door and burner. . . . . . . . . . . . . . . . . . . . . . . . . . . . . . . . . . . . . . . . . . 17
7.4 Boiler jacket . . . . . . . . . . . . . . . . . . . . . . . . . . . . . . . . . . . . . . . . . . . . . . . . . 18
7.5 Nameplate . . . . . . . . . . . . . . . . . . . . . . . . . . . . . . . . . . . . . . . . . . . . . . . . . . 20
7.6 Flue systems . . . . . . . . . . . . . . . . . . . . . . . . . . . . . . . . . . . . . . . . . . . . . . . . 20
7.7 Neutralizer unit . . . . . . . . . . . . . . . . . . . . . . . . . . . . . . . . . . . . . . . . . . . . . . . 23
7.8 Water connections . . . . . . . . . . . . . . . . . . . . . . . . . . . . . . . . . . . . . . . . . . . . 23
8 Commissioning . . . . . . . . . . . . . . . . . . . . . . . . . . . . . . . . . . . . . . . . . . . . . . . 24
9Servicing . . . . . . . . . . . . . . . . . . . . . . . . . . . . . . . . . . . . . . . . . . . . . . . . . . . . 25
9.1 General information . . . . . . . . . . . . . . . . . . . . . . . . . . . . . . . . . . . . . . . . . . . . 25
9.2 Cleaning the boiler. . . . . . . . . . . . . . . . . . . . . . . . . . . . . . . . . . . . . . . . . . . . . 26
9.3 Checklist . . . . . . . . . . . . . . . . . . . . . . . . . . . . . . . . . . . . . . . . . . . . . . . . . . . 28
9.4 Transport Note for Logano SB615. . . . . . . . . . . . . . . . . . . . . . . . . . . . . . . . . . . 29

General safety instructions and explanation of symbols
1
Logano plus SB615 - Technical specifications are subject to change without prior notice.
3
1 General safety instructions and explanation of symbols
Read and follow the safety instructions and rules and bring
them to the attention of the customer.
1.1 Safety instructions
Failure to consider your own safety in an emergency
such as a fire can be fatal.
z Never put yourself at risk of fatal injury. Your own safety
must always take the highest priority.
Risk of explosion if you smell gas
z Turn off the main gas valve.
z Open windows and doors.
z Do not operate any electrical switches or equipment
such as telephones, power plugs and doorbells.
z Extinguish all open flames. Do not smoke. Do not use
lighters of any kind.
z Warn all occupants of the building, but do not ring
doorbells.
z If you can actually hear gas escaping, leave the building
immediately. Prevent others from entering and notify the
police and fire department from outside the building.
z From outside the building: call gas supplier and au-
thorized heating contractor.
Risk of poisoning if you smell flue gases
z Switch off the boiler.
z Open windows and doors.
z Inform an authorized heating contractor.
Risk of poisoning from escaping flue gases when
combustion air supply is inadequate
z Never close off or reduce the size of air inlet or outlet
vents.
z The boiler must not be operated until the obstruction
has been removed.
z Inform the system operator in writing of the problem
and associated danger.
Danger of explosion of flammable gases.
z Any work on components that carry gas may only be
carried out by an certified gas fitter.
Risk of fire from explosive and combustible
materials
z Do not use or store combustible materials (paper, lace
curtains, clothing, thinners, paints, etc.) in the boiler
room.
Risk of system damage due to contaminated
combustion air supply
z Keep the supply of air for combustion free of corrosive
substances (e.g. halogenated hydrocarbons that con-
tain chlorine or fluorine compounds).
z Prevent heavy contamination of the combustion air/am-
bient air by dust, airborne particles, etc.
Danger from electric shock when the boiler is open.
z Before opening the boiler:
Disconnect the heating system from the electrical pow-
er supply by means of the emergency shut-off switch or
the heating system circuit breaker on the main fuse pan-
el.
z It is not sufficient just to switch off the control unit.
z Take measures to ensure the heating system can not be
switched on again unintentionally.
Danger due to short-circuits
To prevent short circuits, only:
z use genuine Buderus wiring.

General safety instructions and explanation of symbols
1
Logano plus SB615 - Technical specifications are subject to change without prior notice.
4
Installation, conversion and operation
z Only use the boiler for its intended purpose.
z Observe all regulations and standards applicable to in-
stallation and operation of the system in your country
and local jurisdiction. Those include local requirements
in respect of positioning, the air inlet and outlet vents
and chimney flue, as well as fuel and electrical connec-
tions.
z The boiler may only be installed or converted by a cer-
tified and experienced heating contractor.
z Do not modify any parts that carry flue gas.
z Work on gas components must be carried out by qual-
ified and certified personnel only.
z Only qualified electricians are permitted to carry out
electrical work.
z Never disable safety relief valves.
Water may escape from the safety relief valve for the
heating system when it is being heated up.
Maintenance and servicing
Heating systems should be regularly maintained for the fol-
lowing reasons:
– to maintain a high level of efficiency and to operate the
system economically (low fuel consumption),
– to achieve a high level of operational reliability,
– to maintain the cleanest possible combustion.
z Recommendation for users:
Sign a maintenance and servicing contract with an ap-
proved heating contractor covering annual servicing
and condition-based maintenance.
z Servicing and repairs may only be carried out by a cer-
tified heating engineer.
z Have any faults immediately repaired in order to prevent
further damage to the system.
z The operator is responsible for the general and environ-
mental safety of the heating system.
z Use only genuine spare parts. Damage caused by the
use of parts not supplied under Buderus is not covered
under the Buderus warranty.
Instructing the customer
z Explain to the customer how the boiler works and how
to operate it.
z Inform the customer that he/she must not carry out any
alterations or repairs.
1.2 Explanation of symbols
Signal words are used to indicate the seriousness of the
ensuing risk if measures for minimizing damage are not
taken.
– Caution indicates that minor property damage may oc-
cur.
– Warning indicates that minor personal injury or severe
property damage may occur.
– Danger means that severe personal injury may occur.
Very serious cases may result in death.
Notes contain important additional information.
Notes do not contain any warnings or information about
hazards or risks.
Warnings are indicated by a warning triangle
and a grey background.
Notes are identified in the text by this symbol
and framed by horizontal lines above and be-
low the text.

Intended use
2
Logano plus SB615 - Technical specifications are subject to change without prior notice.
5
2 Intended use
The Buderus Logano SB615 steel boiler is a condensing
boiler for operation with a fan-assisted gas burner. The
boiler may only be used for heating central heating system
water and indirect heating of domestic hot water (using a
heat exchanger or indirect fired hot water tank), for in-
stance in apartment buildings.
3 Regulations and guidelines
3.1 National regulations
The heating system must comply with the requirements of
the relevant regulatory authorities or otherwise of the Nati-
onal Fuel Gas Code, ANSI Z 223.1. In Canada, the require-
ments of CAN/CGA-B.149.1 and 2, Installation Code for
Gas Burning Appliances and Equipment, must be obser-
ved.
If specified by the relevant regulatory authorities, the
heating system must comply with the regulations of the
Standard for Controls and Safety Devices for Automatical-
ly Fired Boilers, ANSI/ASME CSD-1.
Carbon monoxide detectors must be installed as specified
by the local regulations. The boiler must be serviced annu-
ally.
3.2 Compliance with standards and
regulations
Installation of the boiler must comply with all applicable co-
des and regulations imposed by the national, Federal or lo-
cal authorities and bodies. If no specific requirements are
defined, in the USA, the latest edition of the National Fuel
Gas Code ANSI Z223.1/NFPA 54 must be complied with.
In Canada, installation must comply in all respects with the
latest edition of the Installation Code for Gas Burning
Appliances and Equipment, CAN/CGA-B.149 and the
applicable local regulations and requirements for the
appliance category. The relevant authorities and regulatory
bodies must be informed before installation starts.
Where required by local regulations, the system must com-
ply with the American Society of Mechanical Engineers
Safety Code for Controls and Safety Devices for Automati-
cally Fired Boilers (ASME CSD-1).
For boiler rating plate remove left front panel.
In the Commonwealth of Massachusetts, this appliance
must be installed by a licensed pipe fitter, taps external to
the boiler must be fitted with T-handles and condensate pi-
ping must be fitted in accordance with the State Plumbing
Code.
The local regulations regarding minimum pressure detec-
tors and low-water safety cutouts must be observed. Instal-
lation and operation must comply with the device
manufacturer's technical documentation.
We recommend fitting an 80 mesh dirt filter externally to
the boiler return to prevent contamination of the boiler by
the water.
Leak test
z A leak test must be carried out. The testing pressure is
based on the normal operating pressure of the heating
system and should be 1.3 times that pressure, and in
any case no less than 14 psi (1 bar).
WARNING!
RISK OF FATAL INJURY
from explosion of flammable gases.
z Installation, connection of the fuel supply
and flue pipe, commissioning, connec-
tion of the electrical poower supply, ser-
vicing and repair may only be carried out
by an authorized heating engineer.
z Any work on gas-carrying components
may only be carried out by an authorized
gas installer.
USER NOTE
The details on the boiler rating plate are de-
finitive and must be observed.

Regulations and guidelines
3
Logano plus SB615 - Technical specifications are subject to change without prior notice.
6
Safety limits
Fuels
Logano plus SB615: LPG or natural gas.
Observe information provided by burner manufacturer.
Safety limits
Maximum flow temperature: 208 °F
(98 °C)
Permissible operating
pressure:
500,000 - 630,000 BTU/hr
(145–185 kW)
30 psi
(2.0 bar)
820,000 - 106,000 BTU/hr
(240–310 kW)
1,360,000 - 2,180,000
BTU/hr
(400–640 kW)
Maximum cycle time for:
Safety temperature limiter: 40 s
Temperature control: 40 s
Tab. 1 Safety limits

Pack contents
4
Logano plus SB615 - Technical specifications are subject to change without prior notice.
7
4 Pack contents
– Boiler mounted on pallet
– Supply manifold, packaged with
hydronic control package
– Technical documents, attached to boiler heat exchang-
er
– Spare gasket, attached to boiler heat exchanger
– Boiler jacket panels and installation components, pack-
aged in a wooden crate and cardboard. The assembly
components are located in Pack A
– Controller with wiring diagram and operating instruc-
tions for electronic control of boiler and heating system,
packed in box (optional)
– Neutralizer unit, packed in box
(special-order option)
– Hydronic control package, consisting of aquastat, low
water cut-off, relief valve and temperature pressure
gauge (when ordered from Buderus)
Some of the accessories supplied as standard may not be
required for all boiler models.

Specifications, dimensions and connections
5
Logano plus SB615 - Technical specifications are subject to change without prior notice.
8
5 Specifications, dimensions and connections
7 747 015 037-01.1RS
L
B
M
L
K
VK
RK1
RK2
AKO
EK/EL
H
AA
Q
AA
H
1
H
Fig. 1 Specifications, dimensions and connections
Tab. 2
Key to Fig. 1
ØAA Boiler breech inner diameter
AKO Condensate outlet
EK/EL Cold water inlet/drain
H Boiler height excluding controller
H
1
Boiler height including controller
Logamatic 4311/12 controller = H + 10" (235mm)
H
AA
Flue socket height
RK1 Boiler return
RK2 Boiler return
VK Boiler flow
M Sensing point for temperature sensor/immersion
sleeve
L Boiler length inc. outer casing
LK Boiler heat exchanger length
B Boiler width inc. outer casing

Boiler rating Unit 145 185 240 310 400 510 640
Max. gas input [MBtu/h] 506 644 835 1080 1393 1776 2228
Rated output (gross output) [MBtu/h] 484 612 791 1022 1317 1678 2104
IBR Net [MBtu/h] 421 532 688 889 1145 1459 1830
Thermal efficiency [%] 95.6 95.0 94.8 94.6 94.5 94.5 94.4
Combustion efficiency [%] 97.1 96.7 96.5 96.4 96.3 96.2 96.2
Length L [inch] 68 3/4 68 3/4 70 70 75-1/4
Length L
K
[inch] 60 61 61 66-1/2
Height H [inch] 54-1/4 55-1/2 63-1/2 69-1/2
Width B [inch] 35-1/2 38-1/2 38-1/2 43-1/2
Boiler breech inner diameter ØAA [inch (mm)] 7" (183) 8" (203) 10" (253) 12" (303)
Height H
AA
[inch] 12 12 13 15
Weight approx. [lbs] 1709 1725 1866 1914 2154 2845 2900
Boiler return RK1 [°F] 149 176 212 212
Boiler return RK2 [°F] 104 149 149 176
Flue gas temperature [°F]
1
104 104 115 115 108 111 111
[°F]
2
151 151 160 160 154 156 160
Available flue pressure [inch W.C.] Varies depending on burner
Flue gas back-pressure [inch W.C.] 0,48 0,62 0,88 0,96 1,20 1,43 1,77
Tab. 3 Specifications
1
Flow/return temperature 40 °C/30 °C.
2
Flow/return temperature 75 °C/60 °C.
NOTE
The SB 615/145 and SB 615/185 boilers
are factory-fitted with a stainless steel flue
pipe reducer made by Heat Fab. The flue
connection is reduced from 7" to 6".
All other models require a flue pipe
connector approved for the installation site.
Specifications, dimensions and connections
5
Logano plus SB615 - Technical specifications are subject to change without prior notice.
9

Boiler Installation
6
Logano plus SB615 - Technical specifications are subject to change without prior notice.
10
6 Boiler Installation
It is useful if there is a waste water drain near the installa-
tion site. Refer to page 29 for information on transporting
the boiler.
The boiler should be placed on a foundation
approx. 2 - 4" (50 - 100 mm) high. Refer to dimensions B
and L (Tab. 4) for sizing the foundation.
The base must be flat and level and able to support the
boiler gross weight.
Observe the recommended minimum clearances
(indicated in brackets) for installation and servicing when
positioning the boiler (Fig. 2 or Tab. 4).
The boiler body must be aligned horizontally.
Tab. 4 Wall clearances
1)
Take burner size account
Fig. 2 Boiler room (for dimensions see Tab. 4)
*
)
Take burner size into account.
32" *
min. 4”
min. 8”
Recommended and minimum wall clearances in inch (mm)
Boiler
rating
Clearance
A
1
Clearance
A
2
1)
Lengh
L
Width
B
Width/Height
Delivered
recomm inch (mm) 145 36" (914) 72" (1829) 72" (1816) 36" (900) 29" (720) 53" (1340)
minimum inch (mm) 24" (610) 48" (1290)
recomm inch (mm) 185 36" (914) 72" (1829) 72" (1816) 36" (900) 29" (720) 53" (1340)
minimum inch (mm) 24" (610) 48" (1219)
recomm inch (mm) 240 36" (914) 72" (1829) 73" (1845) 38" (970) 32" (790) 54" (1370)
minimum inch (mm) 24" (610) 48" (1219)
recomm inch (mm) 310 36" (914) 72" (1829) 73" (1845) 38" (970) 32" (790) 54" (1370)
minimum inch (mm) 24" (610) 48" (1219)
recomm inch (mm) 400 36" (914) 72" (1829) 73" (1845) 38" (970) 32" (790) 62" (1570)
minimum inch (mm) 24" (610) 54" (1372)
recomm inch (mm) 510 42" (1067) 78" (1981) 78" (1981) 44" (1100) 37" (920) 69" (1730)
minimum inch (mm) 36" (914) 60" (1524)
recomm inch (mm) 640 42" (1067) 78" (1981) 78" (1981) 44" (1100) 37" (920) 69" (1730)
minimum inch (mm) 36" (914) 60" (1524)

Installation
7
Logano plus SB615 - Technical specifications are subject to change without prior notice.
11
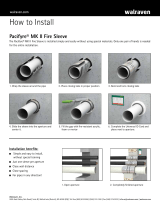
7Installation
7.1 Thermal insulation and outer jacket panels
z Slide the thermal insulation jacket underneath the boiler
z Wrap thermal insulation jackets overlapping around the
boiler and fix at the top with 5 spring clips
(Fig. 4, Item 1). Ensure that both door hinge bolts are
installed properly.
z Open burner door.
z Place lower thermal insulation pad (Fig. 4, Item 2)
against boiler body front panel and fix to the thermal in-
sulation jacket with 2 spring clips on each side.
z Place thermal insulation strip (Fig. 4, Item 3) around
the cylindrical section of the boiler body at the top and
fix to the lower insulation pad with 2 spring clips, one
each side.
z Place top thermal insulation pad against front of boiler
body (Fig. 4, Item 4).
z Close burner door and secure in position with hex-
bolts.
USER NOTE
Except when fitting the front thermal insula-
tion pad, the combustion chamber must re-
main sealed by the burner door so that the
stainless steel combustion chamber is not
damaged by any welding or grinding work.
Fig. 3 Sliding the thermal insulation jacket underneath the
boiler
Item 1: Hinge bolt
7 747 015 037-04.2RS
1
USER NOTE
When fitting the thermal insulation jacket,
make sure that the woven fabric is on the
outside and the cutouts are at the rear.
WARNING!
RISK OF INJURY
due to burner door falling off when opened.
z Make sure that both hinge bolts (Fig. 3,
Item 1) are inserted.
Fig. 4 Wrapping thermal insulation jacket around boiler and
fixing
Item 1: Insulating boiler jacket
Item 2: Lower thermal insulation pad
Item 3: Thermal insulation strip
Item 4: Top thermal insulation pad
1
3
2
4
USER NOTE
Take care to correctly position cutouts for
door hinges and threaded hinges of the
burner door.

Installation
7
Logano plus SB615 - Technical specifications are subject to change without prior notice.
12
z Place rear thermal insulation panel against rear of boiler
to fit over protrusions and fix to side thermal insulation
jacket on both sides using 4 spring clips.
z Fit front cross-member (with trapezoid cutout facing
down) so that the 2 holes match up with the bolts at the
top and fix with nuts.
z Fit rear cross-member (with trapezoid cutout facing
down) so that the 2 holes match up with the bolts at the
top and fix with nuts.
z Position the top flange of the side members in the cut-
out in the front and rear cross-members. Fix with 2 self-
tapping screws, placed through the hole at the front
and the slot at the rear.
Fig. 5 Fixing rear thermal insulation
7 747 015 037-05.1RS
Fig. 6 Positioning and fixing front and rear cross-members
USER NOTE
The edge flanges on the cross-members
must face outwards and the front and rear
cross members must be horizontal and level
with each other.
Fig. 7 Locating and fixing the side members
7 747 015 037-13.1RS

Installation
7
Logano plus SB615 - Technical specifications are subject to change without prior notice.
13
z Insert side panels with the flange behind the boiler
frame at the bottom and in the slot in the center.
z Lift side panels slightly and hook the top flanges over
the side members.
z Push ends of thermal insulation jackets behind side
panel flanges.
z Insert the two bosses of the cable strain relief for the
burner cable into the holes in the left or right side panel
flange.
z Cut burner cable to required length, place in cable
strain relief, close tab and secure with 2 self-tapping
screws.
Fig. 8 Fitting side panels
7 747 015 037-14.1RS
USER NOTE
The cutout in the flange of each side panel
section must be in the center of the boiler.
Fig. 9 Inserting side panels and attaching burner cable
7 747 015 037-15.1RS

Installation
7
Logano plus SB615 - Technical specifications are subject to change without prior notice.
14
z Screw lower rear panel section (on SB615/145 to 310
boilers) to the side panel flanges using 5 self-tapping
screws.
z Locate Z-section edge of upper rear panel behind the
lower rear panel, hold panel against side panel flanges
and attach with 4 self-tapping screws.
z Screw 1 or 2 cable clips or cable guide to top section
of rear panel (Fig. 10).
z Screw rear panel to side panel flanges using 4 self-tap-
ping screws on each side (on SB615/400 to 640 boil-
ers) (Fig. 11).
z Screw 1 or 2 cable clips or cable guide to top flanged
edge.
Fig. 10 Screwing rear panel sections in place (boiler
SB615/145 to 310)
Item 1: Lower rear panel
Item 2: Upper rear panel
Item 3: Cable clamp
7 747 015 037-06.2RS
3
3
2
1
USER NOTE
On the SB615/145 to 310 boilers, the rear
panel consists of 2 sections (Fig. 10),
whereas on the SB615/400 to 640 boilers
use only one piece (Fig. 11).
USER NOTE
Screw top self-tapping screws into holes in
cross-member.
Fig. 11 Screwing rear panel in place (boiler SB615/400
to 640)
Item 1: Rear panel section
Item 2: Cable clip
7 747 015 037-07.1RS
2
2
1
USER NOTE
Screw top self-tapping screws into holes in
cross-member.

Installation
7
Logano plus SB615 - Technical specifications are subject to change without prior notice.
15
z Place front boiler top panel on the side panel flanges
and pull forward until the hooks match up with the slots
on each side.
z Insert 2 self-tapping screws through the tabs on the
front boiler top panel and the side panel flanges and
screw to the side members.
7.2 Mounting and wiring the Logamatic controls
The controls is mounted on top of the boiler and held in
place by 4 tabs and 2 screws.
z Unscrew the two self-tapping screws (Fig. 13, Item 1)
from the top of the terminal cover plate and remove cov-
er plate.
z Feed capillary tubes through the cable entry and unroll
to required length to reach the boiler well.
z Fit controls in position by locating the front catches in
the oval slots, pulling the controller forward and then
tipping backward until the flexible catches on each side
snap into place (see arrows in Fig. 13).
z Secure the controls to the boiler using the two screws
(Fig. 13, Item 3).
Fig. 12 Positioning and fixing front boiler top panel
7 747 015 037-08.1RS
Fig. 13 Fitting the Logamatic controls
Item 1: Self-tapping screws
Item 2: Top cover
Item 3: Screws
7 747 015 037-09.2RS
3
2
1
3
WARNING!
Danger: Risk of fatal injury from
electric shock!
z Electrical work may only be carried out by
properly qualified technicians.
z Before opening any electrical equipment,
isolate it from the power supply and take
steps to ensure the equipment can not
be switched on again uninternationally.
z Observe the local regulations.

Installation
7
Logano plus SB615 - Technical specifications are subject to change without prior notice.
16
z Wire up the electrical connections as shown in the wir-
ing diagram enclosed with the controls.
z Use the plastic clips (Fig. 14, Item 1) to fix the cable.
They provide strain relief on the cables.
z Fit cover plate to controller and secure with the two
screws (Fig. 13, Item 1).
z Route capillary tubes with temperature sensors to boil-
er well, insert and push fully home.
Fig. 14 Cable strain relief
Item 1: Plastic clip
Item 2: Rear panel
7 747 015 037-10.1RS
1
2
3
4
Fig. 15 Inserting temperature sensor in boiler well
USER NOTE
Take care to ensure correct cable and capil-
lary tube routing. Do not kink capillary.
Observe the local regulations.

Installation
7
Logano plus SB615 - Technical specifications are subject to change without prior notice.
17
z The plastic coil (Fig. 16, Item 2) for holding together
the temperature sensor is pushed back automatically
when it is inserted.
7.3 Burner door and burner
The burner door can be hung on either side.
z Push the hinge bolts out of the hinges from underneath
(Fig. 17, Item 1).
z Refit the washer and the two hinge pins on the other
side (Fig. 17, Item 2). Remember the washer!
Fig. 16 Inserting plastic coil in immersion sleeve
Item 1: Balancing spring
Item 2: Plastic coil
Item 3: Sensor retaining clip
Item 4: Well
4
2
1
3
USER NOTE
To ensure good contact between the well
(Fig. 16, Item 4) and the sensor surfaces
and thus establish reliable heat transfer, the
wavy spring (Fig. 16, Item 1) must be
placed between the temperature sensors.
USER NOTE
To reverse the door swing, bolt the burner
door shut and swap the hinges.
Fig. 17 Reversing the door hinges
Item 1: Hinge bolt
Item 2: Washer
1
1
2
2

Installation
7
Logano plus SB615 - Technical specifications are subject to change without prior notice.
18
7.4 Boiler jacket
SB615/145 to 400 boilers
4 top panel sections
SB615/510 to 640 boilers
5 top panel sections
z Position top panel sections loosely on side panels at
each side.
Fig. 18 Sealing the gap between burner and insulation.
Refractory may have to be cut to size depending on
burner make and model.
Item 1: Gap between burner tube and insulation
1
7-5/16
"
(185)
USER NOTE
Follow the burner manufacturer’s instruc-
tions when fitting the burner.
The appropriate burner plate must be
used/modified according to the make/model
of the burner.
The gap between the burner tube and the
thermal insulation must be sealed by the in-
staller (Fig. 18).
Refractory is supplied with the boiler. It must
be cut to the right size to fit.
Fig. 19 Fitting boiler top panel sections – general principle
Item 1: Cutout on SB615/400 and up.
1
USER NOTE
On the SB615/400 and larger boilers, the
second top panel section has a cutout
(Fig. 19, Item 1); the rear sections are iden-
tical and are positioned with the flanged
edge to the front.

Installation
7
Logano plus SB615 - Technical specifications are subject to change without prior notice.
19
z From underneath, locate the vertical tabs on the bottom
cross-member in the slots at the front of the side panel
flanges and fix the cross-member to the front of the boil-
er body with the 2 self-tapping screws.
z Locate 4 vertical hooks (Fig. 21, Item 1) on lower front
panel in the slots in the side panel flanges.
z Locate the rail on the front top panel and lower the top
edge of the top front panel down onto the rail (Fig. 21,
Item 2).
z Position hooks (Fig. 21, Item 3) on top and bottom fas-
cia panels into the front panels.
z Fix appliance insignia plate (Fig. 21, Item 4) to front
panel.
Fig. 20 Fixing the bottom cross-member
Fig. 21 Fixing upper and lower front panel sections
Item 1: Hook
Item 2: Top rail to support upper front panel
Item 3: Hooks on top and bottom fascia panels
Item 4: Appliance insignia plate
3
4
2
1

Installation
7
Logano plus SB615 - Technical specifications are subject to change without prior notice.
20
7.5 Nameplate
z Attach paper rating plate (Fig. 22, Item 1) to left or
right side panel according to boiler room situation.
7.6 Flue systems
z The flue gases produced must be transported to the
outside via flue pipes and chimney flues.
z Building code approved, moisture and condensate re-
sistant flue pipes and chimney flues must be used.
z Before commissioning the heating system, check that
the flue system used is suitable for the boiler.
z Follow guidelines in planning instructions.
z Check the flue connection for leaks.
z Follow the installation instructions of the flue system
manufacturer.
Fig. 22 Attach paper rating plate
Item 1: Rating plate
1
NOTICE:
The metal boiler plate is attached to the steel
boiler vessel behind the left front jacket pan-
el.
/