5
IMPORTANT SAFETY INSTRUCTIONS
SAVE THESE INSTRUCTIONS!
Failure to follow any of the following safety instructions may result in injury or
serious health problems:
• Use this exercise product only as intended and described in this Ownerʼs Guide.
Do not use attachments not recommended by the manufacturer.
• Never drop or insert any object into any opening, or on the Pedal Arm Guide Rails.
• Do not place fingers, feet or any other objects into or near the moving parts of
the B2U/B2R
.
• Never turn foot pedals.
• To avoid entanglement and possible injury, do not expose hands or arms to the
drive mechanism.
• Do not dismount the B2U/B2R until the pedals are at a complete STOP.
• Wa
rn bystanders to keep a safe distance away. Do not allow anyone (other
than the user) to touch the machine while it is in operation.
• Do not remove the B2U/B2R side covers. Only an authorized retailer
should perform maintenance or repair services.
• Do not use outdoors.
CHILDREN
• Keep children off and away from your B2U/B2R at all times!
• When the B2U/B2R is in use, young children and pets should be kept
at least 10 feet away.
OTHER SAFETY TIPS FOR YOUR B2U/B2R
• CAUTION! If you experience chest pains, nausea, dizziness or shortness of
breath, stop exercising immediately and consult your physician before continuing.
• Donʼt wear loose clothing that might catch on any part of the B2U/B2R.
• Read this Ownerʼs Guide in its entirety before operating the B2U/B2R
.
CLEANING
• Use a damp cloth to wipe your B2U/B2R and computer free of sweat and
dust. Always avoid getting extra moisture on the computer. By keeping the
computer face free of sweat, you can ensure a longer computer life.
• Important Reminder: Never use petroleum - based solvents when cleaning.
Doing so will damage the finish on your B2U/B2R
.
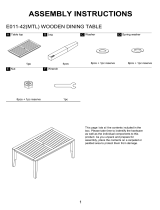
ASSEMBLY
If you have elected to assemble this product yourself, for your safety,
please read and follow each of the steps in the enclosed assembly
instructions. It is recommended that assembly be performed by an
authorized retailer. If you have any questions regarding any part or
function of your B2U/B2R, contact your retailer.
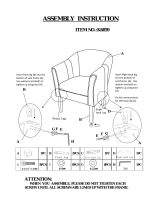
Front Foot
& Transport
Wheels