Page is loading ...

Using the
HART
®
Communicator
with Micro Motion
9700 Series Transmitters
February 1994


Temperature Coefficients for
Flow and Density
Please read this important notice if the sensor/transmitter/peripheral
combination has not been factory-calibrated by Micro Motion.
To further improve the performance of our products, Micro Motion has
changed the way sensor tube temperature is measured. A new RTD and
mounting method have resulted in improved overall performance through:
l Improved response time to changes in fluid temperature
l Improved immunity to changes in ambient temperature
l Improved temperature input to the processor
As a result of the RTD change, the temperature coefficients for flow and
density that are stated in this manual might be different from the values on
the sensor serial number tag. The serial number tag carries the latest and
correct values for the sensor. Failure to use the correct temperature
coefficients may result in performance outside specifications.
Because the correct temperature coefficient will give you the best
flowmeter performance, Micro Motion recommends using the values listed
on the sensor serial number tag when reconfiguring the transmitter and
peripheral device. If the sensor, transmitter, and peripheral were
ordered together as a flowmeter, they are factory-calibrated with the
correct coefficients, and no reconfiguration is required.
Micro Motion, Inc. Micro Motion
USA
Europe
7070 Winchester Circle
Boulder, CO 80301
Tel (303) 530-8400
(800) 522-6277
Fax (303) 530-8459
Groeneveldselaan 8
3903
AZ Veenendaal
The Netherlands
Tel
+31
(0) 318 549
549
Fax
+31
(0) 318 549
559
Micro Motion
©
1997, Micro Motion, Inc.
All rights reserved
P/N 1004596, Rev. A
(6/97)
FISHER-ROSEMOUNT
™
Managing The Process Better.
™
e$
recycled paper


I
Table of Contents
1 Introduction to the Model 275 HART Communicator
. .
1
1.1 About this instruction manual. . . . . . . . . . . . . . . . . . . . . . . 1
1.2 Introduction to 9700 Series transmitters . . . . . . . . . . . . . . 2
1.2.1 Flowmeter operation . . . . . . . . . . . . . . . . . . . . . . . . . . . . . 2
1.2.2 Transmitter outputs . . . . . . . . . . . . . . . . . . . . . . . . . . . . . . 3
2 Transmitter Setup for the Model 275
HART Communicator
. . . . . . . . . . . . . . . . . . . . . . . . . . . .
5
2.1 Connection to a Micro Motion transmitter . . . . . . . . . . . . . 5
2.1.1 Connection to milliamp output wiring terminals . . . . . . . . . 5
2.1.2 Connection to wire loops . . . . . . . . . . . . . . . . . . . . . . . . . . 5
2.2 Setting transmitter switches or jumpers . . . . . . . . . . . . . . . 6
2.2.1 Switch setting for RFT9739 . . . . . . . . . . . . . . . . . . . . . . . . 6
2.2.2 Jumper setting for RFT9712/RFT9729 . . . . . . . . . . . . . . . 8
3 Getting Started with the Model 275
HART Communicator
. . . . . . . . . . . . . . . . . . . . . . . . . . . .
11
3.1 Introduction . . . . . . . . . . . . . . . . . . . . . . . . . . . . . . . . . . . . 11
3.2 Liquid crystal display . . . . . . . . . . . . . . . . . . . . . . . . . . . . . 11
3.3 Action keys. . . . . . . . . . . . . . . . . . . . . . . . . . . . . . . . . . . . . 11
3.4 Software-defined function keys . . . . . . . . . . . . . . . . . . . . . 12
3.5 Alphanumeric and shift keys . . . . . . . . . . . . . . . . . . . . . . . 13
3.6 Fast select . . . . . . . . . . . . . . . . . . . . . . . . . . . . . . . . . . . . . 13
3.7 Data entry. . . . . . . . . . . . . . . . . . . . . . . . . . . . . . . . . . . . . . 14
3.8 Hot key. . . . . . . . . . . . . . . . . . . . . . . . . . . . . . . . . . . . . . . . 14
3.8.1 Adding options to the hot key menu. . . . . . . . . . . . . . . . . . 15
3.8.2 Deleting an option from the hot key menu . . . . . . . . . . . . . 17
4 Process Variables
. . . . . . . . . . . . . . . . . . . . . . . . . . . . . .
19
4.1 View field device variables. . . . . . . . . . . . . . . . . . . . . . . . . 19
4.2 View output variables. . . . . . . . . . . . . . . . . . . . . . . . . . . . . 20
4.2.1 Output variables for RFT9739 . . . . . . . . . . . . . . . . . . . . . . 20
4.2.2 Output variables for RFT9712/RFT9729 . . . . . . . . . . . . . . 21
4.3 View status. . . . . . . . . . . . . . . . . . . . . . . . . . . . . . . . . . . . . 23
4.4 Totalizer control . . . . . . . . . . . . . . . . . . . . . . . . . . . . . . . . . 23

II
5 Diagnostics and Service: Test/Status
. . . . . . . . . . . . . .
25
5.1 Status messages . . . . . . . . . . . . . . . . . . . . . . . . . . . . . . . . 25
5.2 Transmitter diagnostic tools . . . . . . . . . . . . . . . . . . . . . . . . 25
5.2.1 Fault indicators . . . . . . . . . . . . . . . . . . . . . . . . . . . . . . . . . . 26
5.2.2 Diagnostic LED. . . . . . . . . . . . . . . . . . . . . . . . . . . . . . . . . . 26
5.3 Over range and sensor failure messages. . . . . . . . . . . . . . 26
5.4 Transmitter failure messages . . . . . . . . . . . . . . . . . . . . . . . 29
5.5 Field device not characterized . . . . . . . . . . . . . . . . . . . . . . 29
5.6 Calibration failed. . . . . . . . . . . . . . . . . . . . . . . . . . . . . . . . . 29
5.7 Slug flow. . . . . . . . . . . . . . . . . . . . . . . . . . . . . . . . . . . . . . . 30
5.8 Outputs saturated. . . . . . . . . . . . . . . . . . . . . . . . . . . . . . . . 30
5.9 Informational messages . . . . . . . . . . . . . . . . . . . . . . . . . . . 32
5.10 HART Communicator self-test . . . . . . . . . . . . . . . . . . . . . . 35
6 Loop Test
. . . . . . . . . . . . . . . . . . . . . . . . . . . . . . . . . . . . .
37
6.1 Loop test overview . . . . . . . . . . . . . . . . . . . . . . . . . . . . . . . 37
6.2 Milliamp output testing . . . . . . . . . . . . . . . . . . . . . . . . . . . . 37
6.2.1 Milliamp output test in diagnostics/service branch . . . . . . . 38
6.2.2 Milliamp output test in detailed setup branch . . . . . . . . . . . 40
6.3 Frequency/pulse output testing . . . . . . . . . . . . . . . . . . . . . 42
6.3.1 Frequency/output test in diagnostics/service branch . . . . . 43
6.3.2 Frequency/pulse output test in detailed setup branch . . . . 44
6.3.3 Ending the output test. . . . . . . . . . . . . . . . . . . . . . . . . . . . . 46
7 Diagnostics and Service: Calibration
. . . . . . . . . . . . . . .
47
7.1 Calibration overview . . . . . . . . . . . . . . . . . . . . . . . . . . . . . . 47
7.2 Auto zero . . . . . . . . . . . . . . . . . . . . . . . . . . . . . . . . . . . . . . 48
7.2.1 Performing the auto zero . . . . . . . . . . . . . . . . . . . . . . . . . . 48
7.2.2 Diagnosing zeroing failure . . . . . . . . . . . . . . . . . . . . . . . . . 50
7.3 Programming auto zero for the RFT9739. . . . . . . . . . . . . . 50
7.3.1 Zero time . . . . . . . . . . . . . . . . . . . . . . . . . . . . . . . . . . . . . . 50
7.3.2 Convergence limit. . . . . . . . . . . . . . . . . . . . . . . . . . . . . . . . 51
7.4 Density calibration . . . . . . . . . . . . . . . . . . . . . . . . . . . . . . . 53
7.4.1 Density measurement theory . . . . . . . . . . . . . . . . . . . . . . . 53
7.4.2 2-point density calibration for RFT9739 . . . . . . . . . . . . . . . 54
7.4.3 2-point density calibration for RFT9712 or RFT9729 . . . . . 59
7.4.4 Third-point density calibration for RFT9739 . . . . . . . . . . . . 61
7.5 Viscosity calibration for RFT9739. . . . . . . . . . . . . . . . . . . . 65
7.5.1 Single-point viscosity calibration. . . . . . . . . . . . . . . . . . . . . 65
7.5.2 2-point viscosity calibration for version 1.5 and higher. . . . 67
7.6 Temperature calibration for RFT9739 . . . . . . . . . . . . . . . . 70
8 Milliamp Output Trim
. . . . . . . . . . . . . . . . . . . . . . . . . . . .
71
8.1 Preparing for output trim. . . . . . . . . . . . . . . . . . . . . . . . . . . 71
8.2 Milliamp output trim in diagnostics/service branch . . . . . . . 72
8.3 Milliamp output trim in detailed setup branch . . . . . . . . . . . 74
9 Basic setup
. . . . . . . . . . . . . . . . . . . . . . . . . . . . . . . . . . . .
77
9.1 Basic setup overview . . . . . . . . . . . . . . . . . . . . . . . . . . . . . 77
9.2 HART tag . . . . . . . . . . . . . . . . . . . . . . . . . . . . . . . . . . . . . . 77
9.3 Milliamp outputs . . . . . . . . . . . . . . . . . . . . . . . . . . . . . . . . . 78
9.3.1 Measurement units for milliamp outputs. . . . . . . . . . . . . . . 78
9.3.2 Range values for milliamp outputs . . . . . . . . . . . . . . . . . . . 79
9.4 Frequency/pulse output scaling . . . . . . . . . . . . . . . . . . . . . 81

III
10 Detailed Setup: Characterize
. . . . . . . . . . . . . . . . . . . . .
83
10.1 Characterization overview . . . . . . . . . . . . . . . . . . . . . . . . . 83
10.2 Flow characterization . . . . . . . . . . . . . . . . . . . . . . . . . . . . . 83
10.2.1 Flow calibration factor . . . . . . . . . . . . . . . . . . . . . . . . . . . . 84
10.2.2 Field calibration for flow measurement . . . . . . . . . . . . . . . 85
10.3 Density characterization for RFT9739 . . . . . . . . . . . . . . . . 88
10.4 Density characterization for RFT9712 or RFT9729 . . . . . . 90
10.5 Temperature factor for RFT9739 . . . . . . . . . . . . . . . . . . . . 91
10.6 Viscosity characterization for RFT9739 . . . . . . . . . . . . . . . 91
10.6.1 Pressure polling for viscosity . . . . . . . . . . . . . . . . . . . . . . . 92
10.6.2 Viscosity calibration factor . . . . . . . . . . . . . . . . . . . . . . . . . 94
10.6.3 Field device tag . . . . . . . . . . . . . . . . . . . . . . . . . . . . . . . . . 95
10.6.4 Pressure input range . . . . . . . . . . . . . . . . . . . . . . . . . . . . . 96
10.7 Pressure compensation for 2.0 or higher-revision
RFT9739 . . . . . . . . . . . . . . . . . . . . . . . . . . . . . . . . . . . . . . 97
10.7.1 Pressure polling for pressure compensation . . . . . . . . . . . 98
10.7.2 Pressure correction factors for flow and density . . . . . . . . 99
10.7.3 Flow calibration pressure. . . . . . . . . . . . . . . . . . . . . . . . . . 101
10.7.4 Field device tag . . . . . . . . . . . . . . . . . . . . . . . . . . . . . . . . . 102
10.7.5 Pressure input range . . . . . . . . . . . . . . . . . . . . . . . . . . . . . 103
11 Detailed Setup: Measurement Units
. . . . . . . . . . . . . . . .
107
11.1 Measurement units overview . . . . . . . . . . . . . . . . . . . . . . . 107
11.2 Flow and totalizer units . . . . . . . . . . . . . . . . . . . . . . . . . . . 107
11.3 Special units for flow rates and totals. . . . . . . . . . . . . . . . . 111
11.4 Density units. . . . . . . . . . . . . . . . . . . . . . . . . . . . . . . . . . . . 114
11.4.1 API gravity . . . . . . . . . . . . . . . . . . . . . . . . . . . . . . . . . . . . . 115
11.4.2 API standard volume . . . . . . . . . . . . . . . . . . . . . . . . . . . . . 117
11.5 Temperature units . . . . . . . . . . . . . . . . . . . . . . . . . . . . . . . 117
11.6 Viscosity and pressure units for RFT9739. . . . . . . . . . . . . 118
11.6.1 Choosing units of viscosity or pressure . . . . . . . . . . . . . . . 118
11.6.2 Special considerations for units of viscosity and pressure. 120
11.7 Sending measurement units to the transmitter . . . . . . . . . 120
12 Detailed Setup: Configure Field Device Variables
. . . .
121
12.1 Field device variables overview . . . . . . . . . . . . . . . . . . . . . 121
12.2 Flow cutoffs . . . . . . . . . . . . . . . . . . . . . . . . . . . . . . . . . . . . 121
12.2.1 Flow cutoffs for most applications . . . . . . . . . . . . . . . . . . . 123
12.2.2 Flow cutoffs for viscosity measurement. . . . . . . . . . . . . . . 124
12.3 Flow direction. . . . . . . . . . . . . . . . . . . . . . . . . . . . . . . . . . . 125
12.4 Internal damping . . . . . . . . . . . . . . . . . . . . . . . . . . . . . . . . 127
12.4.1 Internal damping on flow outputs. . . . . . . . . . . . . . . . . . . . 127
12.4.2 Damping on density outputs from RFT9739 . . . . . . . . . . . 129
12.4.3 Internal damping on temperature outputs from RFT9739 . 130
12.5 Slug flow limits . . . . . . . . . . . . . . . . . . . . . . . . . . . . . . . . . . 131

IV
13 Detailed Setup: Configure Outputs
. . . . . . . . . . . . . . . . .
133
13.1 Transmitter outputs. . . . . . . . . . . . . . . . . . . . . . . . . . . . . . . 133
13.2 Milliamp outputs . . . . . . . . . . . . . . . . . . . . . . . . . . . . . . . . . 133
13.2.1 Milliamp output variables . . . . . . . . . . . . . . . . . . . . . . . . . . 133
13.2.2 Range values for milliamp outputs . . . . . . . . . . . . . . . . . . . 135
13.2.3 Read-only sensor range limits and minimum span. . . . . . . 137
13.2.4 Flow cutoffs for milliamp outputs . . . . . . . . . . . . . . . . . . . . 139
13.2.5 Added damping on RFT9739 outputs. . . . . . . . . . . . . . . . . 141
13.2.6 Milliamp output testing . . . . . . . . . . . . . . . . . . . . . . . . . . . . 143
13.2.7 Milliamp output trim . . . . . . . . . . . . . . . . . . . . . . . . . . . . . . 143
13.3 Frequency/pulse output . . . . . . . . . . . . . . . . . . . . . . . . . . . 143
13.3.1 Frequency/pulse output variable from RFT9739 . . . . . . . . 143
13.3.2 Frequency/pulse output scaling . . . . . . . . . . . . . . . . . . . . . 144
13.3.3 Frequency pulse width for RFT9739 . . . . . . . . . . . . . . . . . 147
13.4 Frequency/pulse output testing . . . . . . . . . . . . . . . . . . . . . 149
13.5 Control output from RFT9739. . . . . . . . . . . . . . . . . . . . . . . 149
13.6 Fault outputs for RFT9739 . . . . . . . . . . . . . . . . . . . . . . . . . 149
13.6.1 Fault indicators for RFT9739 . . . . . . . . . . . . . . . . . . . . . . . 150
13.6.2 Slug duration for RFT9739 . . . . . . . . . . . . . . . . . . . . . . . . . 151
13.7 HART output. . . . . . . . . . . . . . . . . . . . . . . . . . . . . . . . . . . . 152
13.7.1 Polling address. . . . . . . . . . . . . . . . . . . . . . . . . . . . . . . . . . 153
13.7.2 Required number of preambles . . . . . . . . . . . . . . . . . . . . . 154
13.7.3 Burst mode . . . . . . . . . . . . . . . . . . . . . . . . . . . . . . . . . . . . . 155
13.7.4 Data transmission options for burst mode . . . . . . . . . . . . . 157
14 Detailed Setup: Device Information
. . . . . . . . . . . . . . . .
159
14.1 Device information overview. . . . . . . . . . . . . . . . . . . . . . . . 159
14.2 Device information main menu. . . . . . . . . . . . . . . . . . . . . . 159
14.3 Construction materials submenu . . . . . . . . . . . . . . . . . . . . 161
14.4 Read-only revision numbers submenu. . . . . . . . . . . . . . . . 162
15 Detailed Setup: Events for RFT9739
. . . . . . . . . . . . . . . .
165
15.1 Events overview . . . . . . . . . . . . . . . . . . . . . . . . . . . . . . . . . 165
15.2 Assigning an event to a milliamp output. . . . . . . . . . . . . . . 165
15.3 Assigning an event to the control output . . . . . . . . . . . . . . 166
15.4 Configuring event 1 or event 2 . . . . . . . . . . . . . . . . . . . . . . 167
15.4.1 Assigning variables to events. . . . . . . . . . . . . . . . . . . . . . . 167
15.4.2 Low or high alarm type . . . . . . . . . . . . . . . . . . . . . . . . . . . . 169
15.4.3 Event setpoint. . . . . . . . . . . . . . . . . . . . . . . . . . . . . . . . . . . 171
16 Review
. . . . . . . . . . . . . . . . . . . . . . . . . . . . . . . . . . . . . . . .
175
16.1 Overview of review function . . . . . . . . . . . . . . . . . . . . . . . . 175
16.2 Review menus . . . . . . . . . . . . . . . . . . . . . . . . . . . . . . . . . . 175
16.2.1 Device information menu . . . . . . . . . . . . . . . . . . . . . . . . . . 176
16.2.2 Characterize sensor menu . . . . . . . . . . . . . . . . . . . . . . . . . 177
16.2.3 Field device variables menu. . . . . . . . . . . . . . . . . . . . . . . . 178
16.2.4 Outputs menu. . . . . . . . . . . . . . . . . . . . . . . . . . . . . . . . . . . 180

V
Appendix I
Transmitter Configuration Worksheets . . . . . . . . .
183
Appendix II
Flowmeter Calibration Records. . . . . . . . . . . . . . .
187
Appendix III
Pressure Correction for RFT9739
Flow Measurement . . . . . . . . . . . . . . . . . . . . . . . .
191
Appendix IV
Pressure Correction for RFT9739
Density Measurement . . . . . . . . . . . . . . . . . . . . . .
195
Appendix V
HART Communicator Software Trees. . . . . . . . . .
199
Appendix VI
Index . . . . . . . . . . . . . . . . . . . . . . . . . . . . . . . . . . .
207
Tables
Table 2-1 Micro Motion output wiring connections to the HART
Communicator . . . . . . . . . . . . . . . . . . . . . . . . . . . . . . . 5
Table 2-2 Location of wire loops for connecting a Micro Motion
transmitter to the HART Communicator. . . . . . . . . . . . 6
Table 2-3 RFT9739 switch settings for use with HART
Communicator . . . . . . . . . . . . . . . . . . . . . . . . . . . . . . . 7
Table 3-1 Labels for function keys. . . . . . . . . . . . . . . . . . . . . . . . 13
Table 4-1 Variable assignments for RFT9739. . . . . . . . . . . . . . . 20
Table 4-2 Variable assignments for RFT9712/RFT9729. . . . . . . 22
Table 5-1 Conditions indicated by diagnostic LED . . . . . . . . . . . 26
Table 5-2 Nominal resistance values for Micro Motion sensors . 27
Table 5-3 Using sensor failure and over range messages . . . . . 28
Table 5-4 Using transmitter failure messages . . . . . . . . . . . . . . . 29
Table 5-5 Using outputs saturated messages . . . . . . . . . . . . . . . 32
Table 5-6 Using informational messages. . . . . . . . . . . . . . . . . . . 34
Table 6-1 Milliamp output terminal connections for Micro
Motion transmitters . . . . . . . . . . . . . . . . . . . . . . . . . . . 38
Table 6-2 Frequency/pulse output terminal connections for
Micro Motion transmitters . . . . . . . . . . . . . . . . . . . . . . 42
Table 7-1 Density of air . . . . . . . . . . . . . . . . . . . . . . . . . . . . . . . . 56
Table 7-2 Density of water. . . . . . . . . . . . . . . . . . . . . . . . . . . . . . 58
Table 7-3 Full-scale flow rates for Micro Motion sensors. . . . . . . 62
Table 8-1 Milliamp output terminal connections for Micro
Motion transmitters . . . . . . . . . . . . . . . . . . . . . . . . . . . 71
Table 10-1 Flow temperature coefficients for Micro Motion
sensors . . . . . . . . . . . . . . . . . . . . . . . . . . . . . . . . . . . . 85
Table 10-2 Density temperature coefficients for Micro Motion
sensors connected to RFT9739. . . . . . . . . . . . . . . . . . 89
Table 10-3 Density temperature coefficients for Micro Motion
sensors connected to RFT9712 or RFT9729 . . . . . . . 91
Table 11-1 Measurement units for process variables . . . . . . . . . . 110
Table 12-1 Full-scale flow rates for Micro Motion sensors. . . . . . . 124
Table 12-2 Time constants for internal damping on
flow outputs . . . . . . . . . . . . . . . . . . . . . . . . . . . . . . . . . 128
Table 12-3 Time constants for internal damping on
density outputs from RFT9739 . . . . . . . . . . . . . . . . . . 129
Table 12-4 Time constants for internal damping on
temperature outputs from RFT9739 . . . . . . . . . . . . . . 131
Table 13-1 Filter coefficients for added damping on
milliamp outputs from RFT9739. . . . . . . . . . . . . . . . . . 142
Table 13-2 Burst mode options for HART digital output . . . . . . . . 158
Table 14-1 Configuration parameters in device information main
menu . . . . . . . . . . . . . . . . . . . . . . . . . . . . . . . . . . . . . . 161
Table 14-2 Sensor material, flange, and liner options . . . . . . . . . . 162

VI
Table 14-3 Read-only revision numbers . . . . . . . . . . . . . . . . . . . . 163
Table 15-1 Rates of comparison between setpoints and process
variables assigned to events . . . . . . . . . . . . . . . . . . . . 169
Table 16-1 Cross-reference to information about configuring
parameters visible in review branch. . . . . . . . . . . . . . . 175
Table 16-2 Read-only parameters in device information menu . . . 176
Table 16-3 Read-only parameters in characterize sensor menu . . 177
Table 16-4 Read-only parameters in field device variables menu
for RFT9712/RFT9729. . . . . . . . . . . . . . . . . . . . . . . . . 178
Table 16-5 Read-only parameters in field device variables menu
for RFT9739. . . . . . . . . . . . . . . . . . . . . . . . . . . . . . . . . 179
Table 16-6 Read-only parameters in outputs menu for
RFT9712/RFT9729 . . . . . . . . . . . . . . . . . . . . . . . . . . . 180
Table 16-7 Read-only parameters in outputs menu for RFT9739 . 181
Figures
Figure 2-1 Switches on RFT9739 electronics module. . . . . . . . . . 7
Figure 2-2 Location and orientation of jumpers on processor
board of RFT9712/RFT9729 . . . . . . . . . . . . . . . . . . . . 9
All Contents
©
1993, Micro Motion, Inc. All Rights Reserved.
Micro Motion
®
, ELITE
™
, FlowScale
®
and ProLink
™
are trademarks of
Micro Motion, Inc., Boulder, CO.
HART
®
and SMART FAMILY
®
are trademarks of Rosemount, Inc.,
Eden Prairie, MN.
Teflon
®
and Tefzel
®
are trademarks of E.I. Du Pont de Nemours Co.
Inc., Wilmington, DE.
Cam-lok
®
is a trademark of CAM-LOK, Inc., Cincinatti, OH.
Modbus
®
is a trademark of Modicon, Inc., North Andover, MA.

1 Introduction to the Model
275 HART
®
Communicator
1.1
About this instruction
manual
This manual explains how to use the Rosemount
®
hand-held Model
275 HART
®
Communicator with Micro Motion
®
9700 Series flow
transmitters. This manual is a companion publication to the
Rosemount Product Manual for the HART Communicator.
This manual explains how to use the HART Communicator to perform
online functions with Micro Motion 9700 Series transmitters.
Chapter 2 explains how to set up a Micro Motion transmitter to
operate with the HART Communicator. Chapter 3 explains how to use
the communicator’s keypads and displays. Chapters 4 through 16 are
arranged in the order of the options in the online (main) menu with the
HART Communicator connected to a Micro Motion transmitter. In this
communication mode, the user can perform the following tasks:
l Viewing process variables;
l
Controlling the transmitter’s internal
totalizer(s);
l
Testing, calibrating, and troubleshooting the flowmeter;
l Trimming transmitter outputs;
l
Performing basic or detailed setup of the flowmeter for optimal
performance in specific applications;
l
Reviewing all parameters in the flowmeter configuration.
The HART Communicator also can perform offline tasks, communicate
with any HART-compatible device, and poll devices in a
HART-
compatible network. For more information about using the
communicator, refer to the Rosemount Product Manual for the HART
Communicator, which is shipped with the communicator and with all
Micro Motion 9700 Series transmitters. The Rosemount Product
Manual for the HART Communicator includes the following sections:
-
Liquid crystal display,
-
Action keys,
l
Software-defined function keys,
.
Alphanumeric and shift keys,
l
Hot key menu,
.
HART Communicator connections,
.
Getting to know the HART Communicator,
.
Main (online) menu,
.
Servicing the HART Communicator,
.
Functional specifications,
-
Performance specifications,
-
Physical specifications,
.
Ordering information,
-
Index.

1.2
Introduction to 9700
Series transmitters
Micro Motion 9700 Series transmitters include RFT9712, RFT9729,
and ELITE
®
RFT9739 microprocessor-based transmitters for fluid
process measurement and control. All 9700 Series transmitters can
function as part of a Bell 202 or RS-485 multidrop network.
The RFT9739 has an explosion-proof housing for field installation, or
a rack-mount 19” European-standard 1/3 cassette housing for control
room installation.
l
The RFT9739 works with any ELITE sensor or with any Model D,
DL, or DT sensor.
l
The
RFT9739
can use the Bell
202
or RS-485 standard under
HART
®
protocol, or the RS-485 standard under
Modbus
®
protocol.
l
A 2.0 or higher-revision RR-9739 can simultaneously use HART
and
Modbus
protocols.
The RFT9712 has a NEMA 4-rated housing for field installation. The
RFT9729 provides the same performance as the
RFT9712,
but has a
rack-mount 19” European-standard ½ cassette housing for control
room installation.
l
The RFT9712 or RFT9729 works with any Model D, DL, or DT
sensor.
l
The RFT9712 or
RFT9729
can use the Bell 202 or RS-485
standard under HART protocol.
When operating with a sensor, a 9700 Series transmitter can measure
flow, total (inventory), density, and temperature.
l
The RFT9739 can simultaneously indicate mass and volume flow
rates and totals.
l The RFT9712 or RFT9729 can indicate the mass or volume flow
rate and total.
If a differential pressure transmitter
DP
cell) measures pressure drop
across the sensor, the
RFT9739
can use differential pressure values
to calculate viscosity for certain liquids.
1.2.1
Flowmeter operation The transmitter and sensor function together as a Coriolis mass
flowmeter. The transmitter produces a drive voltage to vibrate the
sensor flow tubes at the structure’s natural frequency. The flow of
fluid through the vibrating tubes twists the tubes at an angle directly
proportional to the mass of the fluid.
Micro Motion mass flow sensors also provide an accurate density
measurement, because the density of the fluid is inversely
proportional to the square of the flow tube frequency.
The transmitter uses the time shift between velocity signals from
pickoffs
mounted on the flow tubes to calculate mass flow, and the
frequency of the signal from one pickoff to calculate density.

The transmitter also measures the flow tube temperature from a
platinum resistance temperature detector
(RTD)
mounted on one flow
tube. Measuring the temperature of the flow tubes is necessary
because changes in temperature affect the rigidity around the twisting
axis and the elasticity around the bending axis. Changes in rigidity
affect the twist angle, which indicates mass flow, while changes in
elasticity affect the tube frequency, which indicates fluid density. In
calculating mass flow and density, the transmitter uses temperature
changes to account for proportional changes in the rigidity and
elasticity of the flow tubes.
1.2.2
Transmitter outputs
The RFT9739 has two milliamp outputs, a frequency/pulse output,
and a control output.
l
Primary and secondary milliamp outputs can produce a O-20 or
4-
20
mA
current. Milliamp outputs can independently indicate mass
flow, volume flow, density, temperature, differential pressure,
viscosity, event 1 status or event 2 status.
l
The
0-10,000
Hz frequency/pulse output can indicate the mass
flow rate, mass total, volume flow rate, or volume total.
l The O/l 5 V control output can indicate faults; forward, reverse, or
bi-directional flow; transmitter zeroing in progress; event 1 status
or event 2 status.
The RFT9712 or RFT9729 has a 4-20 mA output, a frequency/pulse
output, and a flow direction output.
l The milliamp output can indicate mass flow, volume flow, density,
or temperature.
l The O-10,000 Hz frequency/pulse output can indicate the mass
flow rate or volume flow rate.
l The O/l 5 V output indicates forward or reverse flow.
The primary milliamp output on the RFT9739 or the 4-20 mA output
on the RFT9712 or RFT9729 can produce HART-compatible signals
for Bell 202 communication. All 9700 Series transmitters have
connections for RS-485 wiring.
l Up to 10 transmitters, each with a unique polling address of 1 to
15 or a unique tag, can participate with other devices in a Bell 202
multidrop network.
l Up to 15 transmitters, each with a unique polling address of 1 to
15, can participate in an RS-485 multidrop network.


2
2.1
Connection to a Micro
Motion transmitter
Transmitter Setup for the
Model 275
HART
®
Communicator
:
WARNING:
Before connecting the HART Communicator in an explosive
atmosphere, make sure instruments in the loop are installed in
accordance with intrinsically safe or nonincendiary field wiring
practices. Explosions can cause serious injury or death.
To connect an RFT9739 to the communicator, use the primary
milliamp output. To connect the RFT9712 or RFT9729 to the
communicator, use the 4-20 milliamp output.
Alternatively, the communicator can connect to the wire loops located
near the transmitter’s output wiring terminals.
CAUTION:
For the HART Communicator to function properly, a minimum of 250
ohms resistance must be present in the loop. The communicator does
not directly measure loop current.
2.1.1
Connection to milliamp
Table 2-1 lists the output wiring terminals used for connecting the
output wiring terminals transmitter to the HART Communicator.
Table 2-1
Micro Motion output wiring connections to the HART Communicator
Transmitter model
Output wiring terminals
+ -
RFT9739field-mount
17
18
RFT9739 rack-mount
D30
Z30
RFT97 12
17
16
RFT9729
16b
14b
2.1.2
Connection to wire loops
The transmitter has a pair of wire loops for connection to the HART
Communicator. The wire loops are located near the output wiring
terminals. Table 2-2 lists the location of the wire loops in each Micro
Motion transmitter.
5

Table 2-2
Location of wire loops for connecting a Micro Motion
®
transmitter to the HART
®
Communicator
Transmitter model:
Location of
wire
loops
RFT9739 field-mount
To right of output wiring terminals on electronics module
RFT9739 rack-mount
To right of output wiring terminals on back of cassette
RFT97 12
Below input/output wiring panel inside transmitter’s lower compartment
RFT9729
To right of output wiring terminals on back of cassette
2.2
Setting transmitter
switches or jumpers
The user must set switches or jumpers to enable communication
between the transmitter and the HART Communicator.
l
For the RFT9739, set switches as instructed in Subsection 2.2.1.
l
For the RFT971 2 or RFT9729 set the jumper labeled
485/268
as
instructed in Subsection 2.2.2.
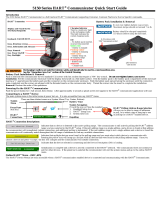
2.2.1
Switch settings for
Use the switches on the electronics module of the RFT9739 to enable
RFT9739
communication with the HART Communicator.
CAUTION:
Older
RFT9739
transmitters have a hardware switch labeled BELL
202. To set switches on an older RFT9739, refer to the installation
manual shipped with the transmitter.
Figure
2-1
illustrates the switches on the electronics module of a 2.0
or
l
.
1.
2.
3.
4.
higher-revision RFT9739.
Software switches, which require turning the transmitter power
supply OFF and ON, are labeled SELECT 3, SELECT 2, SELECT 1,
CONTROL 3, CONTROL 2, and CONTROL 1.
Hardware switches, which function without turning the transmitter
supply OFF and ON, are labeled EXT. ZERO and SECURITY.
If practical, set the switches before installing the transmitter.
Access the switches:
l
To access switches on the field-mount RFT9739, unscrew the
cover from the base of the transmitter, then unlatch the hinged
cover of the module.
l
To access switches on the rack-mount RFT9739, remove the
bottom of the cassette.
Set software switches as desired, shutting power ON and OFF as
indicated in Table 2-3.
After setting switches, securely close the transmitter to maintain
its environmental seal.

Figure 2-1 Switches on
RFT9739
electronics
module
llll
2ln
mzl
4m
6uzl
6=
711
611
9m
NO
S1
SELECT3
SELECT2
SELECT1
CONTROL3
CONTROL2
CONTROL 1
A switch is ON when its toggle is toward the label and OFF when its
toggle is away from the label. Figure 2-1 shows switches in the OFF
position.
EXT.ZERO
SECURITY
Table 2-3
RFT9739
switch settings for use with HART
®
Communicator
NOTES:
1.
The transmitter reads the switch settings when the power supply is turned ON. At each setting, shut OFF power to
the transmitter, then:
a. Set switches as desired.
b. Turn transmitter power supply ON.
c.
Wait until the diagnostic LED on the electronics module blinks ON once per second.
d. Set all switches to OFF.
2. The primary milliamp output must be configured to produce a 4-20 mA current to enable communication between the
HART Communicator and the transmitter.
1 stop bit, odd parity
SELECT SELECT SELECT
CONTROL
CONTROL CONTROL
3
2
1
3
2
1
Setting 1: stop bits and parity
I
1
ON
I
I
I
ON
I
Setting 2: data
bits,
protocol, and physical layer
HART over Bell 202
Modbus
RTU mode (8 bits) over RS-485
and HART over Bell 202
ON
ON ON
ON ON
ON ON
Modbus
ASCII mode (7 bits) over RS-485
and HART over Bell 202
IONIONIONI
I
ON
[~-ON
4-20 mA primary output
4-20 mA secondary output
Setting 3:
milliamp
outputs
ON
ON
O-20 mA secondary output
I l
ON
l
I
ON
l
I

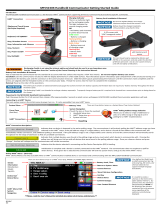
2.2.2
Jumper setting for
Use the
j jumpers inside the RFT9712 or RFT9729 to enable
RFT9712/RFT9729
communication
with the HART Communicator.
WARNING:
Shut OFF the power supply to the transmitter before setting jumpers.
Explosions can cause serious injury or death.
Jumpers are located on the processor board. Figure 2-2 illustrates the
jumpers on the processor board, and shows their orientation.
1. Access the jumpers:
l To access jumpers on the RFT9712, open the upper
compartment cover.
l To access jumpers on the RFT9729, remove the sliding top
cover of the cassette.
2. Set the jumper labeled
268/485
in the 268 position.
8

Figure 2-2
Location and orientation of jumpers on processor board of
RFT9712/RFT9729
-,
.
.
ii-
&Jr
ml
_..._
(
:
~3
,
fJ%
2
.._......
:24
z\i
I
I
\
I
\
I
JUMPER ORIENTATION
\
9

/