Page is loading ...

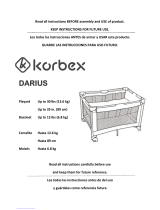
Lullaby
Lullaby LX
Lullaby SE
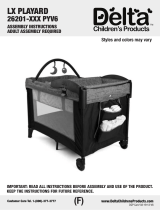
Owner's Manual
Manual del propietario
IS0088.3ES
©2013 Artsana USA, INC. 03/13
Read all instructions BEFORE
assembly and USE of product.
KEEP INSTRUCTIONS FOR
FUTURE USE.
Lea todas las instrucciones ANTES
de armar y USAR este producto.
GUARDE LAS INSTRUCCIONES
PARA USO FUTURO.

2
Failure to follow these warnings and the instructions could result in
serious injury or death
WARNING
• PLEASE READ THESE INSTRUCTIONS
CAREFULLY TO ENSURE THE SAFETY
OF YOUR CHILD.
• ALWAYS PROVIDE THE
SUPERVISION NECESSARY FOR
THE CONTINUED SAFETY OF YOUR
CHILD. WHEN USED FOR PLAYING,
NEVER LEAVE CHILD UNATTENDED.
• Playard MUST be fully assembled
with all top rails and center floor hub
locked into position prior to use or
attaching bassinet. Make sure latches
are secure.
• DO NOT place child in playard unless
all top rails and center floor hub are
securely locked into position and
floor pad is in proper place. Infant
may roll into space between pad and
loose mesh sides causing suffocation.
• Stop using this product when your
child reaches 35 inches (89 cm) in
height, weighs more than 30lbs
(14kg), or is able to climb out.
• DO NOT use the bassinet when a
child is in the playard.
• FALL HAZARD - To help prevent
falls, do not use bassinet when infant
begins to push up on hands and
knees or weighs over 15lbs (6.8kg),
whichever comes rst.
• Child can become entrapped and die
when improvised netting or covers are
placed on top of product. Never add
such items to conne child in product.
• DO NOT use bassinet on a bed, oor
or other surfaces.
• The bassinet is designed for use ONLY
with this Chicco Lullaby Magic Playard.
• Stop using the changing table when
your child reaches 25lbs (11.4 kg).
• Never use this product if there are
any loose or missing fasteners, loose
joints, broken parts, or torn mesh/
fabric. Check before assembly and
periodically during use. Contact
Chicco for replacement parts
and instruction if needed. Never
substitute parts.
• Although Chicco DOES NOT
RECOMMEND renishing this
product, if you choose to renish,
use a nontoxic nish specied for
children's products.
SUFFOCATION HAZARDS - Infants
can suffocate:
• In gaps between extra padding and
product side, and
• On soft bedding.
• Use ONLY the mattress provided
by Chicco. Never add a pillow,
comforter, or another mattress for
padding.

3
Failure to follow these warnings and the instructions could result in
serious injury or death
WARNING
• If a sheet is used with the pad, use
only a tted playard sheet specically
designed to t snug with at least 2”
(5cm) under all sides of the mattress.
The sheet must allow proper use of
the mattress retention straps.
• DO NOT leave child in product with
any side lowered. Be sure all sides
are raised and locked in position
whenever child is in product.
• NEVER use plastic shipping bags as
mattress covers. Do not use plastic
lm as mattress cover unless sold and
intended for that purpose. They can
cause suffocation.
• DO NOT use a water mattress with
this product.
STRANGULATION HAZARDS:
• NEVER use additional mattresses,
padding, sheets, or other objects that
will permit your child to climb out,
fall and/or be injured. If you choose
to ignore this warning, then remove
additional padding, large toy, and
other objects that could serve as steps
for climbing out when your child is
able to pull to a standing position.
• STOP using Bassinet when child
can roll over or push up on hands
and knees or reaches 15lbs (6.8 kg),
whichever comes rst.
• Strangulation Hazard: Child can lift
changing table and get neck trapped
between changing table and playard
frame.
• Never leave changing table in place
when child is in the playard.
• Strings can cause strangulation! DO
NOT place items with a string around
child’s neck (hood strings, pacier
cords,etc.) or attach strings to toys.
• DO NOT suspend strings into the
bassinet or playard.
• DO NOT place the playard near a
window where cords from blinds or
drapes can strangle a child.
• Never leave the bassinet in place
when child is in playard.
OTHER HAZARDS:
• Keep bassinet and playard away from
stoves, heaters, replaces and other
hazards which can cause injury to
your child.
• To reduce the risk of SIDS (Sudden
Infant Death Syndrome), pediatricians
recommend healthy infants be
placed on their back to sleep unless
otherwise advised by a physician.
• DO NOT place more than one child in
bassinet or playard.
• DO NOT move or fold bassinet or
playard with child in it - child could be
injured.

7
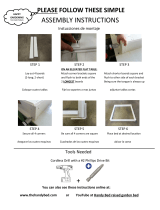
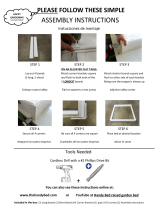
Setting Up the Playard
Instalación del corralito
WARNING
Before use remove and dispose of
any plastic bags and keep them
out of reach of children to avoid
the danger of suffocation.
Failure to follow these warnings
and instructions could result in
serious injury or death. Make sure
top rails and center floor hub are
locked and secure before use. This
product requires adult assembly.
Keep ngers clear of top corners
during setup.
ADVERTENCIA
Antes del uso, saque y deseche las
bolsas de plástico y póngalas lejos
del alcance de los niños para evitar
el peligro de asxia. No observar
estas advertencias e instrucciones
podría resultar en lesiones serias
o la muerte. Asegúrese de que los
rieles superiores y la base central
del piso estén trabados y jos antes
de usar el corralito. Este producto
debe ser ensamblado por un adulto.
Mantenga los dedos alejados de
las esquinas superiores durante el
montaje.

13
Setting Up the Playard
Instalación del corralito
6. Locate 4 Mattress Pad strap holes
on the floor of the playard. Thread
the 4 hook and loop straps/D-rings
through the floor of the playard as
shown.
6. Ubique los 4 oricios para las
correas de la colchoneta en el piso
del corralito. Pase las 4 correas
sujetadoras de velcro o de arandelas
en D hasta el piso del corralito como
muestra la imagen.
6

14
Setting Up the Playard
Instalación del corralito
7. Turn the playard on its side and pull
the straps completely through the
floor of the playard. Thread the strap
around the frame tube as shown. Pull
tight through D-ring and attach hook
and loop together to secure. Pull up
on mattress pad once the straps are
installed to be sure the mattress is
secure.
7. Ponga el corralito de lado y tire de
las correas completamente hasta que
pasen a través del piso del corralito.
Pase la correa alrededor del tubo de la
estructura como muestra la imagen.
Ajuste fuertemente la arandela en D y
las correas sujetadoras de velcro para
que queden jas. Tire de la colchoneta
una vez que las correas estén
instaladas para asegurarse de que
esté rme.
7
a.
b.
c.
d.

16
Assembling Bassinet
Armado de la cuna
10A & B. Fasten four end snaps (10A)
and pull eight toggles through loops
on the sides (10B).
10A & B. Sujete los quatro broches
del extremo (10A) y tire los ocho
cazonetes a través de los nudos de los
costados (10B).
10A
9
10B
9. Slide metal bars into tubing sleeves
inside bassinet and connect metal
bars together.
9. Deslice las barras de metal dentro
de las fundas de los tubos y dentro de
la cuna. Conecte las barras entre sí.

17
Assembling Bassinet
Armado de la cuna
11. Place the mattress in the bottom
of the bassinet. Ensure all straps are
folded under the mattress.
11. Coloque el colchón en el fondo
de la cuna. Asegúrese de que todas
las correas estén plegadas debajo del
colchón.
11
WARNING
Do not place Bassinet on unit if a
child is in the playard. Make sure
playard is fully assembled.
ADVERTENCIA
No ponga la cuna en la unidad si el
niño está en el corralito. Asegúrese de
que el corralito esté completamente
armado.

18
WARNING
FALL HAZARD - To prevent
death or serious injury, always
keep child within arm's reach.
• Never leave child unattended.
• Stop using the changing table
when your child reaches 25 lb
(11.4 kg).
• Do not use on the oor, bed,
counter or other surfaces.
• Do not use changing table as a
sleeping or play area.
• Always remove the changing
table when your child is in the
playard.
• Do not use changing unit if it is
damaged or broken.
ADVERTENCIA
PELIGRO DE CAÍDA - Para
prevenir la muerte o lesiones
graves, siempre mantenga niño
alcance de la mano.
• Jamás deje a su hijo solo.
• Deje de utilizar el cambiador
cuando el niño pese 25 libras
(11.4 kg).
• No usarlo en el piso, la cama, el
tablero o otro supercie.
• No use el mudador como
colchón para jugar o para hacer
dormir a su bebé.
• Siempre retire el mudador
cuando su bebé permanezca en
el corralito.
• No use el mudador si falta o
está rota alguna pieza.
Changing Table Warnings
Advertencias para el cambiador

20
Assembling Changing Table
Instalación de la mesa para cambiar al bebé
13
13. Attach both metal end pieces to
poles, making sure metal spring
button pushes completely through the
holes. Do the same on the opposite
end of the changing table.
13. Conecte los soportes de metal a
los postes, asegurándose de que
el botón del resorte de metal pasa
completamente por el agujero. Haga
lo mismo con el otro extremo de la
mesa.

22
Assembling Changing Table
Instalación de la mesa para cambiar al bebé
15A. Attach the two buckles on the
end panel of the changing table to
the buckles on the long side of the
playard. Repeat on other side of
changing table.
15A. Engancha las dos hebillas del
panel del extremo de la mesa para
cambiar al bebè al lado largo del
corralito. Repita el procedimiento del
otro lado de la mesa para cambiar al
bebè.
15A

23
16. Zip the zipper on the side of the
changing table to the end panel of
the playard. NOTE: All 4 buckles and
the zipper must be securely fastened
when changing table is in use.
Unbuckle the four buckles on the ends
of the changing table. Keep the zipper
zipped. Turn the changing table over
to the outside of the playard.
16. Cierre el cierre en el costado de
la mesa para cambiar al bebè hasta
el panel del extremo del corralito.
NOTA: Las cuatro hebillas y el cierre
deben estar debidamente asegurados
cuando usa la mesa para cambiar al
bebè.
Desabroche las cuatro hebillas de los
extremos del cambiador. Mantenga el
cierre cerrado. Dé vuelta el cambiador
hacia afuera de la cuna corral.
16
Assembling Changing Table
Instalación de la mesa para cambiar al bebé

24
WARNING
Recommended use from birth to 5
months. The toy gym is intended for
visual stimulation and is not intended
to be grasped by the child. Always
attach the provided fasteners (strings,
straps, clamps, etc.) tightly to toy
gym and playard according to the
instructions. Check frequently for
loose or damaged parts. Possible
entanglement or strangulation injury.
DO NOT add additional strings or
straps to toy gym or playard. Remove
toy when baby begins to push up on
hands and knees.
ADVERTENCIA
Uso recomendado: del nacimiento
hasta los 5 meses. El gimnasio está
diseñado como estímulo visual y no
para que el niño lo manipule. Fije
siempre los sujetadores provistos
(cuerdas, correas, abrazaderas, etc.)
rmemente al gimnasio y corralito de
acuerdo con las instrucciones. Revise
frecuentemente para vericar que no
haya piezas ojas o dañadas. Posible
lesión por enredo o estrangulamiento.
NO agregue cuerdas o correas
adicionales al corralito o gimnasio.
Saque el juguete cuando el bebé
comience a incorporarse apoyándose
en las manos y las rodillas.
Assembling the Toy Gym Arch
Cómo armar el arco del gimnasio para bebés
17. Insert all 4 Toy Gym legs into
center hub until they "click" into
locking position .
17. Inserte las cuatro patas del
gimnasio para bebés en el cubo
central hasta que se encaje en la
posición de bloqueo y se oiga clic.
17

26
Assembling the Toy Gym Arch
Cómo armar el arco del gimnasio para bebés
19. Use the hook and loop straps at
the end of each toy gym leg. Pass the
strap through the D-ring under the
mattress pad, and fasten.
19. Utilice las correas sujetadoras
en las el extremo de cada pata del
gimnasio. Pase la correa a través del el
anillo D debajo del colchón para jar
el gimnasio y ajuste.
19

30
With the switch in the MELODY ( ) or SOUND ( ) position you can activate
the following.
VOLUME: To increase the sound, press the ( ) side of the button. To decrease
the sound, press the ( ) side of the button.
VIBRATION: Push the VIBRATION ( ) button once to activate vibration cycle
and it will automatically turn off in 10 minutes. To immediately stop the vibration
cycle, press the VIBRATION ( ) button again. Note: When the LIGHT ( )
button is pushed in the middle of the vibration cycle the light will turn off when
the vibration cycle ends.
LIGHT: Push the LIGHT ( ) button once to activate light cycle and it will
automatically turn off in 10 minutes. To immediately stop the light cycle, press
the LIGHT ( ) button again. Note: When the VIBRATON ( ) button is pushed in
the middle of the light cycle the vibration will turn off when the light cycle ends.
MUSIC/FAST FORWARD: Push the MUSIC/FAST FORWARD ( / ) button once,
it will move to the next melody/sound, play for the 10 minute cycle and stop. If you
press and hold down the MUSIC/FAST FORWARD ( / ) button for 2 seconds, it
will play the current melody/sound continuously for 5 minutes and stop.
23A. The Lullaby NiteLite has (3) modes:
SOUND: The SOUND ( ) position plays
nature sounds. The SOUND ( )
selection will cycle through 3 different
sounds for 10 minutes and go into
standby/sleep mode. MELODY: The
MELODY ( ) position (2) plays soothing
music. The MELODY ( )selection will cycle
through 5 different songs for 10 minutes
and go into standby/sleep mode. OFF: The
(OFF) position will turn OFF all electronics.
To prolong life of batteries, make sure the
power switch is in the OFF position when
not in use.
23
Operate NiteLite Electronics (Select models)
Para utilizar los componentes electrónicos NiteLite
(modelos selectos)

32
24A. To operate the remote control: Slide
the power button on the Nitelite to the
Melody or Sound position. Point the
remote control directly toward the
NiteLite. The remote must be within 10
feet of the electronics unit to send a signal.
Make sure that there are no obstacles
between the remote control and the
remote sensor on the unit. After 45
minutes of no activity with the remote,
the electronic corner and remote enter a
"Sleep" mode to save battery life. To wake
the remote/corner out of sleep mode, a
function on the corner must be pressed or
turn corner off then on.
24A. Para utilizar el control remoto: Deslice el botón de encendido desde
NiteLite hasta la posición de Melodía o Sonido. Apunte el control remoto
directamente hacia NiteLite. El control remoto debe estar dentro de un radio de
10 pies de la unidad electrónica para enviar una señal. Asegúrese de que no haya
obstáculos entre el control remoto y el sensor remoto de la unidad.
Después de 45 minutos de inactividad del control remoto, la unidad electrónica
de la esquina y el control remoto pasan a modo “Suspendido” para ahorrar
batería. Para sacar el control remoto/la unidad de la esquina del modo
Suspendido, se debe presionar una función en la unidad de la esquina, o bien
apagar la unidad de la esquina y luego encenderla nuevamente.
24A
Operating the Remote Control (Select models)
Operación del control remoto (modelos selectos)

33
Operating the Remote Control (Select models)
Operación del control remoto (modelos selectos)
VIBRATION: Push the VIBRATION ( ) button once to activate vibration cycle
and it will automatically turn off in 10 minutes. To immediately stop the vibration
cycle, press the VIBRATION ( ) button again. Note: When the LIGHT ( )
button is pushed in the middle of the vibration cycle the light will turn off when
the vibration cycle ends.
LIGHT: Push the LIGHT ( ) button once to activate light cycle and it will
automatically turn off in 10 minutes. To immediately stop the light cycle, press
the LIGHT ( ) button again. Note: When the VIBRATON ( ) button is pushed in
the middle of the light cycle the vibration will turn off when the light cycle ends.
MUSIC/FAST FORWARD: Push the MUSIC/FAST FORWARD ( / ) button
once, it will move to the next melody/sound, play for the 10 minute cycle and
stop. If you press and hold down the MUSIC/FAST FORWARD ( / ) button for
2 seconds, it will play the current melody/sound continuously for 5 minutes and
stop.
OFF: To stop all of the functions and put the NiteLite into SLEEP mode press
the OFF button. The OFF button does not turn off the power on the NiteLite. To
prolong life of batteries, make sure to slide the power switch on the NiteLite to
the OFF position.
24B. With the switch in the MELODY
( ) or SOUND ( ) position you
can activate the following:
VOLUME: To increase the sound,
press the ( ) side of the button. To
decrease the sound, press the ( )
side of the button.
24B

36
26
26. Top rails cannot be unlocked rst.
Remove bassinet, gym, pad, and
NiteLite. Pull up on the center floor
hub release strap and lift the center
hub up as far as possible.
26. Los rieles superiores no pueden
destrabarse primero. Quite el moisés,
el gimnasio, la almohadilla y NiteLite.
Tire de la correa de liberación de la
base central del piso y levante la base
central lo máximo que sea posible.
Packing Up the Playard
Empaquetado del corralito de juguetes
27. Lift and squeeze center of top rail
to release lock. Push down on top rail
while continuing to squeeze. Top rail
cannot be pushed in until the lock
joint is lifted. If top rail will not unlock,
pull up on center floor hub release
strap to make sure ALL floor rails are
unlocked. Center floor hub must be
even with top rails.
27. Levante y presione el centro del riel
superior para liberar la traba. Empuje
hacia abajo ei riel superior sin dejar de
presionar el centro. El riel superior no
puede presionarse hasta que la junta
de encastre se haya elevado. Si el riel
superior no se destraba, tire de la
correa de liberación de la base central
del piso para asegurarse de que
TODOS los rieles estén destrabados.
La base central del piso debe estar
nivelada con los rieles superiores.
27

38
Packing Up the Playard
Empaquetado del corralito de juguetes
30. Keep instructions for future use.
30. Guarde las istrucciones par uso
futuro.
30

39
Trouble Shooting Guide
TOP RAILS FAIL TO LOCK INTO AN UPRIGHT POSITION :
Before top rails can be locked, the center floor hub must be pulled up as high as the 4
corners. If needed pull up on the center floor hub release strap. If necessary, pull the
release strap up with one hand and lock rails one at a time. Call Chicco Customer
Service (p. 54).
THE FLOOR JOINTS DO NOT FLATTEN:
Turn playard upside down and make sure joints are free from foreign objects.
TOP RAILS DO NOT UNLOCK TO FOLD:
Lift top rail first, then squeeze to release. Before top rails can be unlocked, the center floor
hub must be pulled up. If needed pull up on the center floor hub release strap as high as
the 4 corners.
FLOOR JOINTS DO NOT UNLOCK:
Pull up on the center floor hub release strap to unlock floor joints.
FOLDED PLAYARD DOES NOT FIT INTO MATTRESS PAD AND IT IS DIFFICULT TO
ATTACH HOOK AND LOOP STRAPS:
Pull up on the center floor hub release strap and gather playard legs towards the center to
make the playard more compact. If necessary, shift playard lower on pad or turn slightly
and try again.
BASSINET DOES NOT FIT ONTO PLAYARD:
Playard top rails must be fully upright and locked. Playard floor must be flat.
LULLABY NITELITE ELECTRONICS DOES NOT FIT ONTO CORNER CAPS:
Do not force electronics over corner caps. Try another cap. NiteLite will fit onto any of the
corner caps.
/