A. GENERAL INSTALLATION NOTES:
• All Native Trails products should be installed by a licensed contractor
• Observe and comply with all building and plumbing codes.
• As our basins are handcrafted and dimensions are approximate, we recommend
using the actual basin for the cutout.
• Use 100% Silicone (non-water based) for all installations.
• Ensure adequate space behind the basin for faucet and backsplash,
including the full range of motion for faucet handles and spouts.
• Make sure a watertight seal exists on all drain connections.
• Do not place basin directly on floor. After unpacking, place basin on protective
material such as packing materials.
• Remember to always use non-abrasive cleaners on Native Trails sinks and tubs.
Mild soap and water is recommended. Refer to Care and Maintenance Instructions
for further information.
• If unsure which instructions pertain to your product call our Customer Service
Department at 800.786.0862. You may also view Installation and Care and Maintenance
instructions at www.nativetrails.net.
• CAUTION: Risk of personal injury. Bath tubs, large sinks, and vanities can be extremely
heavy. Obtain sufficient help to carefully lift or move.
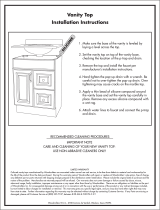
READ THIS FIRST
B. DROP-IN AND RAISED PROFILE SINK INSTALLATION:
If vanity top is pre-cut go to Step 4.
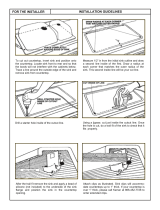
1. Use actual basin as your template. Place it upside down on countertop and
mark countertop by tracing edge of basin. Be sure to allow clearance for faucet
and other accessories or fixtures. *See note below for Palisades
2. Measure inside edge of lip and mark countertop accordingly, inside of the first tracing made.
3. Cut countertop midway in-between the two lines.
4. Temporarily place basin in cut-out to verify proper fit.
5. Apply silicone around cut-out in countertop, and place basin in cut-out.
6. For Raised Profile Sinks: Use wood screws from underneath the countertop and
screw into wood blocks or use silicone on wood blocks to adhere/secure to countertop.
Make sure that the screws align with the wood blocks. If the screws are not placed
properly, damage to the copper may occur.
7. Use a level to ensure that the basin is sitting level in all directions, front to back
and side to side; while pressing down to seal.
8. Carefully remove any excess silicone.
9. Install the drain according to the drain’s installation instructions.
*Palisades: Before cutting the countertop, turn basin over and measure from the
bottom inner edge of the apron to the front edge of the basin (approx.2.5”)
This will provide the measurement for determining where to cut and place the
basin so the apron front extends properly over the edge of the countertop.
DROP-IN
RAISED PROFILE