Page is loading ...

VEHICLE CCTV SYSTEM
VBV-545AM MONITOR
VBV-100C CAMERA
Model:
Brigade Electronics Plc
Brigade House
The Mill, Station Road
South Darenth, Kent Da4 9BD
Tel: +44(0)870 774 1500
Fax: +44(0)870 774 1502
Email: sales@brigade-electronics.co.uk
Website: www.brigade-electronics.co.uk

SAFETY INFORMATION
Before installing the unit, please read all the CAUTIONS and WARNINGS below.
INTRODUCTION
This vehicle CCTV system has been designed to provide years of trouble-free
operation. Please read this manual thoroughly. This manual contains instructions
to make the installation of the camera and monitor easier. The vehicle CCTV
system is a supplement to standard rear-view mirror systems, and will provide
additional rear-view vision when installed and maintained properly. It is not
intended in any way to be a substitute for careful and cautious driving. All
applicable traffic laws and motor safety regulations must still be adhered to.
BEFORE INSTALLATION
1. This system operates from 12 volts DC to 32 volts DC, negative ground.
2. Please install this system according to the instructions in this manual.
3. Do not disassemble the camera or the monitor. This voids the warranty.
Disassembling the camera will compromise the waterproof seal.
4. Connect the system to an ignition switched power source. Connection to a battery
source will reduce battery life.
i
E-Mark
FDA
WARNING
1. To prevent electrical shock, DO NOT OPEN THE MONITOR CASE. There are
potentially lethal voltages inside the monitor. There are no user serviceable parts
inside. If evidence of tampering is detected, the warranty will be considered void.
2. Keep monitor away from leaking water, rain, moisture etc. It is NOT waterproof.
Any moisture inside the monitor could cause extensive damage.
3. Use the thumbscrews to mount the monitor to bracket.
4. Do not cover air ducts. Monitor needs proper ventilation to prevent overheating.
Remove dust and dirt with a damp soft cloth. Heavier dirt should be removed with a
damp soft cloth and mild detergent. Do not use strong cleaning agents containing
gasoline, thinner, benzene or alcohol. These substances may damage the exterior
surface of the monitor.
MAINTENANCE
10
TECHNICAL SPECIFICATION OF MONITOR AND CAMERA
SPECIFICATIONS
VBV-100C CAMERA
VIDEO PICK-UP DEVICE
IMAGE SIZE
SYNCHRONIZATION
REQUIRED ILLUMINATION
VIDEO OUTPUT
OPERATING VOLTAGE
POWER CONSUMPTION
RESOLUTION
OPERATION TEMP
WEIGHT
DIMENSION (W x H x D)mm
VBV-545AM MONITOR
VIDEO SYSTEM
PICTURE TUBE
PICTURE RESOLUTION
POWER CONSUMPTION
OPERATION VOLTAGE
WEIGHT APPROX.
DIMENSION (W x H x D)mm
CCD
1/3 inch
INTERNAL
0 Lux MINIMUM
1V (p-p), 75 ohm
12 Vdc
MAX 2.4W(AT 12 Vdc)
420 TV LINES
-10℃ TO +45℃
0.2Kg
70 x 44 x 54
CCIR
4.5" CRT
600 TV LINES
11W
DC 12V - DC 32V
3.2KG
160 x 127 x 117 (without bracket)

TABLE OF CONTENTS
System composition
System installation guide
ii
Camera mounting(Figures indications)
Monitor mounting(Figures indications)
System connection display
Identifying the parts
Technical specification
Troubleshooting
Unit contain..................................................................................................1
Accessories.................................................................................................1
Mounting camera..........................................................................................2
Wiring camera and monitor............................................................................2
Caution.......................................................................................................2
Mounting the bracket(Fig.1)...........................................................................3
Attaching the camera to vehicle(Fig.2)............................................................3
Mounting the bracket(Fig.3)...........................................................................4
System connection(Fig.6)..............................................................................6
Front and rear view of product(Fig.7)..............................................................7
Panel indications(Fig.8)................................................................................8
Technical specification..................................................................................9
Troubleshooting...........................................................................................9
Technical specification of monitor and camera
Technical specification of monitor and camera ..............................................10
Attaching the monitor to the dash(Fig.4)..........................................................4
9
TROUBLESHOOTING
Solve problems according to the table below
WARNING
Electrical shock or fire hazard. Do not try to service this unit yourself. Service should
be handled by qualified technicians.
Symptom Cause Solution
Rolling image Monitor(horizontal control) Replace monitor
Shrunk & Unstable image Monitor improper voltage check the voltage of power supply
Black image Monitor improper voltage if ok, check fuse->check power cable,
wires or connector(loose or broken?)
If all above item are ok, replace monitor
White image Monitor/Camera Check main system cable. Make sure
all connectors are connected properly.
If ok, check 4 pin DIN monitor cable. If ok,
replace camera
Blurred image Fog, mud, water or ice on Clean camera porthole. If condensation
camera lens or porthole or moisture is visible inside camera,
moisture in camera initiate device immediately.
Engine noise or Static lines Monitor Make sure ground and +12V DC source
is in solid connection. Call tech-support
for assistance
No light displayed on monitor Broken fuse or low bright- Check whether the fuse is broken or
ness level brightness adjustment has been turned
to the lowest level
No image Improper plugging in plug the connector properly or replace
connector or broken system the system connecting cable
connecting cable
If you still can not solve the problems, contact our tech-support engineer for
assistance.
Mounting monitor..........................................................................................2
Mounting cable.............................................................................................2
Screen protecting board and sun visor installation(Fig.5)..................................5

8
1
Before using the product, please make sure that the package of product includes the
following items.
SYSTEM COMPOSITION
Accessories
Monitor bracket
Angle adjustment screw
(Monitor)
Power cable
Bracket mounting screw
(Monitor)
Sun visor
Screen protecting board
System connecting cable
Plastic ear
Angle adjustment screw
(Camera)
Item Quantity
Monitor 1
Camera 1
Monitor bracket 1
Bracket mounting screw(Monitor) 4
Power cable 1
Sun visor 1
Screen protecting board 1
Angle adjustment screw(Monitor) 4
System connecting cable 1
Plastic ear 2
Angle adjustment screw(Camera) 4
Operating instruction 1
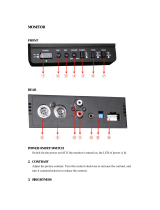
1. Power / Stand-by switch
2. Camera/VCD switch
3. Day/Night lightness option
4. Camera1 switch
5. Camera2 switch
6. Contrast adjustment
7. Brightness adjustment
8. Video input
9. Power input
10. Video output
11. Normal/Mirror image switch
12. Camera input C1
13. Camera input C2
Fig.8 Front and rear view of product
IDENTIFYING THE PARTS
CONT.
BRIT.
ON
STBY
AV
CAM
D/N
COM1
COM2
B/W REAR VIEW MON ITOR
CRT:4. 5 Inch(1 1.4cm)
POW ER INPU T: DC11V~32V
POW ER CON SUMPTION: 11W
POWER
IN
VIDEO
OUT
MIRRO R
C1
C2
C1
C2
1
2
3
4
5
6
7
8
9
10
11
12
13
Postern control power
Reversing control power
Mainframe power
GND (ground)
Motermeter light control power
Details of ports
Port 9/POWER
Port 12/C1
Power of camera
GND (ground)
Empty
Video input
Mirror
Normal
1
2
ON
Turn the switch from up to down can switch the image
display from mirror to normal.
Port 11/MIRROR
Front view
Rear view

2
SYSTEM INSTALLATION GUIDE
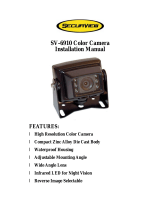
VBV-100C CAMERA
1. Attach camera bracket (see Fig. 2) to upper portion of vehicle. Attachment point
must be sturdy enough to support camera and bracket.
2. Attach camera to bracket using screws provided. Adjust angle as
indicated in Fig. 2. (Use rear bumper and back of vehicle as a reference point.)
3. Wind deflector may be installed. This deflector is designed to reduce the build up
of dust, dirt and moisture on the camera lens. (See Fig.1)
VBV-545AM MONITOR
1. Attach monitor inside vehicle in a location convenient to the driver (e.g. centre of
dash, overhead or in dash) (Fig.4)
2. Use a compression plate to attach the monitor bracket to the dash or overhead.
3. Adjust mounting angle of the monitor to allow driver to easily view the screen from
all seat positions. (Fig. 3)
CABLE
1. The camera to cable connection and the monitor pigtail are waterproof. Be sure to
orient the cables properly.
2. Do not run the cable over sharp edges or corners. Do not kink the cable. Keep the
cable away from hot and rotating parts.
3. Place all excess cable in convoluted tubing.
4. Wire the cable securely.
WIRING CAMERA AND MONITOR
1. See connection diagram for connections to ignition, ground and back up circuit.
(See Fig. 6)
2. Wiring camera: Drill a 22mm diameter hole into vehicle body near the camera and
bracket. Connect camera connector to extension cable in vehicle. Push extra cable
into vehicle (be careful not to kink cable) and fit grommet into hole. Apply sealant
around grommet to increase resistance to water penetration.
3. Wiring Monitor: Insert extension cable into camera #1 position.
If 2 cameras are used, be sure to mark each extension cable properly and plug second
cable into camera #2 position. Bundle excess cable together using a cable tie or vinyl
tape. This will avoid possible damage to cable during operation.
4. The red wire is connected to an ignition power source, the black wire is connected
to chassis ground, and the brown wire is connected to the vehicles back up circuit.
CAUTION
1. Before drilling, be sure no cable or wiring is on the other side. Be sure to drill a
22mm diameter hole only.
2. Feed as much cable as possible into vehicle and clamp securely. This reduces the
possibility of it being hooked or snagged.
3. Keep all cables away from HOT, ROTATING and ELECTRICALLY NOISY
components.
4. To increase protection of cable, place all excess wire and extension cable in
convoluted tubing.
5. Do not twist camera cable and do not cut camera pigtail or cable.
(see Fig. 1)
7
IDENTIFYING THE PARTS
1
2
3
4
5
6
7
CONT.
BRIT.
ON
STBY
AV
CAM
D/N
COM1
COM2
1. ON/STBY button: Blue light indicates starting up, red light indicates mainframe
is in stand-by mode.
2. AV/CAM button: Blue light indicates camera signal input, red light indicates VCD
signal input.
3. D/N button: Blue light indicates night light mode, red light indicates day light
mode.
4. COM1 button: Blue light indicates reversing camera signal input, red light
indicates postern camera input.
5. COM2 button: Blue light indicates postern camera input, red light indicates
reversing camera signal input.
6. CONT. button: To enhance contrast by clockwise rotation, to diminish it by anti-
clockwise rotation.
7. BRIT. button: To enhance brightness by clockwise rotation, to diminish it by anti-
clockwise rotation.
Panel instructions
Fig.7 Panel indications

CAMERA MOUNTING
Fig.1 Mounting the bracket
Camera bracket
Angle adjustment screw
Wind deflector
(optional)
Approximately 90-degree
field of view
Back of vehicle, viewing at
monitor screen
Fig.2 Attaching the camera to the vehicle
Mount camera assembly
high-mounted Centred.
Camera mounting
hole pattern.
6
3
SYSTEM CONNECTION DISPLAY
Power cable connection
1. Red to DC12V-32V power input
2. Brown to reversing control power
3. White to postern control power
4. Black to ground(GND)
Fig.6 System connection
Monitor
Video player
Video tape recorder
This product can be linked to 2 channels of cameras and 1 channel of video input
(VCD signal input) as well as 1 channel of video output which connect to a video
tape recorder for recording images.
System
connecting cable
Camera
AV signal cables
Power cable
FUSE
1
2
4
3
B/W REAR VIEW MON ITOR
CRT:4. 5 Inch(1 1.4cm)
POW ER INPU T: DC11V~32V
POW ER CON SUMPTION: 11W
POWER
IN
VIDEO
OUT
MIRRO R
C1
C2
C1
C2
AV signal cables
To car dashboard

MONITOR MOUNTING
Monitor bracket
Fig.3 Mounting the bracket
Fig.4 Attaching the monitor to the dash
Mounting surface
Bracket mounting screw
Monitor bracket
Spring lockwasher
CONT.
BRIT.
ON
STBY
AV
CAM
D/N
COM1
COM2
Angle adjustment
screw
Plastic ear
4
Fig.5 Screen protecting board and sun visor installation
ON
C T
.
BR
I
T.
N
O
S
T
B
Y
A
V
C
AM
N
D
/
C
O
1
M
2
C
O
M
Sun visor
Screen protecting board
5
MONITOR MOUNTING
/