Page is loading ...

1 3/2/2021
ade in the USA
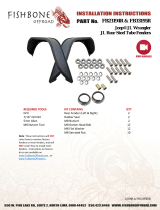
R-STEP
BS-100-JT4
INSTALLATION MANUAL

2 3/2/2021
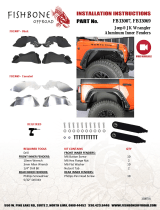
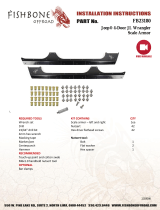
Parts List
Tools Required
Wire Hammer / Mallet
Electrical Tape Painters Tape
3/4” Wrench 3/8” wrench
3/4” Socket 17mm Socket
3/8” Socket 1/2” Socket
3/4” Impact 10 mm Socket
1/4” Ratchet 3/8” Ratchet
1/2” Ratchet
Impact / Heavy Duty
Torque Gun
MOUNTING BRACKETS
Main Mounting Bracket 1
J-Channel Bracket 1
U Channel Bracket 1
Guard Plate with Circuit Board 1
Guard Plate 1
R-STEP INSTALL HARDWARE (PASSENGER SIDE) MINI SLIDER HARDWARE (DRIVER SIDE)

3 3/2/2021
Step 1 - Install wiring harness
*Pre-Installaon Preparaon*
The factory Rubicon rails in the rear will not work with our R-Step. They will need to be removed before the R-Step can be installed.
Also, you will need to lower the spare re so it is clear of the frame for easy installaon of the R-Step.
Having all the required tools before you begin will speed up the install.
Check to see if the fuse is installed in the holder.
If it is, remove it and keep it to be re-installed
later.
Attach red to the positive terminal using a 10
mm socket.
Attach the black to the negative terminal using a
10 mm socket.
Secure these wires in the engine bay using small
zip ties.
Starting near the engine bay, route the power wires up through the engine bay.
Leave the rest of the harness below the engine bay.
To pull the wires up through the engine bay, take a separate wire and fish it down the
gap to the front of the fuse box. Once through the bottom, loop the wire through the
ends of the power and ground wires and pull back up through the opening.
Step 2
1A
1B 1C
2A

4 3/2/2021
Step 3 - Prep the harness
Step - 4
Route the wire along the frame following the existing factory
harness.
The harness will be routed all the way to to the install area of the
R-Step.
Once the wiring is pulled along the frame, go back and secure the
harness to the frame / harness with zip ties and ensure they do not
interfere with other operations on the vehicle and will not get
pinched / cut by moving suspension parts.
Before routing the rest of the harness, We recommend securing the harness wires to themselves as shown and prepping them to easily run
along the frame using a extra wire looped and secured to the 18 pin connector so you can pull / fish it through and over the frame easier
3A 3B 3C
4A
4B 4C

5 3/2/2021
Step 5
With the harness routed, prepare the install area.
Remove the factory harness off of the body sea
(shown right) and push it to the other side of the
seam. (Below)
**DO NOT CUT THE WIRE**
Secure the wire to the other side with zip ties.
The main plug will mount to our R-Step in the final
steps.
Step 6
Take a hammer or mallet and aen the
plug mount into the body. Failure to do
so will result in not enough clearance for
the R-step to install.
5A
5B 5C
6A

6 3/2/2021
Step 7
Using the main rear mounng bracket, run 2 of the large bolts with a washer on the back through the plate. Install in the locaon shown
below.
Install a nut onto the back of the bolts and hang ghten the nuts to hold the mount in place.
7B
7C 7D
7A

7 3/2/2021
Step 8
Step 9
Run the provided shoulder boult through the lower hole in the bracket, through the tube, and
apply a provided ange nut to the other side. Tighten all 3 bolts at this me down.
**On all non-rubicon models, you must install the provided tub into the space between the
frame (shown). Failure to do so will cause damage.
Hang the J shaped bracket from the frame in the shown locaon.
Run a bolt /washer through the main bracket over the frame, and run the U-shaped bracket UNDER the wiring on the opposite side and
against the frame. Apply a ange nut to the bolt to hang the bracket in place. Install the 2nd lower bolt/washer and ange nut. Hand
ghten at this moment, DO NOT OVERTIGHTEN. **IT IS CRITICAL THE BRACKET IS INSTALLED UNDERNEATH THE WIRE**
8A 8B
9A 9B

8 3/2/2021
Step 10 - Route bed wiring
Route the buon wires into the bed of the truck at this point. You will need to drop a string / wire similar to the engine bay through the
opening down above the R-Step locaon to pull the wiring up easily.
10A
Step 11 - Prep Mounting Point
On the Rubicon models, remove the factory
bolt from the rail system.
IF THERE IS NOT A PRE-INSTALLED
NUT AND BOLT IN THE HOLE ON
TRUCKS WITHOUT THE BED RAILS,
USE THE PROVIDED NUTSERT AND
INSTALL INTO THE HOLE TO MOUNT
THE BRACKET BY FOLLWING THE
INSTRUCTIONS BELOW**
10A 10B
11A
Step 12— ONLY FOR JEEPS NOT EQUIPPED WITH THE BED RAIL SYSTEM - Installing Nutsert
1. Assemble the nutsert install hardware as shown on the right:
LONG GOLD BOLT /SPACER / NUT / NUTSERT
2. Push the nutsert in the open hole where the factory bolt would be in
step 11.
3. Use a 13mm open end wrench to hold the silver nut in place holding
the nutsert ght in the hole.
4. Use a 10mm socket / wrench on the head of the gold bolt, and twist
the gold bolt clockwise. This will cause the nutsert to collapse like a
rivut and hold the nutsert in place. Connue twisng the gold bolt
unl the nutsert is fully collapsed and ght in the hole.
5. Remove the gold bolt , spacer, and silver nut leaving only the nutsert. 12A

9 3/2/2021
11A
11C
Step 13
Install the rocker switch into the supplied bracket. Install the 2 red wires on the top and boom pins, with the black wire on the center
pin.
Remove the black screw (if not removed yet) and install the bracket with a provided screw / spacer into the locaon shown.
13C
13B
13A
13D

10 3/2/2021
Step 14
Cover the fender are and paint with tape / covering
to prevent damage to the fenders while installing the
R-Step.
Step 15
Li the R-Step into posion and mount into place.
On each side of the R-Step are studs. These studs go
through the exisng holes on each mounng bracket.
Mount to the most rear bracket rst, and then slide the
other mounts that are hanging into place through the other
14A
15A 15B

11 3/2/2021
Step 16
Aer sliding the brackets into place, install
the anged nuts onto the 3 studs on each
side that are going through the mounng
brackets.
Tighten the nuts on the closest to the rear
bumper mount rst (rst image).
Then ghten the nuts on the front bracket.
Step 17
Tighten the bolts on the U-Channel bracket
at this point. This will require a wrench on
the one side and a torque gun on the other
side.
16A 16B
17A
17B

12 3/2/2021
Step 18
Step 19
Ensure the harness is routed through the small opening above the
rear bracket and is not pinched by mounts or hardware.
The power wires / rocker switch wires will run through the open-
ing.
Clean the surface with an alcohol wipe prior to
aaching wires.
Route the rear sensor wire with a small loop as
shown, then sck one of the rubber D channel
in the shown locaon, and the 2nd D channel
in the lower mounng posion facing the back
of the R-Step.
18A
19A
18B

13 3/2/2021
Step 20
Step 21
Apply the white spacers to the last two studs on each side of the R-Step.
This will be used to mount the blank guard plates.
Mount the circuit board to the rear blank
guard plate.
Slide the guard plate with the circuit board
aached up into place and onto the studs.
Apply a nut to each stud to hold the plate in
place.
Apply guard plate to the opposite side of the
R-Step by sliding it into place on the white
spacers and ghten down.
Connect the white sensor from the harness to
the sensor on the R-Step (blue and white
wires).
Run the harness and hook into the circuit
board.
Route the wires down along the lip of the
R-Step housing and zip e everything to the lip
and around the back of the housing.
Ensure all wires are tucked and protected out
of the way
20A 20B
21A

14 3/2/2021
Step 22
Step 23
Route the remaining harness (motor plug) to the rear of the R-
Step body and zip e to he provided slots.
**CRITICAL**
When securing the rubber boot to the U-
channel, the zip es have to go around
the rubber in the exact locaon shown.
Secure the motor plug wire loom to the opposite side of the U-
Channel bracket.
Double check all wiring to ensure it
has been connected, no wires are
being pinched, all wires are secure,
and jeep factory wiring is secured.
Ensure the plates are secured with
the provided nuts.
Hook the baery up with the fuse
and test the system using the
buon in the bed.
One direcon on the buon with
deploy the step, and one will re-
tract it.
22A 22B
23A
23B

15 3/2/2021
Step 24—Install Mini Slider on Driver Side
Step 23
Remove two bolts holding the muer hanger. Pull down on the
cool muer enough to slip the rear driver's rail into place. Secure
with two bolts to the frame via the pre-drilled threaded
holes. Run the large bolt through the boom hole through the
frame and secure it with a ange nut on the rear side.

16 3/2/2021
PRODUCT INFORMATION:
LIMITED LIFETIME WARRANTY FOR STRUCTURAL AND MECHANICAL COMPONENTS
LIMITED TWELVE (12) MONTH WARRANTY FOR FINISH AND ELECTRICAL COMPONENTS
Rock-Slide Engineering, LLC (“R-SE”) warrants to the original purchaser that (a) the structural and mechanical components of the Step
Sliders will be free of defects in material and workmanship for the lifetime of the Step Sliders (the “product”), and (b) the finish (powder
coat) and the electrical components (including the motor) will be free of defects in material and workmanship for a period of twelve (12)
months from the original date of purchase. This warranty applies only to the original retail purchaser. Warranty is void if product was not
purchased directly from R- SE or from an authorized R-SE retailer or reseller. This warranty applies only with regard to the original instal-
lationof the product to the original vehicle. This warranty does not cover removal or reinstallation of the product.
To exercise this warranty and receive any warranty service, the original purchaser must provide R-SE with proof of purchase and date of
purchase that is acceptable to R-SE, such as a copy of the original purchaser’s purchase receipt. The original purchaser must return the
defective product to R-SE along with a description of the problem, a copy of the original purchase receipt, the original bill of sale and all
contact information (name, address, telephone number and email address). To begin the warranty process, the original purchaser must
email R-SE’s warranty department.
During this warranty term, and upon the original purchaser’s valid exercise of this warranty, R-SE shall, at its option, repair or furnish a
replacement product in the event the original product is deemed by R-SE to be defective. R-SE’s sole liability shall be for repairing or
replacing the product, but R-SE may refund the purchase price at its sole discretion and option. The original purchaser is responsible for
prepayment of all shipping and/or transportation charges with respect to the exercise of this warranty. The product may change without
notice. In the event of a product change, R-SE has no obligation to upgrade or modify any older generation product.
THE WARRANTY SET FORTH HEREIN IS THE ONLY WARRANTY COVERING THE PRODUCT. NO OTHER WARRANTY
EXISTS, EXPRESS OR IMPLIED, INCLUDING, WITHOUT LIMITATION, IMPLIED WARRANTIES OF MERCHANTABILITY
AND/OR FITNESS FOR A PARTICULAR PURPOSE. No retailer, reseller, dealer, agent or employee is authorized to make any modifi-
cations, extensions, amendments or additions to this warranty.
This warranty shall be void in its entirety if R-SE determines that the product installation was modified, changed, altered, customized or in
any way used other than as instructed. Installation of the product without strictly adhering to the installation instructions shall void this
warranty. Installation must be on the proper vehicle or warranty is void.
R-SE SHALL NOT BE LIABLE FOR SPECIAL, INDIRECT, INCIDENTAL OR CONSEQUENTIAL DAMAGES, UNDER ANY LE-
GAL THEORY AND/OR UNDER ANY CIRCUMSTANCE WHATSOEVER. IN ANY EVENT, ANY DAMAGES IN ANY SITUA-
TION SHALL BE LIQUITADED DAMAGES AND MAY NOT EXCEED THE RETAIL PRICE OF THE PRODUCT. R-SE SHALL
NOT BE LIABLE FOR ANY LOSS, DAMAGE OR INJURY DIRECTLY OR INDIRECTLY ARISING FROM THE USE OF OR INA-
BILITY TO DETERMINE THE USE OF THE PRODUCT. THE ORIGINAL PURCHASER IS RESPONSIBLE TO DETERMINE THE
SUITABILITY OF THE PRODUCT FOR ITS INTENDED USE, PRIOR TO USING THE PRODUCT, AND THE ORIGINAL PUR-
CHASER ASSUMES ALL RESPONSIBILITY AND RISK IN CONNECTION THEREWITH.
PATENT INFORMATION:
This product is covered by multiple US issued patents.
PAT US 9,771,024 B2
PAT US 8,833,781B2
PAT US D718,1955
Have feedback, thoughts, or suggestions?
Please email us!
We would be happy to make our instructions easier to read and value your feedback.
Warranty@rockslideengineering.com
/