Page is loading ...

a b
1 3
4
5
6
2
7
8
5
Attach the L-Shaped Bed
Connection Brackets to the
both Bed-Side Rails with
provided at head screws (6).
If the Gladiator is equipped with factory tie-down
system, remove all three rails and clean the
mounting surface. Repeat steps 1-3 for passenger-side Rail Assembly.
Locate the Bed-Front Rail and loosely
start four long at head screws (5).
Once all screws are started, tighten all
four screws on the Bed-Front Rail.
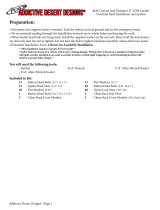
1. Bed-Side Rails x 2
2. Bed-Front Rails x 1
3. L-Shaped Bed Connection Brackets x 2
4. Locking Tie-Down Points x 6
5. Flat Head Screws for Bed Rail Mounting
x 12
6. Flat Head Screws for L-Shaped Bed
Connection Bracket x 4
7. Button Head Screws for L-Shaped Bed
Connection Bracket x 2
8. Socket Head Screws x2 - Only used for
mounting JGBM-100 (Jeep Gladiator
Bed Mount). The instructions for
installing the JGBM-100 on this system
comes with the JGBM-100.
1. 3/16” Allen Wrench
Position the Rail Assembly so the L-Shaped
Bed Connection Bracket is facing the
tailgate. (a) Loosely attach the L-Shaped
Bed Connection Bracket with a button head
screw (7). (b) Loosely start the four long at
head screws (5) through the rail. Repeat
steps for the second Rail Assembly.
Once all screws are started, tighten all ve
screws on the Rail Assembly.
3
4
6Insert Locking Tie-Down
Points as desired on any
of the 3 Bed Rails.
1
Included Components Installation
Required
Tools
Hi-Lift® Trail Trak Cargo Management System for Jeep Gladiator
Hi-Lift® • 46 W Spring St, Bloomfield, IN 47424 • https://hi-lift.com
2
/