
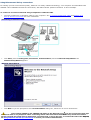
Welcome
Congratulations on your purchase of this Sony VAIO
®
computer, and welcome to the online VAIO
®
Computer User Guide.
This user guide provides detailed information on all aspects of using your new VAIO computer, from keyboard functions to
preinstalled software programs.
In the left navigation window, click the topics you want to learn more about, and that information will be displayed in this
main window.
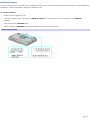
View the Electronic Flyer, which provides updates and supplemental information about your computer.
Go to the Sony Computing Support Web site to view the VAIO
®
Computer Specifications, which lists your computer's
hardware specifications and preinstalled software information.
For Sony software information, click Start and select Welcome to VAIO Life.
Page 1

Caring for Your Computer
This section provides information on how to safely use your Sony computer.
Page 2

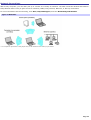
Applying Ergonomics
Your computer is a portable device and can be used in a variety of environments. Whenever possible, you should apply the
following ergonomic considerations:
Position of your computer — Place the computer directly in front of you as you work. Keep your forearms
horizontal, with your wrists in a neutral, comfortable position while using the keyboard, touch pad, or external
mouse. Let your upper arms hang naturally at your sides. Take breaks during sessions with your computer.
Excessive use of the computer may strain muscles or tendons.
Furniture and posture — Sit in a chair with good back support and armrests. Adjust the level of the chair so your
feet are flat on the floor. A footrest may make you more comfortable. Sit in a relaxed, upright posture and avoid
slouching forward or leaning far backward.
Viewing angle of the computer's display — Tilt the display to find the best viewing angle. Also try adjusting the
brightness setting of the display. Following these suggestions can reduce eye strain and muscle fatigue.
Lighting — Choose a location where windows and lights do not create glare or reflection on the display. Use indirect
lighting to avoid bright spots on the display. You can purchase accessories for your display that help reduce glare.
Proper lighting adds to your comfort and work effectiveness.
Placement of an external display — When using an external display, set the display at a comfortable viewing
distance. Make sure the display screen is at eye level or slightly lower when you are sitting in front of the monitor.
Page 3

Storing Your Computer
Do not use or store your computer in a location subject to:
Heat sources, such as radiators or air ducts
Direct sunlight
Excessive dust
Moisture or rain
Mechanical vibration or shock
Strong magnets or speakers that are not magnetically shielded
Ambient temperature higher than 95ºF (35ºC) or less than 40ºF (5ºC)
High humidity
Do not place electronic equipment near your computer. When running, the computer's electromagnetic field may
cause other electronic equipment in close proximity to malfunction.
Provide adequate air circulation to prevent internal heat buildup. Do not place your computer on porous surfaces
such as rugs or blankets, or near materials such as curtains or draperies that may block ventilation. Leave a space
of at least 8 inches (20 cm) behind the back of the computer.
If the computer is brought directly from a cold location to a warm one, moisture may condense inside your computer.
In this case, allow at least one hour before turning on your computer. If any problems occur, unplug your computer,
and contact your Sony Service Center.
The computer uses high-frequency radio signals and may interfere with radio or TV reception. Should this occur,
move the computer a suitable distance away from the radio or TV.
Do not drop the computer or place heavy objects on top of the computer.
Page 4

Using Cables and Connections
Use only specified peripheral equipment and interface cables.
Do not use cut or damaged connection cables.
If the telephone company makes a service call to your home or office and determines that your computer is
responsible for a problem, the telephone company may bill you for the service call. Also, if you do not disconnect
your computer when it is adversely affecting a telephone line, the telephone company has the right to disconnect
your service until you correct the problem.
Page 5

Cleaning Your Computer
Clean the computer with a soft, dry cloth or a soft cloth lightly moistened with a mild detergent solution. Do not use
any type of abrasive pad, scouring powder, or solvent such as alcohol or benzine, as these may damage the finish
of your computer. You can use canned compressed air specifically for computers to remove dust.
If a solid object falls onto the computer or a liquid leaks into the computer, immediately turn off and unplug the
computer. It is best to have the computer checked by qualified personnel before you use it again.
Avoid rubbing the LCD screen as this can damage the screen. Use a soft, dry cloth to wipe the LCD screen or
canned compressed air.
Always disconnect the power cord before cleaning the computer.
Page 6

Handling the LCD Screen
Direct sunlight can damage the LCD. Be careful when using the computer near a window.
Do not scratch the LCD or exert pressure on it. This can cause a malfunction.
Using the computer in low temperature conditions may produce a residual image on the screen. This is not a
malfunction. When the computer returns to normal temperature, the screen returns to normal.
The screen becomes warm during operation. This is normal and does not indicate a malfunction.
The LCD is manufactured using high-precision technology. You may, however, see tiny black points and/or bright
points (red, blue, or green) that continuously appear on the LCD. This is a normal result of the manufacturing
process and does not indicate a malfunction.
Page 7

Powering Your Computer
Your VAIO
®
computer comes with a battery and an AC adapter. This chapter explains how to install and use these supplied
accessories to power your computer. It also describes ways you can efficiently utilize the battery as a power source.
Page 8

Using AC Power
The supplied battery is not charged when you receive your computer. To charge the battery and begin using the computer
immediately, insert the battery into the computer and use the supplied AC adapter as a power source. The computer
automatically charges the installed battery while it uses AC power.
Page 9

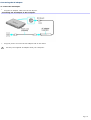
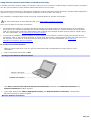
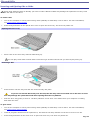
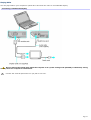
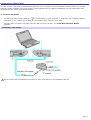
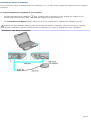
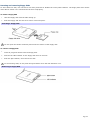
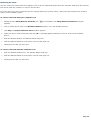
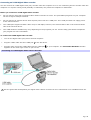
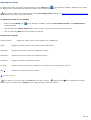
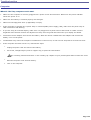
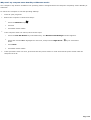
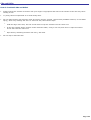
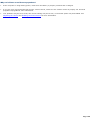
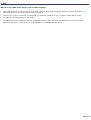
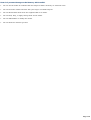
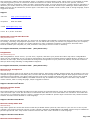
Connecting the AC adapter
To connect the AC adapter
1.
Plug the AC adapter cable into the DC IN port.
Connecting the AC Adapter to the Computer
2.
Plug the power cord into the AC adapter and an AC outlet.
Use only the supplied AC adapter with your computer.
Page 10

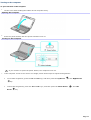
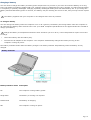
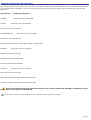
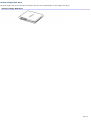
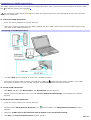
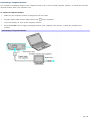
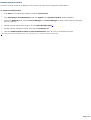
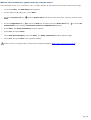
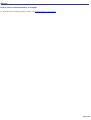
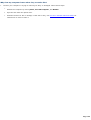
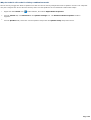
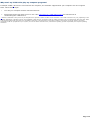
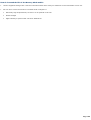
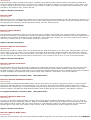
Turning on the computer
To open and turn on the computer
1.
Lift the cover while holding the bottom of the computer firmly.
Opening the Computer
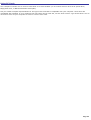
2.
Press the power button until the power indicator turns on.
Turning on the Computer
If you continue to press the power button, the computer turns off.
3.
If the computer screen is too dark or too bright, follow these steps to adjust the brightness:
To increase brightness, press the Fn and F5 keys, and then press the Up Arrow or the Right Arrow
key.
To decrease brightness, press the Fn and F5 keys, and then press the Down Arrow or the Left
Arrow key.
Page 11

Using the Battery
Your computer, depending on the model you purchased, may come equipped with one battery bay and one multipurpose
bay that supports a second battery. If your computer comes with two bays, you can purchase a second rechargeable
battery to extend your computing time. For information on how to extend the life of the battery, see Conserving Battery
Power for more information.
The battery that comes with your computer is not fully charged at the time of purchase.
The brightness of your computer screen automatically dims when you switch from AC power to battery power. To
increase the brightness, press the Fn and F5 keys, and then press the Up Arrow or Right Arrow key.
Page 12

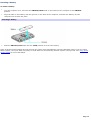
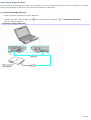
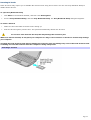
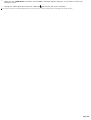
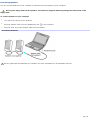
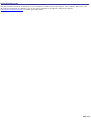
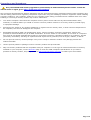
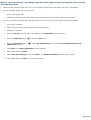
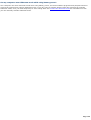
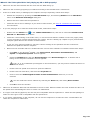
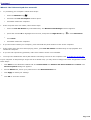
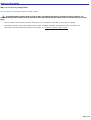
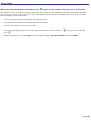
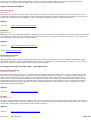
Inserting a battery
To insert a battery
1.
Turn the computer over, and slide the UNLOCK/LOCK latch on the bottom of the computer to the UNLOCK
position.
2.
Align the tabs on the battery with the grooves on the back of the computer, and slide the battery into the
computer until it clicks into place.
Inserting a Battery
3.
Slide the UNLOCK/LOCK latch into the LOCK position to secure the battery.
Some programs and peripheral devices prevent the system from automatically entering Hibernate mode. If you are using
battery power, save your data frequently to avoid data loss and manually activate a power saving mode. See Using power
saving modes for more information.
Page 13

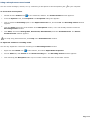
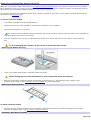
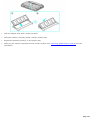
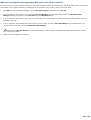
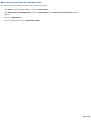
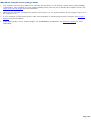
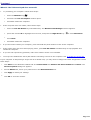
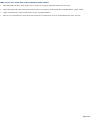
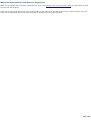
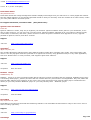
Removing a battery
If you are not using the computer for an extended period of time, remove the battery from the computer to avoid damaging
the battery. Remove the battery when the computer is off.
To remove a battery
1.
Make sure the computer is off.
2.
Turn the computer over, and slide the UNLOCK/LOCK latch on the bottom of the computer to the UNLOCK
position.
3.
Push and hold the RELEASE latch.
4.
While holding the RELEASE latch, slide the battery away from the computer.
Remov ing a Battery
Page 14

Locating battery information
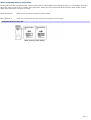
You can view the remaining battery charge and miscellaneous battery information on the Battery Information toolbar, the
PowerProfile window, and the Power Meter window.
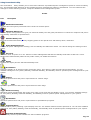
The Battery icons that appear on the Battery Information toolbar and PowerPanel window indicate the current status of
the installed battery.
Battery icon Charge status
Charging
Fully charged
Discharging
No battery
To view the Battery Information toolbar
1.
Right-click the center of the Windows
®
taskbar.
2.
Select Toolbars from the shortcut menu, and click Battery Information. The Battery Information toolbar
appears on the taskbar.
If the Battery Information toolbar is hidden behind the taskbar icons, right-click the taskbar and click to cancel Lock
the Taskbar. Click and drag the edge of the Battery Information toolbar to the left until it is in clear view.
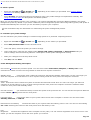
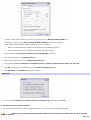
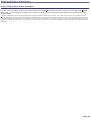
The total charge remaining in the battery is listed in percent and real-time values.
Battery Information Toolbar
*
* T he Battery Information Toolbar may appear slightly different on your computer, depending on the number of batteries your computer supports.
Percentage indicator — Displays the percentage of the remaining charge.
Time indicator — Displays estimated time (hours : minutes) remaining before the battery fully discharges, also
known as the time-to-empty.
To close the Battery Information toolbar
1.
Right-click the Battery Information toolbar.
2.
Select Toolbars from the shortcut menu, and click to cancel Battery Information. The Battery Information
toolbar disappears from the taskbar.
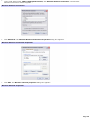
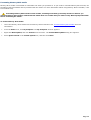
To view the PowerPanel window
Double-click the CPU icon or Profile icon , depending on the model you purchased. The PowerPanel window
appears.
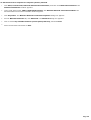
PowerPanel
*
Page 15

* T he P owerP anel window may appear slightly different on your computer, depending on the number of batteries your computer supports.
Power Profile — Displays the power management settings for various devices on your system. You can change the
settings to conserve power.
Battery tab — Displays the total charge remaining in the battery. You can click Advanced for specific information on
the battery.
Alarms tab — Displays the alarm settings, which notify you when the battery is fully charged or too low. You can
change your computer's alarm settings on this window.
Click Help in the lower right corner of the window for more information.
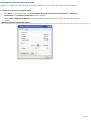
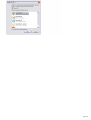
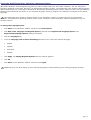
To view the Power Meter window
1.
Double-click the Power icon. The Power Meter window appears. You can also rollover the Power icon to view the
remaining battery charge.
Power icon Power status
Computer is using AC power.
Computer is using AC power and charging the battery.
Battery is charging.
Battery is fully charged.
Battery is discharging.
No battery is inserted in the computer.
If the Power icon is not displayed on the Taskbar Notification area, see To display the Power icon on the taskbar.
Power Meter
Page 16

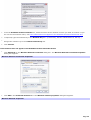
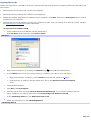
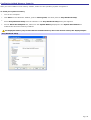
To display the Power icon on the taskbar
1.
Click Start on the Windows
®
taskbar, and click Control Panel.
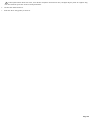
2.
Click Performance and Maintenance, and click Power Options. The Power Options Properties window
appears.
3.
Select the Advanced tab, and then select Always show icon on the taskbar in the Options box. The power icon
appears on the taskbar. See the power icon descriptions above for more information.
Page 17

Charging a battery
You will need to charge the battery if battery power drops below 10 percent or you have not used the battery for a long
time. The lithium-ion battery supplied with your computer may be recharged at any time, whether you wait until the battery
is completely or partially discharged. Charging a partially discharged battery does not affect battery life. If you charge the
battery and find that battery power is still low, the battery may be reaching the end of its life, and you may need to replace
it.
The battery supplied with your computer is not charged at the time of purchase.
To charge a battery
You can charge the battery when the computer is on or off. However, the battery will charge faster when the computer is
off. Charging the battery takes several hours. See your VAIO
®
Computer Specifications for the approximate time needed to
charge your battery.
Charge the battery at temperatures between 50°F and 80°F (10°C to 30°C). Lower temperatures require more time
to charge.
1.
Insert the battery into the battery bay.
2.
Connect the AC adapter to the computer. The computer automatically charges the battery as long as the
computer is using AC power.
The battery indicator blinks while the battery charges. The battery indicator stops blinking when the battery is fully
charged.
Battery Indicator
Battery indicator status Description
On The computer is using battery power.
Single blink The battery is running out of power.
Double blink The battery is charging.
Off The computer is using AC power.
Page 18

Notes on batteries
Never leave the battery in temperatures above 140°F (60°C), such as under direct sunlight or in a car parked in the
sun.
While the battery is in use or being discharged, the battery heats up. This is normal and is not cause for concern.
Keep the battery away from heat sources.
Keep the battery dry.
Do not open or disassemble the battery.
Do not expose the battery to any mechanical shock.
Battery life is shorter in a cold environment because of decreased battery efficiency at low temperatures.
Page 19

Conserving Battery Power
You may use the power saving modes and PowerPanel utility to conserve battery power. Conserving battery power may
significantly extend your computing time, depending on how you use your computer.
Page 20
Page is loading ...
Page is loading ...
Page is loading ...
Page is loading ...
Page is loading ...
Page is loading ...
Page is loading ...
Page is loading ...
Page is loading ...
Page is loading ...
Page is loading ...
Page is loading ...
Page is loading ...
Page is loading ...
Page is loading ...
Page is loading ...
Page is loading ...
Page is loading ...
Page is loading ...
Page is loading ...
Page is loading ...
Page is loading ...
Page is loading ...
Page is loading ...
Page is loading ...
Page is loading ...
Page is loading ...
Page is loading ...
Page is loading ...
Page is loading ...
Page is loading ...
Page is loading ...
Page is loading ...
Page is loading ...
Page is loading ...
Page is loading ...
Page is loading ...
Page is loading ...
Page is loading ...
Page is loading ...
Page is loading ...
Page is loading ...
Page is loading ...
Page is loading ...
Page is loading ...
Page is loading ...
Page is loading ...
Page is loading ...
Page is loading ...
Page is loading ...
Page is loading ...
Page is loading ...
Page is loading ...
Page is loading ...
Page is loading ...
Page is loading ...
Page is loading ...
Page is loading ...
Page is loading ...
Page is loading ...
Page is loading ...
Page is loading ...
Page is loading ...
Page is loading ...
Page is loading ...
Page is loading ...
Page is loading ...
Page is loading ...
Page is loading ...
Page is loading ...
Page is loading ...
Page is loading ...
Page is loading ...
Page is loading ...
Page is loading ...
Page is loading ...
Page is loading ...
Page is loading ...
Page is loading ...
Page is loading ...
Page is loading ...
Page is loading ...
Page is loading ...
Page is loading ...
Page is loading ...
Page is loading ...
Page is loading ...
Page is loading ...
Page is loading ...
Page is loading ...
Page is loading ...
Page is loading ...
Page is loading ...
Page is loading ...
Page is loading ...
Page is loading ...
Page is loading ...
Page is loading ...
Page is loading ...
Page is loading ...
Page is loading ...
Page is loading ...
Page is loading ...
Page is loading ...
Page is loading ...
Page is loading ...
Page is loading ...
Page is loading ...
Page is loading ...
Page is loading ...
Page is loading ...
Page is loading ...
Page is loading ...
Page is loading ...
Page is loading ...
Page is loading ...
Page is loading ...
Page is loading ...
Page is loading ...
Page is loading ...
Page is loading ...
Page is loading ...
Page is loading ...
Page is loading ...
Page is loading ...
Page is loading ...
Page is loading ...
Page is loading ...
Page is loading ...
Page is loading ...
Page is loading ...
Page is loading ...
Page is loading ...
Page is loading ...
Page is loading ...
Page is loading ...
Page is loading ...
Page is loading ...
Page is loading ...
Page is loading ...
Page is loading ...
Page is loading ...
Page is loading ...
Page is loading ...
Page is loading ...
Page is loading ...
Page is loading ...
Page is loading ...
Page is loading ...
Page is loading ...
Page is loading ...
Page is loading ...
Page is loading ...
Page is loading ...
Page is loading ...
Page is loading ...
Page is loading ...
Page is loading ...
Page is loading ...
Page is loading ...
Page is loading ...
Page is loading ...
Page is loading ...
Page is loading ...
Page is loading ...
Page is loading ...
Page is loading ...
Page is loading ...
Page is loading ...
Page is loading ...
Page is loading ...
Page is loading ...
Page is loading ...
Page is loading ...
Page is loading ...
Page is loading ...
Page is loading ...
Page is loading ...
Page is loading ...
Page is loading ...
Page is loading ...
Page is loading ...
-
 1
1
-
 2
2
-
 3
3
-
 4
4
-
 5
5
-
 6
6
-
 7
7
-
 8
8
-
 9
9
-
 10
10
-
 11
11
-
 12
12
-
 13
13
-
 14
14
-
 15
15
-
 16
16
-
 17
17
-
 18
18
-
 19
19
-
 20
20
-
 21
21
-
 22
22
-
 23
23
-
 24
24
-
 25
25
-
 26
26
-
 27
27
-
 28
28
-
 29
29
-
 30
30
-
 31
31
-
 32
32
-
 33
33
-
 34
34
-
 35
35
-
 36
36
-
 37
37
-
 38
38
-
 39
39
-
 40
40
-
 41
41
-
 42
42
-
 43
43
-
 44
44
-
 45
45
-
 46
46
-
 47
47
-
 48
48
-
 49
49
-
 50
50
-
 51
51
-
 52
52
-
 53
53
-
 54
54
-
 55
55
-
 56
56
-
 57
57
-
 58
58
-
 59
59
-
 60
60
-
 61
61
-
 62
62
-
 63
63
-
 64
64
-
 65
65
-
 66
66
-
 67
67
-
 68
68
-
 69
69
-
 70
70
-
 71
71
-
 72
72
-
 73
73
-
 74
74
-
 75
75
-
 76
76
-
 77
77
-
 78
78
-
 79
79
-
 80
80
-
 81
81
-
 82
82
-
 83
83
-
 84
84
-
 85
85
-
 86
86
-
 87
87
-
 88
88
-
 89
89
-
 90
90
-
 91
91
-
 92
92
-
 93
93
-
 94
94
-
 95
95
-
 96
96
-
 97
97
-
 98
98
-
 99
99
-
 100
100
-
 101
101
-
 102
102
-
 103
103
-
 104
104
-
 105
105
-
 106
106
-
 107
107
-
 108
108
-
 109
109
-
 110
110
-
 111
111
-
 112
112
-
 113
113
-
 114
114
-
 115
115
-
 116
116
-
 117
117
-
 118
118
-
 119
119
-
 120
120
-
 121
121
-
 122
122
-
 123
123
-
 124
124
-
 125
125
-
 126
126
-
 127
127
-
 128
128
-
 129
129
-
 130
130
-
 131
131
-
 132
132
-
 133
133
-
 134
134
-
 135
135
-
 136
136
-
 137
137
-
 138
138
-
 139
139
-
 140
140
-
 141
141
-
 142
142
-
 143
143
-
 144
144
-
 145
145
-
 146
146
-
 147
147
-
 148
148
-
 149
149
-
 150
150
-
 151
151
-
 152
152
-
 153
153
-
 154
154
-
 155
155
-
 156
156
-
 157
157
-
 158
158
-
 159
159
-
 160
160
-
 161
161
-
 162
162
-
 163
163
-
 164
164
-
 165
165
-
 166
166
-
 167
167
-
 168
168
-
 169
169
-
 170
170
-
 171
171
-
 172
172
-
 173
173
-
 174
174
-
 175
175
-
 176
176
-
 177
177
-
 178
178
-
 179
179
-
 180
180
-
 181
181
-
 182
182
-
 183
183
-
 184
184
-
 185
185
-
 186
186
-
 187
187
-
 188
188
-
 189
189
-
 190
190
-
 191
191
-
 192
192
-
 193
193
-
 194
194
-
 195
195
-
 196
196
-
 197
197
-
 198
198
-
 199
199
-
 200
200
-
 201
201
-
 202
202


Ask a question and I''ll find the answer in the document
Finding information in a document is now easier with AI
Related papers
Other documents
-
Samsung M531/B User manual
-
Microdia Smart Media Cards Overview
-
Kmart 43031634 User manual
-
Lumens Technology PS760 User manual
-
Creative DESKTOP WIRELESS 6000 User manual
-
HP T3000 Getting Started Manual
-
 V.I.O. POV.HD User manual
-
 Alcohol Soft Alcohol 120% User guide
-
 StarTech.com NOTECONS02 User manual
-
BTC 8190 User manual


