LG LW130W-D User guide
- Category
- Supplementary music equipment
- Type
- User guide

INSTALLATION / OPERATION MANUAL
HD Compact Network Camera
Read this manual carefully and observe the guidance provided herein before installing /
operating the device.
Please keep this Installation / Operation Manual for future reference.
MODEL
LW130W
CAUTION
RISK OF ELECTRIC
SHOCK
DO NOT OPEN
CAUTION:
TO REDUCE THE RISK OF ELECTRIC SHOCK
DO NOT REMOVE COVER (OR BACK)
NO USER-SERVICEABLE PARTS INSIDE
REFER SERVICING TO QUALIFIED SERVICE PERSONNEL.
This lightning flash with
arrowhead symbol within an
equilateral triangle is intended to
alert the user to the presence of
uninsulated dangerous voltage
within the product’s enclosure that
may be of sufficient magnitude to
constitute a risk of electric shock
to persons.
The exclamation point within an
equilateral triangle is intended
to alert the user to the presence
of important operating and
maintenance (servicing)
instructions in the literature
accompanying the product.
FCC WARNING: This equipment may generate or use
radio frequency energy. Changes or modifications to this
equipment may cause harmful interference unless the
modifications are expressly approved in the instruction
manual. The user could lose the authority to operate this
equipment if an unauthorized change or modification is
made.
WARNING
• Do not install this equipment in a confined space
such as a bookcase or similar unit.
• Wiring methods shall be in accordance with the
National Electric Code, ANSI/NFPA 70.
• To reduce a risk of fire or electric shock, do not expose
this product to rain or moisture.
CAUTION
• This installation should be made by a qualified service
person and should conform to all local code.
• The apparatus should not be exposed to water
(dripping of splashing) and no objects filled with
liquids, such as vases, should be placed on the
apparatus.
Disposal of your old appliance
1. When this crossed-out wheeled bin
symbol is attached to a product it
means the product is covered by the
European Directive 2002/96/EC.
2. All electrical and electronic products
should be disposed of separately
from the municipal waste stream
via designated collection facilities
appointed by the government or the
local authorities.
3. The correct disposal of your old appliance will
help prevent potential negative consequences
for the environment and human health.
4. For more detailed information about disposal
of your old appliance, please contact your city
office, waste disposal service or the shop where
you purchased the product.
EEE Compliance with Directive. (for Turkey only)
To disconnect power from mains, pull out the mains
cord plug. When installing the product, ensure that the
plug is easily accessible.
IMPORTANT SAFETY
INSTRUCTIONS
1. Read these instructions.
2. Keep these instructions.
3. Heed all warnings.
4. Follow all instructions.
5. Do not use this apparatus near water.
6. Clean only with dry cloth.
7. Do not block any ventilation openings. Install in
accordance with the manufacturer’s instructions.
8. Do not install near any heat sources such as
radiators, heat registers, stoves, or other apparatus
(including amplifiers) that produce heat.
9. Do not defeat the safety purpose of the polarized
or grounding-type plug. A polarized plug has two
blades with one wider than the other. A grounding
type plug has two blades and a third grounding
prong. The wide blade or the third prong are
provided for your safety. If the provided plug does
not fit into your outlet, consult an electrician for
replacement of the obsolete outlet.
10. Protect the power cord from being walked on
or pinched particularly at plugs, convenience
receptacles, and the point where they exit from the
apparatus.
11. Only use attachments/accessories specified by the
manufacturer.
12. Use only with the cart, stand, tripod, bracket, or
table specified by the manufacturer, or sold with
the apparatus. When a cart is used, use caution
when moving the cart/apparatus combination to
avoid injury from tip-over.
13. Unplug this apparatus during lightning storms or
when unused for long periods of time.
14. Refer all servicing to qualified service personnel.
Servicing is required when the apparatus has been
damaged in any way, such as power-supply cord or
plug is damaged, liquid has been spilled or objects
have fallen into the apparatus, the apparatus has
been exposed to rain or moisture, does not operate
normally, or has been dropped.
EU Conformity Notice
LG Electronics hereby declares that this/these product(s)
is/are in compliance with the essential requirements
and other relevant provisions of Directive 1999/5/EC,
2004/108/EC, 2006/95/EC and 2009/125/EC
Please contact to the following address for obtaining a
copy of the DoC (Declaration of Conformity).
European Standards Centre:
Krijgsman 1, 1186 DM Amstelveen The Netherlands
Indoor use only.
RF Radiation Exposure Statement
This equipment should be installed and operated with
minimum distance 20 cm between the radiator and your
body.
France Notice
Pour la France métropolitaine
2.400 - 2.4835 GHz (Canaux 1à 13) autorisé en usage
intérieur
2.400 -2.454 GHz (canaux 1 à 7) autorisé en usage
extérieur
Pour la Guyane et la Réunion
2.400 - 2.4835 GHz (Canaux 1à 13) autorisé en usage
intérieur
2.420 - 2.4835 GHz (canaux 5 à 13) autorisé en usage
extérieur
Italy Notice
A general authorization is requested for outdoor use in
Italy.
The use of these equipments is regulated by:
1. D.L.gs 1.8.2003, n. 259, article 104 (activity subject
to general authorization) for outdoor use and
article 105 (free use) for indoor use, in both cases
for private use.
2. D.M. 28.5.03, for supply to public of RLAN access to
networks and telecom services.
L’uso degli apparati è regolamentato da:
1. D.L.gs 1.8.2003, n. 259, articoli 104 (attività soggette
ad autorizzazione generale) se utilizzati al di fuori
del proprio fondo e 105 (libero uso) se utilizzati
entro il proprio fondo, in entrambi i casi per uso
private.
2. D.M. 28.5.03, per la fornitura al pubblico dell’accesso
R-LAN alle reti e ai servizi di telecomunicazioni.
FCC Compliance Statement
This device complies with part 15 of the FCC rules.
Operation is subject to the following two conditions:
(1) This device may not cause harmful interference, and
(2) This device must accept any interference received,
including interference that may cause undesired
operation.
NOTE: This equipment has been tested and found to
comply with the limits for a Class B digital device, pursuant
to Part 15 of the FCC Rules. These limits are designed
to provide reasonable protection against harmful
interference in a residential installation. This equipment
generates, uses, and can radiate radio frequency energy
and, if not installed and used in accordance with the
instructions, may cause harmful interference to radio
communications. However, there is no guarantee that
interference will not occur in a particular installation.
If this equipment does cause harmful interference to
radio or television reception, which can be determined by
turning the equipment off and on, the user is encouraged
to try to correct the interference by one or more of the
following measures:
• Reorient or relocate the receiving antenna.
• Increase the separation between the equipment and
receiver.
• Connect the equipment into an outlet on a circuit
different from that to which the receiver is connected.
• Consult the dealer or an experienced radio/TV
technician for help.
CAUTION : Any changes or modifications not expressly
approved by the party responsible for compliance could
void the user’s authority to operate this equipment.
FCC RF Radiation Exposure Statement : This equipment
complies with FCC radiation exposure limits set forth for
an uncontrolled environment. This equipment should
be installed and operated with minimum distance 20
cm between the radiator and your body. End users must
follow the specific operating instructions for satisfying RF
exposure compliance.
This transmitter must not be co-located or operating in
conjunction with any other antenna or transmitter.
CAUTION: Regulations of the FCC and FAA prohibit
airborne operation of radio-frequency wireless devices
because their signals could interfere with critical aircraft
instruments.
Responsible Party:
LG Electronics USA, Inc.
1000 Sylvan Avenue
Englewood Cliffs, NJ 07632
TEL. : +1-800-243-0000
1. Disconnect the stand from the body.
Turn the nut-cover counterclockwise to remove the cover from the body.
2. Fix the stand.
Detach the stand cover and fix the stand using two screws provided with it.
3. Attach the body of the device on the fixed stand.
Engage the stand with the body of the device and turn the nut-cover clockwise to fix it.
Please check the camera and all of the
accompanying components are included in
the package.
a Body
b Stand
Used to support the camera
body or install it on the ceiling.
c Screws and Plastic Anchors
The screws are necessary to
attach the stand on the ceiling.
The plastic anchors are to be
inserted on the holes where
the screws are applied prior to
the screws in order to enhance
the grip of the screws on the
surface.
d Manual CD
The CD-ROM includes the
installation executables for
the application software and
product manual.
e Installation / Operation
Manual
A summarized, quick reference
guide for installing and using
the camera.
f Adapter and AC Cable
Provides the device with DC 5
V power. This unit must always
be operated with a DC 5 V
Certified/Listed, class 2 power
supply only.
a
b
c
d e f
g
h
i
j
k
l
m
n
a Motion Detector
Detects motions occurring in vicinity
of the device.
b Microphone
The sounds coming from the vicinity
of the device is delivered through
this microphone to a connected PC.
c Flash LED
Flash LED lights up the vicinity of
the camera.
d Ethernet Connection Lamp
Turns on in green color when the
ethernet connection to the network
is established.
e Power Lamp
Turns on in green color when the
power supply is on and the device
is running.
f Wireless LAN Connection Lamp
Green light means that the Wireless
LAN connection is successfully
established.
g Ethernet Terminal
Connect the network cable here
h Speaker
The speaker delivers the sounds from
the microphone to the camera.
i WPS, Factory Settings Button
• Press the button for less than
4 seconds to activate WPS
functionality.
• Hold the button for 10 seconds
or longer to activate the
Factory Default Mode.
j Power Socket
Connect a DC 5V power supply
k I/0 Terminals
I/O terminals are used to connect the
camera with a sensor and/or relay
(alarm) devices
l Stand Connecting Hole
You can connect the camera onto a
stand using this hole.
m Micro SD Card Slot Cover / Micro
SD Card Slot
Insert a micro SD card here.
n REBOOT
Push this button to restart the device.
For the initial set-up of the network, take the following steps to
congure your network.
1. Change the PC’s network setting to DHCP.
[Start – Control Panel – Network Connections – Local Area
Connection – Local Area Connection Properties – Internet
Protocol (TCP/IP)]
Click
Click
Click
Click
Click
a
b
c
2. Connect the PC or router to the LG IP camera.
3. Use a power adaptor of the rated electricity configuration to
supply power to the LG IP camera.
4. Turn the LG IP camera on and wait until the green lamp
turns on, which means the booting procedure has been
completed. The Ethernet Lamp will also turn on in a green
color when the network connection is established.
Wireless connection signWired connection sign
5. Install ‘LG IPSOLUTE” software in the provided CD and run IP
Utility.
[Run the ‘IP Utility’]
Run ‘IP Utility’, which will
appear on the desktop
screen after installing ‘LG
IPSOLUTE’.
• PC and LG IP Camera
should be connected
to the same router
before you can use IP
Utility.
[ Screen of IP Utility running ]
6. Click the magnifying glass icon in the top left of IP Utility
to search for LG IP Camera. You can find LG IP Camera
automatically by using IP Utility.
7. Double click the device shown in the search result to access
it through Web Client.
8. When the login window appears, enter the default ID and
password (admin for both) and click the ‘Confirm’ button.
9. Once you log on to the camera, you will see the user
interface screen, where you can use the various features of
the device.
10. To change the network settings, go to Configuration >
Network > TCP/IP If you want to input the IP address directly,
select the IP address status as ‘Statically Set’. If this is the
case, enter the information such as camera IP address,
Subnet mask, Gateway, DNS, etc. to suit the desired network
environment.
Note:
If the Internet service is the dynamic IP address type and the
IP address is automatically received, select ‘Automatically set
with DHCP’.
Product Installation
3
Device Overview -
Components
1
Device Overview -
Components and Features
2
Network Setup -
Wired Network Settings
4

To set up the wireless network, first refer to [Network Setup - Wired
Network Setup] and [Network Setup - Prot Forwarding Setup] and
follow the procedure below.
1. Set up the wireless router for wireless network setup.
A
B
C
D
1.1 Select [Wireless > Basic Wireless Settings].
1.2 Enter the SSID of the router to use. (This is used to select from LG
IP Camera’s AP List.)
1.3 Select the communication channel of the router.
1.4 Determine whether to allow the router search. (If you select
Disable, the router will be hidden in LG IP Camera’s AP List.)
2. Set up the wireless security setup for wireless network setup.
A
B
C
D
2.1 Select [Wireless > Wireless Security].
2.2 Select a security type in Security Mode. (WPA2 Personal is
recommended.)
2.3 Select an encryption type in WPA Algorithms. (AES is
recommended.)
2.4 If WPA is selected, enter an 8-digit password in WPA Shared Key.
3. In LG IP Camera, run the Web client and find and set up the
WLAN.
[path: Configuration > Network > Wireless]
A
B
C
D
E
3.1 Select the network name (SSID) inputted in the router setup.
3.2 Click ‘Info’ to check the access point information.
3.3 Click ‘Add Config’ for wireless setup.
3.4 Enter ‘Network Key’ inputted in the router setup.
3.5 Click the [Save] button to complete the setup.
4. Connect the wireless router that was you set up in LG IP
Camera.
4.1 If you add and save a WLAN, the access point will appear in the
right-hand window. (ex] UMON_AP )
4.2 Select the added access point and click the [Connect] button to
establish the connection.
4.3 If connected with the access point, ‘connecting’ is displayed.
If receiving the IP address, ‘IP assigning’ is displayed. If the
connection is established, ‘connected’ is displayed.
Notes:
• When ‘connected,’ the LG IP Camera Wi-Fi connection lamp turns
green.
• Click the [Disconnect] button to disconnect the network.
5. Rerun IP Utility. You can use IP Utility to find an added LG IP
Camera automatically.
6. Double click the found device to connect to the wireless-
connected Web Client.
• It is recommended to connect to LAN or WLAN. How
to determine whether MAC Address is wireless or wired
: wired (main label ADDR1), wireless (main label ADDR2)
Notes:
In order to connect to the outside after wireless connection, Port
Forwarding setup is required. For how to do this, refer to [Network
Setup - Port Forwarding Setup.
Network Setup -
Wireless Network Settings
4
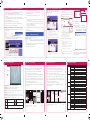
• Change view size: Change the resolution setting of the video image.
• Video Codec: Shows the video codec used in the selected video stream.
• TCP Connection: Shows the type of network connection in use.
• Snapshot: The current image on the Live Screen is saved as a snapshot in JPEG format.
• Master-0: Switches between the video streams.
• Configuration: The settings of the network and the video server can be configured through
this menu. Only a user with the administrator authority can make changes to the configuration.
• Live Screen: Shows the live video image from the camera.
Turn Pan Tilt Zoom on or off. Switch ON/OFF the microphone.
Screen images will be recorded in
real time.
Turn ON/OFF the speaker on your
computer.
Engage / Disengage the audio connection between an IP camera and the
computer.
You can find the LG Mobile Application in the Android market by entering and searching with “LG
IPSOLUTE” and install it easily by following the guide.
1. If you are adding a device for the first time, touch the [OK] button in the Add Device
message. or press the menu button and touch the [Add Device] button.
2. Name - enter a name for the device to monitor (any arbitrary name is allowed)
3. Model - select the device model and touch the OK button
4. Host - enter the public IP address of the router connected with the monitoring device or
enter the DDNS server address (e.g. myhome.lgddns.com) of the monitoring device.
5. Profile – use the slave channel for mobile. Activate the slave channel in the camera setup.
6. Port setup - when connecting through a router from the outside, check and enter the Port
Forwarding value in the Host and Port input boxes.
e.g.] Host > [router’s public IP], HTTP port > [100 ], RTSP port > [101]
7. Enter the ID and password given to the device (IP camera or DVR) to be monitored. (default :
admin/admin)
If the Add Device
message window
appears early
Use the menu
button to add a
device.
Add Device
screen (setup
screen)
Select the model Add Device
completed
You can find the LG Mobile Application in the Android market by entering and searching with “LG
IPSOLUTE” and install it easily by following the guide.
1. If you are adding as device for the first time, touch the [OK] button in the Add Device
message. or touch the [+] button at the top right of the device list to add the device.
2. Name - enter a name for the device to monitor (any arbitrary name is allowed)
3. Model - select the device model and touch the OK button
4. Host - enter the public IP address of the router connected with the monitoring device or
enter the DDNS server address (e.g. myhome.lgddns.com) of the monitoring device.
5. Profile – use the slave channel for mobile. Activate the slave channel in the camera setup.
6. Port setup - when connecting through a router from the outside, check and enter the Port
Forwarding value in the Host and Port input boxes.
e.g.] Host > [router’s public IP], HTTP port > [100 ], RTSP port > [101]
7. Enter the ID and password given to the device (IP camera or DVR) to be monitored.
(default : admin/admin)
If the add device
message window
appears early
Use the [+]
button to add the
device.
Screen for adding
the device
Select the model Add Device
completed
Items LW130W
Camera Image Sensor 1/4 Type Progressive Scan CMOS
Lens Fixed Lens - Wide-angle lens (105°)
Resolution Upto 1280 x 720
Illumination 0.8 [email protected]
0 [email protected] with Flash LED ON
True Day/Night Digital D/N
Image Enhancement Backlight Compensation, Exposure Control, AGC, White Balance, Sharpness
Video / Audio Video Compression H.264_HIGH, H.264, MJPEG
Frame Rate 30fps @ 1280 x 720, 30fps @ D1
Multi-Streaming Dual-Streaming
Video Protocol LG Protocol, ONVIF 2.2 Profile S, PSIA 1.1
Audio Compression G.711, G.726
2-way Audio Support
Event Motion detect Motion Detection
PIR Sensor Detection
Even Notification Email, FTP, Sound Alert, Relay Out, Flash LED
Pre Event Buffering Support
Interface Video Out -
Audio In/Out 1/1 (Built-in)
Alarm In/Out 1/1
PIR Sensor Support
Flash LED Support
SD Slot Support (Micro) - up to 32GB, Class6 recommended
Network Ethernet 10/100 Ethernet
802.11 b/g/n (Wi-Fi)
WPS Support
Security Password Protection, HTTPS(SSL, TLS)
Protocol TCP/IP(IPv4), HTTP, HTTPS, RTP, RTSP, UDP, DHCP, FTP, SMTP, NTP, ARP, ICMP, DDNS(LG)
Remote S/W Web Client, Mobile Application (IPhone, Android), LG Video Management S/W
Connections 4
Misc. Power Source DC 5 V
Operating Temp. 0
o
C to 40
o
C
Operating Humidity 0 % RH to 80 % RH
Weight 100 g
Dimension (W x H x D) Body – 60 mm x 98 mm x 42 mm
Body and Stand – 69 mm x 123 mm x 97 mm
Web Viewer -
Home Screen
5
Mobile Monitoring -
Android
6
Mobile Monitoring -
iPhone
6
Product Specification
7
To access the LW130W from outside
1. It is recommended that you use a dedicated line (public IP) allocated by the ISP for normal use.
(If it is not a dedicated line (public IP), Outside connection may be limited.)
2. You have to set up port-forwarding in the router setup, if you want to access the LG IP camera
from the Internet.
3. The router setup may be limited with a router provided by the ISP for the use of bundled
services (IPTV/internet phone). In this case, contact the ISP to ensure that the Web/RTSP port will
be set for connection from the internet.
• For details on Port Forwarding, refer to the user’s manual of the router.
• If you want to use Port Forwarding, select the camera IP address as ‘Set Manually’. To set the
camera manually, refer to [Network Setup - Wired Network Setup].
Notes: Regarding of port-forwarding set up, please refer to FAQ website of router suppliers.
1. Run Internet Explorer and enter the value of Gateway for [Configuration > Network > TCP/IP] in
the address input box.
2. Click ‘Management Tool’ on the router’s web page and enter the ID and password to log in.
(You can get the router ID and password from the manufacturer.)
A
B
C
D
2.1 Go to [Applications & Gaming > Port Range Forward].
2.2 Enter the LG IP Camera port values. (Basic values - Web: 80, RTSP: 554 )
2.3 Enter the LG IP Camera address.
2.4 Check the ‘Enable’ checkbox and click [Save Setting] to save the value.
Notes:
• The setting screen and method may differ depending on the router. For details, refer to the
user’s manual for the router.
• In order to use multiple cameras, Port Forwarding Setup should be added and the outside
port should be set up differently. Some routers provided by telecom companies may not
be usable due to disconnected external ports.
• Rebooting the router, the public IP may change.
3. Enter [router’s public IP: Web Port value] in the web address input box from the outside to check
the connection.
e.g.] http://[router’s public IP]:Web Port value
http://[router’s public IP]:Web Port value
Notes:
If you use the DDNS settings, you can connect to the camera by using the same DDNS address
even if the router’s public IP address has been changed.
4. For how to set DDNS, refer to the user’s manual.
Network Setup -
Port Forwarding Settings (Linksys)
4
-
 1
1
-
 2
2


LG LW130W-D User guide
- Category
- Supplementary music equipment
- Type
- User guide
Ask a question and I''ll find the answer in the document
Finding information in a document is now easier with AI
Related papers
Other documents
-
Conceptronic CNETCAM Datasheet
-
D-Link DCS-5222L User manual
-
-
-
D-Link Security Camera DCS-1130 User manual
-
Dlink DCS-1100 - mydlink-enabled Wired Network Camera User manual
-
TriVision NC-316PW User manual
-
-
-
Trendnet TV-IP572WI User manual