Honeywell CO25AE User manual

Category
Mobile air conditioners
Type
User manual

This manual is also suitable for

CO25AE
www.honeywellaircoolers.com/products/CO25AE
www.jmatek.com
Model:
Portable Evaporative Air Cooler
User Manual
Read and save these instructions before use
Product video:
5)
6)
7)
8)
9)
10)
11)
12)
Remote Control
Water Fill Door
Drain Plug
Water Tank
1)
2)
3)
4)
Control Panel
Handle
Horizontal Louvers
Power Cord & Plug
PARTS DESCRIPTION
USE & OPERATION
(1)
(9)
(3)
(2)
(4)
(12)
(7)
(8)
(6)
(5)
(11)
(10)
CONTROL PANEL
FUNCTION BUTTONS
POWER
Press the POWER button to turn the unit on. The cooler will start automatically at medium speed. After a
few seconds the speed will switch to low. To turn the unit off, press the button again.
SPEED
Press the SPEED button repeatedly to change the speed between Lo - Med - Hi - Natural.
The indicator light will show the selected speed:
When the Natural mode is selected, The fan will randomly change between High, Medium and Low
speeds to mimic a natural breeze.
Low (Lo) Medium (Med) High (Hi) Natural (Natural)
WARNING -- READ AND SAVE THE AIR COOLER SAFETY & MAINTENANCE GUIDE AND USER
MANUAL BEFORE USING THIS PRODUCT. FAILURE TO FOLLOW THESE INSTRUCTIONS MAY
DAMAGE AND/ OR IMPAIR ITS OPERATION AND VOID THE WARRANTY. IN CASE THERE IS
ANY INCONSISTENCY OR CONFLICT BETWEEN THE ENGLISH VERSION AND ANY OTHER
LANGUAGE VERSION OF THE CONTENT OF THIS MATERIAL, THE ENGLISH VERSION SHALL
PREVAIL.
POWER
Tank Empty
MODE
Fan
Cool
TIMER
0.5hr
1hr
2hr
4hr
SPEED
Natural
Lo
Med
Hi
SWING
EN 1
Casters
Ice Compartment Lid
Vertical Louvers
Water Level Indicator
TIMER
Press the TIMER button until the desired time duration setting is selected. When the set time has
passed, the unit will automatically turn off (unit remains in Standby mode until power cord is unplugged
from electrical socket). The TIMER function allows you to program the unit for up to 7.5 hours of use.
SWING
Press the SWING button until the SWING indicator light is illuminated on the
control panel. The louvers will begin to move left to right automatically.
Vertical Air Flow - You can manually adjust the louvers to change vertical air flow.
MODE
Press the MODE button to select COOL and FAN modes. Pressing the MODE button until COOL is
illuminated on the control panel activates evaporative cooling. The water pump will operate and you will
feel the cooler air after the Honeycomb Cooling Media is completely wet.
Pressing the MODE until Fan is illuminated switches the unit to a fan only mode, without evaporative
cooling.
USE & OPERATION (CONTINUED)
REMOTE CONTROL
FUNCTION BUTTONS (CONTINUED)
ROOM COOLING AND HUMIDIFYING
LOUVER
MOVEMENT
: ON / OFF
: Low / Medium / High / Natural
: Controls cooling or fan option
: Controls the motion of the louvers
: Controls the Timer function for automatic off
Note:
POWER
SPEED
MODE
SWING
TIMER
Water Regulator
MIN
MAX
In cooling mode, Honeywell Air Coolers provide moisturized air through the
evaporation of water. There is a manual Water Regulator knob located in
the ice compartment of the unit. This allows you to adjust the amount of
water pumped over the Honeycomb Cooling Media, thus helping to control
cooling and humidification levels.
When the Water Regulator is set to MIN, the water pump distributes a
minimal amount of water to the Honeycomb Cooling Media. This results in
less water evaporation and reduces the cooling effect.
When the Water Regulator is set to MAX, the water pump distributes the maximum amount of water to
the Honeycomb Cooling Media. This results in maximum water evaporation and the cooling performance
improves.
t
t
POWER
SPEED SWING
TIMERMODE
The remote control requires AAA (2 x 1.5V) batteries for replacement.
Open the battery compartment at the back of the remote control and insert the batteries inside. Care
must be taken to insert the batteries according to the correct polarity (+ / –) markings shown inside the
battery compartment.
EN 2
USE & OPERATION (CONTINUED)
t
t
t
t
t
t
t
t
FILLING WITH WATER
COOLER LOCATION
Make sure to position the air cooler correctly before you set up and start using the product. Please refer
to the COOLER LOCATION section of the separate Safety & Maintenance Guide.
Water Fill Door
Ice Compartment
LOW WATER ALARM
REMOTE CONTROL (CONTINUED)
Always point the remote control signal transmitter towards the unit when operating. Make sure that
the signal path is not obstructed.
Remove the batteries if the unit is not going to be used for an extended period of time.
Do not drop the remote control.
Do not mix different types of batteries such as alkaline, carbon-zinc, or rechargeable batteries.
Do not mix old and new batteries.
Do not recharge the battery.
Exhausted batteries are to be removed from the product and safely disposed of as per local
regulations.
Do not dispose of batteries in fire. Batteries may explode or leak.
WARNING: Caution for ingestion of the small battery. Keep away from children and animals.
CAUTION:
Unplug the unit from the electrical power outlet before emptying or refilling the
water tank.
Open the Water Fill Door located on the side of the unit.
The Water Level Indicator is located at the front of the unit. Refill the water tank
when water level is low. Do not fill water above the "Max." water level mark to
avoid water droplets collecting on the louvers. Check the water level in the tank
before running the COOL function. Make sure that the water in the tank is above
the minimum water level mark. Running the unit in COOL mode with inadequate
water may cause pump failure.
Note: The water capacity refers to the total volume of water that can be
contained within the air cooler water tank and water distribution system. The
water capacity in the tank at the “Max.” indicator level may be lower than the
actual water capacity of the air cooler.
Note: If ice is available, you may add ice in the top ice compartment to enhance
the cooling performance.
WARNING: Do not fill water tank with dirty water or salt water. This can damage
the unit and Honeycomb media.
EN 3
The unit is equipped with a low water sensor. In Cooling Mode, when water in the tank is below the
minimum level, you will hear a beeping sound and the TANK EMPTY indicator light will flash
continuously. The unit will automatically pause evaporative cooling.
USE & OPERATION (CONTINUED)
LOW WATER ALARM (CONTINUED)
CLEANING & DRAINING THE WATER TANK
Move the unit to a location where the water can be drained. Remove the cap from the Drain plug
located at the bottom of the unit. Allow the tank to empty.
Refill the water tank with clean water, up to the maximum level and drain it completely.
Use a damp cloth to remove the dirt and dust from the surface of the unit. Never use corrosive
elements or chemicals to clean this product.
When the product is not in use, store the unit in a dry place out of direct sunlight.
t
t
t
t
WARNING:
Before cleaning the unit, switch the unit OFF and disconnect from the electrical socket.
Below are instructions on how to clean and maintain your air cooler. If the cooler will not be used for a
long period of time, please refer to the STORAGE & MAINTENANCE GUIDELINES located in the
separate Safety & Maintenance Guide.
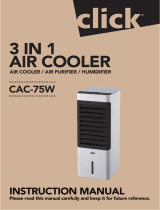
CLEANING THE CARBON DUST FILTER* AND HONEYCOMB COOLING MEDIA
The appliance is supplied with a Carbon Dust Filter* &
Honeycomb Cooling Media.
The Carbon Dust Filter* and Honeycomb Cooling Media are
located inside the Rear Grill. See Figure 1 for instructions on
how to remove them from the unit for cleaning and
maintenance.
Do not run the unit in COOL mode with stale water in the
tank. You must empty the water tank and refill with fresh
water, especially if the tank has not been cleaned in a long
time.
The cleaning frequency for the Honeycomb media depends
on local air and water conditions. In areas where the mineral
content of water is high, mineral deposits may build up on the
Honeycomb Cooling Media and restrict air flow. Draining the
water tank and refilling with fresh water at least once a week
will help reduce mineral deposits. If mineral deposits remain
on the Honeycomb Cooling Media, the media should be
removed and washed under fresh water. The media should
be cleaned every two months or sooner, depending on your
needs.
For best results allow the Honeycomb Cooling Media to dry
after each use by turning off the cool function 15 minutes
before turning the unit off.
t
t
t
t
t
Honeycomb
Cooling Media
Rear Frame
Rear Grill
Carbon Dust
Filter
Figure 1:
Remove all the screws from the Rear Grill.
Carefully push the left and right side of the rear grill and
pull out from the cooler.
Pull out the Carbon Dust Filter* and clean with water as
needed.
To release the Honeycomb Media pull out the Rear
Frame and slide the Honeycomb out of the frame.
Replace or clean media with water and a damp cloth as
needed.
WARNING: DO NOT operate the Air Cooler when the
Rear Grill or Rear Frame is removed from the Air Cooler,
or if there is a loose-fitting Rear Grill or Rear Frame.
Doing so can cause serious injury or dangerous
electrical shock.
1.
2.
3.
4.
5.
Removing the Carbon Dust Filter*/ Honeycomb Cooling Media:
Screws
Push
Push
*Applicable for models with Carbon Dust Filter only.
EN 4
Refill the water tank to deactivate the alarm in cooling mode. First switch OFF the unit and unplug from
the power outlet. Fill the water tank with water above the minimum water level mark. Plug in and switch
ON again.
To deactivate the alarm and continue using the unit as a fan (without evaporative cooling), switch the
unit OFF and then ON again. The Low Water Alarm will not activate in Fan only mode. The Low Water
Alarm will sound again if the COOL function is activated while the water tank is still empty.
Model CO25AE
Product Dimension 480 (W) x 370 (D) x 847 (H) mm
18.9 (W) x 14.6 (D) x 33.3 (H) in
sbl 8.52 / gk 7.11 thgieW teN
V 021 - 011egatloV
zH 06ycneuqerF
Ampere 2.1 A
Wattage 235 W
Version: 110 -120V/60Hz
Protector of motor
Sync. motor
Water pump
Capacitor for fan motor
Fan motor
For USA Outdoor Models Only. This appliance is equipped with a GFCI plug.
Press the TEST button and then the RESET button once every month to ensure proper operation.
Cooling Media Honeycomb
TECHNICAL SPECIFICATIONS
ELECTRICAL WIRING DIAGRAM
JMATEK North America LLC
Mahwah, New Jersey 07495 USA
Phone: 1-800-474-2147
Web: www.jmatek.com
© 2016 JMATEK Limited. All rights reserved.
The Honeywell Trademark is used under license from
Honeywell International Inc.
Honeywell International Inc. makes no representations
or warranties with respect to these products.
This product is manufactured by Airtek Int'l Corp. Ltd.
(subsidiary of JMATEK Ltd.)
  • Page 1 1
  • Page 2 2
  • Page 3 3
  • Page 4 4
  • Page 5 5
  • Page 6 6
  • Page 7 7

Honeywell CO25AE User manual

Category
Mobile air conditioners
Type
User manual
This manual is also suitable for

Ask a question and I''ll find the answer in the document

Finding information in a document is now easier with AI