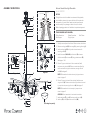
VISUAL COMFORT ARN5522 is an elegant nine-light chandelier that adds a touch of sophistication to any room. Its sturdy construction, easy installation process, and compatibility with various bulb types make it a versatile lighting solution for both residential and commercial spaces. With its adjustable rods and multiple connection points, you can customize the height and arrangement to suit your specific needs. Enjoy the warm, ambient lighting it provides, creating a cozy and inviting atmosphere for your living spaces.
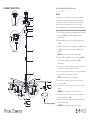
VISUAL COMFORT ARN5522 is an elegant nine-light chandelier that adds a touch of sophistication to any room. Its sturdy construction, easy installation process, and compatibility with various bulb types make it a versatile lighting solution for both residential and commercial spaces. With its adjustable rods and multiple connection points, you can customize the height and arrangement to suit your specific needs. Enjoy the warm, ambient lighting it provides, creating a cozy and inviting atmosphere for your living spaces.


-
 1
1
-
 2
2
-
 3
3


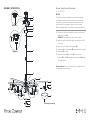
VISUAL COMFORT ARN5522 is an elegant nine-light chandelier that adds a touch of sophistication to any room. Its sturdy construction, easy installation process, and compatibility with various bulb types make it a versatile lighting solution for both residential and commercial spaces. With its adjustable rods and multiple connection points, you can customize the height and arrangement to suit your specific needs. Enjoy the warm, ambient lighting it provides, creating a cozy and inviting atmosphere for your living spaces.
Ask a question and I''ll find the answer in the document
Finding information in a document is now easier with AI
Related papers
-
VISUAL COMFORT KW 5140 User manual
-
-
-
-
-
-
-
-
-


