Page is loading ...

ToughRock
®
Wallworks Guide
Your Guide to Planning, Applying, Installing, Finishing and
Repairing Your Walls and Ceilings with ToughRock Gypsum Board

2
www.gpgypsum.com
1. Sketch
A little planning before the job begins can save you a
lot of time and materials later on.
• Sketch out the area you want to cover with gypsum
board. Use the sketch as a guide to determine how
much wallboard you’ll need.
• Remember to plan for the board to be installed
across (perpendicular to) joists and/or studs.
• Try to avoid end joints wherever possible. To do
that, you may want to buy 128 (3,658 mm) gypsum
board, instead of 88 (2,438 mm), depending on your
room size.
• If end joints can’t be avoided, stagger them so they
all don’t fall at one end of the room.
Your gypsum board should be stored flat, indoors,
away from moisture and temperature extremes, until
you’re ready to use it. As soon as possible after joint
treatment is thoroughly dry, all surfaces should be
sealed or primed with a vinyl or oil base primer/sealer.
2. Estimate
Once you’ve determined how much wallboard you’ll
need, you can use the charts on the next page to
estimate for nails, joint compound and tape.
If you choose the adhesive/nail-on method for wall
installation (see installation instructions), you’ll also
need some gypsum board adhesive. Use 8 quart-sized
(7.6 liters) tubes for each 1,000 sq. ft. (93 m
2
) of
wallboard (1 tube to 4, 48 x 88 [1,220 mm x 2,438 mm]
sheets; 1 tube to 2
1
⁄2, 48 x 128 [1,220 mm x 3,658 mm]
sheets).
Note: If you’re applying wallboard to masonry walls,
see ‘‘Masonry’’ section for additional materials.
How Much Board Do You Need?
First, figure out the wall and ceiling areas.
Width of the room x Length of the room = Ceiling area
(Width + Length) x 2 x Height of the room = Wall area
For example: a 128 x 168 x 88 (3,658 mm x 4,877 mm x 2,438 mm)
room has a wall/ceiling area of 640 sq. ft. (59 m
2
) (Ceiling area:
12 x 16 = 192; Wall area: (12 + 16) x 2 x 8 = 448; 192 + 448 = 640.)
Look at the Room Measurement Table for a quick
reference. Measure door and windows area and subtract
their square footage from the total square footage to
obtain net room area. Then refer to the Panel Coverage
Table to locate the number of wallboard panels required
for the room. Be sure to allow 10% to 15% overage for
cutting and piecing.
Room Measurement Table
48 58 68 78 88 98 108 118 128 138 148 158 168
88 224 248 272 296 320 334 368 392 416 440 464 488 512
98 244 269 294 319 344 369 394 419 444 469 494 519 544
108 264 290 316 342 368 394 420 446 472 498 524 550 576
118 284 311 338 365 392 419 446 473 500 527 554 581 608
128 304 332 360 388 416 444 472 500 528 556 584 612 640
138 324 353 382 411 440 469 498 527 556 585 614 643 672
148 344 374 404 434 464 494 524 554 584 614 644 674 704
158 364 395 426 457 488 519 550 581 612 643 674 705 736
168 384 416 448 480 512 544 576 608 640 672 704 736 768
Panel Coverage Table (in sq. ft. of wall area)
1 2 3 4 5 6
Panel Panels Panels Panels Panels Panels
4* x 8* Panel 32 64 96 128 160 192
4* x 9* Panel 36 72 108 144 180 216
4* x 10* Panel 40 80 120 160 200 240
4* x 12* Panel 48 96 144 192 240 288
4* x 14* Panel 56 112 168 224 280 336
4* x 16* Panel 64 128 192 256 320 384
Besides standard 48 (1,220 mm) widths, ToughRock
®
gypsum board is also available in a 549 (1,370 mm)
width that eliminates the need for gap filler boards in
horizontal applications when walls are 98 (2,743 mm)
high (see illustration). Using 549 (1,370 mm) wide
gypsum board when you have 98 (2,743 mm) ceilings
reduces the number of seams you’ll need to finish and
cuts waste.
Plan

Estimating Gypsum Board Nails
Joist/Stud Wallboard Gypsum Board Approx. lbs. of nails
width Thickness Nails per 1000 sq. ft.
(on center) of wallboard
169
1
⁄29 1
5
⁄89 coated 5
1
⁄4 lbs.
(406 mm) (12.7 mm) (41.3 mm) (2.4 kg)
249
5
⁄89 1
7
⁄89 coated 5
1
⁄4 lbs.
(610 mm) (15.9 mm) (47.6 mm) (2.4 kg)
Estimating Ready-Mix
™
Joint Compound and Tape
ToughRock
®
Georgia-Pacific Estimated Amount
Wallboard Ready-Mix
™
of GP
Sq. Ft. Joint Compound Wallboard Tape
100-200 sq. ft. 12 lb. Pail two 60* rolls
(9-18 m
2
) (5.4 kg) (18.3 m)
500 sq. ft. 48 lb. Ctn. one 250* roll
(46 m
2
) (21.8 kg) (76.2 m)
800 sq. ft. 61.7 lb. Pail two 250* rolls
(74 m
2
) (28 kg) (76.2 m)
Tools
The basic tools you’ll need are:
1. Wallboard knife with heavy-duty blade
2. Wallboard hammer or regular crown-headed
carpenter’s claw hammer
3. 4* (1,220 mm) T-square or steel straightedge
4. Steel tape measure
5. Keyhole or utility saw
6. Joint finishing knives
—
59 (127 mm) and 109 (254 mm)
blades
7. Plastic pan for joint compound
8. Sandpaper, medium texture (80 to 100 grit) and
sanding block for joint finishing
9. Damp sponge
10. Caulking gun
11. Pencil
12. Safety glasses
13. Dust mask for sanding
CAUTION: When working with tools, always wear
approved safety glasses. Always read and follow
manufacturer’s instructions when using adhesives.
®
ORANGE
15 14 13 12 11 10 9 8
7
6 5 4
3 2
2 3 4 5 6 7 8 9
10 11 1 2 1 3 1 4 15 1 6
17 1 8 19
20 2 1
22 2 3 24 25 2 6
27 2 8 29 30
31
1 2 3 4 5 6
32 3 3 34 3 5 3 6 37 3 8 39 4 0 41 42 4 3 44 4 5 46 47
2 3 4 5 6 7 8 9
10 11 1 2 1 3 14 15 1 6
17 1 8 19 2 0 2 1 22 2 3 24 2 5 26 27 2 8 29 3 0
31
32 3 3 34 3 5 3 6 37 3 8 39 4 0 41 42 4 3 44 4 5 46 47
Plan/Apply
www.gpgypsum.com
3
Cut
Using your T-square or straightedge and wallboard
knife, score the gypsum board completely through the
face paper. Then use firm, even pressure to snap the
board along the cut. Fold back the board, and use the
knife to cut the back paper. Smooth rough edges.
Receptacle Openings, Etc.
Carefully measure openings for receptacles, switches,
etc. from the edge and end of the board, and mark
guidelines on the face paper. Use a keyhole saw to cut
the openings. Make sure your measurements and cuts
are accurate, or the cover plate you install later on will
not conceal the hole.
15 14 13
12 11 10
9 8
7
6 5 4 3 2
2 3 4 5 6 7 8 9
1 0 1 1 1 2 1 3
14 15 16
1 7 1 8 1 9 2 0
2 1 2 2 2 3 2 4 2 5 2 6 2 7 2 8
2 9
3 0 3 1
1
2
3
4 5 6
3 2 3 3 3 4 3 5 3 6 3 7 3 8 3 9 4 0 4 1 4 2 4 3 4 4 4 5 4 6 4 7
2 3 4 5 6 7 8 9
1 0 1 1 1 2 1 3 1 4 1 5 16
1 7 1 8 1 9 2 0
2 1 2 2 2 3 2 4 2 5 2 6 2 7 2 8 2 9 3 0 3 1
3 2 3 3 3 4 3 5 3 6 3 7 3 8 3 9 4 0 4 1 4 2 4 3 4 4 4 5 4 6 4 7
Want help calculating the amount of materials
you’ll need for your project? Check out the
ToughRock
®
Calculator at www.toughrock.com.
Simply enter the measurements of your room
and the calculator will do the rest.

Installation
www.gpgypsum.com
4
Ceilings
For ceilings, always use nails or screws (mechanical
attachment) rather than the adhesive/nail-on method.
Nails or screws should be spaced at 79 (178 mm) intervals
around the edges (about
3
⁄89 [9.5 mm] from the edge),
and through the center of the boards. Make sure you
hit the center of the ceiling joists. For joists that are
169 (406 mm) on center (o.c.), use
1
⁄29 (12.7 mm)
gypsum board. For 249 (610 mm) o.c. joists, use
5
⁄89
(15.9 mm) gypsum board or
1
⁄29 (12.7 mm) ceiling board.
All nails should be “dimpled”.
That is, drive the nails firm
enough to indent the board’s
face paper, without tearing
the paper. It’s best to install
ceiling boards before wall
boards. Because gypsum
board is relatively heavy, and
because you’ll be positioning
it overhead, it’s a good idea
to have a couple of friends
help you.
It also helps to have a pair of T-braces to help hold
the board in place while it’s being nailed. A good
T-brace can be made by nailing a 28 (610 mm) piece
of 1 x 4 (25.4 mm x 102 mm) onto the end of a 2 x 4
(51 mm x 102 mm) about
an inch longer than the floor
to ceiling height. Install boards
across (perpendicular to)
ceiling joists.
Walls
On walls, you can get a
better looking job by using
the adhesive/nail-on method.
Use a caulking gun to put a
3
⁄89 (9.5 mm) bead of gypsum
board adhesive on the wall
studs before installing the board. Then nail the board
around the edges (about
3
⁄89 [9.5 mm] from the edge),
and along each end. Space nails at 89 (203 mm)
intervals, and dimple all nails. Test the board to see if
it’s tight. If it’s loose, put a couple of nails in the center.
Many professionals prefer gypsum board screws to
nails for their extremely strong holding power. For
screw application, use only coated gypsum board
screws (wood screws will tear the board), and a
variable-speed power drill with a screwdriver bit.
Install boards horizontally, running across the wall
studs. Start with the top board and work down. Push
the board firmly against the ceiling and nail, keeping
the first nail at least 79 (178 mm) from the interior
ceiling angle.
If your ceiling is higher than 8819 (2,464 mm) or
the wall is 48 (1,220 mm) wide or less, boards may
be installed vertically.
Masonry
If you’re installing
gypsum board on a
masonry wall, first
cut 1 x 2 (25.4 mm
x 51 mm) or 2 x 2
(51 mm x 52 mm)
furring strips to
reach from the
floor to the ceiling.
(2 x 2 [51 mm x 52 mm] strips are good if you plan to
back your wallboard with insulation.) Cut enough
strips to go around the room when nailed vertically on
169 (406 mm) centers. Nail the strips on the walls, 169
(406 mm) o.c., using masonry nails. (Check with your
home supply dealer for the proper nails for your kind
of masonry wall.) When the furring strips are up, rigid
foamboard insulation can be cut and placed between
strips. Then treat the furring as you would ordinary
wall studs, using the wallboard application methods
described in the “Walls” section on the previous page.
Metal Corners
To protect outside corners from edge damage, install
metal cornerbeads after you’ve installed the wallboard.
Nail the metal cornerbead every 59 (127 mm) through
the gypsum board, into the wood framing.

Finishing
www.gpgypsum.com
5
Joints
Finish the joints in four steps. First, apply a coat of
Georgia-Pacific Ready-Mix
™
Joint Compound to the
joints. Then, imbed Georgia-Pacific wallboard tape in
the Ready-Mix Joint Compound, smooth out bubbles
and allow to dry. Next, apply two successive finish
coats over the tape and allow to dry between coats.
Sand when dry.
Bedding
With your 59 (127 mm)
joint finishing knife, apply
a smooth, full, even coat of
Ready-Mix Joint Compound
into the recess created by
the tapered edges of
adjoining boards.
Center a strip of wallboard
tape over the joint, and
press it firmly into the
wet bedding compound with your wallboard knife at a 45°
angle. Press hard enough to squeeze a little compound
out from the edge of the tape, but leave enough
compound for a good bond. Let dry about 24 hours.
Taping & Finishing
When the taped bedding coat is dry, apply your first
finish coat of Ready-Mix Joint Compound. Extend
this coat a few inches beyond the tape, and feather the
edges. Let dry about 24 hours. Then apply a second
finish coat with your 109 (254 mm) joint finishing
knife. Extend this coat 1
1
⁄29 (38 mm) wider than the
first finish coat. Wait 24 hours, and sand lightly with
your sanding block and medium grit sandpaper. Don’t
sand down to the tape. Be very careful not to sand or
scratch the face paper of the wallboard. Wipe off dust
with a damp sponge.
Nail Heads
Draw your 59 (127 mm) joint finishing knife across
the nail head to make sure it is below the surface of
the board. Apply your first coat of Ready-Mix Joint
Compound so that it just fills the nail dimple. Don’t
use excess pressure when applying, or your knife may
scoop compound from the dimple. Let the first coat
dry. At least one more coat will be required. A third
coat of Ready-Mix Joint Compound may be needed.
Sand lightly after each coat dries.
Butt Joints
Butt joints (square cut edge joints) are finished the
same way as regular joints, with one exception.
Because butt joints are not tapered, you need to be
careful not to allow the joint compound and tape to
build up any more than necessary. To reduce the
effect of the build-up, feather the edges of your finish
coats wider than you would for a regular joint.
Outside Corners
Be sure the metal cornerbead is attached firmly (see
‘‘Metal Corners’’ in previous section). Use your 59
(127 mm) knife to spread Ready-Mix Joint Compound
about 39-49 (76-102 mm) past metal corner. Be sure to
cover the metal edges. Let dry 24 hours. Apply second
coat with your 109 (254 mm) knife. Feather edges 29-39
(51–76 mm) beyond first coat. Sand lightly when dry.
A third coat may be needed.
Inside Corners
Cut a strip of wallboard tape
the length of the corner you’re
going to finish. Crease the tape
down the center. Use your 59
(127 mm) knife to spread
Ready-Mix Joint Compound
about 1
1
⁄29 (38 mm) on both
sides of the corner. With the
knife press the tape into the
corner. Use enough pressure
to squeeze some compound from the edge of the tape,
but leave enough compound to form a good bond.
Feather the compound 29 (51 mm) from the edge of
the tape. Let dry 24 hours, finishing only one side at a
time. Let dry, finish other side of corner. Let dry, then
sand corner. Be careful not to let the compound build
up in the very corner of the tape. Excess compound in
the corner could cause hairline cracks.

Create
www.gpgypsum.com
6
Texture
Before you apply any textured surface to wallboard,
make sure all joints, nail heads and corners are finished
properly. Clean all surfaces thoroughly, and apply a
primer coat of white latex paint.
NOTE: It’s very important that you prime surfaces well. Joints
and nail heads may show through unprimed surfaces. It’s also
important to get a prime coat on finished gypsum board as soon
after installation as possible. Gypsum board paper that is
exposed to light for more than a few weeks could darken, and
show through your textured surface.
Choose a texture that fits the decor you’re planning
for the room, and one you’ll feel comfortable applying.
Different textures require different tools and texture
components. Use the examples below to choose a
texture for your walls and ceilings.
After you have decided on a texture, cover floors,
windows, etc. Apply texture to the ceiling first. When
ceiling texture is finished, use a 109 (254 mm) putty
knife to carefully scrape splatters from walls and floors
before texture dries. Be careful not to break the face
paper on gypsum boards. Always wear protective clothing.
Swirl
Tools: Stiff Brush, Clean Bucket
Materials: Georgia-Pacific Wall & Ceiling Texture or
Georgia-Pacific Ready-Mix
™
Joint Compound
(Coverage: 50 lb. [22.7 kg] bag, approx. 400-800 sq. ft.
[37-74 m
2
])
Directions: Mix Wall Texture or Ready-
Mix Joint Compound according to the
instructions on the bag or pail until it is
the consistency of whipped cream. Spread
on a uniform coating using your brush
in a short or broad circular pattern.
Experiment! You might even want to try using a sponge
to create your own effects. Let dry at least 48 hours.
Stipple
Tools: Stipple Paint Roller, Hand
Extension, Roller Pan
Materials: Georgia-Pacific Wall &
Ceiling Texture or Georgia-Pacific
Ready-Mix Joint Compound (Coverage: 50 lb. [22.7 kg]
bag, approx. 400-800 sq. ft. [37-74 m
2
])
Directions: Thin stipple material selected according to
package instructions to a creamy consistency. Don’t
get it too thin, though, or your coverage won’t be
complete. Use the paint roller to spread the mixture
in a uniform coat. Cover the complete ceiling in one
application. Let dry about 48 hours.
Stomp
Tools: Stiff Round Brush with
Extension Handle, Pan, Paint Roller
Materials: Georgia-Pacific Wall &
Ceiling Texture or Georgia-Pacific
Ready-Mix Joint Compound
(Coverage: 50 lb. [22.7 kg] bag,
approx. 400-800 sq. ft. [37-74 m
2
]; Ready-Mix–
200-300 sq. ft. [19-28 m
2
])
Directions: Mix Wall Texture according to package
instructions until it has the consistency of thick whipped
cream, or use thinned Ready-Mix Joint Compound from
the bucket. Apply uniform coat with a paint roller. Use
the round brush to “stomp” the material on the surface.
Cover surface fully. Let dry about 48 hours. The stomp
method is frequently used for textured ceilings.
Brocade
Tools: 109 (254 mm) Hand Trowel, 49
(102 mm) Putty Knife, Clean Bucket
Materials: Georgia-Pacific Wall &
Ceiling Texture or Georgia-Pacific
Ready-Mix Joint Compound (Coverage:
50 lb. [22.7 kg] bag, approx. 400-800 sq. ft.[37-74m
2
];
Ready-Mix–200-300 sq. ft.[19-28 m
2
])
Directions: Mix Wall Texture according to package
instructions, until it is the consistency of mashed
potatoes. Or, use Ready-Mix Joint Compound right
out of the pail. Start in a corner, and work dawn and
across the room, taking areas 38 (914 mm) square at a
time. Dab on large quantities of texture with your
trowel, and brush over lightly to flatten peaks. Blend
sections as you move from one area to the next. Allow
several days to dry.

Repair
www.gpgypsum.com
7
Tools
The materials and tools you’ll need for most repairs are:
1. Georgia-Pacific Ready-Mix
™
Joint Compound
2. Drywall tape
3. Gypsum board scraps
4. Gypsum board nails
5. Utility knife
6. 59 (127 mm) and 109 (254 mm) taping knives
7. Hammer
8. Safety glasses
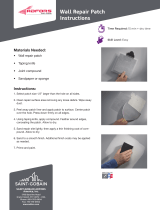
Medium to Small Holes
1. Cut out a rectangle around
damaged area with knife or
keyhole saw.
2. Cut a scrap section of gypsum
board, with top and bottom
slightly larger than the hole.
3. Place a piece of string through the center of scrap.
4. Apply Ready-Mix Joint Compound to edges of
scrap, then slide into hole.
5. Center scrap and pull tight until joint compound
is set.
6. Cut string, fill hole with joint compound.
7. Additional finish coats may be necessary.
Dents and Gouges
1. Fill with Georgia-Pacific Ready-Mix Joint
Compound or Georgia-Pacific Sandable 90
Setting Compound.
2. Touch up with paint.
Large Holes
1. To patch larger holes,
you may have to cut the
gypsum board back to
the studs to replace the
entire damaged section.
2. Apply gypsum board tape and finish off with
Ready-Mix Joint Compound.
Nail Pops
1. Drive new nail about 19-29
(25.4-51 mm) above and below
the one that has popped.
2. Push panel close to the stud while
you “dimple” the two nails. (See
Installation section for explanation
of “dimpling.”)
3. Remove loose material from
dimpled areas, sand lightly.
4. Fill dimpled area with Ready-Mix Joint
Compound
—
let dry overnight.
5. If shrinkage occurs in drying, re-apply Ready-Mix
Joint Compound. When patch is dry, sand lightly.
6. Prime and texture or paint to match existing wall.
Cracks
For large cracks, use Ready-Mix Joint Compound and
drywall tape.
1. Sand the area about 69 (152 mm) on each side of
the crack.
2. Work Ready-Mix Joint Compound down into crack.
3. Center tape over the crack and press down firmly
with a 59 (127 mm) drywall knife.
4. Cover tape with a coat of Ready-Mix Joint
Compound. Smooth it out well beyond tape edges
by feathering.
5. Allow patch to dry overnight. Apply another coat
of Ready-Mix Joint Compound which extends 1
1
⁄29
(38 mm) wider than the last coat. Smooth edges,
let patch dry. Sand lightly.
• Narrow cracks may be filled with Ready-Mix Joint
Compound alone. Use a stiff brush or screwdriver
to remove loose material from the crack.
• Dampen edges of the crack with water.
• Fill deep cracks almost to the surface. Let dry, then
add a thin coat of Ready-Mix Joint Compound.
Smooth out 29 (51 mm) on each side of crack, by
feathering. Let dry. Sand smooth.

Do It Yourself
www.gpgypsum.com
8
Garage
A ToughRock
®
5
⁄89 (15.9 mm) Fireguard
®
gypsum board,
available in 88 to 128 (2,438 mm – 3,658 mm) lengths,
is used in garage walls and ceilings for
improved fire resistance compared
to
1
⁄29 (12.7 mm) gypsum board.
B ToughRock
1
⁄29 (12.7 mm)
gypsum board, available in 88
(2 438 mm) and 128 (3658 mm)
lengths, is the normal wall and
ceiling product for new homes
and additions. ToughRock
1
⁄29
(12.7 mm) CD
®
Ceiling Board
or ToughRock
5
⁄89 (15.9 mm)
Fireguard gypsum board
is preferred for ceilings for improved sag resistance.
C Cornerbead in 88 (2,438 mm) lengths protects outside
corners from damage and gives straight and true
corners.
D Georgia-Pacific Ready-Mix
™
Joint Compound is avail-
able in various sized pails and boxes. Used for taping
and finishing gypsum board. Typical usage: 2 (61 lb.)
pails or boxes per 1000 sq. ft. (93 m
2
)of gypsum board.
E Paper joint tape is used to
tape all joints and interior
angles/corners. Typical usage:
350 lineal feet (107.7 mm)
of tape per 1000 sq. ft.
(93 m
2
) of board.
Bathroom
A ToughRock
1
⁄29 (12.7 mm)
gypsum board is available in 88 (2,438 mm) and 128
(3,658 mm) lengths and is the normal wall and ceiling
product for new homes and additions. ToughRock
1
⁄29 (12.7 mm) CD Ceiling Board or ToughRock
5
⁄89
(15.9 mm) Fireguard gypsum board is preferred for
ceilings for improved sag resistance.
B
1
⁄29 (12.7 mm) DensShield Tile Backer, is a light-
weight, easy to handle substrate that comes in various
sizes including the 329 x 58 (813 mm x 1,524 mm)
size. This heavy-duty backer board for ceramic tile
is used for walls, ceilings, floors and countertops
especially in areas of continuous moisture. Features
a Lifetime Limited Warranty* from Georgia-Pacific
Gypsum on any tile installation applied over
DensSheild.
C ToughRock
1
⁄29 (12.7 mm) Moisture-Guard
®
gypsum
board in 88 (2,438 mm) lengths is the normal product
for bathrooms. DensShield tile backer is recom-
mended for backing tile installations.
D Georgia-Pacific Ready-Mix Joint Compound is
available in various sized pails and boxes. Used for
taping and finishing gypsum board. Typical usage:
2 (61 lb.)(27.7 kg) pails or boxes per 1000 sq. ft.
(93 m
2
) of gypsum board.
Basement
A ToughRock
1
⁄29 (12.7 mm)
gypsum board, available in 88
(2,438 mm), 108 (3,048 mm)
and 128 (3,658 mm) lengths,
is the typical wall and ceiling
drywall product for new
homes and additions.
B ToughRock
5
⁄89 (15.9 mm) Fireguard gypsum board,
available in 88 (2,438 mm) to 128 (3,658 mm)
lengths, is recommended as an alternative to
1
⁄29
(12.7 mm) gypsum board for improved acoustical
isolation and fire resistance compared to
1
⁄29 (12.7 mm)
gypsum board.
C Cornerbead in 88 (2,438 mm) lengths protects outside
corners from damage and gives straight and true
corners.
D Paper joint tape is used to tape all joints and interior
angles/corners. Typical usage: 350 lineal feet
(107.7 mm) per 1000 sq. ft. (93 m
2
) of gypsum board.
E Georgia-Pacific Ready-Mix Joint Compound is
available in various sized pails and boxes. Used for
taping and finishing gypsum board. Typical usage:
2 (61 lb.) (27.7 kg) pails per 1000 sq. ft. (93 m
2
)
of gypsum board.**
Addition
A ToughRock
5
⁄89 (15.9 mm)
Fireguard gypsum board,
available in 88 (2,438 mm)
to 128 (3,658 mm) lengths,
is the preferred substrate
for ceilings and walls for
improved fire resistance and
sound isolation compared to
1
⁄29 (12.7 mm) gypsum board.
B ToughRock
1
⁄29 (12.7 mm) gypsum
board, available in 88 (2,438 mm) and 128 (3,658 mm)
lengths, is the typical wall and ceiling drywall
product for new homes and additions.
A
B
C
E
D
A
B
C
D
E
A
B
D
C
A
C
B
D

9
Georgia-Pacific
Gypsum Products
Georgia-Pacific Ready-Mix
™
Joint Compound
For finishing joints, nail heads and corners. Also can
be used for some texturing, and for most repairs.
Comes ready to use in 12 lb. (5.4 kg), 61 lb. (27.7 kg)
pails, and 48 lb. (21.8 kg) cartons.
Georgia-Pacific Wallboard Tape
For joint finishing, and major repairs. 758 (22.9 m),
2508 (76.2 m) and 5008 (152.4 m) rolls.
Georgia-Pacific Wall and Ceiling Texture
For texturing walls and ceilings. Mix according to
instructions on the label for texture you wish to create.
50 lb. (22.7 kg) bag covers from 200-1000 sq. ft.
(19-93 m
2
) depending on application method and
texture style.
Georgia-Pacific Sandable Setting Compound
Quick setting joint compounds especially suited for
repair work. Mix according to instructions on package.
Comes in 18 lb. (8.2 kg) and 11 kg. bags.
©2011 Georgia-Pacific Corporation. All rights reserved.
Printed in the U.S.A. 5/11 GP-TM Lit. Item #101850.
SALES INFORMATION AND ORDER PLACEMENT
U.S.A. Midwest: 1-800-876-4746 West: 1-800-824-7503
South: 1-800-327-2344 Northeast: 1-800-947-4497
CANADA Canada Toll Free: 1-800-387-6823
Quebec Toll Free: 1-800-361-0486
TECHNICAL INFORMATION
Georgia-Pacific Gypsum Technical Hotline
U.S.A. and Canada: 1-800-225-6119
www.gpgypsum.com
TRADEMARKS CD, DENSSHIELD,
FIREGUARD, READY-MIX, TOUGHROCK
and the GEORGIA-PACIFIC logo are
trademarks owned by or licensed to
Georgia-Pacific Gypsum LLC.
UPDATES AND CURRENT
INFORMATION The information in
this document may change without notice.
Visit our website at www.gpgypsum.com
for updates and current information.
LIMITATION OF REMEDIES
AND DAMAGES Unless otherwise
stated in our written warranty for these
products, our sole liability for any
product claim shall be limited to
reimbursement of the cost of repair or
replacement of the affected product,
up to a maximum amount of two
times the original purchase price for
the affected product. We shall not be
responsible under any circumstances for
lost profits, damage to a structure or
its contents, or indirect, incidental,
special or consequential damages.
Claims shall be deemed waived if
they are not submitted to us in writing
within ten (10) days after discovery of
a product defect/circumstance giving
rise to a claim.
CAUTION: For product fire, safety
and use information, go to gp.com/
safetyinfo.
HANDLING AND USE CAUTION:
This product contains fiberglass. Fibers
and dust may be released from this
product during normal handling and
may result in skin, eye and respiratory
irritation. Avoid breathing dust and
contact with the skin and eyes. Follow
these standard work practices: Wear a
loose-fitting, long-sleeved shirt and
long pants, protective gloves and eye
protection (goggles or safety glasses
with side shields). Wear a dust mask when
sanding. Additional protection such
as NIOSH-approved dust mask may be
needed in poorly ventilated areas or
when very dusty. For Material Safety
Data Sheet or additional information,
call 1-800-225-6119 or visit
www.gpgypsum.com.
FIRE SAFETY CAUTION Passing a
fire test in a controlled laboratory
setting and/or certifying or labeling
a product as having a one-hour, two-
hour, or any other fire resistance or
protection rating and, therefore, as
acceptable for use in certain fire rated
assemblies/systems, does not mean
that either a particular assembly/system
incorporating the product, or any given
piece of the product itself, will neces-
sarily provide one-hour fire resistance,
two-hour fire resistance, or any other
specified fire resistance or protection
in an actual fire. In the event of an
actual fire, you should immediately
take any and all actions necessary
for your safety and the safety of others
without regard for any fire rating of
any product or assembly/system.
C Georgia-Pacific All-Purpose Joint Compound is used
for bedding tape, finishing joints, filling cornerbead,
spotting nails and texturing. Typical usage: 2 (61 lb.)
(27.7 kg) pails per 1000 sq. ft. (93 m
2
) for joint
taping and finishing and 15-50 lbs. (6.8-22.7 kg)
per 1000 sq. ft. (93 m
2
)when used for texturing.
D Georgia-Pacific Ready-Mix Joint Compound is
available in various sized pails and boxes. Used for
taping and finishing gypsum board. Typical usage:
2 (61 lb.) (27.7 kg) pails per 1000 sq. ft. (93 m
2
)
of gypsum board.**
* Please refer to installation recommendations and warranty.
Details available from Georgia-Pacific Gypsum.
** Recommended drywall taping knives: 49 (102 mm) wide for
taping, 69 (152 mm) for the first finish coat, 129 (305 mm) for
second finish coat.
Do It Yourself
/