Page is loading ...

Oneida Air Systems, Inc. 1001 West Fayette St., Syracuse, N.Y. 13204
Phone 1-800-732-4065 315-476-5151 Fax 315-476-5044 www.oneida-air.com
Shown with optional
bolt together Angle
Iron stand.
*Models may
vary sligthly in
appearance.
GORILLA
The
2 HP Cyclonic Dust Collector
Owners Manual
1/07

1
Thank You for Choosing an Oneida Air Systems Product!
OAS manufactures and sells dust collection equipment only. Our qualified technicians and
sales staff are available 7:30am - 6:00pm EST Mon. - Thur. and 7:30am - 5:00pm EST Fri. to
answer any questions concerning OAS products and dust collection. Call for ductwork design
and ductwork quotes, including system pricing and shipping cost.
Table of Contents
Page
Read the entire Owners Manual before installing or operating system!
I.
II.
III.
IV.
V.
VI.
VII.
VIII.
IX.
X.
XI.
XII.
XIII.
XIV.
XV.
XVI.
XVII.
XVIII.
XIX.
2
3
4
5
6
7
8
9
10
11
12
13
14
15
16
17
18
19
20
System Start-Up Information
Commercial Configurations
General Specifications & Fan Performance Curves
Dimensions
General Assembly
General Assembly Instructions
Bracket Assembly
Filter Assembly
Filter Maintenance
Directions for Cleaning External Filter & Clipping Dust Pan
Fan / Blower Wiring Diagram
Troubleshooting
Fire Hazards - Read Before Installing System
Terms and Conditions
Stand Assembly
Accessories
Fan Motor Maintenance
Optional Remote Controller Diagram
Optional Filter Efficiency Gauge Mounting Instructions
2HP Super Dust Gorilla Owners Manual
O.A.S. 2007
c

2
I. System Start-Up Information
1. Read the installation and maintenance instructions as well as the recommended
safety practices in this manual.
2. Install Ductwork completely before operating collector:
A.) Seal ductwork with silicone sealant or duct tape.
B.) Have Dust Bin in place and sealed.
3. Have licensed electrician wire Fan / Blower according to wire diagram on pg. 12
in this owners manual.
4. Have licensed electrician check current draw on motor with all gates open. Current
draw should not exceed maximum motor amperage. (OAS is not responsible for
damage to motors caused by improper installation, wiring or failure to follow these
directions.)
Caution
The Direct Drive Fan / Blower makes the system top heavy!
Use extreme care when setting the unit up!
Warning
If amperage is too high - shut down immediately!
(See troubleshooting section.)
Warning
Do not operate Fan / Blower unless Cyclone and Dust Bin
are in place. Motor will over heat!
Warning
2HP Super Dust Gorilla Owners Manual
O.A.S. 2007
c
Check amperage draw during operation with (2) open 5 dia.
blastgates (or smaller). Make certain amperage is not outside
operating limit indicated on motor plate!

3
II. 2hp Dust Gorilla Configurations
Caution:
If exhaust air is vented outside you must provide make up / return air.
Flue gases (carbon monoxide) can be drawn into the shop from furnaces,
water heaters or other appliances.
1. External Cartridge Filter -
Silencer Included with Filter
1. External
Cartridge
Filter
2HP Super Dust Gorilla Owners Manual
Silencer
included
w/ Filter
O.A.S. 2007
c
Shown with
optional
Angle Iron
Stand.
Cartridge Filter Media
1 Pleated Spun-Bonded Cartridge Filter 39 / 95 Sq. Ft.
Accredited, independent lab tested.
Bathed in teflon-like coating for easy dust release.
Captures 99.9% of Test Material from 0.2 - 2 microns.
2hp and Under Systems
13 Diameter Filter
1. Carefully pull
Silencer up over the
flange end until
black plastic top
meets flange plate.
It is a tight fit.
2. Slide Filter up to
meet Flange
Plate. Fasten
bottom brace to
rod to hold Filter.
Follow Pg. 9 in Owners Manual to Complete Installation.

III. General Specifications & Fan Performance Curves
2HP Super Dust Gorilla Owners Manual
O.A.S. 2007
c
4
- Sleeve kit adds 7 (4 is minimum)
- 35 gal. bin is 22 dia. x 22.5 h / 55 gal. bin is 22 dia. x 35.5 h
- Several Filter Options Available- Galvanized steel construction
- The collector can be hung on the wall, from the ceiling, or free standing support using
the 10 ga. angle iron ring at the top of the cone.
(See assembly instructions)
2.0 hp
Height without
Dust Bin
Cyclone
Diameter
Inlet
Diameter
Weight without
Dust Bin
TEFC
Motors
Class F
115/230v
23/11.5 amps
1.15 Service Factor
63 21 7
Approx. Wt.
122 lbs.
w/o drum or filter
Static pressure and volume together determine
a fans performance. Several factors, such as
layout of ductwork and diameter of openings,
can affect a fans performance.
2hp Super Dust Gorilla System
Industrial Baldor TEFC 2hp motor*
115/230v - 23/11.5 amps / 1.15 Service Factor
Full 16 gauge galvanized cyclone & 11 ga. fan housing
7 dia. inlet / 8 rectangular outlet
14.25 dia. x 4 wide cast aluminum fan wheel
back inclined non-sparking, non-ferrous dynamic, two-planed
balanced to ISO 6.3 specifications.
Sound 78 - 79dB @ 10 with Built-in Silencer and Filter
95 Sq. Ft. Filter Media / Spun-Bonded
2hp Super Dust Gorilla CFM vs. SP Curve*
9
8
7
6
5
4
3
2
0
Static Pressure at Cyclone Inlet
CFM
0 200 400 600 1000800
10
1400 1600
6.3
1200
10.65
9.4
4.3
11
8.25
3
2.3
1422 cfm @
2.3 SP w/c
w/o filter.
Vented outside.
- Without Filter
- With Filter
*Fan curves vary slightly with different filter packages.
1349 cfm @ 2.3
SP w/c w/ filter.
FCS133900
1422 CFM @ 2.3 SP w/c w/o filter
*
* Note: Motor Starter supplied
with system is for 220v only.

5
IV. Dimensions
For Minimum Mounting Heights w/ 39 Filter.
*Dimensions subject to slight variation in manufacturing.
2HP Super Dust Gorilla Owners Manual
O.A.S. 2007
c
91.00
Dimensions shown with
2" flex hose between
drum and cone collars
66.50
75.50
35 Gal Shown
Add 13" for 55 Gal
26.34
42.5
56.00
GORILLA
The
TM
24.25
16.00
Allow 1 - 2 from ceiling.
7.00
39.00
6.00
8.00
13.00
13.00

2HP Super Dust Gorilla Owners Manual
O.A.S. 2007
c
6
V. General Assembly
1. Motor Assembly - BXI002105
1a. 2 hp Motor - BMZ020105
1b. Magnetic Starter w/ Remote Option - AMR221114
1c. Cord Connector - WCC025038
1d. Cord Connector Lock Nut - WCN120000
1e. Fan Wheel - BWX142578
1f. Motor Plate - RMP002105
2. Fan Housing - BHX030005
3. Cyclone Barrel - SXI002105
4. Cyclone Cone - SCX002105
5. Plenum 9 Kit - GXF015339
5a. Plenum Elbow 8 Assembly - FPX015339
5b. Filter Support Rod (2) - YSS000200
5c. 5/16 Connector 18 x 7/8 - VRH051618 (1)
5d. Filter Support Brace - RBX000000
5e. Washer - AFW170000
5f. Thumb Nut - AFT000001
5g. Internal Silencer (Pat. Pend.) - BSC130000
5h. Dust Pan - RFG130805
5i. Dust Clips (3) - AFC000000
5j. Hardware Kit - AHX000000
a. (3) 3/8 x 1 1/4 Bolts - AFS015700
b. (14) 3/8 Washers - AFW190000
c. (7) 3/8 Wiz Nuts - AFT00004
d. (4) 3/8 x 1 Bolts - AFS015100
e. (12) 5/16 x 1 Bolts Prewelded - AFB155190
f. (24) 5/16 Washers - AFW180000
g. (28) 5/16 Nuts AFT155175
h. Gasket (25) RAZ000000
5k. Owners Manual - ZBM000013
6. Filter 13 dia. x 39 L - FCS133995
7. Wall Bracket - SMS300021
8. Decal - (1) Oneida Logo - ZBC000015
9. Decal - (1) Gorilla Logo - ZBC990020
10. Rotation Label - ZBC000029
11. Caution / Exhaust Label - ZBS000004
12. General Caution Label - ZBS000001
13. Filter Maintenance Label - ZBS000007
14. Caution / Check Frequently Label - ZBS000006
15. Caution / Drum Cover Label - ZBS000005
16. Gal. Fiber Drum Kit (Standard) - SDK350901
16a. Drum Lid w/ 9 Ring - SDX000900
16b. Hose Clamp (2) - ACB120000
16c. Flex Hose (9) - DHF090000
16d. 35 Gal. Fiber Drum - SDS350000
17. 55 Gal. Fiber Drum Kit - SDK550901
17a. Drum Lid w/ 9 Ring - SDX000900
17b. Hose Clamps (2) - ACB120000
17c. Flex Hose (9) - DHF090000
17d. 55 Gal. Fiber Drum - SDS550000
18. 55 Gal. Steel Drum Kit - SEK550901
18a. Drum Lid w/ 9 Ring - SEX550900
18b. Hose Clamps (2) - ACB120000
18c. Flex Hose (9) - DHF090000
18d. 55 Gal. Steel Drum - SES550000
7
1a
1f
5jh
5jh
2
3
4
16b
16c
16b
16a
16d
5a
5g
6
5b
5d
5e
5f
5h
5i
8
9
(8) 5/16 Washers
(8) 5/16 Nuts
(12) 5/16 x 1 1/4 Bolts
(12) 5/16 Washers
(12) 5/16 Nuts
(4) 3/8 x 1 Bolts
(4) 3/8 Washers
(4) 3/8 Nuts
(3) 3/8 x 1 1/4 Bolts
(3) 3/8 Washers
(3) 3/8 Nuts
Filter Maintenance
Failure to follow filter maintenance instructions
in owners manual will cause filter to be
damaged.
Blow down filter at end of day with compressed
air per owners manual or blow down when back
pressure reaches 3 water gauge - whichever
comes first. Never allow gauge to reach 5.
Caution
Check Dust Bin Frequently For
Smoldering Materials. Empty Bin Before
Leaving Shop.
Drum cover must be in place when system
is operating to prevent motor overheating!
An airtight seal between the cyclone and
drum will provide the necessary resistance
needed to prevent motor overheating!
Caution
Caution:
If exhaust air is vented outside you must provide
make up/return air.
Flue gases (carbon monoxide) can be drawn into
the shop from furnaces, water heaters or other
appliances.
To avoid personal injury or property damage, read owners manual thoroughly before
installing and operating system. (Read section on collector location and fire hazards.)
This collector is for use with WOOD DUST ONLY!
Keep fire extinguishers handy at all times.
Do not use this product to collect other types of dusts or fumes.
(Fire or explosion may occur!)
Do not introduce sparks or sources of ignition into collector.
Personnel should stay at least 20 ft. away from operating system.
(Deflagration Hazard)
Empty and check dust bin frequently for possible smoldering materials.
Rotating blades inside. Keep hands and objects away.
Do not operate system unless COMPLETELY assembled with dustbin.
(Personal injury or motor damage may occur!)
Consult local fire marshal before installing.
Follow all Federal, State, Local and NFPA codes when installing system.
To reduce the risk of injury from moving parts - unplug before servicing.
To reduce the risk of electric shock - unplug before cleaning or servicing.
Read Before Installing and Operating!
For All
Systems
Caution
(8) 5/16 Washers
(8) 5/16 Nuts
34a. Optional 35 gal. Angle Iron Stand - STG021035
1.Uprights - SXX000056 (4)
2. Braces - SXX000021 (4 / SXX000023 (3)
3. Feet - STX002001 (4)
34b. Optional 55 gal. Angle Iron Stand - STG021055
1. Uprights - SXX000068 (4)
2. Braces - SXX000021 (7)
3. Feet - STX002001 (4)
Optional Angle Iron Stand
From Included
Hardware
Stand - Hardware Kit -
AHX021023
A. (32) AFB155190 -
5/16 Bolts
B. (32) AFT155175 -
5/16 Wiz Nuts
C. (64) AFW180000 -
5/16 Flat Washers
5c
XGK020105
5jh
1e
The
TM
GORILLA

7
2HP Super Dust Gorilla Owners Manual
O.A.S. 2007
c
VI. General Assembly Instructions
Cyclone
Barrel
Cyclone
Cone
2.
Cyclone
Barrel
Air Inlet
Fan /
Blower
Housing
Before you start, make sure you have cut and placed
the provided gasket material on top and bottom of the
Fan/Blower housing and the Cone as shown in the
diagrams. Then determine which direction you want
your filter to hang and which direction your ductwork
will enter the collector.
Air
Outlet
Gasket
Material -
Outside of
Bolt Circle
on underside
of Housing.
Silicone nuts.
There are essentially three ways to assemble your collector
and to attach it to the bracket. The way that is right for you
should be determined by expertise and manpower available.
When the units are all assembled they are very heavy and top
weighted. All of this should be taken into account before
deciding on the method best suited for you.
Do NOT use hook on motor to lift unit.
3.
3/8 Bolt / (2) Washers /
Serrated Nut per bolt hole
on each side and back.
4.
Collector
Hose Clamp
Hose Clamp
Flex Hose
Dust Bin
Gasket
Material
(12) 3/8 Bolts
(24) Flat Washers
(12) Serrated Nuts
Bolt
Washer
Flange
Washer
Nut
Gasket Material -
Outside of
Bolt Circle on top
of Housing.
To further eliminate
air leaks, a small
amount of silicone
should be used on
nuts used to
secure motor plate.
Motor
& Plate
Method #1 -
Bolt Fan/Blower housing to Cyclone barrel. Then bolt
Motor and Plate to Fan/Blower housing. Carefully lay
unit on its side and then bolt cone to barrel. Lift entire
unit up onto wall braket. Unit is extremely heavy and
top weighted, be advised!
Method #2 -
Bolt Fan/Blower housing to Cyclone barrel. Then bolt
Motor and Plate to Fan/Blower housing. Put Cone up
on Wall Bracket and orient holes. Lift assembled unit
onto cone making sure proper holes are lined up. Bolt
unit to bracket, then finish bolting barrel to cone.
Method #3 -
Bolt Fan/Blower housing to Cyclone barrel. Put Cone
up on Wall Bracket and orient holes. Lift assembled unit
onto cone making sure proper holes are lined up. Bolt
unit to bracket, then finish bolting barrel to cone. Lift
Motor & Plate onto Fan/Blower housing and bolt together
in proper direction.
GORILLA
The
TM
GORILLA
The
TM
GORILLA
The
TM
With all assemblies, make sure
rectangular air outlet is oriented on
Fan/Blower housing as you are
looking down as in Fig. 1A or facing
it as shown in diagrams. This is very
important. Then you can rotate
housing to whatever bolt position is
best for your shop.
1.
Gasket
Material -
Inside of
Bolt Circle
TOP
TOP
VIEW
TOP
Fig. 1A
Note: For cyclonic preseparation there must be an air tight seal between cyclone and dust
container. Dust bin must be located vertically under cyclone, material drops down by gravity.

8
2HP Super Dust Gorilla Owners Manual
O.A.S. 2007
c
VII. Bracket Assembly
1. You must determine the direction the fan outlet will point to
proceed with this mounting assembly. The collector will seem
quieter if the outlet is aimed away from the area people tend to
work. Slots in the brackets are .406 x 1.00
Note: Bolts included to mount bracket to collector. Hardware
NOT included to mount to wall.
2. Hold bracket against wall with top of plate at 56. Mark where
mounting holes fall. Mount wall bracket. For wall mounting, the
bolt centers on the brackets are at 16to accomodate most wall
stud spacing. See Fig. 1 & 2. Use a Level to ensure straightness.
3. Attach bracket to wall with lag screws, concrete anchors, or
other suitable hardware. See Fig. 2 & 3. Note: When installing
the brackets on a concrete wall, mount 2 x 4s between wall and
brackets to stabilize and dampen vibration.
4. Position Angle Ring around top of cone over bracket. Line up
one hole in Ring with hole in each bracket at desired rotation of
outlet. If rotation you desire does not correspond to an existing
hole in Angle Ring, drill new ones. Use three 3/8 bolts (included)
with washers & lock washers to secure the fan. See Fig. 4.
5. Attach tightly with bolts. See Fig. 4.
Note: Please do not install an Oneida Dust Collection System alone. Competent
assistance is advisable. Units are heavy!
56 to top of plate.
Distance tor minimum
mounting height.
4
1
.406 x 1.00
16
12 Ga.
2
3
Level
24.25
16

VIII. Filter Assembly
9
2HP Super Dust Gorilla Owners Manual
O.A.S. 2007
c
Note: Do not return exhaust air to the shop unless filter media is added.
External 39 Filter Assembly
1. Attach cartridge with hardware provided making sure
gasket is attached. See Fig. 1
2. If Filter requires additional support. Use the plate at the
top of the filter to support the filter assembly.
Note: If filter cartridge is located away from the cyclone
and motor, additional square-to-round connectors and pipe
can be purchased.
*Silencer Included.
For Filter cleaning instructions and
Dust Pan clipping instructions, see pg. 11.
Caution:
If exhaust air is vented outside you must provide make up / return air.
Flue gases (carbon monoxide) can be drawn into the shop from furnaces,
water heaters or other appliances.
1. Exhaust air to exterior of building.
Mount directly at the hole in exterior
wall or use a square-to-round transition
and ductwork to vent air to exterior.
No Filter Assembly
* Exhaust Diverter -
Can be used either
up or down
Option -
* Only usable on No Filter.
Caution: Rotating blades! Keep hands clear. Keep
people away from exhaust.
GORILLA
The
TM
GORILLA
The
TM
Fig. 1
Gasket
Material
(4) 3/8 x 1 Bolts
(8) Washers
(4) Serrated Nuts
Before attaching filter, you must first
carefully pull foam silencer on to end of
plenum, pushing black plastic end against
flange plate. It is a tight fit.
Dust Bin
Dust Pan
Clips (3)
Silencer
Filter
Rod
Brace
Washer
Wing Nut

10
IX. Filter Maintenance
External Filter Cartridge Cleaning Intervals
Caution: Fine dust collected in filter is hazardous
to your health! Do not breathe!
When unit is turned off, use compressed air to blow dust off from
exterior of filter. Hold nozzle at least 8 away from filter pleats*.
Do not remove bottom dust pan before or during the blow-off
process! Let dust settle into dust pan. Unclip and dump out dust.
Filter removal is not required.
* WARNING: A close, direct blast with the compressed air nozzle
too close to filter, may damage filter media. Always wear safety
glasses while blowing off filter.
Fan / Blower & Cyclone Outside Placement
Fan / Blower has a TEFC - Totally Enclosed Fan Cooled motor.
Note: Use steel drum when placed outside.
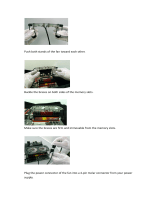
Before Operation:
Mount system and connect cyclone and dust bin. Make sure dust bin is in place before turning on the dust
collector.
Do not operate Fan / Blower unless Cyclone and Dust Bin are in place! Motor will overheat!
Electrical Wiring:
Make sure power source matches wire voltage configurations on motor.
Prior to connecting to the power line, check motor plate for proper voltage and rotation connection. Wire for
counter-clockwise rotation. Fan wheel must rotate counter-clockwise if looking down on fan housing.
Note: If fan is wired incorrectly and fan is rotating backwards, poor suction and airflow will result. See Wire
Diagrams on motor plate.
Use 12 gauge cord for the fan / blowers.
Lubrication:
See page 18 for instructions.
Caution: Rotating Fan Blades! Keep objects clear of outlet.
2HP Super Dust Gorilla Owners Manual
O.A.S. 2007
c
Shown with
optional
Angle Iron
Stand.

11
X. Directions for Cleaning External Filter
2HP Super Dust Gorilla Owners Manual
O.A.S. 2007
c
The External Filter can be cleaned using the following methods:
Wait a few minutes for internal dust to settle then unclip
and carefully empty dust bin.
Keep nozzle at least 6 from filter and keep your pressure
down. Closer blasts may damage filter material. Rinse
off INSIDE of filter. Let filter dry completely before reuse
or keep a spare filter on hand.
2. Empty Dust Bin.
All steps should be done with a dust mask and eye protection.
3. Rinse with water. (Optional)
1. Compressed air from outside.
6
Blast air along pleats of the filter at about a 20 angle.
Blast air out and away from you or anyone in the general
area.
Keep air nozzle at least 6 from filter. Closer blasts may
damage filter material.
6
Clipping Filter Dust Pan
Position bottom of U on top of clip between filter pleats,
then push bottom of clip underneath the rim of the dust
pan. Space the three clips equally around the dust pan,
making sure the pan is even with filter bottom and tightly
sealed.
Bottom of U
Side view
of clip

Motor
Baldor 2hp
Catalog
#VL3515T
12
2HP Super Dust Gorilla Owners Manual
O.A.S. 2007
c
XI. Wiring Diagram for Magnetic Starter (220v, 1 ** )*
*Starter will not operate at any other voltages.
**Starter is shown configured for 1O but can also be used for 2hp, 3O motors.
Always use a licensed, professional electrician.
Open access cover on the
Overload.
Set the overload amperage
dial for the SFA* amperage
of your motor. The SFA*
value can be found below:
SFA = 12.1
(FLA 11.5)
Note: Overload must be set
or nuisance tripping may
occur.
*SFA - Service Factor Amperage
*FLA - Full Load Amperage
I
O
Dedicated Receptacle Fed
from 2 Pole Dedicated Circuit
Breaker,
Magnetic Starter -
Mount Close to Collector
6 Long Type SJT
14 AWG Power Cord
6-20P
6-20R
Optional Remote Controller diagram pg. 19
* Note: Motor Starter supplied
with system is for 220v only.
Note: This Dust Collector is
pre-wired at the factory and
need only be plugged into a
NEMA 6020R dedicated
electrical receptacle. 3hp
single phase only.

Unplug unit before servicing or cleaning.
13
XII. Troubleshooting
13
2HP Super Dust Gorilla Owners Manual
O.A.S. 2007
c

XIII. Fire Hazards -
Read Before Installing and Operating
Do not use this product to collect other types of dust or flammable vapors.
Fire or explosion may occur!
Never collect sparks from a bench grinder into a wood dust collector.
Never introduce sparks or sources of ignition into the dust collector.
Personnel should keep at least 20 feet away from unit.
Check dust bin frequently and before leaving the shop for smoldering material.
Keep portable Fire Extinguishers handy.
The ABC type (dry chemical) is generally a good choice for small wood shops.
Additional information on portable extinguishers can be found in NFPA 10 (Standard for Portable Fire Extinguishers).
Be especially careful with sanding units. They can produce concentrations of dust in the combustible range. Make
certain enough air volume is at the suction point to capture all the particulate generated.
This high air volume will dilute the mixture below the lower limit of flammability. Be careful not to generate sparks into
the sanding dust.
Empty dust bin and clean filter often, especially when sanding.
Dont overload woodworking equipment, especially sanders. Excessive frictional heat can spontaneously ignite dust.
Sparks can be generated in several ways:
High-speed sanders and abrasive planers may strike foreign material
Saws and edgers may strike foreign material and create a red hot metal fragment.
Knots in hardwood can create frictional sparks.
Tramp metal when drawn into the collector can spark against ductwork.
Check wood stock for old nails and screws which can create red hot metal fragments.
Avoid using excessively large wood waste storage bins.
Always check storage bins for smoldering material before leaving for the day.
Electrically ground all equipment and ducting. Static sparks can ignite wood dust. (Avoid using PVC drainpipe)
Dont allow accumulation of layers of fine dust on horizontal surfaces. (Especially overhead lights, electrical boxes,
and fuse panels which can ignite dust)
Oneida Collectors are designed for WOOD DUST only!!
Wood shaping and cutting processes generate wood chips, shavings, and dust. These materials are considered
combustible. Air borne wood dust below 420 microns in size (.017 of an inch) in certain concentration ranges when
ignited can deflagrate (burn quickly).
An ignition source such as a spark, or ember, can ignite a dust mixture resulting in an expanding flame front, which
can cause an explosion if tightly contained. A disturbance that raises a cloud of accumulated fine dust can raise additional
dust clouds, which can cause a series of explosions that can level an entire building. Until this type of fire has been
witnessed, it is difficult to believe the devastation. This type of fire is rare but worth safeguarding against.
The best way to avoid a wood shop fire is to keep the shop clean. A shop ankle deep in dust with layers of fine dust
everywhere is an accident waiting to happen. A good dust collection system reduces overall fire hazards but also adds
new concerns. A fire hazard is still present. Combustible material is now in the dust collector and storage container.
It is the buyers responsibility to follow all applicable federal, state, local, OSHA, NFPA, or authorities having
jurisdiction codes and regulations when installing and operating this dust collector.
Fire Marshalls may want the unit located outside of the building. If the collector is located inside the facility,
controls such as spark detection, suppression, or explosion venting may be required.
Most local jurisdictions consult or adopt NFPA ( National Fire Protection Agency) codes. However, other codes
may apply. Local codes may vary from jurisdiction to jurisdiction.
NFPA 664 Code book, Standard for the Prevention of Fires and Explosions in Wood Processing and Woodworking
Facilities, applies to woodworking operations that occupy areas of more than 5,000 sq. ft. or to areas where
dust producing equipment requires an aggregate dust collection flow rate of more than 1500 cfm (Cubic Feet
per Minute). This exempts some small operators from the NFPA code 664, but other codes may apply in your
jurisdiction. Consult your local Fire Marshall for help. Additional information can be found in NFPA Code Book
664.
The following points are worth heeding:
The customer assumes the responsibility for contacting their insurance underwriter with regard to specific
application requirements of explosion venting or if additional fire protection and safety equipment may be
required.
Unplug unit before servicing or cleaning.
14
2HP Super Dust Gorilla Owners Manual
O.A.S. 2007
c

XIV. Terms and Conditions
Please look over the shipped order very carefully in the presence of the delivery person for damage or
incomplete shipment before signing the delivery receipt. Please note any tears or irregularities in shipping
packaging, however slight, on the shipping delivery receipt. This could be an indication of extensive concealed
damage. The shipping company will not take responsibility if the damage is not noted on the delivery receipt.
In the event of shipping damage, call O.A.S. immediately so we can expedite replacements. Please check
in all parts within 3 days from receiving order. Notify O.A.S. immediately of any missing or incorrect parts.
O.A.S. does not accept any claims for damage or shortage after 3 days from date of delivery.
Checking in Order
Oneida Air Systems warrants products it manufactures for a period of 2 years to the original purchaser from
the date of purchase. Items not manufactured by O.A.S. are limited to their own manufacturers warranties.
This warranty does not apply to defects due directly or indirectly to misuse, negligence, accidents, abuse,
repairs, or alterations or lack of maintenance. This is Oneida Air Systems sole written warranty and any and
all warranties that may be implied by law, including any merchantability or fitness, for any particular purpose,
are hereby limited to the duration of this written warranty. O.A.S. does not warrant or represent that the
merchandise complies with the provisions of any law or acts unless the manufacturer so warrants. In no
event shall O.A.S.s liability under this warranty exceed the purchase price paid for the product and any legal
actions brought against Oneida Air Systems shall be tried in the State of New York, County of Onondaga.
Oneida Air Systems shall in no event be liable for death, injuries to persons or property or for incidental,
contingent, special, or consequential damages arising from the use of our product.
Oneida Air Systems does not warrant or authorize use of wood dust collectors for other purposes. This
includes wood products that are treated, coated, or otherwise altered from their natural state.
Limited Warranty
Products will be shipped to Buyers single destination. Title and risk of loss shall pass to the Buyer upon
delivery to such destination. Buyer pays transportation expenses. Dates of shipment are advisory and O.A.S.
will make reasonable efforts to ship on or before the date states for shipment, however, O.A.S. shall not incur
any liability for failure to ship on that date.
Delivery Risk of Loss
Buyer must inform O.A.S. of any shortage or damage, by so noting in writing, on the freight delivery bill prior
to signing to indicate receipt of shipment. All claims, including claims covered under the limited warranty, are
subject to inspection and investigation by O.A.S.. O.A.S. reserves the right to inspect and investigate all
returned products before Buyers claim is settled. All products returned for a refund must be unused, resaleable
and purchased within the last six months. There are no refunds on flex hose, custom made components,
or partial kit items. Kits must be returned in full (all components) for credit. There will be a 25% restocking
fee applied to any returned items.
Returned Goods Policy
*Note: Motors should be protected from extreme weather to prolong motor life.
Single phase motors should only be started and stopped up to 4 - 10 times per
hour. Starting single phase motors more frequently can cause heat build up
and can cause the motor overload to trip or cause motor damage. In general,
motors should be started and stopped as little as possible for maximum
lifespan and best economy (electrical use).
15
2HP Super Dust Gorilla Owners Manual
O.A.S. 2007
c
Some parts of this system are outsourced and not made in the USA.

16
2HP Super Dust Gorilla Owners Manual
O.A.S. 2007
c
XV. Stand Assembly
Included Hardware:
(32) 5/16 x 1 Bolts - AFB155190
(32) 5/16 Nuts - AFW180000
(64) 5/16 Flat Washers - AFT155175
23 7/8
23 7/8
23 7/8
21 3/4
21 3/4
21 3/4
21 3/4
56
Bolt
Washers
Stand
Nut
FRONT has no
lower brace across.
The two triangular
slotted braces go on
the left and right top.
LEFT
RIGHT
Lower left and right
braces have no slots
in top.
Optional 35 gal. Angle Iron Stand - STG021035
1.Uprights - SXX000056
2. Braces - SXX000021
Optional 55 gal. Angle Iron Stand - STG023055
1. Uprights - SXX000068
2. Braces - SXX000021
Optional Angle Iron Stand

2HP Super Dust Gorilla Owners Manual
O.A.S. 2007
c
XVI. Accessories
56
25
25
Bolt Together
Angle Iron Stand
STG021035 - 35 gal. Stand
STG021055 - 55 gal. Stand
Replacement
Filter
FCS133900
Dust Containers
35 gal. Fiber
55 gal. Fiber
55 gal. Steel
ABX000000
Kit Contents:
8 Ft. Hose and Connection
0
1
2
3
4
5
INCHES W.C.
Gauge
Bracket
This easy to read gauge takes the guesswork out of knowing when your filters need
to be cleaned and tells you how much pressure is backed up behind your filters. It
reads pressure from plenum to gauge up to 8 away and allows you to keep your dust
collection system running efficiently.
Filter Efficiency Gauge
FXK000000
The BAG Gripper provides the ability to use convenient plastic bags inside
your dust drum. It provides a constant, negative pressure on the outside
surface of the plastic bag that keeps it pulled tight against the sides of the
dust drum. Can be used with 35 and 55 gal. barrels. Must be wired into
your system.
The BAG Gripper
13 x 39 / 95 Sq. Ft. Spun-Bonded. Filters 99.9% of test material from 0.2 to 2 microns.
17

18
2HP Super Dust Gorilla Owners Manual
O.A.S. 2007
c
XVII. Fan Motor Maintenance
Per Baldor specifications, their 2 pole motors (3600 RPM) motors are to be relubricated every 5500 hours.
Table 1 - Service Conditions
Table 2 - Lubrication Interval Multiplier
Per Baldor specifications, add .30 ounces (8.4 grams) of Mobil Polyrex grease by weight or .6 cubic inches (2 teaspoons)
of Mobil Polyrex grease by volume.

19
2HP Dust Gorilla Owners Manual
O.A.S. 2007
c
Retrofit (Wiring) of Wireless Remote into 220V Control Circuit of Square D / Telemecanique Mag Starters
Remote
Black Box
6T3
4T2
2T1
A2
A1
13NO
5L3
3L21L1
Contactor
Overload
98 97 95 96
Amp
Adjustment
Dial
YEL
BRN
BRN
YEL
RED
RED
RED
RED
Wire
Nuts
Start Stop
Start / Stop
Push Button
Assembly on
Starter (Molex)
3 Wire
Adaptor
Molex
AMA000000
Plug into 9 pin female Molex
on back panel of starter base.
1A
3
2
YEL
YEL
BRN
BRN
BRN
YEL
RED
RED
BRN
YEL
Square D
Telemecanique
Mag Starters
AMK Series
34 12
Female molex
at bottom of
starter
AMR220000
Important! Remove this factory
installed Jumper Wire.
Remote
Black Box
Remote is mounted inside
starter top cover by using
double-sided tape
(supplied).
14NO
6T3
4T2
2T1
A2
A1
13NO
5L3
3L21L1
18 17
Contactor
6T34T22T1
Overload
98 97 96 95
Amp
Adjustment
Dial
YEL
BRN
BRN
YEL
RED
RED
YEL
BRN
BRN
YEL
RED
RED
BRN
Retrofit (Wiring) of Wireless Remote into 220V OAS Import Magnetic Starters: AMI020000
AMI030000
NHD, Inc.
Mag Starters
Red
Remove this
factory installed
red wire!
XVIII. Remote Wiring Diagram
Blue
(ON)
Red
(OFF)
Black
(antenna)
Red:
AC Power
Brown:
N/C contact (OFF)
Yellow:
N/O contact (ON)
Red
Red
Yellow
Yellow
Brown
Brown
Remote Controller Diagram
/