Page is loading ...

WRAPAROUND ROD INSTALLATION INSTRUCTION
Tools needed Parts
Bracket Instruction
• Drill with 3/16” drill bit
• Philips head screw driver
• Level
• Allen Wrench (Included)
5 6 7 8
1 2
2 3 4
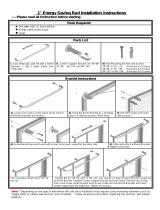
1. Remove the Barrel Brackets by loosening
screws on the rod with included Allen wrench
(as shown).
2. Use the Barrel Bracket as a
guideline and place it in
desired position. Mark holes.
• 2-piece telescopic pipe set with 2
Barrel Brackets. L shaped pipes extend
from center.
• Center Support Bracket
for 48”-84” and 66”-120”.
• Wall Mounting Anchors and
Screws
48” – 84” 6 Anchors & 6 Screws
66”–120” 6 Anchors & 6 Screws
3. Drill 3/16” holes. Insert wall
anchors.*
4. Place Barrel Bracket onto
wall and locate holes for
screws.
5. Screw Barrel Bracket
onto wall.
6. Using a level, repeat for opposite
end.
1. Use the Rod Connector to connect the 2
base rods together. After installing the rod to
the Barrel Brackets, position the Center
Support Bracket and mark holes on the wall.
2. Remove the rod. Repeat step 3 to screw the
Center Bracket base onto the wall. Replace
rod and tighten screws with included Allen
wrench.
66”-120“ Rod will require a Center Support
Bracket and a Rod Connector.
7. Place rod onto the Barrel Brackets and
tighten screws with included Allen
wrench.
8. This completes the installation of a
48”-84” wraparound rod set.
Barrel Bracket
Same Level
1
* It may be necessary to use mounting hardware such as toggle bolts or hollow wall anchors (not included), depending on the type of wall the rod set
is installed. Follow the instructions above using proper fasteners instead of anchors.
/
