Page is loading ...

1
FLUSHMOUNT
CEILING FIXTURE
ITEM #0595696
MODEL# MXL2007-LED2X34K840
Français p. 8
Español p. 15
Serial Number
Purchase Date
Questions, problems, missing parts? Before returning to your retailer, call our customer
service department at 1-800-643-0067, 8 a.m. - 6 p.m., EST, Monday - Thursday,
8 a.m. - 5 p.m., EST, Friday.
EB15252
ATTACH YOUR RECEIPT HERE
Portfolio
®
is a registered trademark of
LF, LLC. All rights reserved.
Lowes.com/portfolio

32
PACKAGE CONTENTS
SAFETY INFORMATION
A
C
D
B
PART DESCRIPTION QUANTITY
A Fixture Plate 1
B Diffuser (preassembled
onto Fixture Plate (A))
1
C Diffuser Latch (preassembled
onto Fixture Plate (A))
2
D End Cap (preassembled
onto Fixture Plate (A))
2
HARDWARE CONTENTS (shown to size)
CC
Wire Nut
Qty. 3
SAFETY INFORMATION
AA
Wood Screw
Qty. 4
Drywall Anchor
Qty. 4
BB
Lowes.com/portfolio
Lowes.com/portfolio
This fixture can be used with most dimmers to create your desired ambience with smooth
dimming to 10% of full light levels.
Please read and understand this entire manual before attempting to assemble, operate or
install the product. Failure to do so could lead to fire, electric shock or other injuries that
could be hazardous or even fatal.
Be sure the electricity to the wires you are working on is shut off. Either remove the fuse
or turn off the circuit breaker.
Changes or modifications not expressly approved by the party responsible for compliance
could void the user’s authority to operate the equipment.
CAUTION:
The fixture body is one piece. Do not disassemble it.
NOTICE
This device complies with Part 15 of the FCC Rules. Operation is subject to the following
two conditions: (1) This device may not cause harmful interference, and (2) this device
must accept any interference received, including interference that may cause undesired
operation.
This equipment has been tested and found to comply with the limits for a Class B digital
device, pursuant to part 15 of the FCC Rules. These limits are designed to provide
reasonable protection against harmful interference in a residential installation. This
equipment generates, uses and can radiate radio frequency energy and, if not installed
and used in accordance with the instructions, may cause harmful interference to radio or
television reception, which can be determined by turning the equipment off and on. The
user is encouraged to try to correct the interference by one or more of the following
measures:
Reorient or relocate the receiving antenna.
Increase the separation between the equipment and the receiver.
Connect the equipment into an outlet on a circuit different from that to which the receiver
is connected.
Consult the dealer or an experienced radio/TV technician for help.
This Class B digital apparatus complies with Canadian ICES-003.
•
•
•
•
•
-
-
-
-
•

4 5
A
C
D
B
CC
CC
INSTALLATION INSTRUCTIONS
INSTALLATION INSTRUCTIONS
2. With another person holding fixture plate (A) up to the
mounting surface so the wires align with the outlet box
(not included), mark the mounting holes of fixture plate
(A) with a pencil (not included). Set fixture plate (A)
aside.
WARNING: Two people are required for this step.
WARNING: Two people are required for this step.
Ensure the power is off before proceeding.
2
1. Open the diffuser latches (C) on fixture plate (A). Pull
and hold open the end caps (D) and remove diffuser
(B) from fixture plate (A). Set diffuser (B) aside until
later.
1
Before beginning assembly of product, make sure all parts are present. Compare parts with
package contents list and hardware contents list. If any part is missing or damaged, do not
attempt to assemble the product.
Estimated Assembly Time: 45 minutes (with two adults).
Tools Required for Assembly (not included): Phillips screwdriver, flathead screwdriver, safety
glasses, hammer, pencil, pliers, step ladder, power drill and 1/8-in. drill bit or 5/32-in. drill bit.
PREPARATION
Wood Screw x 4
AA
3
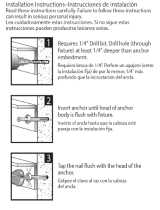
3. DRYWALL MOUNTING: Use a 1/8 in. drill bit (not
included) at the 4 marked locations. Install drywall
anchors (BB) into the holes with a hammer (not
included). Install the wood screws (AA) into drywall
anchors (BB), leaving approximately 3/8 in. gap
between the screw head and the mounting surface.
WALL STUD MOUNTING: Use a 5/32 in. drill bit (not
included) at the 4 marked locations. Install wood
screws (AA) into the mounting surface, leaving
approximately 3/8 in. gap between the screw head
and the mounting surface.
Wall Stud
Pilot hole
BB
Drywall Mounting Wall Stud Mounting
Drywall
Hardware Used
Drywall Anchor x 4
BB
Hardware Used
Wire Nut x 3
Lowes.com/portfolio
Lowes.com/portfolio
outlet box
A
4.
With another person holding fixture plate (A) up near
the outlet box, connect the supply wires to the fixture
wires --
black to black, white to white, and green to
copper/bare.
WARNING: If there is no ground supply wire, stop
installation and consult a qualified electrician.
Once wire connections are made, secure each with a
wire nut (AA) and tuck all wiring into the outlet box.
4
A

C
AA
6
5. Still with the assistance of another person, route the
wire connections snug into outlet box. Then, secure
fixture plate (A) to mounting surface by sliding the
fixture plate (A) so the previously installed wood screws
(AA) move to the narrow end of the keyslot holes.
Tighten wood screws (AA) securely.
5
AA
AA
INSTALLATION INSTRUCTIONS
TROUBLESHOOTING
CARE AND MAINTENANCE
Clean with a mild, non-abrasive glass cleaner and soft cloth. Do NOT use solvents or
cleaners containing abrasive agents. When cleaning the fixture, make sure the power is
turned off, and any liquid spray should be applied to the cleaning cloth and not sprayed
directly onto the fixture itself.
Bulb Information: The total fixture wattage is 68 watts max. Note the LEDs are not
replaceable.
Lowes.com/portfolio
6. Pull and hold open one end cap (D) and slide diffuser
(B) back in place. Pull and hold open the other end cap
(D), inserting the other end of diffuser (B). Ensure
diffuser (B) is secure before proceeding.
6
D
B
A
7. Close the diffuser latches (C) to complete installation.
7
7
The manufacturer warrants this lighting fixture to be free from defects in materials and
workmanship for a period of five (5) years from the date of original purchase by the consumer.
We will repair or replace (at our option) the unit in the original color, and style if available, or in a
similar color and style if the original item has been discontinued, without charge, exclusive of
bulbs. Defective units must be properly packed and returned to the manufacturer with a letter of
explanation and your original purchase receipt showing date of purchase. Call
1-800-643-0067
to
obtain a Return Authorization number and an address where to ship your defective product.
Note: No C.O.D. shipments will be accepted. The liability of the manufacturer is in any case
limited to replacement of the defective light fixture product. The manufacturer will not be liable for
any other loss, damage, or injury which is caused by the product. This limitation upon the liability
of the manufacturer includes any loss, damage, or injury which is (I) to person or property or
otherwise; (II) incidental or consequential in nature; (III) based upon theories of warranty,
contract, negligence, strict liability, tort, or otherwise; or (IV) directly or indirectly related to the
sale, use, or repair of the product. This warranty gives you specific rights, and you may also have
other rights which vary from state to state.
WARRANTY
Lowes.com/portfolio
Printed in China
Portfolio
®
is a registered trademark of
LF, LLC. All rights reserved.
PROBLEM
POSSIBLE CAUSE
CORRECTIVE ACTION
Fixture does not light.
Circuit breaker trips
when light is turned
on.
1. Power is off.
2. Incorrect wire connection.
3. Defective wall switch.
Crossed wires or power wire
is grounded out.
1. Check circuit breaker or wall switch.
2. Check wire splices.
3. Replace switch.
Verify wires are correctly connected.
/