Page is loading ...

1
ITEM #0338648, 0482291
WALL LANTERN
MODEL #40683, 40684
Questions, problems, missing parts? Before returning to your retailer, call our customer
service department at 1-800-643-0067, 8 a.m. - 6 p.m., EST, Monday - Thursday, 8 a.m. - 5 p.m.,
EST, Friday.
Serial Number _________________________ Purchase Date _________________________
ATTACH YOUR RECEIPT HERE
EB13711
Portfolio® is a registered trademark
of LF, LLC. All Rights Reserved.
Français p. 8
Español p. 15
Lowes.com/portfolio

2
Lowes.com/portfolio
PACKAGE CONTENTS
PART DESCRIPTION QUANTITY
A Fixture 1
B Ring 1
C Mounting Bracket 1
Long Mounting
Screw
Qty. 2
Short Mounting
Screw
(preassembled
to Mounting
Bracket (C))
Qty. 2
Wire Connector
Qty. 3
Cap Nut
(preassembled to
Short Mounting
Screw (BB))
Qty. 2
Rubber Washer
(preassembled to
Short Mounting
Screw (BB))
Qty. 2
HARDWARE CONTENTS (shown actual size)
A B
CC DD EE
C
BBAA

Lowes.com/portfolio
3
SAFETY INFORMATION
Please read and understand this entire manual before attempting to assemble, operate or install the
product.
WARNING:
• Failure to disconnect the power supply prior to installation may result in serious injury or death.
• Somemetalpartsinthexturemayhavesharpedges.Topreventcutsandscrapes,wear
gloves when handling parts.
• Account for small parts and destroy packing material, as these may be hazardous to children.
• Useashlightoralternatelightsourcetolightworkareaduringinstallation.
• Assistancemayberequiredtosupportxtureduringinstallation.
• Toreducetheriskofre,electricalshock,orpersonalinjury,wireconnectorsprovidedwiththis
fan are designed to accept only one 12-gauge house wire and two lead wires from the fan. If
your house wire is larger than 12 gauges and there is more than one house wire to connect to
the two fan lead wires, consult an electrician for the proper size wire connectors to use.
CAUTION:
• Be sure the outlet box is properly grounded or that a ground (green or bare) wire is present.
• Carefully check all screws, bolts and nuts to ensure they are secured.
PREPARATION
Before beginning installation of product, make sure all parts are present. Compare parts with
package contents list and hardware contents list. If any part is missing or damaged, do not attempt to
assemble, install or operate the product.
Estimated Assembly Time: 35 minutes
Tools Required for Assembly (not included): Flathead screwdriver, Phillips screwdriver, Pliers, Wire
cutters, Electrical tape and Safety goggles.
Helpful Tools (not included): Wire strippers, Wire cutters, Safety glasses and Step ladder.

Lowes.com/portfolio
4
BB
DD
EE
C
AA
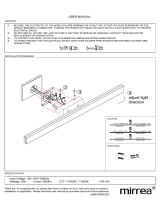
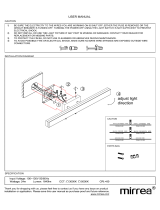
ASSEMBLY INSTRUCTIONS
1. Shut off power at the circuit breaker or fuse panel
beforeremovingtheoldxture.
DANGER: Failure to disconnect the power
supply prior to installation may result in serious injury
or death.
2. Ifnecessary,removetheoldxture.Tobetterassist
you later in the wiring process, consider making a
sketchofhowthextureiswiredbeforeyouremoveit.
3. Attach the mounting bracket (C) to the outlet box
(not included) using the long mounting screws
(AA). Then, remove the cap nuts (DD) and rubber
washers (EE) from the short mounting screws (BB).
Note: Short mounting screws (BB) should protrude
out from the outlet box and the horizontal bar with
short mounting screws (BB) should be parallel to the
horizon to ensure proper mounting.
Hardware Used
AA
Long Mounting
Screw
x 2
Short Mounting
Screw
x 2
Cap Nut x 2
Rubber Washer x 2
1
ON
OFF
ON
OFF
3
2
BB
DD
EE

Lowes.com/portfolio
5
ASSEMBLY INSTRUCTIONS
4. If necessary, strip 1/2 in. of insulation from the end
of each supply wire. Twist the stripped ends of each
strand of wire with pliers (not included).
5.Connectsupplyandxture(A)wiresaccordingtothe
diagram and these steps:
•ConnecttheBarewirefromthexture(A)tothe
Bare/Green (ground) supply wire.
•ConnecttheBlackwirefromthexture(A)tothe
Black (hot) supply wire.
•ConnecttheWhitewirefromthexture(A)tothe
White (common) supply wire.
•Secureallwiringconnectionstogetherwithwire
connectors (CC).
•LooptheBarewirefromthexture(A)aroundthe
ground screw on the mounting bracket (C). Tighten
screw to hold bare wire in place.
Note: If house wires are different colors than referred
to above, stop immediately. It is recommended a
professional electrician determines the proper wiring.
Hardware Used
CC
Wire Connector x 3
6. Tape the wire connectors (CC) to the wire using
electrical tape (not included). Turn the spliced/taped
wires upward and gently push the wires and wire
connectors (CC) into the outlet box.
WARNING: Ensure no bare wire or wire strands
are visible after making connections. Place the Black
and White wire connections on opposite sides of the
outlet box.
Hardware Used
CC
Wire Connector x 3
CC
CC
CC
Fixture
Black
White
Bare/Green
Black
White
Bare
6
4
5

Lowes.com/portfolio
6
ASSEMBLY INSTRUCTIONS
7. Turn the ring (B) clockwise on the threaded rod
preassembledonthexture(A).
8.Mountthexture(A)ontotheshortmountingscrews
(BB) and secure with rubber washers (EE) and cap
nuts (DD).
Hardware Used
BB
Short Mounting
Screw
x 2
Cap Nut x 2
Rubber Washer x 2
9. Install light bulb (not included). Use a 60-watt max.
medium-base E26 incandescent bulb or a 13-watt
max. medium-base E26 CFL.
B
B
B
A
7
8
9
DD
DD
A
EE
BB
EE

Lowes.com/portfolio
7
CARE AND MAINTENANCE
Important: Shut off the main power supply before you begin any maintenance tasks.
Periodicallycleanthextureusingamild,non-abrasiveglasscleanerandsoftcloth.DoNOTuse
solvents or cleaners containing abrasive agents and do not spray liquid cleaner directly onto the bulb
or wiring.
TROUBLESHOOTING
PROBLEM POSSIBLE CAUSE CORRECTIVE ACTION
Thexturedoesn’t
light.
1. Bulb is faulty or burned out.
2. The power is off or the fuse is
blown.
3. There is a faulty wire
connection.
4. The switch is bad.
1. Replace with new bulb.
2. Turn the power on or check the
fuse.
3. Turn the power off and check all
wire connections.
4. Test or replace the switch.
The fuse blows or
circuit breaker trips
when light is turned on.
There are wires crossed or the
power wire is grounded out.
Turn the power off and check all
wiring connections.
Fixturedoesnott
ushagainstthe
mounting surface.
Outlet box may not be mounted
ushwiththewall.
Removextureandmounting
bracket. Turn each short mounting
screw to adjust the length of the
screw protruding from the mounting
bracket.
Printed in China
Portfolio® is a registered trademark of LF, LLC. All Rights Reserved.
9045 · 08/23/13
LIMITED WARRANTY
Themanufacturerwarrantsallofitslightingxturesagainstdefectsinmaterialsandworkmanshipfor
three (3) years from the date of purchase. If within this period the product is found to be defective,
take a copy of the bill of sale as a proof of purchase and the product in its original carton to the place
of purchase. The manufacturer will, at its option, repair, replace or refund the purchase price to the
consumer.Allcostsofinstallationandremovalofthextureistheresponsibilityoftheconsumer.This
warrantydoesnotcoverxturesbecomingdefectiveduetomisuse,accidentaldamageorimproper
handlingand/orinstallationandspecicallyexcludesliabilityfordirect,incidentalorconsequential
damages. As some states do not allow exclusions of limitations on an implied warranty, the above
exclusionandlimitationmaynotapply.Thiswarrantygivesyouspecicrightsandyoumayalsohave
other rights which may vary from state to state.
/