Page is loading ...

Model 5718
DualBrite
®
Motion
Sensor Light Control
© 2012 HeathCo LLC 204067-01A
TEST
2 Shells
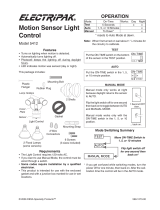
Features
• Turnsonlightingwhenmotionisdetected.
• Automaticallyturnslightingoff.
•
Threelampmodesavailable:Security,BulbSaver,
orAlertFlash.
• DualBrite
®
Timer.
• Photocellkeepsthelightingoffduringdaylighthours.
• LEDindicatesmotionwassensed(dayornight).
• NoteforCFLbulbusers:DimmableCFLbulbsre-
quired.
TEST 1 5 20
ON-TIME
Off 3 6 Duskto
Dawn
DualBrite
®
Put ON-TIME switch
on the sensor bottom
toTESTandtheDual-
Brite
®
switchOFF.
OPERATION
*resetstoAutoModeatdawn.
ON-TIME
TEST 1 5 20
AUTO
Note:Whenrstturnedonwaitabout1
1
/
2
minutesfor
thecircuitrytocalibrate.
Thispackageincludes:
LightControl
Sensor
Cover
Plate
Lamp
Holders
PlasticHanger
RubberPlug
Gasket
6Screws
(3sizesincluded)
MountingStrap
MountingBolt
2Wire
Connectors
Requirements
• Thelightcontrolrequires120-voltsAC.
• IfyouwanttouseManualMode,thecontrolmustbe
wiredthroughaswitch.
• Some codes require installation by a qualified
electrician.
• Thisproductisintendedforusewiththeenclosed
gasketandwithajunctionboxmarkedforuseinwet
locations.
Mode: On-Time: Works: Day Night
Test
5Seconds x x
Normal
1,5,20minutes x
Manual
UntilDawn* x
Accent
3,6Hr.toDawn
x
LAMPMODE
NORMALSOFTFLASH
LAMP MODE
Put the LAMP MODE
switch in the Security
(“Normal”), BulbSaver
(“Soft”), or AlertFlash
(“Flash”)position.
PuttheON-TIMEswitchinthe
1,5,or20minuteposition.

2
204067-01
ON-TIME
RANGE
DUAL BRITE™
MIN MAX
TEST 1 5 20
MINUTES
OFF 3 6 DUSK TO
HOUR DAWN
LAMP MODE
NORMAL SOFT FLASH
INSTALLATION
Foreasyinstallation,selectanexistinglightwithawall
switchforreplacement.
Forbestperformance,mountthextureabout8ft.(2.4m)
abovetheground.
NOTE:
Ifxtureismountedhigherthan
8ft.(2.4m),aimingthesensordownwillreducecoverage
distance.
Foreavemountonly:
❒Swingthesensorheadtowardstheclampscrew
joint.
If thesensorpops out of the ball joint, loosen the
clampscrewandpushthesensorbackintotheball
joint.Tightentheclampscrewwhendone.
❒Thenrotatethesensorheadclockwise180°sothe
controlsfacedown.
Wall Mount Eave Mount
For under eave installation, the sensor head must
be rotatedasshowninthenexttwostepsforproper
operationandtoavoidtheriskofelectricalshock.
Controls
Controls
Controls
ClampScrew
MANUAL MODE
...backon.
1SecondOFF
then...
Move ON-TIME Switch to
1, 5, or 20 minutes
Mode Switching Summary
Flip light switch off
for one second then
back on*
MANUAL MODE
AUTO
TEST
* Ifyougetconfusedwhileswitchingmodes,turnthe
poweroffforoneminute,thenbackon.Afterthecali-
brationtimethecontrolwillbeintheAUTOmode.
Manual mode only works at night
becausedaylightreturnsthesensor
toAUTO.
Flipthelightswitchoffforonesecond
thenbackontotogglebetweenAUTO
andMANUALMODE.
Manual mode works only with the
ON-TIME switch in the 1, 5, or 20
position.
DualBrite
®
Timer
Lightcomesonhalfbrightforselectedtimeafterdusk
(Off,3hr.,6hr.,untildawn).SelectingOFFdisables
thisfeature.Themotionsensingfeatureswillcontinue
toworkasdescribedinthismanual.Ifmotionissensed,
thelightturnsonfullbrightfortheON-TIME(1,5,or
20minutes)thenreturnstodimmode.
Lamp Modes
Therearethreelampmodes(lightturn-oneffects)avail-
ablewhenmotionisdetected:
• SECURITY (“NORMAL”) - Light instantly comes
on.
• BULBSAVER (“SOFT”) -Lightstartsdimandgrad-
ually increases to full brightness. Light gradually
dimstohalf-bright,pauses,andthencontinuesdim-
mingtooffwhenmotionisnolongerdetectedand
afterselectedON-TIME.
• ALERTFLASH (“FLASH”) -Light ashesonthen
offtwicebeforeturningonfullbrightness.

3
204067-01
Wire the Light Control
White to White
Black to Black
Junction box ground wire to
green ground wire on fixture.
Gasket
MountingStrap
Mounting
Bolt
Rubber
Plug
Mount the Light Control
1. Alignthelightcontrolcoverplateandcoverplate
gasket.Securewiththemountingbolt.
2. Alignthethreeslotsinthedecorativeshellwiththe
lampholderpins.Pushtheshellinandthentwist
clockwisetolock.Repeatforothershell.
LockNut
Toavoidwaterdamageandelectricalshock,
keeplampholders30°belowhorizontal.
5. Adjustthelampholdersbylooseningthelocknuts
butdonotrotatethelampholdersmorethan180°
fromthefactorysetting.Whenscrewingintheood
lamps,donotovertighten.
Keeplampsatleast
1"(25mm)fromthe
sensor.Donotallow
the lamps to block
thelens.
Lens
3. Pushtherubberplugrmlyintoplace.
4. Ifawetlocationjunctionboxwasnotused,caulk
thewallplatemountingsurfacewithsiliconeweather
sealant.
Shell Slot
1. Removetheexistinglightxture.
2. Installthemountingstrapasshownusingtwoscrews
thattyourjunctionbox.
3. Theplastichangercanbeusedtoholdthexture
whilewiring.Thesmallendoftheplastichanger
canbethreadedthroughtheholeinthecenterof
thecoverplate.Thesmallendthengoesintoone
oftheslotsonthemountingstrap.
4. Route the light control’s wires through the large
gasketholes.
5. Twistthejunctionboxwiresandxturewirestogether
asshown.Securewithwireconnectors.
WARNING: Turn power off at circuit breaker or
fuse. Place tape over circuit breaker switch and
verify power is off at the fixture.

4
204067-01
Motion
Motion
NOTE:
Ifxtureismountedhigherthan8ft.(2.4m),aiming
thesensordownwillreducecoveragedistance.
Thedetectorislesssensitivetomotiondirectlytowardsit.
3. Loosentheclampscrewinthe
sensor ball joint and gently
rotatethesensor.
4. Walk through the coverage
area noting where you are
whenthelightsturnon(also,
theLEDwillashseveraltimes
whenmotionisdetected).Move
thesensorheadup,down,or
sidewaystochangethecover-
agearea.Keep the sensor at
least 1" (25 mm) away from
the lamps.
5. AdjusttheRANGEasneeded.
RANGE set too high may
increasefalsetriggering.
6. Secure the sensor head by
tightening the clamp screw.
Donotovertightenthescrew.
7. SettheamountofTIMEyouwantthelightstostay
onaftermotionisdetected(1,5,or20minutes).
8. SettheDualBrite
®
switchtotheamountoftime
afterduskyouwantthelightsonatlowlevel(Off,
3,6Hrs.,Dusk-to-Dawn).
9. Set the LAMP MODE switch to the desired light
turn-oneffect(Security,BulbSaver,AlertFlash).
Bottom of Sensor
Avoid aiming the control at:
•Objects that change temperature rapidly, such as
heating vents and air conditioners.These heat
sourcescouldcausefalsetriggering.
•Areaswherepets or unwanted trafficmaytrigger
thecontrol.
•Nearby large, light-colored objectsreectinglight
maytriggertheshut-offfeature.Donotpointother
lightsatthesensor.
70ft.
(21m)
8ft.
(2.4m)
270°
Clamp
Screw
Ball
Joint
Aim Sensor
Down for Short
Coverage
Aim Sensor
Higher for Long
Coverage
Least Sensitive Most Sensitive
Sensor
WARNING - Risk of fire. Do not aim the lamps
at a combustible surface within 3 ft. (1 m).
Maximum Range Maximum
Coverage Angle
100ft.
(30.5m)
Boosted
LAMP MODE
NORMAL SOFT FLASH
ON-TIME DUAL BRITE™
TEST 1 5 20
MINUTES
OFF 3 6 DUSK TO
HOUR DAWN
MAXMIN
RANGE
TEST AND ADJUSTMENT
1. Turn on the circuit breaker and light switch.
NOTE: Sensor hasa 1
1
/
2
minute warm up period
beforeitwilldetectmotion.Whenrstturned
on,wait1
1
/
2
minutes.
2. Turn the RANGE control to the medium position
(halfway between MIN and MAX), DualBrite
®
to
OFF,andtheON-TIMEcontroltotheTESTposition.

5
204067-01
SPECIFICATIONS
Range............Up to 70 ft. (21 m); 100 ft.
(30.5m)withRangeBoost.[varies
withsurroundingtemperature]
SensingAngle......Upto270°
ElectricalLoad......Up to 300 Watt Maximum In-
candescent [Up to 150 Watt
maximumeachlampholder]
OR
Up to60Watt MaximumPAR
38 dimmable self-ballasted
CFL (SBCFL) [Up to 30 Watt
maximumeachlampholder].
TROUBLESHOOTING GUIDE
SYMPTOM POSSIBLE CAUSE
Lights will not come on.
1. Lightswitchisturnedoff.
2. Floodlightislooseorburnedout.
3. Fuseisblownorcircuitbreakeristurnedoff.
4. Daylightturn-offisineffect(recheck after dark).
5. Incorrectcircuitwiring,ifthisisanewinstallation.
6. Re-aimthesensortocoverdesiredarea.
Lights come on in daylight.
1. Lightcontrolmaybeinstalledinarelativelydarklocation.
2. LightcontrolisinTest.(Set control switch to an ON-TIME position).
Lights come on for no ap-
parent reason.
1. Lightcontrolmaybesensingsmallanimalsorautomobiletrafc(re-aim sensor).
2. Rangeissettoohigh.(Reduce Range).
3. DualBrite
®
Timerison.
Lights turn off too late in
Dusk-to-Dawn setting
1. Sensorisinarelativelydarklocation.(Relocate sensor, or use 3 hr or 6 hr setting.)
Lights stay on
continuously.
1. Aoodlampispositionedtooclosetothesensororpointedatnearbyobjectsthat
causeheattotriggerthesensor.(Reposition the lamp away from the sensor or nearby
objects).
2. Lightcontrolispointedtowardaheatsourcelikeanairvent,dryervent,orbrightly-painted
heat-reectivesurface.(Reposition sensor. Reduce Range).
3. LightcontrolisinManualMode.(Switch to Auto.)
Lights flash on and off.
1. HeatorlightfromthelampsmaybeturningtheLightcontrolonandoff.(Reposition
the lamps away from the sensor).
2. Heatbeingreectedfromotherobjectsmaybeaffectingthesensor.(Reposition sen-
sor).
3. LightcontrolisintheTestmodeandwarmingup.(Flashing is normal under these
conditions. Turn Boost off.)
4. Lightmaybeleakingthroughtheoodlampreectors.(Replace the lamps with new high
quality PAR 38 lamps or make sure the metal lamp protectors are installed).
5. LightcontrolisinAlertFlashmode.(Flashing is normal in this mode. Select Security
or BulbSaver mode to turn flash mode off).
6. CFLbulbmaynot be dimmabletypebulb.(Use only dimmable self-ballasted CFL
(SBCFL) bulbs.)
Lights flash once, then stay
off in Manual Mode.
1. Sensorisdetectingitsownlights.(Reposition lamps to keep area below the sensor
relatively dark.)
PowerRequirements. 120VAC,60Hz
OperatingModes....TEST, AUTO and MANUAL
MODE
LampModes.......Security, BulbSaver, Alert-
Flash
TimeDelay ........1,5,20minutes
DualBrite
®
Timer....3,6hours,Dusk-to-Dawn
HeathCoLLCreservestherighttodiscontinueprod-
uctsandtochangespecicationsatanytimewithout
incurringanyobligationtoincorporatenewfeatures
inproductspreviouslysold.

6
204067-01
TWO YEAR LIMITED WARRANTY
Thisisa“LimitedWarranty”whichgivesyouspeciclegalrights.Youmayalsohaveotherrightswhichvaryfrom
statetostateorprovincetoprovince.
Foraperiodoftwoyearsfromthedateofpurchase,anymalfunctioncausedbyfactorydefectivepartsor
workmanshipwillbecorrectedatnochargetoyou.
Not Covered -Repairservice,adjustmentandcalibrationduetomisuse,abuseornegligence,lightbulbs,
batteries,andotherexpendableitemsarenotcoveredbythiswarranty.Unauthorizedserviceormodica-
tionoftheproductorofanyfurnishedcomponentwillvoidthiswarrantyinitsentirety.Thiswarrantydoes
notincludereimbursementforinconvenience,installation,setuptime,lossofuse,unauthorizedservice,or
returnshippingcharges.
ThiswarrantycoversonlyHeathCoLLCassembledproductsandisnotextendedtootherequipmentand
componentsthatacustomerusesinconjunctionwithourproducts.
THIS WARRANTY IS EXPRESSLY IN LIEU OF ALL OTHER WARRANTIES, EXPRESS OR IMPLIED,
INCLUDINGANYWARRANTY,REPRESENTATIONORCONDITIONOFMERCHANTABILITYORTHAT
THEPRODUCTSAREFITFORANYPARTICULARPURPOSEORUSE,ANDSPECIFICALLYINLIEUOF
ALLSPECIAL,INDIRECT,INCIDENTAL,ORCONSEQUENTIALDAMAGES.
REPAIRORREPLACEMENTSHALLBETHESOLEREMEDYOFTHECUSTOMERANDTHERESHALL
BENOLIABILITYONTHEPARTOFHEATHCOLLCFORANYSPECIAL,INDIRECT,INCIDENTAL,OR
CONSEQUENTIALDAMAGES,INCLUDINGBUTNOTLIMITEDTOANYLOSSOFBUSINESSORPROF-
ITS,WHETHERORNOTFORESEEABLE.Somestatesorprovincesdonotallowtheexclusionorlimitation
ofincidentalorconsequentialdamages,sotheabovelimitationorexclusionmaynotapplytoyou.
Please keep your dated sales receipt, it is required for all warranty requests.
TECHNICAL SERVICE
Please call 1-800-858-8501 (English speaking only) for assistance before returning
product to store.
Ifyouexperienceaproblem,followthisguide.YoumayalsowanttovisitourWebsiteat:www.hzsupport.com.
Iftheproblempersists,call*forassistanceat1-800-858-8501(Englishspeakingonly),8:00AMto5:00PMCST
(M-F).Youmayalsowrite*to:
HeathCo LLC
P.O.Box90045
BowlingGreen,KY42102-9045
ATTN:TechnicalService
*IfcontactingTechnicalService,pleasehavethefollowinginformationavailable:ModelNumber,DateofPur-
chase,andPlaceofPurchase.
No Service Parts Available for this Product
Please keep your dated sales receipt, it is required for all warranty requests.

19
204067-01
Notes / Notas ______
__________________
__________________
__________________
__________________
__________________
__________________
__________________
__________________
__________________
__________________
__________________

20
204067-01
Staple Purchase Receipt Here
Engrape aquí el recibo de compra
Agrafez le reçu d’achat ici
PLEASE KEEP YOUR DATED SALES RECEIPT,
IT IS REQUIRED FOR ALL WARRANTY REQUESTS.
POR FAVOR GUARDE SU RECIBO DE VENTA FECHADO; SE LO
REQUIERE PARA CUALQUIER SOLICITUD DE GARANTÍA.
VEUILLEZ CONSERVER LE REÇU PORTANT LA DATE D'ACHAT;
VOUS EN AUREZ BESOIN POUR TOUTES VOS DEMANDES
LIÉES À LA GARANTIE.
Purchase Information
Información de la compra
Renseignements d’achat
Model #: _________________ Date of Purchase: _____________
Nº de modelo / N° de modèle Fecha de compra / Date d’achat
/