Linksys X1000 Owner's manual

Category
Routers
Type
Owner's manual
3

Linksys X1000
3







DVD/CD-RW Drive (E:) Linksys
Router Setup
AutoPlay
Always do this for software and games:
Install or run program
General options
Set up your Linksys Router
Published by Cisco Consumer Products LLC
Set AutoPlay defaults in Control Panel
Open folder to view files
using Windows Explorer
Speed up my system
using Windows ReadyBoost




  Windows
.)( Setup

. 

Mac
.)( Setup









 . DSL
 X1000 :)
( Modem-router

DSL

.

 DSL :)
( Router only
.























3
Инсталиране
Linksys X1000
3
Автоматично настройване на модем-
рутера
1.
Поставете компактдиска в CD или DVD устройството.
2.
Щракнете върху Set up your Linksys Router (Настройване на рутера
Linksys).
DVD/CD-RW Drive (E:) Linksys
Router Setup
AutoPlay
Always do this for software and games:
Install or run program
General options
Set up your Linksys Router
Published by Cisco Consumer Products LLC
Set AutoPlay defaults in Control Panel
Open folder to view files
using Windows Explorer
Speed up my system
using Windows ReadyBoost
Ако не виждате това:
За Windows щракнете върху Start тарт), Computer (Компютър),
след това щракнете двукратно върху иконата на CD устройството
и иконата Setup (Настройка).
За Mac щракнете двукратно върху иконата CD на десктопа и след
това щракнете двукратно върху иконата Setup (Настройка).
3.
Прочетете лицензионните условия, поставете отметка в квадратчето
и след това щракнете върху Next (Напред).
4.
В екрана How will you be using your X1000 (Как ще използвате вашето
устройство X1000) щракнете върху Modem-router (Модем-рутер)
или Router only (Само рутер) и след това щракнете върху Next
(Напред).
Modem-router (Модем-рутер): Използвайте устройството
X1000 като DSL модем и рутер. Ако разполагате с DSL връзка от
доставчик на Интернет услуги, тази опция осигурява Интернет
достъп и свързване с мрежата за домашните ви компютри, без да
е необходим отделен модем и рутер.
Router only (Само рутер): Ако имате отделен кабел или DSL модем
за Интернет достъп, тази опция осигурява свързване с мрежата за
домашните ви компютри.
Отваря се екранът We are now setting up your Linksys X1000 (В момента
се настройва вашият Linksys X21000). След това от вас ще се поиска
да свържете кабелите на вашия рутер.
Инсталиране
3
Instalace
Linksys X1000
3
Automatická instalace modemu a
směrovače
1.
Vložte disk CD do jednotky CD nebo DVD.
2.
Klepněte na možnost Set up your Linksys Router (Nainstalovat
směrovač Linksys).
DVD/CD-RW Drive (E:) Linksys
Router Setup
AutoPlay
Always do this for software and games:
Install or run program
General options
Set up your Linksys Router
Published by Cisco Consumer Products LLC
Set AutoPlay defaults in Control Panel
Open folder to view files
using Windows Explorer
Speed up my system
using Windows ReadyBoost
Pokud se tato obrazovka nezobrazí:
Vsystému Windows klepněte na tlačítko Start, Počítač a poklepejte
na mechaniku CD a na ikonu Setup (Nastavení).
Vsystému Mac poklepejte na ikonu CD na ploše a poklepejte na ikonu
Setup (Nastavení).
3.
těte si licenční ujednání, zaškrtněte políčko a klepněte na možnost
Next (Další).
4.
Na obrazovce How will you be using your X1000 (Způsob použití zařízení
X1000) klepněte na možnost Modem-router (Modem a směrovač) nebo
Router only (Pouze směrovač) a pak klepněte na tlačítko Next (Další).
Modem-router (Modem a směrovač): Zařízení X1000 můžete využívat
zárov jako modem DSL a směrovač. Pokud váš poskytovatel
internetových služeb zajišťuje připojení DSL, můžete stouto možností
přistupovat k internetu a zároveň mít propojené všechny počítače
vdomácnosti, aniž byste potřebovali oddělený modem a směrovač.
Router only (Pouze směrovač): Pokud využíváte pro připojení
kinternetu zvláštní modem kabelového připojení nebo modem DSL,
můžete stouto možností zajistit připojení ksíti pro všechny počítače
vdomácnosti.
Zobrazí se obrazovka We are now setting up your Linksys X1000 (Probíhá
instalace zařízení Linksys X1000). Pak budete požádáni o připojení kabelu
směrovače.
Instalace
3
Installation
Linksys X1000
3
Automatisk opsætning af din
modemrouter
1.
Læg cd'en i cd- eller dvd-drevet.
2.
Click Set up your Linksys Router (Konfigurer din Linksys-router).
DVD/CD-RW Drive (E:) Linksys
Router Setup
AutoPlay
Always do this for software and games:
Install or run program
General options
Set up your Linksys Router
Published by Cisco Consumer Products LLC
Set AutoPlay defaults in Control Panel
Open folder to view files
using Windows Explorer
Speed up my system
using Windows ReadyBoost
Hvis du ikke får vist dette:
Windows: Klik Start, Computer, og dobbeltklik cd-drevet og
Opsætning-ikonet.
Mac: Dobbeltklik cd-ikonet på skrivebordet, og dobbeltklik på
Opsætning-ikonet.
3.
Læs licensvilkårene, marker afkrydsningsfeltet, og klik derefter Next
(Næste).
4.
skærmen How will you be using your X1000 (Hvordan vil du bruge
din X1000) skal du klikke på Modem-router (Modemrouter) eller Router
only (Kun router) og klikke på Next (Næste).
Modem-router (Modemrouter): Brug X1000 som både DSL-modem og
router. Hvis du har en DSL-internetudbyder, giver denne valgmulighed
internetadgang og netværksforbindelse for computerne i hjemmet,
uden at du behøver separat modem og router.
Router only (Kun router): Hvis du har et separat kabel- eller
DSL-modem til internetadgang, giver denne valgmulighed
netværksforbindelse for computerne i hjemmet.
Skærmen We are now setting up your Linksys X1000 (Nu konfigurerer vi
din Linksys X1000) åbnes. Du bliver derefter bedt om at tilslutte kablerne
til routeren.
Installation
3
Εγκατάσταση
Linksys X1000
3
Αυτόματη εγκατάσταση του
δρομολογητή μόντεμ
1.
Εισαγάγετε το CD στη μονάδα CD ή DVD.
2.
Πατήστε Set up your Linksys Router (Εγκατάσταση του δρομολογητή
Linksys).
DVD/CD-RW Drive (E:) Linksys
Router Setup
AutoPlay
Always do this for software and games:
Install or run program
General options
Set up your Linksys Router
Published by Cisco Consumer Products LLC
Set AutoPlay defaults in Control Panel
Open folder to view files
using Windows Explorer
Speed up my system
using Windows ReadyBoost
DVD/CD-RW Drive (E:) Linksys
Router Setup
AutoPlay
Always do this for software and games:
Install or run program
General options
Set up your Linksys Router
Published by Cisco Consumer Products LLC
Set AutoPlay defaults in Control Panel
Open folder to view files
using Windows Explorer
Speed up my system
using Windows ReadyBoost
Αν δεν βλέπετε αυτήν την επιλογή:
Στα Windows, πατήστε Start (Έναρξη), Computer (Υπολογιστής)
και κάντε διπλό κλικ στη μονάδα CD και στο εικονίδιο Setup
(Εγκατάσταση).
Σε Mac, κάντε διπλό κλικ στο εικονίδιο CD στην επιφάνεια εργασίας
και, στη συνέχεια, κάντε διπλό κλικ στο εικονίδιο Setup (Εγκατάσταση).
3.
Διαβάστε τους όρους της άδειας χρήσης, επιλέξτε το πλαίσιο ελέγχου και
κάντε κλικ στο κουμπί Next (Επόμενο).
4.
Στην οθόνη How will you be using your X1000 (Χρήση του X1000), κάντε
κλικ στην επιλογή Modem-router (Δρομολογητής μόντεμ) ή Router
only (Μόνο δρομολογητής) και στη συνέχεια πατήστε Next (Επόμενο).
Modem-router (Δρομολογητής μόντεμ): Χρησιμοποιήστε το X1000
τόσο ως μόντεμ DSL όσο και ως δρομολογητή. Εάν έχετε πάροχο
υπηρεσιών DSL Internet, η επιλογή αυτή παρέχει πρόσβαση στο
Internet και συνδεσιμότητα δικτύου στους οικιακούς υπολογιστές
σας, χωρίς την ανάγκη ξεχωριστού μόντεμ και δρομολογητή.
Router only (Μόνο δρομολογητής): Εάν έχετε ξεχωριστό καλωδιακό
ή DSL μόντεμ για πρόσβαση στο Internet, η επιλογή αυτή παρέχει
συνδεσιμότητα δικτύου στους οικιακούς υπολογιστές σας.
Ανοίγει η οθόνη We are now setting up your Linksys X1000 ίνεται
εγκατάσταση του Linksys X1000). Θα σας ζητηθεί να συνδέσετε τα
καλώδια του δρομολογητή.
5.
Αν στο Βήμα 4 επιλέξατε Router only (Μόνο δρομολογητής):
a.
Συνδέστε το καλώδιο τροφοδοσίας και ενεργοποιήστε το κουμπί
λειτουργίας.
Εγκατάσταση
User Guide
Linksys X1000 N300 Wireless Router with ADSL2+ Modem
i
Contents
Linksys X1000
i
Product Overview
X1000. . . . . . . . . . . . . . . . . . . . . . . . . . . . . . . . . . . . . .1
Top 1
Back 1
Wall-mounting placement 2
Installation
Set up your modem-router automatically . . . . . . . . . . . . . . .3
Set up your modem-router manually . . . . . . . . . . . . . . . . . .4
Connect your modem-router 4
Set up your modem-router as only a router 5
How to use Cisco Connect
How to access Cisco Connect . . . . . . . . . . . . . . . . . . . . . . .6
Main Menu . . . . . . . . . . . . . . . . . . . . . . . . . . . . . . . . . .6
Main Menu – Computers and Devices 7
Main Menu – Parental Controls 7
Main Menu – Guest Access 7
Main Menu – Router Settings 7
Advanced Conguration
How to access the browser-based utility. . . . . . . . . . . . . . . .8
How to use the browser-based utility. . . . . . . . . . . . . . . . . .9
Setup > Basic Setup . . . . . . . . . . . . . . . . . . . . . . . . . . . . .9
ADSL mode 9
Ethernet mode 10
Manual setup 12
Wi-Fi Protected Setup 13
Wireless > Wireless Security . . . . . . . . . . . . . . . . . . . . . . .14
Personal Options 14
Oce Options 14
Wireless Security 14
Wireless > Guest Access . . . . . . . . . . . . . . . . . . . . . . . . . 17
Guest Access 18
Guest Instructions 18
Troubleshooting
X1000. . . . . . . . . . . . . . . . . . . . . . . . . . . . . . . . . . . . . 19
Specications
X1000. . . . . . . . . . . . . . . . . . . . . . . . . . . . . . . . . . . . . 21
Contents
1
Product Overview
Linksys X1000
1
X1000
Top
Ethernet—If the LED is continuously lit, the modem router is
successfully connected to a device through that port.
Wi-Fi Protected Setup™The LED is continuously lit when a Wi-Fi
Protected Setup™ connection is successfully established. The LED
blinks slowly while Wi-Fi Protected Setup™ is setting up a connection,
and blinks rapidly if an error occurs. The LED is off when Wi-Fi Protected
Setup™ is idle.
Wireless—Lights up when the wireless feature is enabled. It flashes
when the modem router is actively sending or receiving data over the
network.
WAN—Lights up green when the modem router is connected directly
to an ADSL line. Lights up blue when the modem router is set up as
a router only and is connected to the internet through a separate
modem.
InternetLights up green when the modem router has an Internet
connection. Flashes green while the modem router is establishing the
Internet connection. Lights up red when the modem router cannot
obtain an IP address.
Power—Lights up green when the modem router is powered on.
When the modem router goes through its self-diagnostic mode during
every boot-up, the LED flashes. When the diagnostic is complete, the
LED is continuously lit. Lights up red when an error occurs.
Back
DSL portConnects to the ADSL line.
Cable portTo use the modem router as only a router, use
a network cable to connect this port to a separate modems
LAN/Ethernet port.
Ethernet port—Using Ethernet cables (also called network
cables), these Ethernet ports connect the modem router
to computers and other Ethernet network devices on your
wired network.
Wi-Fi Protected Setup™ button—Press this button to
have Wi-Fi Protected Setup search for your Wi-Fi Protected
Setup™-supported wireless device.
Reset buttonThis button allows you to reset the router
to its factory defaults. Press and hold the Reset button for
about five seconds.
Power portThe Power port connects to the included
power adapter.
Power button—Press | (on) to turn on the modem router.
Product Overview
2
Product Overview
Linksys X1000
Wall-mounting placement
The router has two wall-mount slots on its bottom panel. The distance between
the slots is 75.6 mm. Two screws are needed to mount the router.
Suggested Mounting Hardware
3-5 mm
7-8 mm 1.5-2 mm
NOTE
Cisco is not responsible for damages incurred by unsecured wall-
mounting hardware.
Follow these instructions:
1. Determine where you want to mount the router. Make sure that the wall
you use is smooth, flat, dry, and sturdy. Also make sure the location is
within reach of an electrical outlet.
2. Drill two holes into the wall. Make sure the holes are 75.6 mm apart.
3. Insert a screw into each hole and leave 3 mm of its head exposed.
4. Position the router so the wall-mount slots line up with the two screws.
5. Place the wall-mount slots over the screws and slide the router down
until the screws fit snugly into the wall-mount slots.
Wall-mounting template
Print this page at 100% size.
Cut along the dotted line, and place on the wall to drill precise spacing.
75,6 mm
3
Installation
Linksys X1000
3
Set up your modem-router automatically
1.
Insert the CD into your CD or DVD drive.
2.
Click Set up your Linksys Router.
DVD/CD-RW Drive (E:) Linksys
Router Setup
AutoPlay
Always do this for software and games:
Install or run program
General options
Set up your Linksys Router
Published by Cisco Consumer Products LLC
Set AutoPlay defaults in Control Panel
Open folder to view files
using Windows Explorer
Speed up my system
using Windows ReadyBoost
If you do not see this:
For Windows, click Start, Computer, then double-click the CD drive
and the Setup icon.
For Mac, double-click the CD icon on your desktop, then double-click
the Setup icon.
3.
Read the license terms, select the checkbox, then click Next.
4.
At the How will you be using your X1000 screen, click Modem router or
Router only, then click Next.
Modem router: Use the X1000 as both a DSL modem and a router. If
you have a DSL Internet service provider, this option provides Internet
access and networking connectivity to your homes computers,
without the need for a separate modem and router.
Router only: If you have a separate cable or DSL modem for Internet
access, this option provides networking connectivity to your homes
computers.
The We are now setting up your Linksys X1000 screen opens. You are then
asked to connect your routers cables.
5.
If you chose Router only in Step 4:
a.
Connect the power cable, then turn on the power switch.
b.
Connect the blue cable to the Cable port on the back of your router
and to the modem.
c.
Follow the on-screen instructions to finish the setup.
6.
Or, if you chose Modem router in Step 4:
a.
Connect the power cable. If your router has a power button, turn it
on.
Installation
4
Installation
Linksys X1000
b.
Connect the gray cable to the modem-router’s DSL port and to a
telephone jack on your wall, then click Next.
You are asked to enter your ISP information.
c.
Select your region, click Next, then select your ISP. If prompted, enter
your DSL account name and password.
Or, to skip the automatic detection of your region and manually
configure your Internet connection, select My region is not in this
list, then click Next. Use information available from your ISP to
complete the remaining screens for DSL settings, Internet type, and
account information.
d.
Follow the on-screen instructions to finish the setup.
Set up your modem-router manually
NOTE
Run the Setup CD-ROM to install the modem-router. If you cannot
run the Setup CD-ROM, refer to the steps below.
NOTE
If you are setting up your modem-router in New Zealand, see
“NOTE FOR USERS IN NEW ZEALAND” on page 6.
Connect your modem-router
To connect your modem-router:
1.
Power down all your network devices, including your computer(s) and
the modem-router. If you currently use a modem, disconnect it now—
the modem-router replaces your modem.
2.
Connect one end of the provided Ethernet cable to your computer’s
Ethernet adapter and the other end to an Ethernet port on the back of
the modem-router.
3.
Repeat step 2 for each additional computer or device that you want to
connect to the modem-router.
NOTE
If your computer’s Ethernet adapter is not set up, refer to the
Ethernet adapter’s documentation for more information.
4.
Connect one end of the phone cable to the DSL port on the back.
5
Installation
Linksys X1000
5.
Connect the other end of the phone cable to the wall jack with ADSL
service or microfilter.
NOTE
If you experience static on your phone line, you may need a
microfilter or splitter. (This is required for users in the UK; other
users should contact their ISPs to verify. ISDN users do not need
a microfilter.) If you require a microfilter, you must install one for
each phone or fax that you use. To install a microfilter, plug it into
a phone jack that has ADSL service, then connect one end of the
provided phone cable to the microfilters DSL port.
6.
Connect one end of the power adapter cord to the Power port and the
other end to the electrical outlet.
7.
Power on the computer that you will use to configure the modem-router.
8.
The LEDs for Power, Wireless, and Ethernet (one for each connected
computer) should light up. If not, make sure the modem-router is
powered on and the cables are securely connected.
Set up your modem-router as only a router
NOTE
Run the Setup CD-ROM to install the modem-router. If you cannot
run the Setup CD-ROM, refer to the steps below.
To set up your modem-router as a router:
1.
Connect one end of the provided Ethernet cable to your computer’s
Ethernet adapter and the other end to an Ethernet port on the back of
the modem-router.
2.
Connect one end of an Ethernet cable to the Cable port on the back of
the modem-router, then connect the other end to an available Ethernet/
LAN port on your modem.
3.
Connect one end of the power adapter cord to the Power port and the
other end to the electrical outlet.
4.
Power on the computer that you will use to configure the modem-router.
5.
The LEDs for Power, Wireless, and Ethernet (one for each connected
computer) should light up. If not, make sure the modem-router is
powered on and the cables are securely connected.
6
How to use Cisco Connect
Linksys X1000
NOTE FOR USERS IN NEW ZEALAND
To set up the device, follow these instructions:
1.
Access the Setup > Basic Setup screen.
2.
Select RFC 2364 PPPoA from the Encapsulation drop-down menu.
3.
For the Virtual Circuit ID, enter 0 for the VPI and 100 for the VCI.
4.
Select VC for Multiplexing.
5.
Select Multimode from the DSL Modulation drop-down menu.
6.
Enter your User Name and Password details from your ISP.
7.
Click Save Settings.
How to use Cisco Connect
Cisco Connect provides an easy way to manage your router and network. You
can connect computers or devices to your router, give Internet access to guests
in your home, and change the routers settings.
How to access Cisco Connect
Windows
Go to Start > All Programs > Cisco Connect.
Mac
Go to Go > Applications > Cisco Connect.
Main Menu
When Cisco Connect starts up, the main menu appears and offers four options:
Computers and Devices, Parental Controls, Guest Access, and Router Settings.
7
How to use Cisco Connect
Linksys X1000
Main Menu – Computers and Devices
Use this option to connect another computer or device to the router.
1.
To connect another computer or device to the router, click Add device.
Then, follow the on-screen instructions.
Main Menu – Parental Controls
Parental controls restrict Internet access for up to five computers. For the
computers you select, you can block or limit Internet access to specific times.
You can also block specific websites.
1.
To enable parental controls or change settings, click Change. Then,
follow the on-screen instructions.
Main Menu – Guest Access
Guest Access provides Internet access only; it does not provide access to the
local network and its resources. Guest Access helps minimize exposure of your
local network. To give Internet access to friends or family, provide the guest
network name and password displayed on this screen.
When a guest wants Internet access in your home, have the guest do the
following:
1.
Connect to the wireless guest network, which is the name of your wireless
network followed by -guest.
2.
Open a web browser.
3.
On the login screen, enter the password of your guest network. Then
click Login.
4.
To disable Guest Access or change settings, click Change. Then, follow
the on-screen instructions.
Main Menu – Router Settings
Use this option to personalize the routers settings.
1.
To change settings, click Change. The Router settings screen appears.
Personalize
Router name The name of the router is displayed (this is also the name of
your wireless network). To change the name, click Change. Then, follow the
on-screen instructions.
Password The password that protects access to the routers settings is
displayed (this also protects wireless access to your local network). To change
the password, click Change. Then, follow the on-screen instructions.
CAUTION
When you change the router name or password, the name or
password of your wireless network also changes, and the router
is reset. ALL computers and devices connected to your router will
momentarily lose their Internet connection. Wired computers and
devices will reconnect automatically; however, you will need to
reconnect all wireless computers and devices using the wireless
networks new name or password.
Port Lights
on/off To allow the lights on the router to turn on, keep the default, on.
8
Advanced Configuration
Linksys X1000
Easy Setup Key
Update or create key The Easy Setup Key is a USB flash drive that holds the
wireless settings for the router. If you want to create or update an Easy Setup
Key, click this option. Then, follow the on-screen instructions.
Internet Speed
Launch Test You can use the Internet speed test to determine your ISP’s
current download and upload speeds. Connection speed depends on many
factors, and may change throughout the day. To run the speed test, click this
option. Then, follow the on-screen instructions.
Other Options
Register now to receive special offers and updates To sign up to receive
special offers and updates from Cisco and Cisco partners, click this option.
Router details To view more information about the router, click this option.
The Router details screen appears, displaying the Model name, Model number,
Serial number, Firmware version, Operating system, Software version,
Connection type (WAN), IP address (LAN), IP address (WAN), and Computer IP
address. (WAN stands for Wide Area Network, such as the Internet. IP stands for
Internet Protocol. LAN stands for Local Area Network.)
Advanced settings To access settings for advanced users, click this option.
Then, follow the on-screen instructions.
Advanced Configuration
After setting up the router with the setup software (located on the CD-ROM),
the router will be ready for use. If you would like to change its advanced
settings, or if the software does not run, use the router’s browser-based utility.
You can access the utility via a web browser on a computer connected to the
router. For more help with the utility, click Help on the right side of the screen
or go to our website.
How to access the browser-based utility
1.
To access the browser-based utility, launch the web browser on your
computer, and enter the router’s default Internet Protocol (IP) address,
192.168.1.1, in the Address field. Then press Enter.
NOTE
You can also access the browser-based utility on Windows
computers by entering the device name in the Address field.
A login screen appears. (A similar screen appears for non-Windows 7
users.)
2.
In the User name field, enter admin.
9
Advanced Configuration
Linksys X1000
3.
In the Password field, enter the password created by the setup software.
If you did not run the setup software, then enter the default, admin.
NOTE
You can also access the browser-based utility through Cisco
Connect.
4. Click OK to continue.
How to use the browser-based utility
Use the tabs at the top of each screen to navigate within the utility. The tabs are
arranged in two levels, top-level tabs for general functions and lower-level tabs
for the corresponding specific functions.
The top-level tabs are: Setup, Wireless, Security, Access Restrictions, Applications
& Gaming, Administration, and Status. Each of these has its own unique, lower-
level tabs.
NOTE
Within this User Guide, each screen is identified by its top- and
lower-level tab names. For example, “Setup > Basic Setup” is the
screen accessed via the Setup top-level tab, and its Basic Setup
lower-level tab.
If you change any settings on a screen, you must click Save Settings to apply
your changes, or click Cancel Changes to clear your changes. These controls
are located at the bottom of each screen.
NOTE
To learn more about any field, click Help on the right side of the
screen.
Setup > Basic Setup
The first screen that appears is the Basic Setup screen. This allows you to change
the router’s general settings.
ADSL mode
ADSL mode (default) has the following fields that should be completed:
Language
Select your language
To use a different language, select one from the drop-
down menu. The language of the browser-based utility will change five seconds
after you select another language.
Internet Setup
The Internet Setup section configures the router to your Internet connection.
Most of this information can be obtained through your Internet Service
Provider (ISP).
10
Advanced Configuration
Linksys X1000
Internet Connection Type
Select the type of Internet connection your ISP provides from the drop-down
menu. The available types are:
Bridged Mode Only
RFC 2684 Bridged
RFC 2684 Routed
IPoA
RFC 2516 PPPoE
RFC 2364 PPPoA
Bridged Mode Only
In this mode, only the DSL modem function is available, and all Gateway
features are disabled. If selected, you only need to enter the VC Settings.
RFC 2684 Bridged
If selected, enter the correct data for the IP Settings. Select Obtain an IP
address automatically if your ISP allocates an IP address upon connection.
Otherwise, select Use the following IP address.
RFC 2684 Routed
With this method, you are required to use a permanent IP address to connect
to the Internet.
IPoA
IPoA (IP over ATM) uses a fixed IP address.
RFC 2516 PPPoE
Some DSL-based ISPs use PPPoE (Point-to-Point Protocol over Ethernet) to
establish Internet connections. If you are using PPPoE, your IP address is
provided automatically.
RFC 2364 PPPoA
Some DSL-based ISPs use PPPoA (Point-to-Point Protocol over ATM) to establish
Internet connections. If using PPPoA, your IP address is provided automatically.
Network Setup
The Network Setup section configures the IP settings for your local network.
Ethernet mode
If you select Ethernet (router-only) mode, the following fields are available:
Language
Select your language
To use a different language, select one from the drop-
down menu. The language of the browser-based utility will change five seconds
after you select another language.
Internet Setup
The Internet Setup section configures the router to your Internet connection.
Most of this information can be obtained through your Internet Service
Provider (ISP).
11
Advanced Configuration
Linksys X1000
Internet Connection Type
Select the type of Internet connection your ISP provides from the drop-down
menu. The available types are:
Automatic Configuration - DHCP
Static IP
PPPoE
PPTP
L2TP
Telstra Cable
Automatic Configuration - DHCP
The default Internet Connection Type is Automatic Configuration - DHCP
(Dynamic Host Configuration Protocol). Keep the default only if your ISP
supports DHCP or if you connect using a dynamic IP address. (This option
usually applies to cable connections.)
Static IP
If you are required to use a fixed IP address to connect to the Internet, select
Static IP.
PPPoE
If you have a DSL connection, check whether your ISP uses Point-to-Point
Protocol over Ethernet (PPPoE). If so, select PPPoE.
Connect on Demand or Keep AliveThe Connect on Demand and Keep
Alive options let you choose whether the router connects to the Internet
only as needed (useful if your ISP charges for connect time), or if the
router should always be connected. Select the appropriate option.
PPTP
Point-to-Point Tunneling Protocol (PPTP) is a service that generally applies to
connections in Europe. If your PPTP connection supports DHCP or a dynamic IP
address, then select Obtain an IP Address Automatically. If you are required
to use a fixed IP address to connect to the Internet, then select Specify an IP
Address and configure the options below.
Connect on Demand or Keep AliveThe Connect on Demand and Keep
Alive options let you choose whether the router connects to the Internet
only as needed (useful if your ISP charges for connect time), or if the
router should always be connected. Select the appropriate option.
L2TP
Layer 2 Tunneling Protocol (L2TP) is a service that generally applies to
connections in Israel.
Connect on Demand or Keep AliveThe Connect on Demand and Keep
Alive options let you choose whether the router connects to the Internet
only as needed (useful if your ISP charges for connect time), or if the
router should always be connected. Select the appropriate option.
Telstra Cable
Telstra Cable is a service that generally applies to connections in Australia.
Network Setup
The Network Setup section configures the IP settings for your local network.
Wireless > Basic Wireless Settings
NOTE
To learn more about any field, click Help on the right side of the
screen.
The basic settings for wireless networking are set on this screen.
There are two ways to configure the Routers wireless network(s), manual and
Wi-Fi Protected Setup.
Wi-Fi Protected Setup is a feature that makes it easy to set up your wireless
network. If you have client devices, such as wireless adapters, that support Wi-
Fi Protected Setup, then you can use Wi-Fi Protected Setup.
Configuration View To manually configure your wireless networks, select
Manual.
12
Advanced Configuration
Linksys X1000
Manual setup
Set up the wireless network on this screen.
NOTE
After you set up the wireless network(s), set up the wireless security
settings. Go to Wireless > Wireless Security on page 14.
Network Mode In most network configurations, you should leave it set to
Mixed (default).
Wireless settings
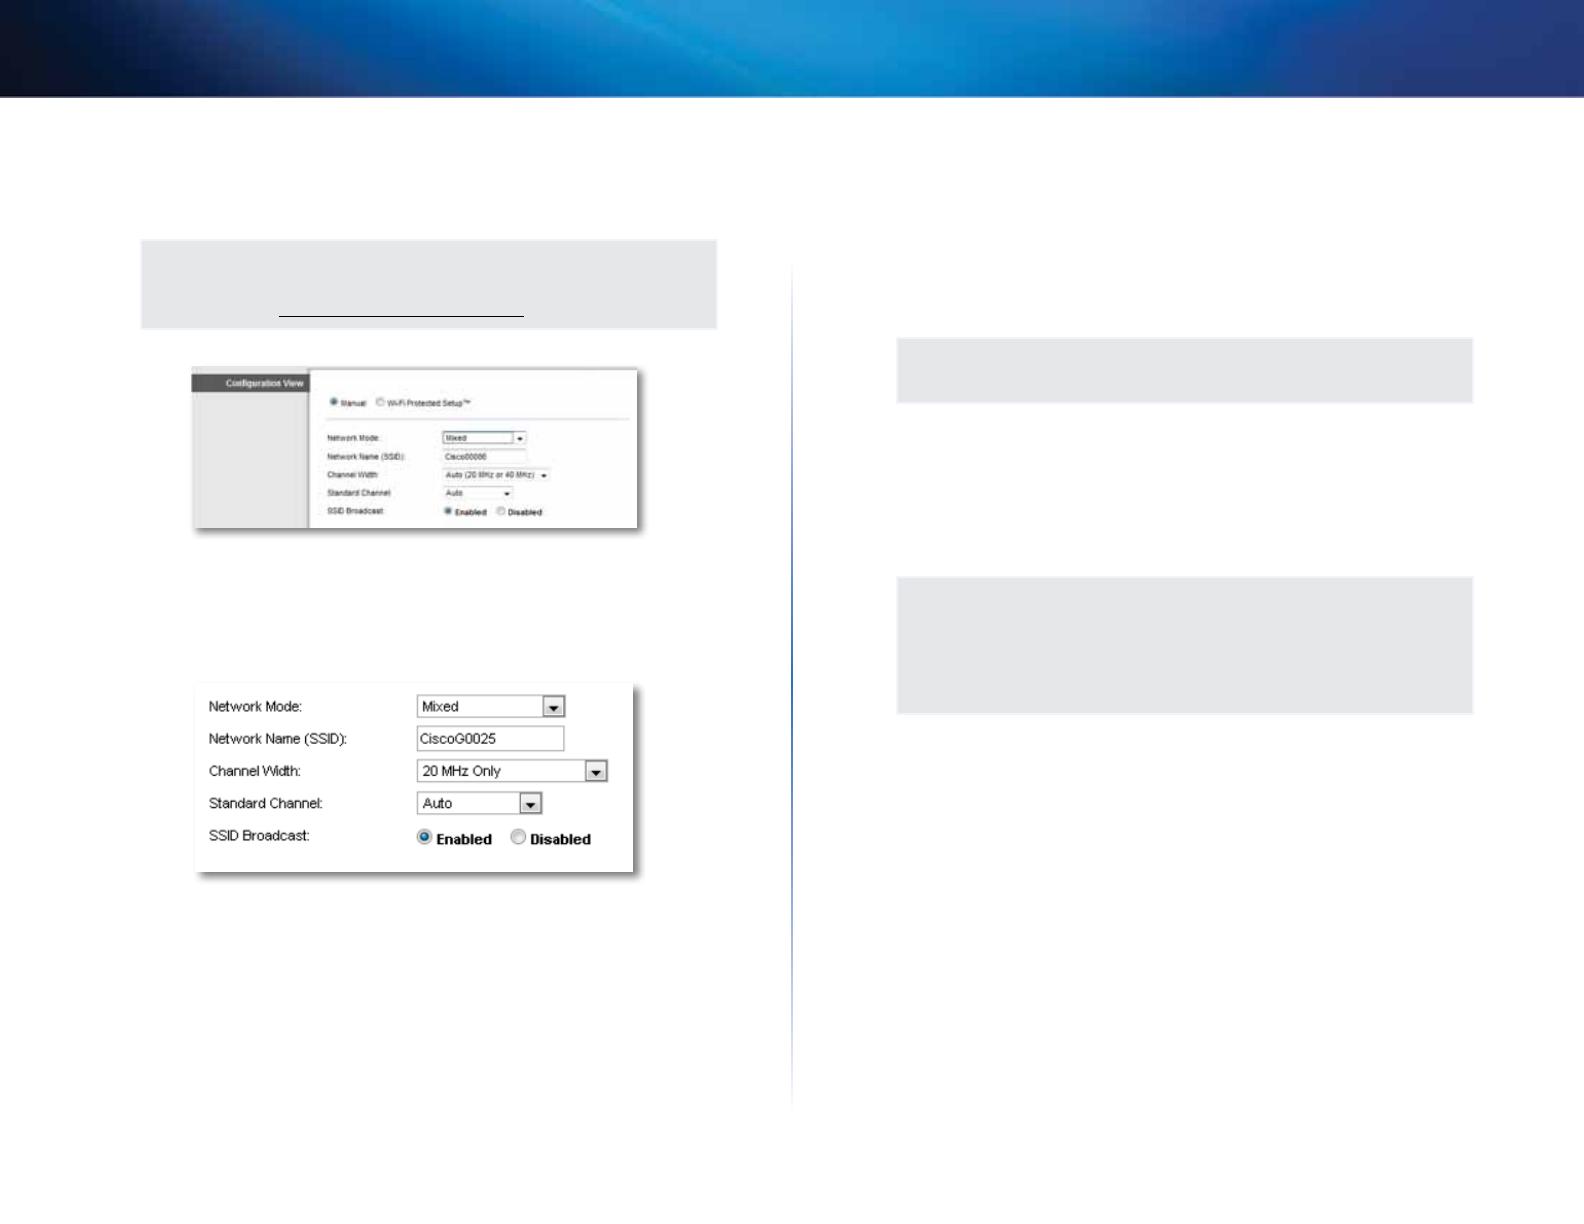
Basic Wireless Settings (Manual) > Wireless Settings
Network Mode Select the wireless standards your network will support.
Mixed If you have Wireless-N, Wireless-G, and Wireless-B devices in your
network, keep the default, Mixed.
Wireless-B/G Only If you have both Wireless-B and Wireless-G devices in
your network, select Wireless-B/G Only.
Wireless-B Only If you have only Wireless-B devices, select Wireless-B
Only.
Wireless-G Only If you have only Wireless-G devices, select Wireless-G
Only.
Wireless-N Only If you have only Wireless-N devices, select Wireless-N
Only.
Disabled If you have no Wireless-B, Wireless-G, and Wireless-N devices in
your network, select Disabled.
NOTE
If you are not sure which mode to use, keep the default, Mixed.
Network Name (SSID) The Service Set Identifier (SSID) is the network name
shared by all devices in a wireless network. It is case-sensitive and must not
exceed 32 keyboard characters. The default is Cisco followed by the last 5 digits
of the router’s serial number, which is found on the bottom of the router. If
you used the setup software for installation, then the default Network Name is
changed to an easy-to-remember name.
NOTE
If you restore the routers factory default settings (by pressing the
Reset button or using the Administration > Factory Defaults screen),
the Network Name will return to its default value, and all devices
on your wireless network will need to be reconnected.
Channel Width For best performance in a network using Wireless-B, Wireless-G
and Wireless-N devices, select Auto (20 MHz or 40 MHz). For a channel width
of 20 MHz, keep the default, 20 MHz only.
Standard Channel Select the channel from the drop-down list for Wireless-B,
Wireless-G, and Wireless-N networking. If you are not sure which channel to
select, then keep the default, Auto.
SSID Broadcast When wireless clients survey the local area for wireless
networks to associate with, they will detect the SSID broadcast by the router.
To broadcast the routers SSID, keep the default, Enabled. If you do not want to
broadcast the routers SSID, then select Disabled.
13
Advanced Configuration
Linksys X1000
Wi-Fi Protected Setup
Three methods of Wi-Fi Protected Setup are available. Use the method that
applies to the client device you are configuring.
NOTE
Wi-Fi Protected Setup configures one client device at a time.
Repeat the instructions for each client device that supports Wi-Fi
Protected Setup.
Wi-Fi Protected Setup light activity
The Cisco logo on the top panel of the router functions as the Wi-Fi
Protected Setup light.
When the Wi-Fi Protected Setup process is active, the light flashes slowly.
When the Wi-Fi Protected Setup is successful, the light is continuously lit.
If there is an error, the light flashes quickly for two minutes; please wait
and try again.
Wait until the light is continuously lit, before starting the next Wi-Fi
Protected Setup session.
Wi-Fi Protected Setup Button Use this method if your client device has a
Wi-Fi Protected Setup button.
NOTE
Make sure you configure one client device at a time.
a.
Click or press the Wi-Fi Protected Setup button on the client device.
b.
Click the Wi-Fi Protected Setup button on the routers Wi-Fi Protected
Setup screen, OR press and hold the Wi-Fi Protected Setup button on
the back panel of the router for one second.
c.
After the client device has been configured, click OK on the router’s
Wi-Fi Protected Setup screen within two minutes.
Enter Client Device PIN on Router Use this method if your client device
has a Wi-Fi Protected Setup PIN (Personal Identification Number).
a.
Enter the PIN from the client device in the field on the routers Wi-Fi
Protected Setup screen.
b.
Click the Register button on the routers Wi-Fi Protected Setup screen.
c.
After the client device has been configured, click OK on the router’s
Wi-Fi Protected Setup screen within two minutes.
  • Page 1 1
  • Page 2 2
  • Page 3 3
  • Page 4 4
  • Page 5 5
  • Page 6 6
  • Page 7 7
  • Page 8 8
  • Page 9 9
  • Page 10 10
  • Page 11 11
  • Page 12 12
  • Page 13 13
  • Page 14 14
  • Page 15 15
  • Page 16 16
  • Page 17 17
  • Page 18 18
  • Page 19 19
  • Page 20 20
  • Page 21 21
  • Page 22 22
  • Page 23 23
  • Page 24 24
  • Page 25 25
  • Page 26 26
  • Page 27 27
  • Page 28 28
  • Page 29 29
  • Page 30 30
  • Page 31 31
  • Page 32 32
  • Page 33 33
  • Page 34 34
  • Page 35 35
  • Page 36 36
  • Page 37 37
  • Page 38 38
  • Page 39 39
  • Page 40 40
  • Page 41 41
  • Page 42 42
  • Page 43 43
  • Page 44 44
  • Page 45 45
  • Page 46 46
  • Page 47 47
  • Page 48 48
  • Page 49 49
  • Page 50 50
  • Page 51 51
  • Page 52 52
  • Page 53 53
  • Page 54 54
  • Page 55 55
  • Page 56 56
  • Page 57 57
  • Page 58 58
  • Page 59 59
  • Page 60 60
  • Page 61 61
  • Page 62 62
  • Page 63 63
  • Page 64 64
  • Page 65 65
  • Page 66 66
  • Page 67 67
  • Page 68 68
  • Page 69 69
  • Page 70 70
  • Page 71 71
  • Page 72 72
  • Page 73 73
  • Page 74 74
  • Page 75 75
  • Page 76 76
  • Page 77 77
  • Page 78 78
  • Page 79 79
  • Page 80 80
  • Page 81 81
  • Page 82 82
  • Page 83 83
  • Page 84 84
  • Page 85 85
  • Page 86 86
  • Page 87 87
  • Page 88 88
  • Page 89 89
  • Page 90 90
  • Page 91 91
  • Page 92 92
  • Page 93 93
  • Page 94 94
  • Page 95 95
  • Page 96 96
  • Page 97 97
  • Page 98 98
  • Page 99 99
  • Page 100 100
  • Page 101 101
  • Page 102 102
  • Page 103 103
  • Page 104 104
  • Page 105 105
  • Page 106 106
  • Page 107 107
  • Page 108 108
  • Page 109 109
  • Page 110 110
  • Page 111 111
  • Page 112 112
  • Page 113 113
  • Page 114 114
  • Page 115 115
  • Page 116 116
  • Page 117 117
  • Page 118 118
  • Page 119 119
  • Page 120 120
  • Page 121 121
  • Page 122 122
  • Page 123 123
  • Page 124 124
  • Page 125 125
  • Page 126 126
  • Page 127 127
  • Page 128 128
  • Page 129 129
  • Page 130 130
  • Page 131 131
  • Page 132 132
  • Page 133 133
  • Page 134 134
  • Page 135 135
  • Page 136 136
  • Page 137 137
  • Page 138 138
  • Page 139 139
  • Page 140 140
  • Page 141 141
  • Page 142 142
  • Page 143 143
  • Page 144 144
  • Page 145 145
  • Page 146 146
  • Page 147 147
  • Page 148 148
  • Page 149 149
  • Page 150 150
  • Page 151 151
  • Page 152 152
  • Page 153 153
  • Page 154 154
  • Page 155 155
  • Page 156 156
  • Page 157 157
  • Page 158 158
  • Page 159 159
  • Page 160 160
  • Page 161 161
  • Page 162 162
  • Page 163 163
  • Page 164 164
  • Page 165 165
  • Page 166 166
  • Page 167 167
  • Page 168 168
  • Page 169 169
  • Page 170 170
  • Page 171 171
  • Page 172 172
  • Page 173 173
  • Page 174 174
  • Page 175 175
  • Page 176 176
  • Page 177 177
  • Page 178 178
  • Page 179 179
  • Page 180 180
  • Page 181 181
  • Page 182 182
  • Page 183 183
  • Page 184 184
  • Page 185 185
  • Page 186 186
  • Page 187 187
  • Page 188 188
  • Page 189 189
  • Page 190 190
  • Page 191 191
  • Page 192 192
  • Page 193 193
  • Page 194 194
  • Page 195 195
  • Page 196 196
  • Page 197 197
  • Page 198 198
  • Page 199 199
  • Page 200 200
  • Page 201 201
  • Page 202 202
  • Page 203 203
  • Page 204 204
  • Page 205 205
  • Page 206 206
  • Page 207 207
  • Page 208 208
  • Page 209 209
  • Page 210 210
  • Page 211 211
  • Page 212 212
  • Page 213 213
  • Page 214 214
  • Page 215 215
  • Page 216 216
  • Page 217 217
  • Page 218 218
  • Page 219 219
  • Page 220 220
  • Page 221 221
  • Page 222 222
  • Page 223 223
  • Page 224 224
  • Page 225 225
  • Page 226 226
  • Page 227 227
  • Page 228 228
  • Page 229 229
  • Page 230 230
  • Page 231 231
  • Page 232 232
  • Page 233 233
  • Page 234 234
  • Page 235 235
  • Page 236 236
  • Page 237 237
  • Page 238 238
  • Page 239 239
  • Page 240 240
  • Page 241 241
  • Page 242 242
  • Page 243 243
  • Page 244 244
  • Page 245 245
  • Page 246 246
  • Page 247 247
  • Page 248 248
  • Page 249 249
  • Page 250 250
  • Page 251 251
  • Page 252 252
  • Page 253 253
  • Page 254 254
  • Page 255 255
  • Page 256 256
  • Page 257 257
  • Page 258 258
  • Page 259 259
  • Page 260 260
  • Page 261 261
  • Page 262 262
  • Page 263 263
  • Page 264 264
  • Page 265 265
  • Page 266 266
  • Page 267 267
  • Page 268 268
  • Page 269 269
  • Page 270 270
  • Page 271 271
  • Page 272 272
  • Page 273 273
  • Page 274 274
  • Page 275 275
  • Page 276 276
  • Page 277 277
  • Page 278 278
  • Page 279 279
  • Page 280 280
  • Page 281 281
  • Page 282 282
  • Page 283 283
  • Page 284 284
  • Page 285 285
  • Page 286 286
  • Page 287 287
  • Page 288 288
  • Page 289 289
  • Page 290 290
  • Page 291 291
  • Page 292 292
  • Page 293 293
  • Page 294 294
  • Page 295 295
  • Page 296 296
  • Page 297 297
  • Page 298 298
  • Page 299 299
  • Page 300 300
  • Page 301 301
  • Page 302 302
  • Page 303 303
  • Page 304 304
  • Page 305 305
  • Page 306 306
  • Page 307 307
  • Page 308 308
  • Page 309 309
  • Page 310 310
  • Page 311 311
  • Page 312 312
  • Page 313 313
  • Page 314 314
  • Page 315 315
  • Page 316 316
  • Page 317 317
  • Page 318 318
  • Page 319 319
  • Page 320 320
  • Page 321 321
  • Page 322 322
  • Page 323 323
  • Page 324 324
  • Page 325 325
  • Page 326 326
  • Page 327 327
  • Page 328 328
  • Page 329 329
  • Page 330 330
  • Page 331 331
  • Page 332 332
  • Page 333 333
  • Page 334 334
  • Page 335 335
  • Page 336 336
  • Page 337 337
  • Page 338 338
  • Page 339 339
  • Page 340 340
  • Page 341 341
  • Page 342 342
  • Page 343 343
  • Page 344 344
  • Page 345 345
  • Page 346 346
  • Page 347 347
  • Page 348 348
  • Page 349 349
  • Page 350 350
  • Page 351 351
  • Page 352 352
  • Page 353 353
  • Page 354 354
  • Page 355 355
  • Page 356 356
  • Page 357 357
  • Page 358 358
  • Page 359 359
  • Page 360 360
  • Page 361 361
  • Page 362 362
  • Page 363 363
  • Page 364 364
  • Page 365 365
  • Page 366 366
  • Page 367 367
  • Page 368 368
  • Page 369 369
  • Page 370 370
  • Page 371 371
  • Page 372 372
  • Page 373 373
  • Page 374 374
  • Page 375 375
  • Page 376 376
  • Page 377 377
  • Page 378 378
  • Page 379 379
  • Page 380 380
  • Page 381 381
  • Page 382 382
  • Page 383 383
  • Page 384 384
  • Page 385 385
  • Page 386 386
  • Page 387 387
  • Page 388 388
  • Page 389 389
  • Page 390 390
  • Page 391 391
  • Page 392 392
  • Page 393 393
  • Page 394 394
  • Page 395 395
  • Page 396 396
  • Page 397 397
  • Page 398 398
  • Page 399 399
  • Page 400 400
  • Page 401 401
  • Page 402 402
  • Page 403 403
  • Page 404 404
  • Page 405 405
  • Page 406 406
  • Page 407 407
  • Page 408 408
  • Page 409 409
  • Page 410 410
  • Page 411 411
  • Page 412 412
  • Page 413 413
  • Page 414 414
  • Page 415 415
  • Page 416 416
  • Page 417 417
  • Page 418 418
  • Page 419 419
  • Page 420 420
  • Page 421 421
  • Page 422 422
  • Page 423 423
  • Page 424 424
  • Page 425 425
  • Page 426 426
  • Page 427 427
  • Page 428 428
  • Page 429 429
  • Page 430 430
  • Page 431 431
  • Page 432 432
  • Page 433 433
  • Page 434 434
  • Page 435 435
  • Page 436 436
  • Page 437 437
  • Page 438 438
  • Page 439 439
  • Page 440 440
  • Page 441 441
  • Page 442 442
  • Page 443 443
  • Page 444 444
  • Page 445 445
  • Page 446 446
  • Page 447 447
  • Page 448 448
  • Page 449 449
  • Page 450 450
  • Page 451 451
  • Page 452 452
  • Page 453 453
  • Page 454 454
  • Page 455 455
  • Page 456 456
  • Page 457 457
  • Page 458 458
  • Page 459 459
  • Page 460 460
  • Page 461 461
  • Page 462 462
  • Page 463 463
  • Page 464 464
  • Page 465 465
  • Page 466 466
  • Page 467 467
  • Page 468 468
  • Page 469 469
  • Page 470 470
  • Page 471 471
  • Page 472 472
  • Page 473 473
  • Page 474 474
  • Page 475 475
  • Page 476 476
  • Page 477 477
  • Page 478 478
  • Page 479 479
  • Page 480 480
  • Page 481 481
  • Page 482 482
  • Page 483 483
  • Page 484 484
  • Page 485 485
  • Page 486 486
  • Page 487 487
  • Page 488 488
  • Page 489 489
  • Page 490 490
  • Page 491 491
  • Page 492 492
  • Page 493 493
  • Page 494 494
  • Page 495 495
  • Page 496 496
  • Page 497 497
  • Page 498 498
  • Page 499 499
  • Page 500 500
  • Page 501 501
  • Page 502 502
  • Page 503 503
  • Page 504 504
  • Page 505 505
  • Page 506 506
  • Page 507 507
  • Page 508 508
  • Page 509 509
  • Page 510 510
  • Page 511 511
  • Page 512 512
  • Page 513 513
  • Page 514 514
  • Page 515 515
  • Page 516 516
  • Page 517 517
  • Page 518 518
  • Page 519 519
  • Page 520 520
  • Page 521 521
  • Page 522 522
  • Page 523 523
  • Page 524 524
  • Page 525 525
  • Page 526 526
  • Page 527 527
  • Page 528 528
  • Page 529 529
  • Page 530 530
  • Page 531 531
  • Page 532 532
  • Page 533 533
  • Page 534 534
  • Page 535 535
  • Page 536 536
  • Page 537 537
  • Page 538 538
  • Page 539 539
  • Page 540 540
  • Page 541 541
  • Page 542 542
  • Page 543 543
  • Page 544 544
  • Page 545 545
  • Page 546 546
  • Page 547 547
  • Page 548 548
  • Page 549 549
  • Page 550 550
  • Page 551 551
  • Page 552 552
  • Page 553 553
  • Page 554 554
  • Page 555 555
  • Page 556 556
  • Page 557 557
  • Page 558 558
  • Page 559 559
  • Page 560 560
  • Page 561 561
  • Page 562 562
  • Page 563 563
  • Page 564 564
  • Page 565 565
  • Page 566 566
  • Page 567 567
  • Page 568 568
  • Page 569 569
  • Page 570 570
  • Page 571 571
  • Page 572 572
  • Page 573 573
  • Page 574 574
  • Page 575 575
  • Page 576 576
  • Page 577 577
  • Page 578 578
  • Page 579 579
  • Page 580 580
  • Page 581 581
  • Page 582 582
  • Page 583 583
  • Page 584 584
  • Page 585 585
  • Page 586 586
  • Page 587 587
  • Page 588 588
  • Page 589 589
  • Page 590 590
  • Page 591 591
  • Page 592 592
  • Page 593 593
  • Page 594 594
  • Page 595 595
  • Page 596 596
  • Page 597 597
  • Page 598 598
  • Page 599 599
  • Page 600 600
  • Page 601 601
  • Page 602 602
  • Page 603 603
  • Page 604 604
  • Page 605 605
  • Page 606 606
  • Page 607 607
  • Page 608 608
  • Page 609 609
  • Page 610 610
  • Page 611 611
  • Page 612 612
  • Page 613 613
  • Page 614 614
  • Page 615 615
  • Page 616 616
  • Page 617 617
  • Page 618 618
  • Page 619 619
  • Page 620 620
  • Page 621 621
  • Page 622 622
  • Page 623 623
  • Page 624 624
  • Page 625 625
  • Page 626 626
  • Page 627 627
  • Page 628 628
  • Page 629 629
  • Page 630 630
  • Page 631 631
  • Page 632 632
  • Page 633 633
  • Page 634 634
  • Page 635 635
  • Page 636 636
  • Page 637 637
  • Page 638 638
  • Page 639 639
  • Page 640 640
  • Page 641 641
  • Page 642 642
  • Page 643 643
  • Page 644 644
  • Page 645 645
  • Page 646 646
  • Page 647 647
  • Page 648 648
  • Page 649 649
  • Page 650 650
  • Page 651 651
  • Page 652 652
  • Page 653 653
  • Page 654 654
  • Page 655 655
  • Page 656 656
  • Page 657 657
  • Page 658 658
  • Page 659 659
  • Page 660 660
  • Page 661 661
  • Page 662 662
  • Page 663 663
  • Page 664 664
  • Page 665 665
  • Page 666 666
  • Page 667 667
  • Page 668 668
  • Page 669 669
  • Page 670 670
  • Page 671 671
  • Page 672 672
  • Page 673 673
  • Page 674 674
  • Page 675 675
  • Page 676 676
  • Page 677 677
  • Page 678 678

Linksys X1000 Owner's manual

Category
Routers
Type
Owner's manual

Ask a question and I''ll find the answer in the document

Finding information in a document is now easier with AI