X1000

Linksys X1000 Owner's manual

  • Hello! I am an AI chatbot trained to assist you with the Linksys X1000 Owner's manual. I’ve already reviewed the document and can help you find the information you need or explain it in simple terms. Just ask your questions, and providing more details will help me assist you more effectively!
3

Linksys X1000
3







DVD/CD-RW Drive (E:) Linksys
Router Setup
AutoPlay
Always do this for software and games:
Install or run program
General options
Set up your Linksys Router
Published by Cisco Consumer Products LLC
Set AutoPlay defaults in Control Panel
Open folder to view files
using Windows Explorer
Speed up my system
using Windows ReadyBoost




  Windows
.)( Setup

. 

Mac
.)( Setup









 . DSL
 X1000 :)
( Modem-router

DSL

.

 DSL :)
( Router only
.























3
Инсталиране
Linksys X1000
3
Автоматично настройване на модем-
рутера
1.
Поставете компактдиска в CD или DVD устройството.
2.
Щракнете върху Set up your Linksys Router (Настройване на рутера
Linksys).
DVD/CD-RW Drive (E:) Linksys
Router Setup
AutoPlay
Always do this for software and games:
Install or run program
General options
Set up your Linksys Router
Published by Cisco Consumer Products LLC
Set AutoPlay defaults in Control Panel
Open folder to view files
using Windows Explorer
Speed up my system
using Windows ReadyBoost
Ако не виждате това:
За Windows щракнете върху Start тарт), Computer (Компютър),
след това щракнете двукратно върху иконата на CD устройството
и иконата Setup (Настройка).
За Mac щракнете двукратно върху иконата CD на десктопа и след
това щракнете двукратно върху иконата Setup (Настройка).
3.
Прочетете лицензионните условия, поставете отметка в квадратчето
и след това щракнете върху Next (Напред).
4.
В екрана How will you be using your X1000 (Как ще използвате вашето
устройство X1000) щракнете върху Modem-router (Модем-рутер)
или Router only (Само рутер) и след това щракнете върху Next
(Напред).
Modem-router (Модем-рутер): Използвайте устройството
X1000 като DSL модем и рутер. Ако разполагате с DSL връзка от
доставчик на Интернет услуги, тази опция осигурява Интернет
достъп и свързване с мрежата за домашните ви компютри, без да
е необходим отделен модем и рутер.
Router only (Само рутер): Ако имате отделен кабел или DSL модем
за Интернет достъп, тази опция осигурява свързване с мрежата за
домашните ви компютри.
Отваря се екранът We are now setting up your Linksys X1000 (В момента
се настройва вашият Linksys X21000). След това от вас ще се поиска
да свържете кабелите на вашия рутер.
Инсталиране
3
Instalace
Linksys X1000
3
Automatická instalace modemu a
směrovače
1.
Vložte disk CD do jednotky CD nebo DVD.
2.
Klepněte na možnost Set up your Linksys Router (Nainstalovat
směrovač Linksys).
DVD/CD-RW Drive (E:) Linksys
Router Setup
AutoPlay
Always do this for software and games:
Install or run program
General options
Set up your Linksys Router
Published by Cisco Consumer Products LLC
Set AutoPlay defaults in Control Panel
Open folder to view files
using Windows Explorer
Speed up my system
using Windows ReadyBoost
Pokud se tato obrazovka nezobrazí:
Vsystému Windows klepněte na tlačítko Start, Počítač a poklepejte
na mechaniku CD a na ikonu Setup (Nastavení).
Vsystému Mac poklepejte na ikonu CD na ploše a poklepejte na ikonu
Setup (Nastavení).
3.
těte si licenční ujednání, zaškrtněte políčko a klepněte na možnost
Next (Další).
4.
Na obrazovce How will you be using your X1000 (Způsob použití zařízení
X1000) klepněte na možnost Modem-router (Modem a směrovač) nebo
Router only (Pouze směrovač) a pak klepněte na tlačítko Next (Další).
Modem-router (Modem a směrovač): Zařízení X1000 můžete využívat
zárov jako modem DSL a směrovač. Pokud váš poskytovatel
internetových služeb zajišťuje připojení DSL, můžete stouto možností
přistupovat k internetu a zároveň mít propojené všechny počítače
vdomácnosti, aniž byste potřebovali oddělený modem a směrovač.
Router only (Pouze směrovač): Pokud využíváte pro připojení
kinternetu zvláštní modem kabelového připojení nebo modem DSL,
můžete stouto možností zajistit připojení ksíti pro všechny počítače
vdomácnosti.
Zobrazí se obrazovka We are now setting up your Linksys X1000 (Probíhá
instalace zařízení Linksys X1000). Pak budete požádáni o připojení kabelu
směrovače.
Instalace
3
Installation
Linksys X1000
3
Automatisk opsætning af din
modemrouter
1.
Læg cd'en i cd- eller dvd-drevet.
2.
Click Set up your Linksys Router (Konfigurer din Linksys-router).
DVD/CD-RW Drive (E:) Linksys
Router Setup
AutoPlay
Always do this for software and games:
Install or run program
General options
Set up your Linksys Router
Published by Cisco Consumer Products LLC
Set AutoPlay defaults in Control Panel
Open folder to view files
using Windows Explorer
Speed up my system
using Windows ReadyBoost
Hvis du ikke får vist dette:
Windows: Klik Start, Computer, og dobbeltklik cd-drevet og
Opsætning-ikonet.
Mac: Dobbeltklik cd-ikonet på skrivebordet, og dobbeltklik på
Opsætning-ikonet.
3.
Læs licensvilkårene, marker afkrydsningsfeltet, og klik derefter Next
(Næste).
4.
skærmen How will you be using your X1000 (Hvordan vil du bruge
din X1000) skal du klikke på Modem-router (Modemrouter) eller Router
only (Kun router) og klikke på Next (Næste).
Modem-router (Modemrouter): Brug X1000 som både DSL-modem og
router. Hvis du har en DSL-internetudbyder, giver denne valgmulighed
internetadgang og netværksforbindelse for computerne i hjemmet,
uden at du behøver separat modem og router.
Router only (Kun router): Hvis du har et separat kabel- eller
DSL-modem til internetadgang, giver denne valgmulighed
netværksforbindelse for computerne i hjemmet.
Skærmen We are now setting up your Linksys X1000 (Nu konfigurerer vi
din Linksys X1000) åbnes. Du bliver derefter bedt om at tilslutte kablerne
til routeren.
Installation
3
Εγκατάσταση
Linksys X1000
3
Αυτόματη εγκατάσταση του
δρομολογητή μόντεμ
1.
Εισαγάγετε το CD στη μονάδα CD ή DVD.
2.
Πατήστε Set up your Linksys Router (Εγκατάσταση του δρομολογητή
Linksys).
DVD/CD-RW Drive (E:) Linksys
Router Setup
AutoPlay
Always do this for software and games:
Install or run program
General options
Set up your Linksys Router
Published by Cisco Consumer Products LLC
Set AutoPlay defaults in Control Panel
Open folder to view files
using Windows Explorer
Speed up my system
using Windows ReadyBoost
DVD/CD-RW Drive (E:) Linksys
Router Setup
AutoPlay
Always do this for software and games:
Install or run program
General options
Set up your Linksys Router
Published by Cisco Consumer Products LLC
Set AutoPlay defaults in Control Panel
Open folder to view files
using Windows Explorer
Speed up my system
using Windows ReadyBoost
Αν δεν βλέπετε αυτήν την επιλογή:
Στα Windows, πατήστε Start (Έναρξη), Computer (Υπολογιστής)
και κάντε διπλό κλικ στη μονάδα CD και στο εικονίδιο Setup
(Εγκατάσταση).
Σε Mac, κάντε διπλό κλικ στο εικονίδιο CD στην επιφάνεια εργασίας
και, στη συνέχεια, κάντε διπλό κλικ στο εικονίδιο Setup (Εγκατάσταση).
3.
Διαβάστε τους όρους της άδειας χρήσης, επιλέξτε το πλαίσιο ελέγχου και
κάντε κλικ στο κουμπί Next (Επόμενο).
4.
Στην οθόνη How will you be using your X1000 (Χρήση του X1000), κάντε
κλικ στην επιλογή Modem-router (Δρομολογητής μόντεμ) ή Router
only (Μόνο δρομολογητής) και στη συνέχεια πατήστε Next (Επόμενο).
Modem-router (Δρομολογητής μόντεμ): Χρησιμοποιήστε το X1000
τόσο ως μόντεμ DSL όσο και ως δρομολογητή. Εάν έχετε πάροχο
υπηρεσιών DSL Internet, η επιλογή αυτή παρέχει πρόσβαση στο
Internet και συνδεσιμότητα δικτύου στους οικιακούς υπολογιστές
σας, χωρίς την ανάγκη ξεχωριστού μόντεμ και δρομολογητή.
Router only (Μόνο δρομολογητής): Εάν έχετε ξεχωριστό καλωδιακό
ή DSL μόντεμ για πρόσβαση στο Internet, η επιλογή αυτή παρέχει
συνδεσιμότητα δικτύου στους οικιακούς υπολογιστές σας.
Ανοίγει η οθόνη We are now setting up your Linksys X1000 ίνεται
εγκατάσταση του Linksys X1000). Θα σας ζητηθεί να συνδέσετε τα
καλώδια του δρομολογητή.
5.
Αν στο Βήμα 4 επιλέξατε Router only (Μόνο δρομολογητής):
a.
Συνδέστε το καλώδιο τροφοδοσίας και ενεργοποιήστε το κουμπί
λειτουργίας.
Εγκατάσταση
User Guide
Linksys X1000 N300 Wireless Router with ADSL2+ Modem
i
Contents
Linksys X1000
i
Product Overview
X1000. . . . . . . . . . . . . . . . . . . . . . . . . . . . . . . . . . . . . .1
Top 1
Back 1
Wall-mounting placement 2
Installation
Set up your modem-router automatically . . . . . . . . . . . . . . .3
Set up your modem-router manually . . . . . . . . . . . . . . . . . .4
Connect your modem-router 4
Set up your modem-router as only a router 5
How to use Cisco Connect
How to access Cisco Connect . . . . . . . . . . . . . . . . . . . . . . .6
Main Menu . . . . . . . . . . . . . . . . . . . . . . . . . . . . . . . . . .6
Main Menu – Computers and Devices 7
Main Menu – Parental Controls 7
Main Menu – Guest Access 7
Main Menu – Router Settings 7
Advanced Conguration
How to access the browser-based utility. . . . . . . . . . . . . . . .8
How to use the browser-based utility. . . . . . . . . . . . . . . . . .9
Setup > Basic Setup . . . . . . . . . . . . . . . . . . . . . . . . . . . . .9
ADSL mode 9
Ethernet mode 10
Manual setup 12
Wi-Fi Protected Setup 13
Wireless > Wireless Security . . . . . . . . . . . . . . . . . . . . . . .14
Personal Options 14
Oce Options 14
Wireless Security 14
Wireless > Guest Access . . . . . . . . . . . . . . . . . . . . . . . . . 17
Guest Access 18
Guest Instructions 18
Troubleshooting
X1000. . . . . . . . . . . . . . . . . . . . . . . . . . . . . . . . . . . . . 19
Specications
X1000. . . . . . . . . . . . . . . . . . . . . . . . . . . . . . . . . . . . . 21
Contents
1
Product Overview
Linksys X1000
1
X1000
Top
Ethernet—If the LED is continuously lit, the modem router is
successfully connected to a device through that port.
Wi-Fi Protected Setup™The LED is continuously lit when a Wi-Fi
Protected Setup™ connection is successfully established. The LED
blinks slowly while Wi-Fi Protected Setup™ is setting up a connection,
and blinks rapidly if an error occurs. The LED is off when Wi-Fi Protected
Setup™ is idle.
Wireless—Lights up when the wireless feature is enabled. It flashes
when the modem router is actively sending or receiving data over the
network.
WAN—Lights up green when the modem router is connected directly
to an ADSL line. Lights up blue when the modem router is set up as
a router only and is connected to the internet through a separate
modem.
InternetLights up green when the modem router has an Internet
connection. Flashes green while the modem router is establishing the
Internet connection. Lights up red when the modem router cannot
obtain an IP address.
Power—Lights up green when the modem router is powered on.
When the modem router goes through its self-diagnostic mode during
every boot-up, the LED flashes. When the diagnostic is complete, the
LED is continuously lit. Lights up red when an error occurs.
Back
DSL portConnects to the ADSL line.
Cable portTo use the modem router as only a router, use
a network cable to connect this port to a separate modems
LAN/Ethernet port.
Ethernet port—Using Ethernet cables (also called network
cables), these Ethernet ports connect the modem router
to computers and other Ethernet network devices on your
wired network.
Wi-Fi Protected Setup™ button—Press this button to
have Wi-Fi Protected Setup search for your Wi-Fi Protected
Setup™-supported wireless device.
Reset buttonThis button allows you to reset the router
to its factory defaults. Press and hold the Reset button for
about five seconds.
Power portThe Power port connects to the included
power adapter.
Power button—Press | (on) to turn on the modem router.
Product Overview
2
Product Overview
Linksys X1000
Wall-mounting placement
The router has two wall-mount slots on its bottom panel. The distance between
the slots is 75.6 mm. Two screws are needed to mount the router.
Suggested Mounting Hardware
3-5 mm
7-8 mm 1.5-2 mm
NOTE
Cisco is not responsible for damages incurred by unsecured wall-
mounting hardware.
Follow these instructions:
1. Determine where you want to mount the router. Make sure that the wall
you use is smooth, flat, dry, and sturdy. Also make sure the location is
within reach of an electrical outlet.
2. Drill two holes into the wall. Make sure the holes are 75.6 mm apart.
3. Insert a screw into each hole and leave 3 mm of its head exposed.
4. Position the router so the wall-mount slots line up with the two screws.
5. Place the wall-mount slots over the screws and slide the router down
until the screws fit snugly into the wall-mount slots.
Wall-mounting template
Print this page at 100% size.
Cut along the dotted line, and place on the wall to drill precise spacing.
75,6 mm
3
Installation
Linksys X1000
3
Set up your modem-router automatically
1.
Insert the CD into your CD or DVD drive.
2.
Click Set up your Linksys Router.
DVD/CD-RW Drive (E:) Linksys
Router Setup
AutoPlay
Always do this for software and games:
Install or run program
General options
Set up your Linksys Router
Published by Cisco Consumer Products LLC
Set AutoPlay defaults in Control Panel
Open folder to view files
using Windows Explorer
Speed up my system
using Windows ReadyBoost
If you do not see this:
For Windows, click Start, Computer, then double-click the CD drive
and the Setup icon.
For Mac, double-click the CD icon on your desktop, then double-click
the Setup icon.
3.
Read the license terms, select the checkbox, then click Next.
4.
At the How will you be using your X1000 screen, click Modem router or
Router only, then click Next.
Modem router: Use the X1000 as both a DSL modem and a router. If
you have a DSL Internet service provider, this option provides Internet
access and networking connectivity to your homes computers,
without the need for a separate modem and router.
Router only: If you have a separate cable or DSL modem for Internet
access, this option provides networking connectivity to your homes
computers.
The We are now setting up your Linksys X1000 screen opens. You are then
asked to connect your routers cables.
5.
If you chose Router only in Step 4:
a.
Connect the power cable, then turn on the power switch.
b.
Connect the blue cable to the Cable port on the back of your router
and to the modem.
c.
Follow the on-screen instructions to finish the setup.
6.
Or, if you chose Modem router in Step 4:
a.
Connect the power cable. If your router has a power button, turn it
on.
Installation
4
Installation
Linksys X1000
b.
Connect the gray cable to the modem-router’s DSL port and to a
telephone jack on your wall, then click Next.
You are asked to enter your ISP information.
c.
Select your region, click Next, then select your ISP. If prompted, enter
your DSL account name and password.
Or, to skip the automatic detection of your region and manually
configure your Internet connection, select My region is not in this
list, then click Next. Use information available from your ISP to
complete the remaining screens for DSL settings, Internet type, and
account information.
d.
Follow the on-screen instructions to finish the setup.
Set up your modem-router manually
NOTE
Run the Setup CD-ROM to install the modem-router. If you cannot
run the Setup CD-ROM, refer to the steps below.
NOTE
If you are setting up your modem-router in New Zealand, see
“NOTE FOR USERS IN NEW ZEALAND” on page 6.
Connect your modem-router
To connect your modem-router:
1.
Power down all your network devices, including your computer(s) and
the modem-router. If you currently use a modem, disconnect it now—
the modem-router replaces your modem.
2.
Connect one end of the provided Ethernet cable to your computer’s
Ethernet adapter and the other end to an Ethernet port on the back of
the modem-router.
3.
Repeat step 2 for each additional computer or device that you want to
connect to the modem-router.
NOTE
If your computer’s Ethernet adapter is not set up, refer to the
Ethernet adapter’s documentation for more information.
4.
Connect one end of the phone cable to the DSL port on the back.
5
Installation
Linksys X1000
5.
Connect the other end of the phone cable to the wall jack with ADSL
service or microfilter.
NOTE
If you experience static on your phone line, you may need a
microfilter or splitter. (This is required for users in the UK; other
users should contact their ISPs to verify. ISDN users do not need
a microfilter.) If you require a microfilter, you must install one for
each phone or fax that you use. To install a microfilter, plug it into
a phone jack that has ADSL service, then connect one end of the
provided phone cable to the microfilters DSL port.
6.
Connect one end of the power adapter cord to the Power port and the
other end to the electrical outlet.
7.
Power on the computer that you will use to configure the modem-router.
8.
The LEDs for Power, Wireless, and Ethernet (one for each connected
computer) should light up. If not, make sure the modem-router is
powered on and the cables are securely connected.
Set up your modem-router as only a router
NOTE
Run the Setup CD-ROM to install the modem-router. If you cannot
run the Setup CD-ROM, refer to the steps below.
To set up your modem-router as a router:
1.
Connect one end of the provided Ethernet cable to your computer’s
Ethernet adapter and the other end to an Ethernet port on the back of
the modem-router.
2.
Connect one end of an Ethernet cable to the Cable port on the back of
the modem-router, then connect the other end to an available Ethernet/
LAN port on your modem.
3.
Connect one end of the power adapter cord to the Power port and the
other end to the electrical outlet.
4.
Power on the computer that you will use to configure the modem-router.
5.
The LEDs for Power, Wireless, and Ethernet (one for each connected
computer) should light up. If not, make sure the modem-router is
powered on and the cables are securely connected.
6
How to use Cisco Connect
Linksys X1000
NOTE FOR USERS IN NEW ZEALAND
To set up the device, follow these instructions:
1.
Access the Setup > Basic Setup screen.
2.
Select RFC 2364 PPPoA from the Encapsulation drop-down menu.
3.
For the Virtual Circuit ID, enter 0 for the VPI and 100 for the VCI.
4.
Select VC for Multiplexing.
5.
Select Multimode from the DSL Modulation drop-down menu.
6.
Enter your User Name and Password details from your ISP.
7.
Click Save Settings.
How to use Cisco Connect
Cisco Connect provides an easy way to manage your router and network. You
can connect computers or devices to your router, give Internet access to guests
in your home, and change the routers settings.
How to access Cisco Connect
Windows
Go to Start > All Programs > Cisco Connect.
Mac
Go to Go > Applications > Cisco Connect.
Main Menu
When Cisco Connect starts up, the main menu appears and offers four options:
Computers and Devices, Parental Controls, Guest Access, and Router Settings.
7
How to use Cisco Connect
Linksys X1000
Main Menu – Computers and Devices
Use this option to connect another computer or device to the router.
1.
To connect another computer or device to the router, click Add device.
Then, follow the on-screen instructions.
Main Menu – Parental Controls
Parental controls restrict Internet access for up to five computers. For the
computers you select, you can block or limit Internet access to specific times.
You can also block specific websites.
1.
To enable parental controls or change settings, click Change. Then,
follow the on-screen instructions.
Main Menu – Guest Access
Guest Access provides Internet access only; it does not provide access to the
local network and its resources. Guest Access helps minimize exposure of your
local network. To give Internet access to friends or family, provide the guest
network name and password displayed on this screen.
When a guest wants Internet access in your home, have the guest do the
following:
1.
Connect to the wireless guest network, which is the name of your wireless
network followed by -guest.
2.
Open a web browser.
3.
On the login screen, enter the password of your guest network. Then
click Login.
4.
To disable Guest Access or change settings, click Change. Then, follow
the on-screen instructions.
Main Menu – Router Settings
Use this option to personalize the routers settings.
1.
To change settings, click Change. The Router settings screen appears.
Personalize
Router name The name of the router is displayed (this is also the name of
your wireless network). To change the name, click Change. Then, follow the
on-screen instructions.
Password The password that protects access to the routers settings is
displayed (this also protects wireless access to your local network). To change
the password, click Change. Then, follow the on-screen instructions.
CAUTION
When you change the router name or password, the name or
password of your wireless network also changes, and the router
is reset. ALL computers and devices connected to your router will
momentarily lose their Internet connection. Wired computers and
devices will reconnect automatically; however, you will need to
reconnect all wireless computers and devices using the wireless
networks new name or password.
Port Lights
on/off To allow the lights on the router to turn on, keep the default, on.
8
Advanced Configuration
Linksys X1000
Easy Setup Key
Update or create key The Easy Setup Key is a USB flash drive that holds the
wireless settings for the router. If you want to create or update an Easy Setup
Key, click this option. Then, follow the on-screen instructions.
Internet Speed
Launch Test You can use the Internet speed test to determine your ISP’s
current download and upload speeds. Connection speed depends on many
factors, and may change throughout the day. To run the speed test, click this
option. Then, follow the on-screen instructions.
Other Options
Register now to receive special offers and updates To sign up to receive
special offers and updates from Cisco and Cisco partners, click this option.
Router details To view more information about the router, click this option.
The Router details screen appears, displaying the Model name, Model number,
Serial number, Firmware version, Operating system, Software version,
Connection type (WAN), IP address (LAN), IP address (WAN), and Computer IP
address. (WAN stands for Wide Area Network, such as the Internet. IP stands for
Internet Protocol. LAN stands for Local Area Network.)
Advanced settings To access settings for advanced users, click this option.
Then, follow the on-screen instructions.
Advanced Configuration
After setting up the router with the setup software (located on the CD-ROM),
the router will be ready for use. If you would like to change its advanced
settings, or if the software does not run, use the router’s browser-based utility.
You can access the utility via a web browser on a computer connected to the
router. For more help with the utility, click Help on the right side of the screen
or go to our website.
How to access the browser-based utility
1.
To access the browser-based utility, launch the web browser on your
computer, and enter the router’s default Internet Protocol (IP) address,
192.168.1.1, in the Address field. Then press Enter.
NOTE
You can also access the browser-based utility on Windows
computers by entering the device name in the Address field.
A login screen appears. (A similar screen appears for non-Windows 7
users.)
2.
In the User name field, enter admin.
9
Advanced Configuration
Linksys X1000
3.
In the Password field, enter the password created by the setup software.
If you did not run the setup software, then enter the default, admin.
NOTE
You can also access the browser-based utility through Cisco
Connect.
4. Click OK to continue.
How to use the browser-based utility
Use the tabs at the top of each screen to navigate within the utility. The tabs are
arranged in two levels, top-level tabs for general functions and lower-level tabs
for the corresponding specific functions.
The top-level tabs are: Setup, Wireless, Security, Access Restrictions, Applications
& Gaming, Administration, and Status. Each of these has its own unique, lower-
level tabs.
NOTE
Within this User Guide, each screen is identified by its top- and
lower-level tab names. For example, “Setup > Basic Setup” is the
screen accessed via the Setup top-level tab, and its Basic Setup
lower-level tab.
If you change any settings on a screen, you must click Save Settings to apply
your changes, or click Cancel Changes to clear your changes. These controls
are located at the bottom of each screen.
NOTE
To learn more about any field, click Help on the right side of the
screen.
Setup > Basic Setup
The first screen that appears is the Basic Setup screen. This allows you to change
the router’s general settings.
ADSL mode
ADSL mode (default) has the following fields that should be completed:
Language
Select your language
To use a different language, select one from the drop-
down menu. The language of the browser-based utility will change five seconds
after you select another language.
Internet Setup
The Internet Setup section configures the router to your Internet connection.
Most of this information can be obtained through your Internet Service
Provider (ISP).
10
Advanced Configuration
Linksys X1000
Internet Connection Type
Select the type of Internet connection your ISP provides from the drop-down
menu. The available types are:
Bridged Mode Only
RFC 2684 Bridged
RFC 2684 Routed
IPoA
RFC 2516 PPPoE
RFC 2364 PPPoA
Bridged Mode Only
In this mode, only the DSL modem function is available, and all Gateway
features are disabled. If selected, you only need to enter the VC Settings.
RFC 2684 Bridged
If selected, enter the correct data for the IP Settings. Select Obtain an IP
address automatically if your ISP allocates an IP address upon connection.
Otherwise, select Use the following IP address.
RFC 2684 Routed
With this method, you are required to use a permanent IP address to connect
to the Internet.
IPoA
IPoA (IP over ATM) uses a fixed IP address.
RFC 2516 PPPoE
Some DSL-based ISPs use PPPoE (Point-to-Point Protocol over Ethernet) to
establish Internet connections. If you are using PPPoE, your IP address is
provided automatically.
RFC 2364 PPPoA
Some DSL-based ISPs use PPPoA (Point-to-Point Protocol over ATM) to establish
Internet connections. If using PPPoA, your IP address is provided automatically.
Network Setup
The Network Setup section configures the IP settings for your local network.
Ethernet mode
If you select Ethernet (router-only) mode, the following fields are available:
Language
Select your language
To use a different language, select one from the drop-
down menu. The language of the browser-based utility will change five seconds
after you select another language.
Internet Setup
The Internet Setup section configures the router to your Internet connection.
Most of this information can be obtained through your Internet Service
Provider (ISP).
11
Advanced Configuration
Linksys X1000
Internet Connection Type
Select the type of Internet connection your ISP provides from the drop-down
menu. The available types are:
Automatic Configuration - DHCP
Static IP
PPPoE
PPTP
L2TP
Telstra Cable
Automatic Configuration - DHCP
The default Internet Connection Type is Automatic Configuration - DHCP
(Dynamic Host Configuration Protocol). Keep the default only if your ISP
supports DHCP or if you connect using a dynamic IP address. (This option
usually applies to cable connections.)
Static IP
If you are required to use a fixed IP address to connect to the Internet, select
Static IP.
PPPoE
If you have a DSL connection, check whether your ISP uses Point-to-Point
Protocol over Ethernet (PPPoE). If so, select PPPoE.
Connect on Demand or Keep AliveThe Connect on Demand and Keep
Alive options let you choose whether the router connects to the Internet
only as needed (useful if your ISP charges for connect time), or if the
router should always be connected. Select the appropriate option.
PPTP
Point-to-Point Tunneling Protocol (PPTP) is a service that generally applies to
connections in Europe. If your PPTP connection supports DHCP or a dynamic IP
address, then select Obtain an IP Address Automatically. If you are required
to use a fixed IP address to connect to the Internet, then select Specify an IP
Address and configure the options below.
Connect on Demand or Keep AliveThe Connect on Demand and Keep
Alive options let you choose whether the router connects to the Internet
only as needed (useful if your ISP charges for connect time), or if the
router should always be connected. Select the appropriate option.
L2TP
Layer 2 Tunneling Protocol (L2TP) is a service that generally applies to
connections in Israel.
Connect on Demand or Keep AliveThe Connect on Demand and Keep
Alive options let you choose whether the router connects to the Internet
only as needed (useful if your ISP charges for connect time), or if the
router should always be connected. Select the appropriate option.
Telstra Cable
Telstra Cable is a service that generally applies to connections in Australia.
Network Setup
The Network Setup section configures the IP settings for your local network.
Wireless > Basic Wireless Settings
NOTE
To learn more about any field, click Help on the right side of the
screen.
The basic settings for wireless networking are set on this screen.
There are two ways to configure the Routers wireless network(s), manual and
Wi-Fi Protected Setup.
Wi-Fi Protected Setup is a feature that makes it easy to set up your wireless
network. If you have client devices, such as wireless adapters, that support Wi-
Fi Protected Setup, then you can use Wi-Fi Protected Setup.
Configuration View To manually configure your wireless networks, select
Manual.
12
Advanced Configuration
Linksys X1000
Manual setup
Set up the wireless network on this screen.
NOTE
After you set up the wireless network(s), set up the wireless security
settings. Go to Wireless > Wireless Security on page 14.
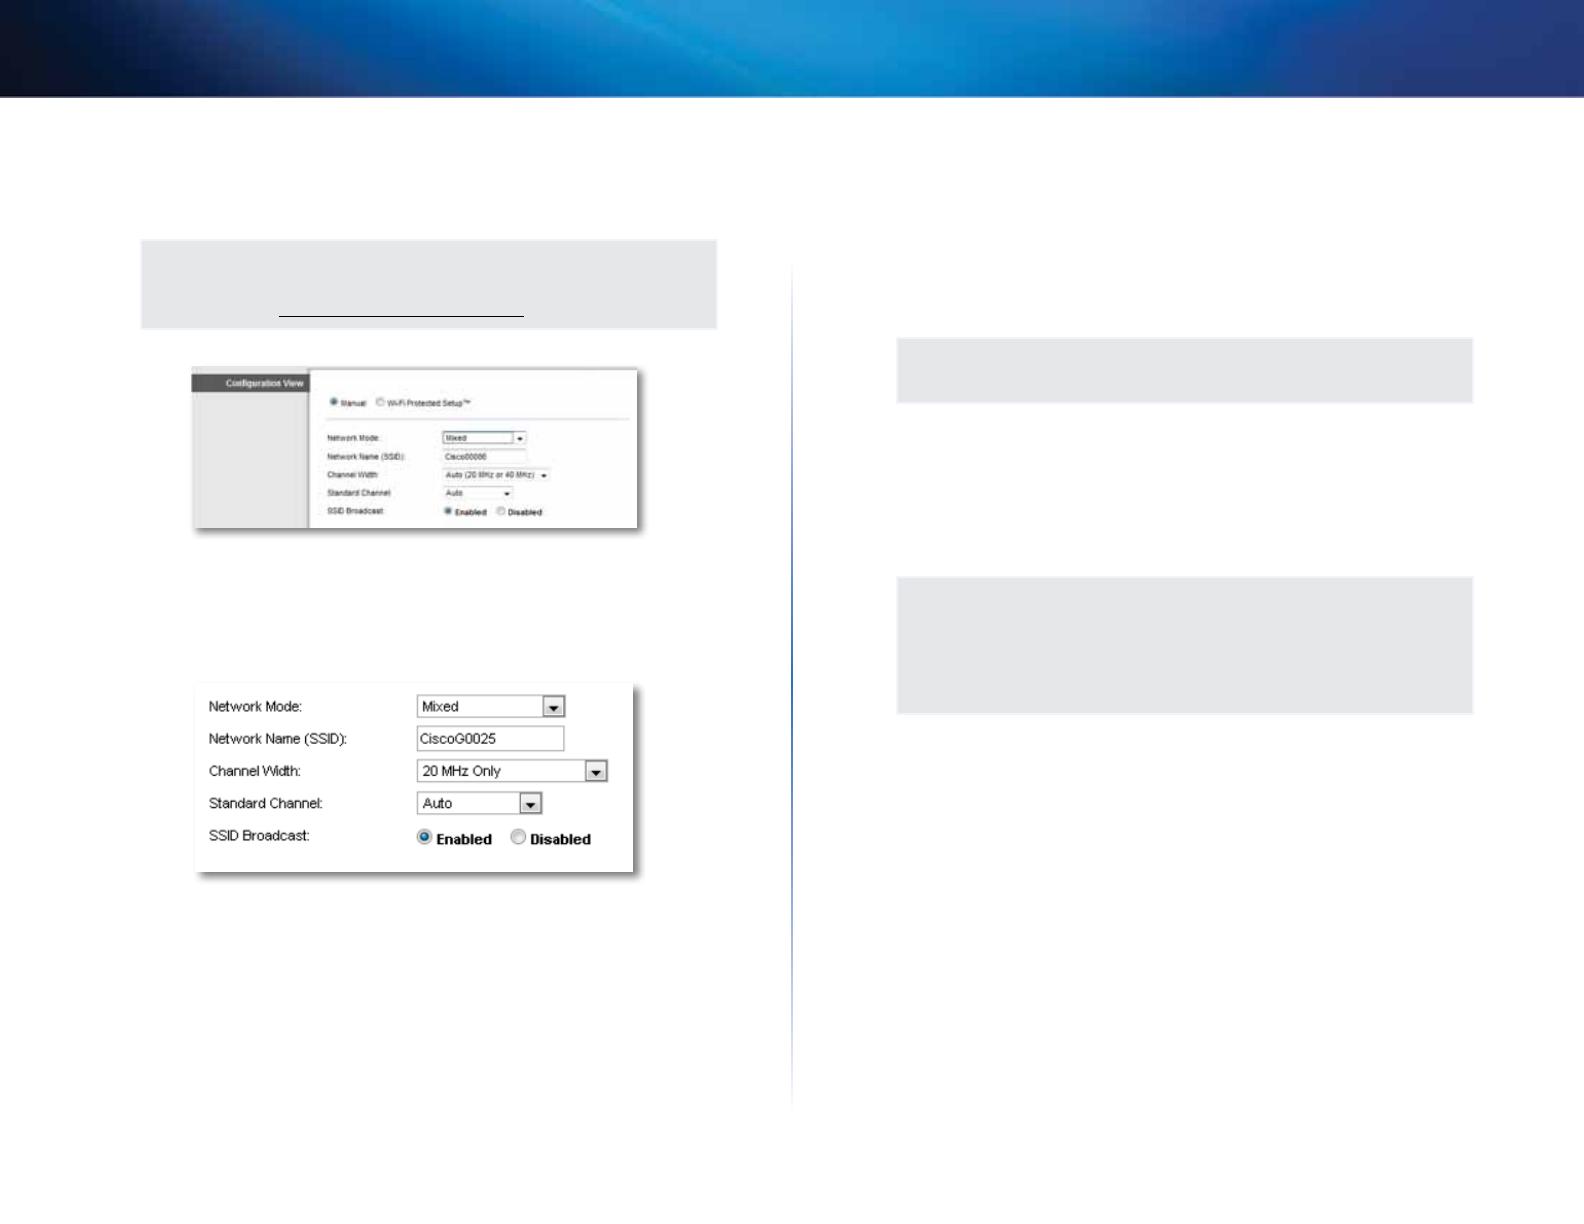
Network Mode In most network configurations, you should leave it set to
Mixed (default).
Wireless settings
Basic Wireless Settings (Manual) > Wireless Settings
Network Mode Select the wireless standards your network will support.
Mixed If you have Wireless-N, Wireless-G, and Wireless-B devices in your
network, keep the default, Mixed.
Wireless-B/G Only If you have both Wireless-B and Wireless-G devices in
your network, select Wireless-B/G Only.
Wireless-B Only If you have only Wireless-B devices, select Wireless-B
Only.
Wireless-G Only If you have only Wireless-G devices, select Wireless-G
Only.
Wireless-N Only If you have only Wireless-N devices, select Wireless-N
Only.
Disabled If you have no Wireless-B, Wireless-G, and Wireless-N devices in
your network, select Disabled.
NOTE
If you are not sure which mode to use, keep the default, Mixed.
Network Name (SSID) The Service Set Identifier (SSID) is the network name
shared by all devices in a wireless network. It is case-sensitive and must not
exceed 32 keyboard characters. The default is Cisco followed by the last 5 digits
of the router’s serial number, which is found on the bottom of the router. If
you used the setup software for installation, then the default Network Name is
changed to an easy-to-remember name.
NOTE
If you restore the routers factory default settings (by pressing the
Reset button or using the Administration > Factory Defaults screen),
the Network Name will return to its default value, and all devices
on your wireless network will need to be reconnected.
Channel Width For best performance in a network using Wireless-B, Wireless-G
and Wireless-N devices, select Auto (20 MHz or 40 MHz). For a channel width
of 20 MHz, keep the default, 20 MHz only.
Standard Channel Select the channel from the drop-down list for Wireless-B,
Wireless-G, and Wireless-N networking. If you are not sure which channel to
select, then keep the default, Auto.
SSID Broadcast When wireless clients survey the local area for wireless
networks to associate with, they will detect the SSID broadcast by the router.
To broadcast the routers SSID, keep the default, Enabled. If you do not want to
broadcast the routers SSID, then select Disabled.
13
Advanced Configuration
Linksys X1000
Wi-Fi Protected Setup
Three methods of Wi-Fi Protected Setup are available. Use the method that
applies to the client device you are configuring.
NOTE
Wi-Fi Protected Setup configures one client device at a time.
Repeat the instructions for each client device that supports Wi-Fi
Protected Setup.
Wi-Fi Protected Setup light activity
The Cisco logo on the top panel of the router functions as the Wi-Fi
Protected Setup light.
When the Wi-Fi Protected Setup process is active, the light flashes slowly.
When the Wi-Fi Protected Setup is successful, the light is continuously lit.
If there is an error, the light flashes quickly for two minutes; please wait
and try again.
Wait until the light is continuously lit, before starting the next Wi-Fi
Protected Setup session.
Wi-Fi Protected Setup Button Use this method if your client device has a
Wi-Fi Protected Setup button.
NOTE
Make sure you configure one client device at a time.
a.
Click or press the Wi-Fi Protected Setup button on the client device.
b.
Click the Wi-Fi Protected Setup button on the routers Wi-Fi Protected
Setup screen, OR press and hold the Wi-Fi Protected Setup button on
the back panel of the router for one second.
c.
After the client device has been configured, click OK on the router’s
Wi-Fi Protected Setup screen within two minutes.
Enter Client Device PIN on Router Use this method if your client device
has a Wi-Fi Protected Setup PIN (Personal Identification Number).
a.
Enter the PIN from the client device in the field on the routers Wi-Fi
Protected Setup screen.
b.
Click the Register button on the routers Wi-Fi Protected Setup screen.
c.
After the client device has been configured, click OK on the router’s
Wi-Fi Protected Setup screen within two minutes.
/