Page is loading ...

2
1
3
4
7
6
5
PROFESSIONAL Stud Finder
HART9PRO
SAFETY RULES FOR
THE PROFESSIONAL Stud Finder
WARNING:
Read all instructions before use. Failure to follow
safety instructions may result in electric shock, fire,
and/or serious injury and death.
WARNING:
TURN OFF all gas, water, and electric power before
using any drilling or penetrating devices or
equipment including drills, saws, routers, hammers,
nails, screws, etc.
FAILURE TO TAKE THESE AND OTHER
NECESSARY PRECAUTIONS COULD RESULT IN
ELECTRIC SHOCK, FIRE, AND/OR SERIOUS
INJURY AND DEATH.
Use extreme caution under these circumstances or
whenever live wiring is present. Always turn off the
electrical power, gas and water supplies before
penetrating a surface.
FCC PART 15 CLASS B
REGISTRATION WARNING
This device complies with Part 15 of FCC rules.
Operation is subject to the following two conditions:
1. This device may not cause harmful interference, and
2. This device must accept any interference received,
including interference that may cause undesired
operation.
NOTICE:
It is possible that there may be wood, metal, wiring,
or other objects behind the surface that are not
detected. The stud finder may also detect pipes,
wires, or other objects that the user may not want it
to detect. The stud finder is designed to detect any
inconsistency but does not identify what type of
inconsistency or object it detects. The illuminated
LEDs may indicate the location of many different
features including, but not limited to, studs, beams,
water pipes, gas pipes, wires, an inconsistency in
the surface material or paint, etc.
NOTICE:
The stud finder alone should not be relied upon
exclusively to locate objects behind a scanned
surface. Use other sources of information to help
locate objects. Other sources of information may
include, but are not limited to, construction plans,
visible points of entry of pipes, location of switches
and outlets, and standard stud spacing practices.
SYMBOL SIGNAL MEANING
PRODUCT SPECIFICATIONS
Product Weight: 0.32 lbs
Product Dimensions: 5.45 x 2.8 x 2.05 in.
ACCURATE
The multiple LEDs on the PROFESSIONAL Stud Finder
track the location of studs to accurately and reliably
identify the center and edges of studs simultaneously.
EASY
Just press and hold the button to instantly detect studs.
No calibration required.
MULTI-SENSE TECHNOLOGY
The PROFESSIONAL Stud Finder has 9 sensors with
Multi-Sense Technology. In comparison, conventional
stud finders have 1 or 2 sensors. With more sensors, the
PROFESSIONAL stud finder more accurately identifies
the location of studs.
TO OPERATE:
• Hold the stud finder by the
handle. Do not touch the
detector outside of the
handle area while
scanning.
• Place the
PROFESSIONAL
Stud Finder firmly against the surface.
Press and hold the “on” button.
• With the button depressed, you may immediately begin
scanning the wall. (No calibration or tuning is required.)
As you scan, LED lights will immediately display the
location of any hidden objects.
• The PROFESSIONAL Stud Finder uses Active Learning
Technology™. With Active Learning Technology™, the
readings become more accurate the longer you hold
the button while scanning the wall.
• On some surfaces, it may be helpful to slide the stud
finder up and down to confirm the location of a stud.
HANDLE HOLD
When operating the PROFESSIONAL Stud Finder, the
hand should remain on the handle. Holding the
PROFESSIONAL Stud Finder on the sides may cause
the unit to work inaccurately.
FEATURES
SENSING THROUGH DIFFERENT MATERIALS:
Moisture
The scanned surface should be clean and dry. Paint and
wallpaper need to be completely dry before scanning for
studs. It may take up to 2 weeks for wallpaper to dry
enough to detect studs.
Foil-Backed Insulation
Although not common, foil-backed insulation can cause
inconsistent readings with all electronic stud finders,
including the PROFESSIONAL Stud Finder.
Metallic Content in Wallpaper
Wallpaper with metallic content can block the detector’s
signals.
Textured Walls and Acoustic Ceilings
The PROFESSIONAL Stud Finder is capable of detecting
studs through many textures and surfaces. The unit will
however work most accurately if placed firmly against the
flattest portions of the wall. For the best results, prior to
beginning your scan, identify a horizontal area that is
consistently the flattest.
Lath and Plaster
Irregularities in plaster thickness and variations in
construction materials can make it difficult to locate
studs behind lath and plaster walls. Also, the stud finder
may not be able to detect if the plaster uses metal mesh
reinforcement. Although many users have success, there
is no guarantee the PROFESSIONAL Stud Finder will
work on all lath and plaster walls.
Tile, Flooring, Roofing, and Exteriors
The PROFESSIONAL Stud Finder works by measuring
the density of material behind the sensors to determine
the location of studs. Due to the variability of density in
tile flooring, roofing and exterior materials, we do not
recommend the PROFESSIONAL Stud Finder for use in
these applications.
LIVE ELECTRICAL WARNING™
The PROFESSIONAL Stud Finder LIVE ELECTRICAL
WARNING™ works continually while the button is
depressed. When a live electrical wire is detected, the
yellow lightning bolt symbol may illuminate to indicate
the presence of live wires.
The PROFESSIONAL Stud
Finder uses Active Learning
Technology™. To best
detect the presence of live
electrical wires, slowly scan
in both directions, passing over the same location
multiple times, for a more accurate reading.
NOTE: The PROFESSIONAL Stud Finder LIVE
ELECTRICAL WARNING™ is optimized for finding live
wires near studs.
WARNING: Use extreme caution under these
circumstances or whenever live wiring is present.
Always turn off the electrical power, gas and water
supplies before penetrating a surface.
STICKERS / DECALS
Do not place decals or stickers, especially those
containing metal, on the sensor board, or on the stud
finder in any place.
DISASSEMBLY / PLASTIC PADS
Do not disassemble the stud finder or remove the plastic
pads on the bottom. The stud finder will not operate
correctly without the plastic pads properly in place.
Cleaning
Before turning on, ensure that the stud finder is clean and
dry. If necessary, wipe the stud finder dry using a clean
cloth. If the detector is wet or dirty it may not operate
properly.
Temperature
If the stud finder is subject to a significant temperature
change, allow it to adjust to the ambient temperature
before using. The entire area of the sensor board should
be at a similar temperature for best operation.
BATTERIES
The PROFESSIONAL Stud Finder uses 2 AAA batteries.
Do not mix old and new batteries. Do not mix alkaline,
standard or rechargeable batteries. For best
performance, use alkaline batteries only.
REPLACING THE BATTERIES
• Remove the battery cover by gently depressing on the
right side and then lifting. Remove both
batteries and dispose of them
properly. Please recycle.
• Replace with new AAA
batteries.
• Close the battery cover by inserting the clip into the
battery cavity, gently depress the other side of the
battery cover inserting the other clip into the battery
cavity until it clicks closed.
DISPOSAL
Stud finders and packaging should be sorted for
recycling.
ENVIRONMENTAL CONDITIONS
HART stud finders will work best when maintained in
the following environmental conditions:
Storage
Temperature (0°F to 120°F)
(-18°C to 50°C)
Humidity 0% to 90%
Relative humidity
(non-condensing)
Operating
Temperature (32°F to 110°F)
(0°C to 43°C)
Humidity 0% to 90%
Relative humidity
(non-condensing)
LIMITED WARRANTY
Franklin Sensors warrants this product to be free from
defects in material and workmanship for one year. This
LIMITED WARRANTY does not cover products that are
improperly used, abused, or altered. Defective
products will be replaced or repaired. If a product is
found to be defective within the warranty period,
Franklin Sensors will, at its sole discretion, either repair
or replace the defective product. This limited warranty
does not apply to products that are subjected to freight
damage, accident, abuse, alteration, misuse, improper
repair, etc. Franklin Sensors and Franklin Sensors’
authorized distributors shall bear no other liability or
obligation under this warranty.
IN NO EVENT SHALL FRANKLIN SENSORS HAVE
ANY LIABILITY FOR CONSEQUENTIAL OR
INCIDENTAL DAMAGES INCLUDING, BUT NOT
LIMITED TO, LOST PROFITS, DAMAGE TO
GOODWILL, LOSS OF TIME, INCONVENIENCE OR
OTHER COMMERCIAL OR ECONOMIC LOSS, and in
no event shall Franklin Sensors be liable for damages
exceeding the purchase price.
HART, the HART logo and H logo are trademarks of
Techtronic Cordless GP and are used pursuant to a
license.
In the event of a product defect, please return the
product postage paid with proof of purchase to:
Franklin Sensors Inc.
Attn: Returns Department
6675 N Pollard Ln.
Meridian, ID 83646
(208) 918-2403
returns@franklinsensors.com
Hours of Operation: Monday-Friday,
8 AM to 5 PM,
Mountain Time Zone
US Patents 8,476,912 8,669,772 8,736,283
8,791,708 8,836,347 8,884,633
US and Foreign Patents Pending.
HART9PROE1 (12-2019)
WARNING:
OPERATOR’S MANUAL
!
!
!
LIVE
ELECTRICAL
WARNING™:
Indicates a hazardous
situation, which, if not
avoided, could result
in death or serious
injury.
Indicates a hazardous
situation, which, if not
avoided, could result
in death or serious
injury.
Includes information
considered important.
NOTICE:
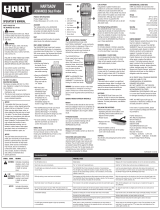
1. LED Lights
2. LIVE ELECTRICAL
WARNING™
3. Battery Cover
4. Ergonomic Handle
5. Detector Housing
6. Sensor Board
7. “On” Button
TROUBLESHOOTING
CONDITION PROBABLE CAUSE SOLUTION
No LED lights come on. Weak battery. Replace with 2 new AAA alkaline batteries. Do not mix old and new batteries.
Stud finder only works momentarily. The “on” button isn’t being held down.
Hold the “on” button down until you have completed your scan.
The LED lights are indicating the location of pipes and wires, not just studs.
The PROFESSIONAL Stud Finder indicates the location of inconsistencies.
The LED lights may indicate the location of a pipe, electrical wiring, other objects near the surface being
scanned, or an inconsistency in the surface material or paint, etc.
Look for evenly placed studs on either side. Scan above the location and below the location to
confirm results. Use caution before penetrating wall. See the SAFETY RULES FOR THE PROFES-
SIONAL Stud Finder.
Difficulty starting a scan near doors and windows. Solid headers and triple studs are often present around doors and windows. The
PROFESSIONAL Stud
Finder
indicates the change in density. If all the sensors sense the same density, the LEDs will not illuminate.
Begin the scan away from the window or door, then move the stud finder to the area around the
window or door. For best results, keep stud finder 3”/7cm away from wood trim, outlets, switches, etc.
Stud finder doesn’t work through new wall paper. The moisture in the wall after wall papering can block the stud finder’s signal. Wait until the wallpaper is dry. It may take up to 2 weeks for the paper to dry sufficiently.
My house was built prior to about 1960. The walls are lath and plaster.
The stud finder doesn’t work very well anywhere in my house.
Older houses that were built with lath and plaster, instead of sheet rock, often have too much inconsistency
in the walls for the detector to work reliably.
Try using the stud finder at a higher point on the wall, or a lower point on the wall.
Inconsistent readings. Operator is holding the unit near the base rather than on the handle.
Anomaly in the surface material.
Sometimes after continuously scanning the wall for a period of time the readings seem to be less consistent.
Only hold the unit by the handle with a finger continually pressing the button.
Test at a higher location, or lower location on the wall.
Release the button and press the button again.
The LED lights sometimes appear to light up sporadically or inconsistently. Wires, pipes, or other construction inconsistencies can cause erratic or erroneous readings. Features on the
opposite side of a wall may also be a source of inconsistent readings.
Test at points on the wall that are higher, or lower. The stud finder may also work best if it is used
more than 3”/7cm away from metal objects such as outlets, light switches, etc.
1/1