Page is loading ...

STICKERS / DECALS
Do not place decals or stickers, especially metal
decals or stickers on the sensor board, or on the
stud nder in any place.
DISASSEMBLY / TEFLON PADS
Do not disassemble the stud nder or remove
the teon pads that are on the bottom. The stud
nder will not operate correctly without the
teon pads properly in place.
BATTERIES
The ProSensor 710 uses 2 AA batteries. Use
alkaline batteries only; do not use rechargeable
batteries. Replace both batteries at the
same time.
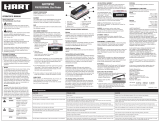
REPLACING THE BATTERIES
• Remove battery cover,
by sliding the cover to
the left and lifting.
Remove batteries and
dispose of the
batteries properly. Please recycle.
• Replace with 2 new AA alkaline batteries.
• Replace battery cover. Close battery cover
by sliding the cover to the right until it snaps
into place.
STORAGE
Store the stud nder in a clean, dry place at
room temperature. Protect against direct sunlight
and moisture.
ENVIRONMENTAL CONDITIONS
Storage Temperature 0°F to 120°F
(-18°C to 50°C)
Operating Temperature 32°F to 110°F
(0°C to 43°C)
Storage Humidity 0% to 90%
relative humidity
(non-condensing)
Operating Humidity 0% to 90%
relative humidity
(non-condensing)
DISPOSAL
Stud nders and packaging should be sorted
for recycling.
FCC PART 15 CLASS B REGISTRATION
WARNING
This device complies with Part 15 of FCC rules.
Operation is subject to the following two
conditions:
1. This device may not cause harmful
interference,
and
2. This device must accept any interference
received, including interference that may
cause undesired operation.
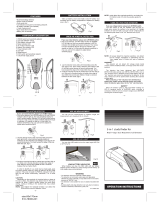
TO OPERATE:
• Hold the stud nder by the handle. Do not
touch the detector outside of the handle area
while scanning.
• Place the ProSensor 710 rmly against the
surface and press the “on” button. Continue to
hold the “on” button down.
• LED lights will immediately display the location
of any hidden objects.
• The “on” button may be pressed before or
after placing the stud nder on the surface to
be scanned. The stud nder will detect studs
without sliding the stud nder across the wall,
but will also operate correctly if it is slid across
the wall.
• If more than one hidden object is present, the
stud nder will show the location of more than
one hidden object.
• LED lights indicate the width of hidden
object(s).
• On some surfaces it may be helpful to slide the
stud nder up and down to conrm the
location of a stud.
Professional
STUD
FINDER
PROSENSOR 710
FRANKLIN SENSORS PROSENSOR 710
Congratulations on selecting the most advanced
wall sensor on the market. Your ProSensor 710
incorporates advanced technology that precisely
senses the surface in thirteen locations
simultaneously, then instantly identies the
location(s) of hidden object(s). It is the
easiest-to-use, fastest, and most accurate stud
nder on the market.
SAFETY RULES FOR THE PROSENSOR 710
WARNING: Read all instructions before use.
Failure to follow safety instructions may result
in electric shock, re, and/or serious injury
and death.
SAVE THESE INSTRUCTIONS
WARNING: It is possible that there may be
wood, metal, wiring, or other objects behind the
surface that are not detected. It is also possible
that the stud nder may detect pipes, wires, or
other objects that the user may not want it to
detect. The stud nder is designed to detect any
inconsistency without identifying the nature of
the inconsistency. The stud nder does not
identify what type of object it detects. The
illuminated LEDs may indicate the location of
many different features including, but not limited
to, studs, beams, water pipes, gas pipes, wires,
an inconsistency in the surface material or
paint, etc.
WARNING: TURN OFF all gas, water, and
electric power before using any drilling or
penetrating devices or equipment including
drills, saws, routers, hammers, nails, screws, etc.
WARNING: The stud nder alone should not be
relied upon exclusively to locate objects behind
a scanned surface. Use other sources of
information to help locate objects. Other sources
of information may include, but is not limited to,
construction plans, visible points of entry of
pipes, location of switches and outlets, and
standard 16" and 24" stud spacing practices.
FAILURE TO TAKE THESE AND OTHER
NECESSARY PRECAUTIONS COULD RESULT
IN ELECTRIC SHOCK, FIRE, AND/OR SERIOUS
INJURY AND DEATH.
Clean
Before turning on, ensure that the stud nder is
clean and dry. If necessary, wipe the stud nder
dry using a clean cloth. If the detector is wet or
dirty it may not operate properly.
Temperature
If the stud nder is subject to a signicant
temperature change, allow it adjust to the
ambient temperature before using. The entire
area of the sensor board should be at a similar
temperature for best operation.
IMPORTANT: READ BEFORE USING.
SAVE THESE INSTRUCTIONS.
Operating/Safety Instructions
1. LED Lights
2. Ergonomic Handle
3. “On” Button
4. Battery Cover
5. Detector Housing
6. Sensor Board
OPERATING INSTRUCTIONS
1
2
3
4
6
5
SENSING THROUGH DIFFERENT MATERIALS:
Moisture
The scanned surface should be clean and dry.
Paint and wallpaper need to be completely dry
before scanning for studs. It may take up to
2 weeks for wallpaper to dry enough to
detect studs.
Curved Surfaces
There is a minor degree of curvature in the walls
of most homes and buildings. The curvature is
small enough that it may not be noticed. The
ProSensor 710 can detect objects through
curved surfaces because the ProSensor 710 has a
sensor board that bends slightly to match the
contour of most walls. Press the stud nder rmly
against the surface and the sensor board will
match the contour of the surface, and provide
the best reading.
Foil-Backed Insulation
Although foil covered insulation is not very
common, metal foil can cause inconsistent
readings with all electronic stud nders,
including the ProSensor 710.
Metallic Content in Wallpaper
Wallpaper with metallic content can block the
detector’s signals.
Textured Walls and Acoustic Ceilings
The ProSensor 710 is capable of detecting studs
through many textured surfaces. The stud nder
should be placed rmly against the surface for
best results.
Lath and Plaster
Irregularities in plaster thickness and variations in
construction materials can make it difcult to
locate studs behind lath and plaster walls. Also,
if the plaster has a mesh reinforcement, the stud
nder may not be able to detect through the
metal mesh. Although many users have success
with the ProSensor 710 on lath and plaster walls,
there is no guarantee the ProSensor 710 will
work on all lath and plaster walls.
Tile, Flooring, Roong, and on the Outside
of the House
The ProSensor 710 works by measuring the
density of material behind the sensors to
determine the location of studs. Due to the
variability in the density of materials in tile,
ooring, roong, and on the outside of the
house, we do not recommend the ProSensor
710 for use in these applications.
Fold
Fold
Fold Fold
WARRANTY
Franklin Sensors warrants this product to be free
from defects in material and workmanship for
one year. This LIMITED WARRANTY does not
cover products that are improperly used, abused,
or altered. Defective products will be replaced or
repaired. If a product is found to be defective
within the warranty period, Franklin Sensors will,
at its sole discretion, either repair or replace the
defective product. This limited warranty does not
apply to products that are subjected to freight
damage, accident, abuse, alteration, misuse,
improper repair, etc. Franklin Sensors and
Franklin Sensors’ authorized distributors shall
bear no other liability or obligation under
this warranty.
Franklin Sensors does not authorize any person or
representative
to assume or grant any other
warranty or obligation with the sale of this
product. Franklin Sensors’ limited warranty is
valid only if you retain proof of purchase from
Franklin Sensors or a Franklin Sensors authorized
dealer for this product. If you purchase this
product from any other source, your purchase is
“AS IS,” which means Franklin Sensors grants
you no warranty, and that you, not Franklin
Sensors, assume the entire risk of the quality and
performance of this product. The warranty
period for any replaced and/or repaired part
under this warranty shall expire at the end of the
original warranty period.
ALL EXPRESS AND IMPLIED WARRANTIES FOR
THIS PRODUCT, ARE LIMITED IN DURATION TO
THE WARRANTY PERIOD, AND NO
WARRANTIES, WHETHER EXPRESS OR
IMPLIED, WILL APPLY AFTER THIS PERIOD. THIS
WARRANTY IS EXCLUSIVE AND IN LIEU OF ALL
OTHER OBLIGATIONS, LIABILITIES OR
WARRANTIES. In no event shall Franklin Sensors
or its licensed distributors be liable or
responsible for INCIDENTAL OR
CONSEQUENTIAL DAMAGES or for any other
direct or indirect damage, loss, cost, expense or
fee. Some states do not allow the exclusion or
limitation of incidental or consequential
damages, so this exclusion or limitation may not
apply to you. This warranty gives you specic
legal rights and you may also have other rights
that vary from state to state.
In the event of a product defect, please return
the product postage paid with proof of
purchase to:
Franklin Sensors Inc.
Attn: Returns Department
13601 W. McMillan Road Suite 102 - 170
Boise, ID 83713
(208) 918-2403
Hours of Operation: Monday-Friday,
8 AM to 5 PM,
Mountain Time Zone
US and Foreign Patents Pending.
Rev. E1
TROUBLE SHOOTING
TROUBLESHOOTING
CONDITION PROBABLE CAUSE SOLUTION
No LED lights come on. Weak battery. Replace with 2 new AA alkaline batteries.
Stud nder only works momentarily. The “on” button isn’t being held down.
Hold the “on” button down until you have completed your scan.
The LED lights are indicating the location of pipes
and wires, not just studs.
The ProSensor 710 indicates the location of inconsistencies.
The
LED lights may indicate the location of a pipe, electrical wiring,
other objects near the surface being scanned, or an inconsistency
in the surface material or paint, etc.
Look for evenly placed studs on either side (16", 24", on center, etc.) Scan
above the location and below the location to conrm results. Use caution
before penetrating wall. See the SAFETY RULES FOR THE PROSENSOR 710.
Difculty starting a scan near doors and windows. Double studs, triple studs and solid headers are often
present
around doors and windows. The stud nder requires
the presence
of a region without studs to correctly identify studs.
Begin the scan away from the window or door, then move the stud nder to the
area around the window or door. For best results, keep stud nder 3" away from
wood trim, outlets, switches, etc.
Stud nder doesn’t work through new wall paper. The moisture in the wall after wall papering can block the stud
nder’s signal.
Wait until the wallpaper is dry. It may take up to 2 weeks for the paper to dry
sufciently.
My house was built prior to about 1960. The walls
are lath and plaster. The stud nder doesn’t work
very well anywhere in my house.
Older houses that were built with lath and plaster, instead of
sheet rock, often have too much inconsistency in the walls for the
detector to work reliably.
Try using the stud nder at a higher point on the wall, or a lower point on
the wall.
Inconsistent readings. Curved surface.
Anomaly in the surface material.
Press the stud nder rmly against the wall so that the contour of the sensor
board matches the slight contour of the wall.
Test at a higher location, or lower location on the wall.
Sometimes after scanning the wall for a period of time the
readings seem to be less consistent.
Release the button and press the button again.
When I put my hand in front of the sensor board,
the readings are not what I would expect.
The stud nder is designed for detecting features in walls,
not hands.
Place the stud nder on the wall to detect hidden features.
The LED lights sometimes seem to light up
sporadically or inconsistently.
Wires, pipes, or other construction inconsistencies can cause
erratic or erroneous readings. Features on the opposite side of a
wall may also be a source of
inconsistent readings.
Test at points on the wall that are higher, or lower. The stud nder may also
work best if it is used more than 3 inches away from metal objects such as
outlets, light switches, etc.
/