Page is loading ...

Designed to locate wood studs and avoid metallic objects, such as plumbing,
conduit, straps, brackets, screws, protector plates, or ducts hiding in the wall,
patented Target Control® (TC™) technology analyzes complex data streams while
+ FILTERz™ technology helps avoid low signal-strength, non-metallic targets,
such as plastic pipe, PEX tubing, wiring, and more. TC™ is enabled in
Auto and Edge modes only. TC™ is not enabled in DeepScan® mode.
Three scan modes:
• Auto Mode locates the center and edges of wood studs up to ¾" (19 mm) deep.
TC™ technology is always engaged in this mode and will filter out metal.
The Left Edge, Center, and Right Edge Indicators will all light green to designate
tool is in Auto mode.
• Edge Mode locates the edges of wood studs up to ¾" (19 mm) deep.
TC™ technology is always engaged in this mode and will filter out metal.
Both Edge Indicators will light green to designate tool is in Edge mode.
• DeepScan® Mode locates the center of wood and metal studs up to
1½" (38 mm) deep. TC™ technology is off in this mode and will detect metal.
Center Indicator will light green to designate the tool is in DeepScan® mode.
BEFORE YOU BEGIN
Always map your work area prior to cutting or drilling.
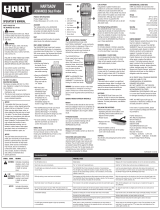
- Always use two new AA (1.5 V) alkaline batteries with an extended expiration date at least 3 years beyond the current date. Match battery direction to the image inside
of battery cavity.
- Do not rely exclusively on the tool to locate items behind a surface. Use other information to help locate such items before penetrating the surface including
construction plans, visible points of entry of pipes, wiring into walls such as in a basement, andstandard stud-spacing practices.
- Always start your scan in Auto or Edge mode, which scans for wood studs through surfaces up to ¾" (19mm)deep. DeepScan® mode may detect objects further behind
the wall that may or may not be a stud.
- Studs are normally spaced 16" or 24" (40 cm or 60 cm) apart on center, are normally 1½" (38 mm) wide, and may be separatedby firestops. Anything closer together,
or of a different width, may not be a stud.
- Always scan for studs at several different heights on the wall and mark the location of every target indicated by the stud finder. This scans for wood and metal studs andis
called “mapping the wall.” Pipes and other objects will likely not give consistent readings from floor to ceiling, as a stud would.
- Studs normally run from floor to ceiling, except above and below windows and above doors.
- Readings should always be consistent and repeatable.
- Zircon® stud finders are recommended for interior use only.
- Other objects commonly contained in walls, floors, or ceilings are water pipes (plastic and metal), gaslines, firestops, and electrical wiring.
- Sensing depth and accuracy can vary depending on scanning environment conditions, such as mineralcontent, moisture, texture, and consistency of the wall materials.
- Depending on the proximity of electrical wiring or pipes to the wall surface, tool may detect them in the same manner as studs. Caution should always be used
when nailing, cutting, or drilling in walls, floors, and ceilings that could contain these items. Use extreme caution under these circumstances or
whenever live AC wiring is present.
Wood Stud SuperScan®
Advanced Stud Finder with Target Control® + FILTERz™ Technology
EN
1
WIREWARNING® DETECTION
WireWarning® Detection continuously detects and alerts for live,
unshieldedAC (alternating current) wires in all modes. Whenlive AC voltage
is detected, warningindicator appears until tool ismoved sufficiently away
from the live wire. When calibration begins over an AC wire, AC icon will flash.
Use extreme caution under these circumstances or whenever live
AC wiring is present.
WARNING
Tool may not detect AC activity if wires are more than
2" (50mm) behind the scanned surface, in concrete,
encased inconduit, behind a plywood shear wall or metallic wall covering,
or if moisture is present in the environment or scannedsurface.
METALLIWARNING® INDICATION
In Auto and Edge modes, when metal is detected, the Stop Indicator will display
a solid red light (known as MetalliWarning® Indication).
LOLEVEL® INDICATION
In Auto and Edge modes, when tool senses a sustained weak signal, the Stop
Indicator will flash red. A weak (low) signal may indicate other objects are present,
such as plastic water pipes, PEX tubing, and plastic sewer drains.
INSTALL AA BATTERIES
Always use two new AA (1.5 V) alkaline batteries with an extended expiration
date at least 3 years beyond current date. Match battery direction to image inside
battery cavity.
WARNING
Do not rely exclusively on tool to locate items behind
a surface. Use other information to help locate items before
penetrating thesurface, includingconstruction plans, visible points of
entry of pipes and wiring into walls, suchas in abasement, andstandard
stud-spacing practices.
POWER UP / SELECT MODE
Press and release the Power Button to turn tool on. Do NOT hold Power Button
down while scanning. Tool will calibrate as confirmed by a simultaneous flicker of
the SpotLite® Pointer, all indicators briefly lighting, and haptic vibration. To change
between modes, press the Power Button repeatedly until reaching the desired mode.
Mode sequence is as follows: Auto, Edge, DeepScan® modes.
Tool will power off 3 minutes after the Power Button is released or when the tool is
lifted from the surface after calibration is complete. To manually power off the tool,
press the Power Button down 2 seconds. The tool will power back on in the mode
last engaged.
SCANNING TECHNIQUE
For best results, hold tool flat against the surface, with thumb and index fingers
placed on the pivot pinch grip and Power Button. Holding the tool incorrectly can
cause inaccurate readings. Move slowly when scanning. Do not touch wall surface
with either hand during calibration or scanning.
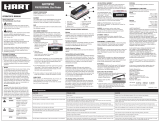
SpotLite® Pointer
Target Arrow
Indicator
Stop Indicator
Left Edge
Indicator
Right Edge
Indicator
Center Indicator
Power Button
Low Battery
Indicator
WireWarning®
Detection Indicator
Battery Door Tab Pivot Pinch Grip
ABOUT WOOD STUD SUPERSCAN® ADVANCED STUD FINDER

SCAN IN AUTO MODE
Use Auto mode to find the center and edges of wood studs
up to ¾" (19 mm) deep.
1. Hold tool flat against wall, then press and release
Power Button. Toggle mode by pressing then releasing Power
Button repeatedly until the Center and Edge Indicators light
solid green (Figure A). Unit will calibrate in 1–2 seconds.
Do not move tool during calibration. Proper calibration
is confirmed by a simultaneous flicker of SpotLite® Pointer,
all indicators briefly lighting, and haptic vibration.
2. Slide tool slowly along wall. When tool finds the edge
of a stud, SpotLite® Pointer illuminates, Edge Indicator
flashes green, Target Indicator Arrow lights solid green,
and a haptic vibration occurs. (FigureB)
3. Continue sliding. When tool finds the center of a stud,
SpotLite® Pointer illuminates, Center Indicator flashes green,
Target Arrow Indicator lights solid green, and a haptic
vibration occurs (Figure C). Mark spot where stud center
was found.
4. Continue scanning past to find other stud edge.
The width of a stud is typically 1½" (38 mm).
Trust but Verify is a technique that can help minimize
hitting existing metals on a stud, such as nails, screws,
and protector plates. Once you have found the center of the
stud in Auto mode, continue to run the tool vertically up
and down the stud. The Stop Indicator light will turn on over
screws or other metal, then turn off again when the stud
is free from metal. If metal protector plates are properly installed
over plumbing and electrical, the "safe-to-drill" zones are typically between adjacent
drywall screws, nails, or protector plates. If the Stop Indicator stays continuously on
when running vertically up and down the object, it could be a metal pipe and should
not be mistaken for a stud.
SCAN IN EDGE MODE
Use Edge mode to find the edges of wood studs up to ¾" (19 mm) deep.
See SCANNING TECHNIQUE for best results.
1. Hold tool flat against wall, then press and release Power
Button. Toggle mode by pressing then releasing Power Button
repeatedly until only both Edge Indicators light solid green
(Figure D). Wait for the tool to calibrate in 1–2 seconds.
Do not move tool during calibration. Calibration is
confirmed by a simultaneous flicker of SpotLite® Pointer,
all indicators briefly lighting, and a haptic vibration.
2. Slide tool slowly along wall, keeping the Power
Button pressed. When tool finds the edge of a stud,
SpotLite® Pointer illuminates, Edge Indicator flashes green,
Target Arrow Indicator lights solid green, and a haptic
vibration occurs (Figure E). Mark stud edge.
3. Continue sliding. When tool scans over the object,
the Target Arrow Indicator will light solid green to indicate
its presence only and is not indicating stud center.
4. Continue sliding. When tool finds other stud edge,
SpotLite® Pointer illuminates, other Edge Indicator
flashes green, Target Arrow Indicator lights solid green,
and a haptic vibration occurs. Mark other stud edge.
SCAN IN DEEPSCAN® MODE
DeepScan® mode locates the center of wood and metal studs through thicker walls
up to 1½" (38 mm) deep. See SCANNING TECHNIQUE for best results.
1. Hold tool flat against wall, then press and release
Power Button. Toggle mode by pressing then releasing Power
Button repeatedly until only the Center Indicator lights solid
green (Figure F). Wait for the tool to calibrate in 1–2 seconds.
Do not move tool during calibration. Calibration is
confirmed by a simultaneous flicker of SpotLite® Pointer,
all indicators briefly lighting, and a haptic vibration.
2. Slide tool slowly along wall. When tool finds center
of a wood or metal stud, SpotLite® Pointer illuminates,
Center Indicator flashes green, Target Arrow Indicator lights
solid green, and a haptic vibration occurs. Mark stud center.
NOTE: In DeepScan® mode, the Stop Indicator will flash red when metal is detected.
To confirm you have located a wood stud, use the
Trust but Verify
technique to find
drywall screws or nails up and down stud. Other objects, such as plastic plumbing
pipes, do not contain nails or drywall screws. A metal pipe or stud will give a
continuous metal reading indicated by the solid illuminated Stop Indicator.
WARNING
DO NOT ASSUME THERE ARE NO LIVE ELECTRICAL WIRES
IN THE WALL. DO NOT TAKE ACTIONS THAT COULD BE
DANGEROUS IF THE WALL CONTAINS A LIVE ELECTRICAL WIRE.
ALWAYS TURN OFF THE ELECTRICAL, GAS, AND WATER SUPPLIES BEFORE
PENETRATING A SURFACE. FAILURE TO FOLLOW THESE INSTRUCTIONS
MAY RESULT IN ELECTRIC SHOCK, FIRE, AND/OR SERIOUS INJURY OR
PROPERTY DAMAGE.
WORKING WITH DIFFERENT MATERIALS
Studs Studs are normally spaced 16" or 24" (40 cm or 60 cm) apart on center
and are ½" (38 mm) wide. Anything closer together, or of a different width, may not
be a stud.
Wallpaper Tool functions normally on walls covered with wallpaper or fabric, unless
the materials are metallic foil, contain metallic fibers, or are still wet after application.
Wallpaper may need to dry for several weeks after application. For freshly painted
walls, it may take a week or longer to dry after application.
Lath and plaster Tool is not designed to scan over lath and plaster. Highly textured
walls or acoustic ceilings. When scanning a ceiling or wall with an uneven surface,
place thin cardboard on the surface to be scanned and scan over the cardboard in
DeepScan® mode.
Wood flooring, subflooring, or gypsum drywall over plywood sheathing
Use DeepScan® mode and move the tool slowly. This tool cannot scan for wood studs
and joists through carpet and padding.
Electrical wiring and pipes Depending on the proximity of electrical wiring
or pipes to the wall surface, tool may detect them in the same manner as studs.
Caution should always be used when nailing, cutting, or drilling
in walls, floors, and ceilings that may contain these items.
NOTE: Sensing depth and accuracy can vary depending on scanning
environment conditions such as mineral content, moisture, texture,
and consistency of the wall materials.
Figure B
Figure D
Figure C
Figure E
Figure F
2
Figure A
LIMITED LIFETIME WARRANTY
Zircon Corporation (“Zircon”) warrants
to the originalpurchaser (or original user
by gift) that this product will be free from
defects in materials and workmanshipfor its
useful life (not to exceed twenty years from
dateofpurchase).This warranty is limited
to the electronic circuitry of theproduct,
and specifically excludes consumable parts,
including batteries, andsoftware, even if
packaged with theproduct. Defectscaused
byabuse, modification, handlingcontrary to
these instructions, otherunreasonableuse,
or neglect are not covered under
thiswarranty. No liability is accepted for
normal wear and tear and minor defects
which do not detract from the function of
the product.
THIS LIMITED LIFETIME WARRANTY IS IN
LIEU OF ALL OTHER WARRANTIES, EXPRESS
OR IMPLIED, INCLUDING THE IMPLIED
WARRANTIES OF MERCHANTABILITY AND
FITNESS FOR A PARTICULAR PURPOSE.
IN NO EVENT WILL ZIRCON BE LIABLE FOR
ANY SPECIAL, INDIRECT, INCIDENTAL OR
CONSEQUENTIAL DAMAGES RESULTING FROM
POSSESSION, USE, OR MALFUNCTION OF THIS
PRODUCT. NO OTHER REPRESENTATIONS OR
CLAIMS OF A SIMILAR NATURE WILL BIND OR
OBLIGATE ZIRCON.
Some states do not allow limitations
on certain implied warranties and/or the
limitation on incidental or consequential
damages, sothe above limitations
and exclusions may not apply to you.
This warranty gives you specific
legal rights, and you may also have other
rights which vary from state to state.
ThisLimited Lifetime Warranty applies
only to products purchased within the
United States of America (USA) andCanada.
For warranty applicable toproducts
purchased in all other geographicalareas,
see www.zircon.com/warranty.
Any in-warranty defective product returned
to Zircon, freightprepaid, along with
dated purchase receipt and $10.00 to cover
shipping and handling, will be repaired
or replaced, atZircon’s option. If the
returned product is no longer available,
Zircon may replace the product with a
similar product of similar function.
This is your sole and exclusive remedy for
breach of this Limited Lifetime Warranty.
To return product, call the Zircon Customer
Service number below to request an RMA
number and return product with shipment
tracking to:
Zircon Corporation
Attn: Returns Department
1580 Dell Avenue
Campbell, CA 95008-6992 USA
Include your name, return address,
RMA number, and package tracking number.
Allow 4–6 weeks for delivery.
If you do not agree to the terms of this
Limited Lifetime Warranty, you may not use
this product and must promptly return it to
the retailer, along with a dated purchase
receipt within 30 days of purchase for a
refund of the purchase price.
Customer Service: 1-800-245-9265
or 1-408-963-4550
Monday–Friday, 8:00 a.m.–5:00 p.m. PT
www.zircon.com • [email protected]
©2023 Zircon Corporation
P/N 73190 • Rev A 03/23
ACT, DeepScan, + FILTERz, LoLevel,
MetalliWarning, SpotLite, SuperScan,
Target Control, TC, WireWarning,
and Zircon are trademarks or registered
trademarks of Zircon Corporation.
FCC Part 15 Class B Registration Warning: This tool complies with Part 15 of FCC Rules. Operation is
subject to the following two conditions: (1) this tool may not cause harmful interference, and(2) this
tool must accept any interference received, includinginterference that may cause undesiredoperation.

3
TROUBLESHOOTING & CONSTRUCTION TIPS
SITUATION LIKELY CAUSE SOLUTION
Tool detects objects other than
studs during scanning or finds more
objects that look like studs than
should be there.
Objects may benear, ortouching,
theback of the wall surface.
• Check for other studs equally spaced to either side at 16"or24" (40cm or 60 cm)
and check for the same stud at spots directly above or below the first scan area.
• Standard studs measure approximately 1½" (38 mm) between edges. Anything smaller
or larger is likely not a stud (unless near a door orwindow).
Studs are continuously detected near
windows anddoors. Multiple studs are inuse. Double and triple studs are sometimes used around doors andwindows. Headers are used
above them. Detect outer edges so you know where to begin.
Electrical wires suspected but
none detected.
Wires deeper than 2" (50 mm) from
the surface might not be detected.
If there is an outlet switch, turn it to ON position while scanning, but turn OFF when
working near the wires. Use extra caution if the area has plywood, thick wood backing
behind drywall, or walls that are thicker than normal.
Wires may not be live. Plug a lamp into the outlet and turn it on to test whether wires are live.
Tool Indicators flash continuously
when trying to find stud.
Scanner is experiencing oversaturation
when scanning over a dense object. Restart scan and recalibrate in a different location.
Low Battery Indicator on. Low battery. Install two new AA (1.5 V) alkaline batteries with extended expiration dates.
Low Battery Indicator flashes and tool
does notoperate. Dead battery. Install two new AA (1.5 V) alkaline batteries with extended expiration dates.
Scan QR code for more information.
/