Page is loading ...

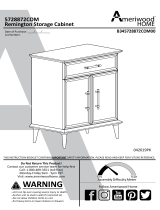
5757337COM
5DrawerDresser
‐Unitcantipovercausingsevereinjuryordeath.
‐Anchorunittostudinwall(ifinstructedto).
‐DoNotallowchildrentoclimbonunit.
‐Putheavyitemsonlowershelvesordrawers.
B345757337COM0
THISINSTRUCTIONBO OKLETCONTAINS
IMPORTANT
SAFETYINFORMATION.PLEASEREADANDKEEPFORFUTUREREFERENCE.
WARNING
FollowAmeriwoodHome
Tube
You
DateofPurchase___/___/___
LotNumber:
DoNotReturnThisProduct!
Contactourcustomerserviceteamforhelpfirst.
Call:1‐800‐489‐3351(tollfree)
Monday‐Friday9am‐5pmCST
Visit:www.ameriwoodhome.com
AssemblyDifficultyMeter
Easy
Tough

ContactUs!
HelpfulHints
2
ameriwoodhome.com
DoNOTreturnthisproduct!
Contactourfriendlycustomerserviceteamfirstforhelp.
Callus!
1‐800‐489‐3351
Monday‐Friday
9am‐5pmCST
Visitameriwoodhome.comtoviewthe
limitedwarrantyvalidintheU.S.andCanada.
AssemblyTips
‐Openyouritemintheareayouplantokeepittoavoidexcessiveheav ylifting.
‐Identify,sortandcountthe partsbeforeattemptingassembly.
‐Compressiondowelsarelightlytappedinwithahammer.
‐Slidesarelabeledwitha
R
(right)and
L
(left)forproperplacement.
‐MakesuretoalwaysfacethepointonthetopoftheCamLock towar d sthe
outeredge.
‐Useallthenailsprovidedforthebackpanelandspreadthemou tequally.
‐Backpanelmustbeusedtomakesureyourunitissturdy.
‐Do
NOTuseharshchemicalsorabrasivecleanersonthisitem.
‐Neverpush,pull,ordragyourfurniture.
Tube
You
Tube
You
PEOPLENEEDEDFORASSEMBLY:1‐2
ESTIMATEDASSEMBLYTIME:1HOUR

3
ameriwoodhome.com
BeforeYouStart
Q
u
i
c
k
T
i
p
A
s
s
e
m
b
l
y
CamLockFasteningSystem
ThisCamLockFasteningSystem willbeusedthroughouttheassemblyprocess.
1
3
2
4
Tube
You
Readthrougheachstepcarefullyandfollowtheproperorder
Separateandcountallyourpartsandhardware
Giveyourselfenoughroomfortheassemblyprocess
Havethefollowingtools:FlatHeadScrewdriver,#2PhillipsHead
ScrewdriverandHammer
Caution:Ifusingapowerdrillorpowerscrewdriverforscr ewing,
pleasebeawaretoslowdownandstopwhenscrewistight.
Failuretodosomayresultinstrippingthescrew.

4
ameriwoodhome.com
BoardIdentification
Notactualsize
LeftPanel
35757337010
Top
35757337030
Support
35757000050
RightPanel
35757337020
Bottom
35757337040
UpperRail
35757337060
LowerRail
35757337070
x2
VerticalMolding
35757337080
x5
DrawerFront
35757337090
x5
DrawerBack
35757331100
x5
DrawerBottom
35757331110
x5
LeftDrawerSide
35781331250
x5
RightDrawerSide
35781331260
A B
C
D
E
F
G
H
I
J
K
Y Z

5
ameriwoodhome.com
BoardIdentification
Notactualsize
BackPanel
K575700000
Thispieceispaperboard
construction.Itisnotmade
fromwood,butisrequiredfor
theassemblyofyourunit.
S
S
A
B
C
D
E
F
G
H
H
I
J
K
Y
Z

6
ameriwoodhome.com
PartList
ActualSize
NotActualSize
5
4
3
2
1
(x12)
#A22570
camlock
(x12)
#A22510
cambolt
(x6)
#A22920
connector
(x6)
#A22910
connectorbolt
(x6)
#A21660
wooddowel
6
7
8
9
(x20)
#A12120
7/16"panhead
(x50)
#A11080
7/16"flathead
(x20)
#A11600
1‐1/4"flathead
(x8)
#A12955
1‐1/8"flathead
(x32)
#A21110
nail
(x10)
#A17100
7/16"bolt
10
11
LeftCabinetMember
RightCabinetMember
LeftDrawerMember
RightDrawerMember
(x5)
#A56770
DrawerSlideKit
13c
13d
13a
13b
13
(x1)
#A84050
SafetyBracketKit
(x10)
#A54223
DrawerBracket
(x5)
#A50515
Handle
14a
14b
14c
14d
16
15

7
ameriwoodhome.com
STEP
1
Proper orientation of CAM LOCK
Tip
Assembly
Quick
(x2)
#A22570
Attachallhardwareasshown.Usingfourscrews(9),
attachtheverticalmolding(H)totheleftpanel(A)as
shown.Pleasenote,therearefourpilotholesinthe
verticalmolding(H)forattachment.
1
2
5
2
(x4)
#A22510
(x1)
#A21660
(x4)
#A12955
5
9
9
1
1
2
2
2
9
9
9
A
endview
H
8
9
(x20)
#A11600
1‐1/4"flathead
(x8)
#A12950
1‐1/8"flathead
Donotgetscrews#8	mixedup.You
willusetheshorterofthetwointhisstep.

8
ameriwoodhome.com
STEP2
(x5)
#A56770
(x15)
#A11080
Attachedfiveleftcabinetmembers(13a)totheleftpanel(A)withscrews(7)asshown.
Marked with a "L".
LeftCabinetMember
13a
7
13a
7
13a
13a
13a
13a
13a
A

9
ameriwoodhome.com
STEP3
Proper orientation of CAM LOCK
Tip
Assembly
Quick
1
2
5
9
(x2)
#A22570
(x4)
#A22510
(x1)
#A21660
(x4)
#A12955
Attachallhardwareasshown.Usingfourscrews(9),attachthe
verticalmolding(H)totherightpanel(B)asshown.Pleasenote,
therearefourpilotholesintheverticalmolding(H)for
attachment.
endview
5
9
2
1
1
2
2
2
9
9
9
B
H
8
9
(x20)
#A11600
1‐1/4"flathead
(x8)
#A12950
1‐1/8"flathead
Donotgetscrews#8	mixedup.You
willusetheshorterofthetwointhisstep.

10
ameriwoodhome.com
STEP
4
7
RightCabinetMember
(x5)
#A56770
(x15)
#A11080
Attachfiverightcabinetmembers(13b)totherightpanel(B)withscrews(7)asshown.
Marked with a "R".
13b
13b
13b
13b
13b
13b
7
13b
B

11
ameriwoodhome.com
STEP
5
14b
14a
2
4
(x4)
#A22510
(x3)
#A22910
(x1)
#A84050
2
4
4
4
2
2
2
14a
14b
C
Donottightenthisscrew.

12
ameriwoodhome.com
STEP
6
3
(x3)
#A22920
Youwillneedtotaptheconnector
(3)withahammertofullyinsert.
Besuretheconnectorispositioned
asshownbeforepushingintohole.
3
3
3
F

13
ameriwoodhome.com
STEP
7
Presstheupperrail(F)ontothetop(C)asshownsotheconnectors(3)engagetheconnector
bolts(4).Turnthescrewinthecenteroftheconnector(3)clockwisetolockinplace.
Turn clockwise to lock in place.
C
F
3

14
ameriwoodhome.com
STEP8
1
3
4
Youwillneedtotaptheconnector
(3)withahammertofullyinsert.
Besuretheconnectorispositioned
asshownbeforepushingintohole.
(x4)
#A22570
(x3)
#A22920
(x3)
#A22910
(x2)
#A21660
5
1
5
1
5
Proper orientation of CAM LOCK
Tip
Assembly
Quick
3
3
3
4
4
4
D
G

15
ameriwoodhome.com
STEP9
endview
D
G
3
Turn clockwise to lock in place.
Pressthelowerrail(G)ontothebottom(D)asshownsotheconnectorbolts(4)engagethe
connectors(3).Turnthescrewinthecenteroftheconnector(3)clockwisetolockinplace.

16
ameriwoodhome.com
STEP10
1
5
(x4)
#A22570
(x2)
#A21660
5
5
1
1
Proper orientation of CAM LOCK
Tip
Assembly
Quick
E

17
ameriwoodhome.com
STEP
11
Attachthebottom(D)andsupport(E)totheleftpanel(A)
asshown.Turnthecamlocksclockwisetolockinplace.
U
N
LO
C
K
L
O
C
K
A
D
E

18
ameriwoodhome.com
STEP12
U
N
L
O
C
K
L
O
C
K
D
E
A
B

19
ameriwoodhome.com
STEP13
U
N
L
O
C
K
L
O
C
K
A
B
C

20
ameriwoodhome.com
STEP
14
11
(x32)
#A21110
IMPORTANT!
THEBACKPANELISASTRUCTURALPARTOFTHISUNITANDMUSTBEINSTALLEDPROPERLY.
Withthehelpofanotherperson,turntheunitoverasshown.Positionthebackpanel(S)as
shown.Flushthebottomedgeofthebackpanelwiththeedgeofthebottom(D).Assurethatthe
unitissquare.Distancefromcornertocornermustbeequalasshown.Nail
straightintoback
edgesasshown.
11
S
D
Makesureedgesareflush
witheachother.
backpanelnotch
/