Page is loading ...

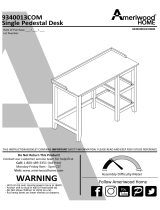
5998335WCOM
Dresser
‐Unitcantipovercausingsevereinjuryordeath.
‐Anchorunittostudinwall(ifinstructedto).
‐DoNotallowchildrentoclimbonunit.
‐Putheavyitemsonlowershelvesordrawers.
B345998335WCOM0
THISINSTRUCTIONBO OKLETCONTAINS
IMPORTANT
SAFETYINFORMATION.PLEASEREADANDKEEPFORFUTUREREFERENCE.
WARNING
FollowAmeriwoodHome
Tube
You
DateofPurchase___/___/___
LotNumber:
DoNotReturnThisProduct!
Contactourcustomerserviceteamforhelpfirst.
Call:1‐800‐489‐3351(tollfree)
Monday‐Friday9am‐5pmCST
Visit:www.ameriwoodhome.com
AssemblyDifficultyMeter
Easy
Tough
0 29986
5
998
5
8

ContactUs!
HelpfulHints
2
ameriwoodhome.com
DoNOTreturnthisproduct!
Contactourfriendlycustomerserviceteamfirstforhelp.
Callus!
1‐800‐489‐3351
Monday‐Friday
9am‐5pmCST
Visitameriwoodhome.com
to view the
limited warranty valid in the U.S. and Canada.
AssemblyTips
‐Openyouritemintheareayouplantokeepittoavoidexcessiveheavylifting.
‐Identify,sortandcountthe partsbeforeattemptingassembly.
‐Compressiondowelsarelightlytappedinwithahammer.
‐Slidesarelabeledwitha
R
(right)and
L
(left)forproperplacement.
‐Makesuretoalwaysfacethepointonthetopofthe CamLocktowardsthe
outeredge.
‐Useallthenailsprovidedforthebackpanelandspreadthemoutequally.
‐Backpanelmustbeusedtomakesureyourunitissturdy.
‐DoNOTus
eharshchemicalsorabrasivecleanersonthisitem.
‐Neverpush,pull,ordragyourfurniture.
Tube
You
Tube
You
PEOPLENEEDEDFORASSEMBLY:1‐2
ESTIMATEDASSEMBLYTIME:1HOUR

3
ameriwoodhome.com
BeforeYouStart
Q
u
i
c
k
T
i
p
A
s
s
e
m
b
l
y
CamLockFasteningSystem
ThisCamLockFasteningSystem willbeusedthroughouttheassemblyprocess.
1
3
2
4
Tube
You
Readthrougheachstepcarefullyandfollowtheproperorder
Separateandcountallyourpartsandhardware
Giveyourselfenoughroomfortheassemblyprocess
Havethefollowingtools:FlatHeadScrewdriver,#2PhillipsHead
ScrewdriverandHammer
Caution:Ifusingapowerdrillorpowerscrewdriverforscr ewing,
pleasebeawaretoslowdownandstopwhenscrewistight.
Failuretodosomayresultinstrippingthescrew.

4
ameriwoodhome.com
BoardIdentification
Notactualsize
Tube
You
LeftPanel
35998335010
RightPanel
35998335020
Top
35998335030
Bottom
35998335040
KickPanel
35998335050
4DrawerFronts
35998335061
4DrawerBacks
C1670608331500B
4LeftDrawerSides
C1670346331090L
4RightDrawerSides
C1670346331090R
Brace
35998000100
SolidBack
35998000110
4DrawerBottoms
35998331120
BackPanel
K59320000
A
B
C
D
E
K
M
J
H
L
G
I
F

5
ameriwoodhome.com
BoardIdentification
Notactualsize
Tube
You
M
K
J
E
D
C
B
L
I
H
G
F
Thispieceisofpaperboardconstruction.Itisnotmadefrom
wood,butisrequiredfortheassemblyofyourunit.
A

6
ameriwoodhome.com
PartList
ActualSize
Tube
You
(x12)
#A22510
cam bolt
(x40)
#A11080
7/16" flat screw
(x16)
#A11600
1-1/4" screw
(x12)
#A22570
cam lock
(x8)
#A21660
wood dowel
(x4)
#A53600
angle bracket
(x8)
#A12700
7/8" pan screw
(x18)
#A21110
nail
(x30)
#A12120
7/16" pan screw

7
ameriwoodhome.com
NotActualSize
PartList
Tube
You
(x4)
#A55990
drawer slide
(x8)
#A54223
drawer bracket
(x1)
#A84050
safety bracket kit
(x4)
#A50690
handle
leftcabinet
member
rightcabinet
member
leftdrawer
runner
rightdrawer
runner

8
ameriwoodhome.com
STEP
1
Tube
You
(x4)
#A22510
*rawedgesareshaded
(x1)
#A84050
Screwfourcamboltsintothetop(C).
Fastenthesafetybrackettothetop(C)withscrew.
C

9
ameriwoodhome.com
STEP2
Proper orientation of CAM LOCK
Tip
Assembly
Quick
Tube
You
*rawedgesareshaded
(x4)
#A22570
(x4)
#A53600
(x2)
#A21660
(x8)
#A12120
E
D
Insertfourcamlocksandtwowooddowelsintothebottom(D).
Fastenthekickpanel(E)tothebottom(D)withfouranglebracketsandeightscrews.

10
ameriwoodhome.com
STEP3
Proper orientation of CAM LOCK
Tip
Assembly
Quick
Tube
You
(x4)
#A22570
(x4)
#A21660
Insertfourcamlocksandtwowooddowelsintothebottom(D).
Fastenthekickpanel(E)tothebottom(D)withfouranglebracketsandeightscrews.
J
K

11
ameriwoodhome.com
STEP
4
Tube
You
(x2)
#A22570
(x1)
#A21660
(x4)
#A22510
(x12)
#A11080
A
finishededge
markedwitha"CL"
Inserttwocamlocksandonewooddowelintotheleftpanel(A).
Screwfourcamboltsintotheleftpanel(A).
Fastenfourmetalslidestotheleftpanel(A)withscrews.
Proper orientation of CAM LOCK
Tip
Assembly
Quick
(x4)
#A55990

12
ameriwoodhome.com
STEP
5
Tube
You
(x12)
#A11080
(x1)
#A21660
(x4)
#A22510
(x2)
#A22570
B
Inserttwocamlocksandonewooddowelintotherightpanel(B).
Screwfourcamboltsintotheleftpanel(B).
Fastenfourmetalslidestotheleftpanel(B)withscrews.
markedwitha"CR"
Proper orientation of CAM LOCK
Tip
Assembly
Quick
finishededge
(x4)
#A55990

13
ameriwoodhome.com
STEP
6
Tube
You
K
J
D
B
A
UNLOCK
LOCK
T
i
t
u
s
Attachbottom(D),brace(J),andsolidback(K)tothe
leftandrightpanel(A&B)andtightenthecamlocks.
allfinishededgesandsurfacesarefacingupwards
x8

14
ameriwoodhome.com
STEP
7
Tube
You
Attachtop(C)totheleftandrightpanel(A&B)andtightenthecamlocks.
C
B
A
UNLOCK
LOCK
T
i
t
u
s
allfinishededgesandsurfacesarefacingupwards
x4

15
ameriwoodhome.com
STEP8
Tube
You
(x18)
#A21110
IMPORTANT!
THEBACKPANELISASTRUCTURALPART
OFTHISUNITANDMUSTBEINSTALLEDPROPERLY.
*rawedgesareshaded
(x6)
#A12120
M
Assurethattheunitissquare.
Distancefromcornertocorner
mustbeequalasshown.
turntheunitontoitsfront
K
and/or serious injury.
Failure to do so could cause instability, product collapse,
All nails must be driven into the parts straight and centered.
Please make sure that the Back Panel is attached securely.
WARNING

16
ameriwoodhome.com
STEP9
Tube
You
(x1)
#A84050
stud
wallboard
hole
Option1:
Screwthroughthesafetybracketandintoa
solidareaofthewall.Ifyoucannotscrewinto
somethingsolid,useoption2.
Option2:
Drilla3/16"diameterhole(5mm)inthe
wallboard.Tapthewallanchorintothehole
untilitisflush.Fastenthesafetybracketto
thewallanchorwiththescrew.
placetheunitupright

17
ameriwoodhome.com
STEP10
Tube
You
(x8)
#A54223
Laythedrawersides(H&I)downonaflathardsurface.Carefullylineupthedrawerbracketwiththe
holesinthedrawersides(H&I)asshown.
Usingahammer,tapeachdrawerbracketstempartwayintoeachhole.Repeatthisprocessuntilthe
drawerbracketisfullyseated
onthedrawerside.
I
H
marked"LEFT"
marked"RIGHT"
x4
bracketorientation
bracketorientation

18
ameriwoodhome.com
STEP
11
Tube
You
(x16)
#A12120
Fastenthedrawersides(H&I)tothedrawerfront(F)withscrews.
F
I
H
marked"LEFT"
marked"RIGHT"
x4
*rawedgesareshaded

19
ameriwoodhome.com
STEP12
Tube
You
(x16)
#A11600
Slidethedrawerbottom(L)intothegroovesofthedrawersides(H&I)andthedrawerfront(F).
Fastenthedrawerback(G)tothedrawersides(H&I)withscrews.
L
I
H
G
F
marked"BACK"
x4
*rawedgesareshaded

20
ameriwoodhome.com
STEP13
Tube
You
Fastenthemetalslidestothedrawersides(H&I)withscrews.
Fastenahandletoeachdrawerfront(F)withscrews.
F
I
H
markedwitha"DL"
markedwitha"DR"
x4
(x16)
#A11080
(x8)
#A12700
(x4)
#A50690
(x4)
#A55990
/