Page is loading ...

Installation and Assembly:
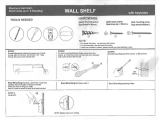
DUKANE PROJECTOR SHORT THROW WALL ARM
Model: UST-WALLARM3
PROJECTOR POSITION FOR
60" - 70" SCREEN SIZE
PROJECTOR POSITION FOR
70" - 100" SCREEN SIZE
430-User Guide UST-WALLARM3-00

2 of 14
ISSUED:07-25-11 SHEET #: 125-9225-1
• DonotbegintoinstallyourPeerlessproductuntilyouhavereadandunderstoodtheinstructionsandwarnings
containedinthisInstallationSheet.Ifyouhaveanyquestionsregardinganyoftheinstructionsorwarnings,forUS
customerspleasecallPeerlesscustomercareat1-800-865-2112,forallinternationalcustomers,pleasecontact
yourlocaldistributor.
• Thisproductshouldonlybeinstalledbysomeoneofgoodmechanicalaptitude,hasexperiencewithbasicbuilding
construction,andfullyunderstandstheseinstructions.
• Makesurethatthesupportingsurfacewillsafelysupportthecombinedloadoftheequipmentandallattached
hardwareandcomponents.
• NeverexceedtheMaximumLoadCapacity.Seepageone.
• Ifmountingtowoodwallstuds,makesurethatmountingscrewsareanchoredintothecenterofthestuds.Useof
an“edgetoedge”studnderishighlyrecommended.
• Alwaysuseanassistantormechanicalliftingequipmenttosafelyliftandpositionequipment.
• Tightenscrewsrmly,butdonotovertighten.Overtighteningcandamagetheitems,greatlyreducingtheirholding
power.
• Thisproductisintendedforindooruseonly.Useofthisproductoutdoorscouldleadtoproductfailureandpersonal
injury.
• Thisproductwasdesignedtobeinstalledonthefollowingwallconstructiononly;
WALL CONSTRUCTION HARDWARE REQUIRED
• WoodStud Included
• WoodBeam Included
• SolidConcrete Included
• CinderBlock Included
• Brick ContactQualiedProfessional
• Otherorunsure? ContactQualiedProfessional
WARNING
Tools Needed for Assembly
• studnder("edgetoedge"studnderisrecommended)
• phillipsscrewdriver
• drill
• 1/4"bitforconcreteandcinderblockwall
• 5/32"bitforwoodstudwall
• level
• maskingtape
• 6mmallenwrench
Table of Contents
PartsList.................................................................................................................................................................................3
WallPlateLocationTemplate.................................................................................................................................................4
InstallationtoSingleWoodStudWall.....................................................................................................................................5
InstallationtoSolidConcreteandCinderBlockWall.............................................................................................................6
Attachingadapterplateassemblytoprojector.......................................................................................................................7
Installationusingwallarmbracket.........................................................................................................................................8
Installationusingwallarmbracketandextensionbracket.............................................................................................. 9-10
AdjustingtheProjector................................................................................................................................................... 12-13
Fastenwallarmcover......................................................................................................................................................... 14

3 of 14
ISSUED:07-25-11 SHEET #: 125-9225-1
Some parts may appear slightly different than illustrated.
Before you start make sure all parts listed are included with your product.
F
A
E
G H
I J K
B
DC
N
L
M
PARTS LIST
Description Qty. Part #
A
adapterplateassembly 1 056-2051
B extensionbracket 1 056-2039
C wallarmbracket 1 056-2045
D wallplate 1 056-2046
E wallplatecover 1 056-2047
F projectortiltplate 1 056-2042
G cablemanagementbracket 2 056-2050
H projectorattachmentbracket 1 056-2048
I shimspacerplate 1 056-2049
J #14x2.5"woodscrew 4 5S1-015-C04
K concreteanchor 4 590-0230
L M4x8mmsocketpinserratedwasherheadscrew 4 510-2005
M M6x10mmsocketpinscrew 4 520-2255
N #8x3/8"sheetmetalscrew 2 500-2008
O #10flatblackwasher 4 540-9400
P M5x8mmpanheadblackscrew 4 570-0005
Q 4mmallenwrench 1 560-9646
R M5x20mmsocketpinserratedwasherheadscrew 5 510-2065
S wallarmcap 1 056-2054
T M5x10mmsocketpinserratedwasherheadscrew 6 510-2063
U extensioncap 1 590-2337
P
O
Q
R
S
T
U

4 of 14
ISSUED:07-25-11 SHEET #: 125-9225-1
Wall Plate Location
Determineandmarkthetopedgeofthe
screenactiveimage.
NOTE: Makesuretoleaveadequatespaceabovethe
topedgeoftheactiveimageforthewallarmandprojector
tobeinstalled.Approximatedimension(23.0")
Usingyourmarkforthetopedgeofactiveimagedetermine
dimensionBtolocatethebottomwallplate(D)
mountinghole.
A=Boardsize/diagonalactiveimagesize
B=Distancefromthetopedgeoftheactiveimagetothebottom
mountingholeofwallplate(D).
C
=Distancefromthetopedgeoftheactiveimagetothebottom
edgeofwallplate(D).
TOPOFACTIVEIMAGE
SCREENACTIVEIMAGE
8.9"
7.5"
B
PROJECTORMIRROR
AMOUNTOFVERTICALADJUSTMENT
BOARDTHICKNESS
A
.7
.7
SCREENCENTER
2.0"
1
MANUFACTURER MODEL A B C
HitachiStarboard Trio88 88 13.90 11.90
HitachiStarboard Trio77 77 11.68 9.68
Mimio HD90 88 13.90 11.90
Mimio Board80 78 11.82 9.82
Mimio Board100 98 14.60 12.60
Polyvision/ENO TS620 77.8 11.79 9.79
Polyvision/ENO TSL620 77.8 11.79 9.79
Polyvision/ENO 2610 78 11.82 9.82
Polyvision/ENO 2650 75‐16:10 12.00 10.00
Polyvision/ENO 2650 75‐4:3 11.40 9.40
Polyvision/ENO 2810 96 15.10 13.10
Polyvision/ENO 2850 93‐16:10 14.65 12.65
Polyvision/ENO 2850 93‐4:3 13.85 11.85
Promethean 587Pro 87 13.75 11.75
Promethean 387 87 13.75 11.75
Promethean 387Pro 87 13.75 11.75
Promethean 595Pro 95 14.95 12.95
Promethean 395 95 14.95 12.95
Promethean 395Pro 95 14.95 12.95
Promethean 164 64 9.86 7.86
Promethean 378 78 11.82 9.82
Promethean 378Pro 78 11.82 9.82
Promethean 178 78 11.82 9.82
Smart 885 87 13.75 11.75
Smart 685 87.13 13.76 11.76
Smart 690 94 14.80 12.80
Smart 660 64 9.86 7.86
Smart 880 77 11.68 9.68
Smart 680 77 11.68 9.68
BOTTOM
MOUNTINGHOLE
D
C

5 of 14
ISSUED:07-25-11 SHEET #: 125-9225-1
Usingwallplate(D)asatemplate,drillfour5/32"(4mm)dia.holestoaminimumdepthof2.5"(64mm).Attach
wallplate(D)tocentersofwoodstudsusingfour#14x2.5"woodscrews(J)showningure1.1.
Fastenwallarmbracket(C)looselytowallplate(D)usingfourM5x8mmpanheadblackscrews(P),and
four#10blackwashers(O).
Installation to Single Wood Stud Wall
1
P
O
D
D
J
DIAMONDINDICATES
TOPOFWALLPLATE
C
g1.1 g1.2
• Installermustverifythatthesupportingsurfacewillsafelysupportthecombinedloadoftheequipmentandall
attachedhardwareandcomponents.
• Tightenwoodscrewssothatwallplateisrmlyattached,butdonotovertighten.Overtighteningcandamagethe
screws,greatlyreducingtheirholdingpower.
• Nevertighteninexcessof80in.•lb(9N.M.).
• Makesurethatmountingscrewsareanchoredintothecenterofthestud.Theuseofan"edgetoedge"studnder
ishighlyrecommended.
• Hardwareprovidedisforattachmentofmountthroughstandardthicknessdrywallorplasterintowoodstuds.Install-
ersareresponsibletoprovidehardwareforothertypesofmountingsituations.
WARNING

6 of 14
ISSUED:07-25-11 SHEET #: 125-9225-1
J
K
g1.4
CINDER
BLOCK
SOLID
CONCRETE
C
Installation to Solid Concrete or Cinder Block
• WheninstallingPeerlesswallmountsoncinderblock,verifythatyouhaveaminimumof1-3/8"(35mm)ofactual
concretethicknessintheholetobeusedfortheconcreteanchors.Donotdrillintomortarjoints!Besuretomount
inasolidpartoftheblock,generally1"(25mm)minimumfromthesideoftheblock.CinderblockmustmeetASTM
C-90specications.Itissuggestedthatastandardelectricdrillonslowsettingisusedtodrilltheholeinsteadofa
hammerdrilltoavoidbreakingoutthebackoftheholewhenenteringavoidorcavity.
• Concretemustbe2000psidensityminimum.Lighterdensityconcretemaynotholdconcreteanchor.
• Makesurethatthewallwillsafelysupportfourtimesthecombinedloadoftheequipmentandallattachedhardware
andcomponents.
WARNING
1
CUTAWAY VIEW
INCORRECT CORRECT
wall
plate
wall
plate
plaster/
drywall
plaster/
drywall
concrete
concrete
1
3
2
K
Drillholesandinsertanchors(K).
Placeplate(AA)overanchors(EE)andsecurewithscrews(DD).
Tightenallfasteners.
C
K
J
concrete
surface
• Tightenscrewssothatwallplateisrmlyattached,
butdonotovertighten.Overtighteningcandamage
screws,greatlyreducingtheirholdingpower.
• Nevertighteninexcessof80in.•lb(9N.M.).
• Alwaysattachconcreteexpansionanchorsdirectly
toload-bearingconcrete.
• Neverattachconcreteexpansionanchorsto
concretecoveredwithplaster,drywall,orother
nishingmaterial.Ifmountingtoconcretesurfaces
coveredwithanishingsurfaceisunavoidable),
thenishingsurfacemustbecounterboredas
shownbelow.Besureconcreteanchorsdonot
pullawayfromconcretewhentighteningscrews.If
plaster/drywallisthickerthan5/8"(16mm),custom
fastenersmustbesuppliedbyinstaller.
WARNING
Makesurethatwallarmbracket(C)islevel,useitas
atemplatetomarkfourmountingholes.Drillfour5/16"
(8mm)dia.holestoaminimumdepthof2.5"(64mm).
Insertconcreteanchors(K)inholesushwithwallas
shown(right).Placewallarmbracketoveranchorsand
securewith#14x2.5"screws(J).Level,thentightenall
fasteners.

7 of 14
ISSUED:07-25-11 SHEET #: 125-9225-1
Secureloweradapterplateontoprojectortiltplate(F)usingfourM6x10mmsocketpinscrews(M).
Re-fastenknobsandM10washersfromtopofadapterplateassembly(A).
Placeprojectortiltplate(F)ontoprojectorand
secureusingfourM4x8mmsocketpinserrated
washerheadscrews(L).
RemoveknobsandM10washersfromtopof
adapterplateassembly(A).
2 3
4
A
KNOBS
M10 WASHERS
FRONTOF
PROJECTOR
MOUNTINGLOCATIONS
FRONTOF
PROJECTOR
KNOBS
M10
WASHERS
UPPER
ADAPTERPLATE
LOWERADAPTER
PLATE
UPPER
ADAPTER
PLATE
LOWER
ADAPTER
PLATE
F
L
M
A
F
SHORTFLANGE
OPPOSITETHE
PROJECTOR
LENS
NOTE: MAKESURETHAT
UPPERADAPTERPLATE
HOLESARECENTERED
WITHPROJECTORLENS
UPPERADAPTER
PLATEHOLES

8 of 14
ISSUED:07-25-11 SHEET #: 125-9225-1
FastentwoM5x20mmsocketpinserrated
washerheadscrews(R)intotopofadapter
plateassembly(A)leaving3/8"ofexposed
threadasshownbelow.
FastenoneM5x20mmsocketpinserratedwasher
headscrews(R)intotopofprojectorattachment
bracket(H)leavingnoexposedthreadonbottomof
bracketasshownbelow.
5
6
3/8"
Slidetwocablemanagementbrackets(G)intochannelinwallarmbracket(C)asshownbelow.
Slidewallplatecover(E)ontowallarmbracket(C).
7
Option 1 - PROJECTOR POSITION FOR 60" - 70" SCREEN SIZE.................PAGE 8
Option 2 - PROJECTOR POSITION FOR 70" - 100" SCREEN SIZE..............PAGE 9
R
H
R
G
C
8
Selectprojectormountorientation.
R
H
FLUSHWITHBOTTOM
E
C
A

9 of 14
ISSUED:07-25-11 SHEET #: 125-9225-1
DETAIL 1
Securewallarmcap(S)intowallarmbracket(C)usingtwo#8x3/8"sheetmetalscrews(N).
Routeprojectorcablesasshown.Usetwocablemanagementbrackets(G)asneeded.
NOTE:#8x3/8"sheetmetalscrews(N)willbeshortenedforproduction.
FastentwoM5x20mmsocketpinserratedwasherheadscrews(R)intotopofadapterplateassembly(A).
SKIPTOPAGE11.
10
AttachexposedM5x20mmsocketpinserratedwasherheadscrews(R)ontopofadapterplateassembly(A)
throughslotinwallarmbracket(C)andkeyholesinprojectorattachmentbracket(H)asshownindetail1.
Slideprojectorattachmentbracket(H)towardwall.OnceinlockedpositiontightenallthreeM5x20mmsocketpin
serratedwasherheadscrews(R)usingsecuritywrench(Q)asshownindetail2.
9
FRONTOFPROJECTOR
FRONTOFPROJECTOR
FRONTOFPROJECTOR
Installation using Wall Arm Bracket
PROJECTORCABLES
TIGHTEN
SCREWS
S
N
G
R
NOTE: Verifythatallscrews
areinthecenteroftheslot.
PROJECTOR POSITION FOR 60" - 70" SCREEN SIZE
SKIP TO PAGE 9 IF MOUNTING WITH 70" - 100" SCREEN SIZE
H
DETAIL 2
R

10 of 14
ISSUED:07-25-11 SHEET #: 125-9225-1
FRONTOFPROJECTOR
FRONTOFPROJECTOR
Installation using Wall Arm Bracket and Extension Bracket
FRONTOFPROJECTOR
9
10
DETAIL 2
B
C
Snapextensioncap(U)intoextensionbracket(B)inorientationasshowningure9.1.
Slidewallplatecover(E)ontowallarmbracket(C).
Slideextensionbracket(B)intowallarmbracket(C)indesiredposition.
TIGHTEN
SCREWS
H
I
SECONDHOLE
MAYALSOBE
USED IF DESIRED
I
KEYHOLE
NOTE: Verifythatallscrews
areinthecenteroftheslot.
T
FIGURE 9.2
FIGURE 9.1
B
U
PROJECTOR POSITION FOR 70" - 100" SCREEN SIZE
E
DETAIL 3
DETAIL 4
R
Requirements for Shim Spacer
1.Whenthefrontpre-fastenedM5x20mmsocketpinserratedwasherheadscrew(R)oftheadapterplate
assembly(A)goesthroughtheextensionbracket(B)andwallarmbracket(C).
2.Whenthereisagapbetweenthebottomoftheprojectorattachmentbracket(H)andtheextensionbracket(B).
NOTE:IfShimspacerplate(I)isnotrequiredskiptostep11
PositionexposedM5x20mmsocketpinserratedwasherheadscrews(R)throughslotinextensionbracket(B)and
wallarmbracket(C).Positionscrewsinkeyholesinprojectorattachmentbracket(H),andholeinshimspacerplate
(I)asshownindetail3.Slideprojectorattachmentbracket(H)towardwall.Onceinlockedpositiontightenallthree
M5x20mmsocketpinserratedwasherheadscrews(R)usingsecuritywrench(Q)asshownindetail4.
Secureextensionbracket(B)intowallarmbracket(C)andsecureusingfourM5x10mmsocketpinscrews(T)in
desiredposition.NOTE: MakesurethatfourM5x10mmsocketpinscrews(T)areused.
SKIPTOSTEP12.
A
R
R

11 of 14
ISSUED:07-25-11 SHEET #: 125-9225-1
FRONTOFPROJECTOR FRONTOFPROJECTOR
FIGURE 9.2
FIGURE 9.1
FRONTOFPROJECTOR
FRONTOFPROJECTOR
FRONTOFPROJECTOR
FRONTOFPROJECTOR
Installation using Wall Arm Bracket and Extension Bracket
PROJECTORCABLES
11
12
AttachexposedM5x20mmsocketpinserratedwasherheadscrews(R)intotopofadapterplateassembly(A)
throughslotinextensionbracket(B)andkeyholesinprojectorattachmentbracket(H)asshownindetail5.
Slideprojectorattachmentbracket(H)towardwall.OnceinlockedpositiontightenallthreeM5x20mmsocketpin
serratedwasherheadscrews(R)usingsecuritywrench(Q)asshownindetail6.
Secureextensionbracket(B)intowallarmbracket(C)andsecureusingfourM5x10mmsocketpinscrews(T)
usingsecuritywrench(Q)indesiredposition.NOTE: MakesurethatfourM5x10mmsocketpinscrews(T)
areused.
TIGHTEN
SCREWS
G
B
C
Routeprojectorcablesasshown.Usetwocablemanagementbrackets(G)asneeded.
FastentwoM5x20mmsocketpinserratedwasherheadscrews(R)intotopofadapterplateassembly(A).
R
NOTE: Verifythatallscrews
areinthecenteroftheslot.
T
DETAIL 3
DETAIL 4
DETAIL 5
DETAIL 6
B
H
A
R
R

12 of 14
ISSUED:07-25-11 SHEET #: 125-9225-1
Pitch Adjustment
Loosenknobsonfrontofprojector,andtighten
knobsonbackofprojectortopitchprojector
forward.Reverseforprojectortopitchbackward.
SUPPORTING SURFACE NOT
SHOWN FOR CLARITY
Roll Adjustment
Loosenknobsonleftsideofprojector,andtighten
knobsonrightsideofprojectortorollprojectorto
theright.Reverseforprojectorrolltotheleft.
SUPPORTING SURFACE NOT
SHOWN FOR CLARITY
LOOSEN DO NOT
ADJUST
TIGHTEN
LOOSEN DO NOT
ADJUST
TIGHTEN
DETAIL 5
DETAIL 6
14

13 of 14
ISSUED:07-25-11 SHEET #: 125-9225-1
DO NOT
ADJUST
TIGHTEN
DO NOT
ADJUST
TIGHTEN
Combination for Pitch and Roll Rotation
SUPPORTING SURFACE NOT
SHOWN FOR CLARITY
Tightenknobonbackrightofprojector,andloosen
knobonleftfrontofprojectortopitchandrotate
projectorbackwardtotherightasshowning.13.1.
Reverseforprojectortopitchbackwardtotheleft.
Loosenknobonbackrightofprojector,andtighten
knobonleftfrontofprojectortopitchandrotate
projectorbackwardtotherightasshowning.13.2.
Reverseforprojectortopitchbackwardtotheleft.
Fig. 13.1
NOTE:Formoreadjustment,knobscanbe
turnedindividually
LOOSEN DO NOT
ADJUST
TIGHTEN
Gripsidesofprojectorandgentlyrotatetodesired
position.
Swivel Adjustment
SUPPORTING SURFACE NOT
SHOWN FOR CLARITY
D

14 of 14
ISSUED:07-25-11 SHEET #: 125-9225-1
©2009PeerlessIndustries,Inc.Allrightsreserved.
PeerlessisaregisteredtrademarkofPeerlessIndustries,Inc.
Allotherbrandandproductnamesaretrademarksorregisteredtrademarksoftheirrespectiveowners.
Securewallplatecover(E)towallarmbracket(C)usingtwo
M5x10mmsocketpinserratedwasherheadscrews(T).
Note:Adjustheightofwallplatepriortofasteningwallplatecover(E)forprojectorimagelocation.Usesecurity
wrench(Q)tofastenscrews.
SUPPORTING SURFACE NOT
SHOWN FOR CLARITY
T
E
C
Fig. 13.2
14
/