Page is loading ...

Benutzerhandbuch
User’s guide
Manual de usuario
Manuel utilisateur
Manuale d’uso
Gebruikersdocumentatie
T3 (IP) Comfort
connected to Integral 5
IP Telephony
Contact Centers
Mobility
Services

Contents
2
Contents
Familiarize yourself with your telephone
Important notes ......................................................................................................... 4
Your T3 (IP) Comfort at a glance ................
.............................................................. 9
All keys at a glance ................................................................................................. 10
Basic rules of operation .................................
......................................................... 11
Putting the telephone into service (T3 IP only) .
...................................................... 15
Making calls as usual
Answering calls ........................
............................................................................... 18
Calling someone .....................................................................................................
21
Establishing several connections ........................................................................... 27
Making calls without the handset ............................................................................ 32
Making calls with ease
Using the call list ..................................................................................................... 35
Routing calls ........................................................................................................... 40
Using the phone book .............................................................................................
48
Setting reminders (appointments) ..........................................................................
52
Viewing charges* .................................................................................................... 57
Locking the telephone ............................................................................................ 60
Sending and receiving messages .....................
...................................................... 62
Outside business hours (night service)* ...........
...................................................... 66
Telephoning with partners ......................................................................................
67
Customizing the telephone
Setting audio, contrast and language ............
......................................................... 70
Assigning functions/phone numbers to keys ..........................................................
75
Changing general settings ......................................................................................
81
Settings for your telephone system ........................................................................
96
IP-specific settings ................................................................................................ 103
Auxiliary devices*
Links* .................................................................................................................... 108
The DSS module .................................................................................................. 110
Headset ................................................................................................................ 112
Extras for your telephone
Hotel functions* .............................................
....................................................... 115
Look it up whenever in doubt
Telephone functions and symbols ........................................................................
124
Messages on the display ...
................................................................................... 128
Ring tones and handset tones ..............................................................................
130

3
Contents
Menu overview ......................................................................................................131
Troubleshooting .....................................................................................................134
Index ......................................................................................................................135

Important notes
4
Familiarize yourself with your telephone
Familiarize yourself with your telephone
Important notes
Which systems can you connect your telephone to?
This telephone is only intended to be conne
cted to Avaya PBX systems. It must not
be connected directly to a PSTN.
Declaration of conformity (T3)
We, Avaya GmbH & Co. KG, declare that the T3 Comfort telephone complies with
the ba
sic requirements and other relevant provisions of EU directive 1999/5/EU
(Radio and Telecommunication Terminal Equipment, R&TTE).
This telephone is intended for connection to digital interfaces of Avaya telecommuni-
cations systems and meets the fundamental requirement
s formulated in EC directive
1999/5/EC (Radio and Telecommunication Terminal Equipment, R&TTE).
This telephone has been designed in such a way that it
is unsuitable for direct opera-
tion on interfaces of public telecommunication networks.
When using links and DSS modules:
This link / DSS module is intended for connection to T3 telephones and meets the
fund
amental requirements of EC directive 1999/5/EC (Radio and Telecommunication
Terminal Equipment, R&TTE).
The design of this link / DSS module makes it suitable for use with T3 telephones
on
ly.
If any problems occur during operation, please first co
ntact your specialist dealer or
your system administrator.
The complete declaration of conformity can be ob
tained at the following Internet
address:
http://www.avaya.de/gcm/emea/de/includedcontent/conformity.htm or look
for ’Conformity’ in the index.
Declaration of conformity (T3 IP)
We, Avaya GmbH & Co. KG, declare that the T3 IP Comfort telephone complies with
the ba
sic requirements and other relevant provisions of EU directive 1999/5/EU
(Radio and Telecommunication Terminal Equipment, R&TTE).
This telephone is designed for connection to Eth
ernet/LAN interfaces of IP compati-
ble telecommunications systems from Avaya, and
complies with the basic require-
ments of EU directive 1999/5/EU (RTTE).
Avaya cannot guarantee successful operation of the
telephone in LAN or intranet
environments in which no Avaya telecommunications system is present.

5
Familiarize yourself with your telephone
Important notes
When using links and DSS modules:
This link / DSS module is intended for connection to T3 IP telephones and meets the
fu
ndamental requirements of EC directive 1999/5/EC (Radio and Telecommunication
Terminal Equipment, R&TTE).
The design of this link / DSS module makes it suitable for use with T3 IP telephones
onl
y.
If any problems occur during operation, please first cont
act your specialist dealer or
your system administrator.
The complete declaration of conformity can be obtained at the following Internet
addr
ess:
http://www.avaya.de/gcm/emea/de/includedcontent/conformity.htm or look
for ’Conformity’ in the index.
Software License
License
USE OR INSTALLATION OF THE PRODUCT INDICATES End User’s acceptance of
t
he GENERAL LICENSE TERMS AVAILABLE ON THE AVAYA WEBSITE AT
http://support.avaya.com/LicenseInfo/
("GENERAL LICENSE TERMS").
If you do not wish to be bound by these terms, you must return the product(s) to the
point of purchase withing ten (10) days of delivery for a refund or credit. IN ADDI-
TION TO THE GENERAL LICENSE TERMS, THE FOLLOWING
LICENSE TERMS
AND RESTRICTIONS APPLY TO THE PRODUCT.
Avaya grants End User a license within the scope
of the license types described
below. The applicable number of licenses and units of capacity for which the license
is granted will be one (1), unless a different number of licenses or units of capacity is
specified in the Documentation or other materials available to End User. "Designated
Processor" means a single stand-alone computing device. "Server" means a Desi-
gnated Processor that hosts a software application
to be accessed by multiple users.
"Software" means the computer programs in object code, originally licensed by
Avaya and ultimately utilized by End User, whether as stand-alone Products or pre-
installed on Hardware. "Hardware" means the standard hardware Products, origi-
nally sold by Avaya and ultimately utilized by End User.
License Type(s):
Designated System(s) License (DS). End User
may install and use each copy of the
Software on only one Designated Processor, unless a different number of Designa-
ted Processors is indicated in the Documentation or other materials available to End

Important notes
6
Familiarize yourself with your telephone
User. Avaya may require the Designated Processor(s) to be identified by type, serial
number, feature key, location or other specific designation, or to be provided by End
User to Avaya through electronic means established by Avaya specifically for this
purpose.
Third-party Components
Certain software programs or portions thereof included in the Product may contain
sof
tware distributed under third party agreements ("Third Party Components"), which
may contain terms that expand or limit rights to use certain portions of the Product
("Third Party Terms"). Information identifying Third Party Components and the Third
Party Terms that apply to them is available on Avaya’s web site at:
http://support.avaya.com/ThirdPartyLicense/
To which system is your telephone connected? (T3)
You can find out which system your telephone is connected to as follows:
Press the "Menu" function key during a call
or with the handset off-hook:
The "Info/Service" menu appears, but only if yo
ur telephone is connected to the Inte-
gral 55 Communication Server. In this menu you can also view, for example, the
type, catalogue number and software version.
Which system is your IP telephone connected to? (T3 IP)
You can tell which Avaya telephone system your telephone is connected to as fol-
lows:
When logging in for the first time:
If your telephone is connected to the Integral 5, a log-in window appears first in
wh
ich you can enter your extension number and PIN. No log-in window appears if
your telephone is connected to the Integral 55 Communication Server.
If you have already logged in:
Press the "Menu" function key during a conversation or with the handset off-hook:
The "Info/Service" menu appears, but only if yo
ur telephone is connected to the Inte-
gral 55 Communication Server. You can view various IP settings there.
Hints for the location of the phone
Place the telephone on a non-slip surface, especia
lly if the furniture is new or has
recently been cleaned or polished. Varnishes or cleaning agents may contain sub-
stances which soften the pads on the underside
of the telephone and the pads could
then mark your furniture. Avaya cannot assume liability for damage of this kind.

7
Familiarize yourself with your telephone
Important notes
Repairs
The telephone set may only be opened or repaired by qualified technicians. Do not
ope
n the telephone yourself. This could otherwise result in damage to the telephone,
making it inoperable.
What you should definitely read
You should definitely read the following sections. These sections explain all the parts
of you
r telephone. You will find out how to use your telephone.
Overview of your telephone (
→
p. 9)
Basic rules of operation (
→
p. 11)
Putting the telephone into service (
→
p. 15)
i
Note
• You will often find this information line at the end of a section or chapter. It contains
additional information that will help you to make better use of the functions.
Additional functions
Functions marked by a * are not stand
ard features of your telephone.
Other functions may be disabled or – depending on the system software – not availa-
ble. Please consult your system administrator
if you want to use any of these
functions.
... telephoning made easy
You can make the following settings immediately or during your first telephone calls:
• Adapt the volume (
→
p. 71) for ringing, for the receiver and the settings for
handsfree (
→
p. 73) to your surroundings.
• Adapt the contrast of the display (
→
p. 71) to the lighting conditions where you
are.
• Select which language (
→
p. 74) all display information is to appear in. The
available languages are English, French and German.
• Save frequently used call numbers to a personal phone book (
→
p. 48). You can
modify personal phone book entries yourself.
User manual in other languages
Would you prefer to read these operating instru
ctions in a different language? Go to
the Avaya Support page at http://support.avaya.com where you can access our list
of documents. Look there to find out whether the language version you want is
available for download.

Important notes
8
Familiarize yourself with your telephone
Dispose of waste equipment properly - the environment will thank you for it
Waste electrical and electronic equipment bearing this symbol may
contain substances that are dangerous to humans and the environ-
ment. For this reason, you must not dispose of such equipment toge-
ther with unsorted municipal (domest
ic) waste. To protect our
environment, pubic collection points are available at which you can
dispose of waste electrical and electronic equipment that bears this
symbol.
To prevent these substances from spre
ading in our environment and
reduce the pollution of natural resources, you can also take part in the
Avaya take-back scheme for waste equipment. Under this scheme,
the materials in the waste equipment will be recovered in a proper pro-
fessional manner with individual components being re-used.

9
Familiarize yourself with your telephone
Your T3 (IP) Comfort at a glance
Your T3 (IP) Comfort at a glance
1 Display
2 Level-switching key for display keys
3 Clear key
4 Arrow keys for navigating within the display
5 OK key
6 Escape key
7 Cover with alpha keypad underneath
8 Digit keys with letters
9 Function keys (some of them with LEDs)
10 Volume/contrast keys
11 Call display
12 Display keys for destinations, functions, partners and lines

All keys at a glance
10
Familiarize yourself with your telephone
All keys at a glance
... Digit keys with letters: For dialling call numbers and entering
codes. The alphabetic labelling allows you
to dial with letters (vanity numbers).
Star and hash: For special functions
Escape: Ends the current connection during a call, and also cancels entries (the
next higher menu level then appears on the display).
Clear: Deletes the character above the mar
ker. The last character is deleted if
the cursor is positioned after the last character.
Arrow up / down: Moves the cursor up or down in the display.
+ / -: Increases or decreases the volume or contrast.
Arrow left / right: Moves the cursor to th
e left or right in the display.
Enter: Opens a selected menu item or confirms an input.
Switch level: Activates the next level
for the display keys.
Function keys:
• 10 display keys below the display.
• 12 user-definable function keys next to the numeric keypad, 6 of these with LEDs.
• 5 function keys with permanent assignment: Hands
free/monitoring, mute (switch
off microphone), menu, redial and refer-back.
Built-in alphabetic keypad: For convenient text entry.
i
Note
• The default assignment for the function keys is printed on the enclosed label strips.

11
Familiarize yourself with your telephone
Basic rules of operation
Basic rules of operation
You can select and use most of the functions from the menu. To make operation
easier, you can assign frequently used functions to the function keys. Some keys are
already assigned functions when the phone is delivered.
Selecting functions from the menu
Press the "Menu" function key.
or scroll to the desired menu item.
Confirm your selection. T
he selected function is displayed. In many cases a
submenu also appears. You can scroll through the submenu in the same way as in
the menu.
i
Notes
• Functions already assigned to keys no longer appear in the menu.
• You can find all functions in the Menu overview (
→
p. 131).
Cancelling or exiting an action
If you have entered the wrong data or made the wrong setting:
Press (several times if necessary) to can
cel the procedure. You will then move
up one menu level or go to the idle display.
i
Note
• The following settings cannot be undone using the Escape key:
• Changes to the assignment of function keys
• Settings that have been changed using the OK key.
The display helps you
The displays guide you step by step as you use the ph
one. The display provides you
with a great deal of information, such as the status of your current connection.
The phone number of every external ISDN caller will appear in the display providing
th
ey have not disabled call number display. This enables you to see who is calling. If
your phone book already contains the name and phone number of the caller, their
name will displayed when they call.
The 10 display keys can be assigned different functions. You can read the current
fu
nction of each key on the display.
Basic rules of operation
12
Familiarize yourself with your telephone
What is shown on the idle display?
The idle display shows:
• Your name and call number
• Weekday, date and time
• Assignment of display keys
• The display key level
• Status messages where applicable
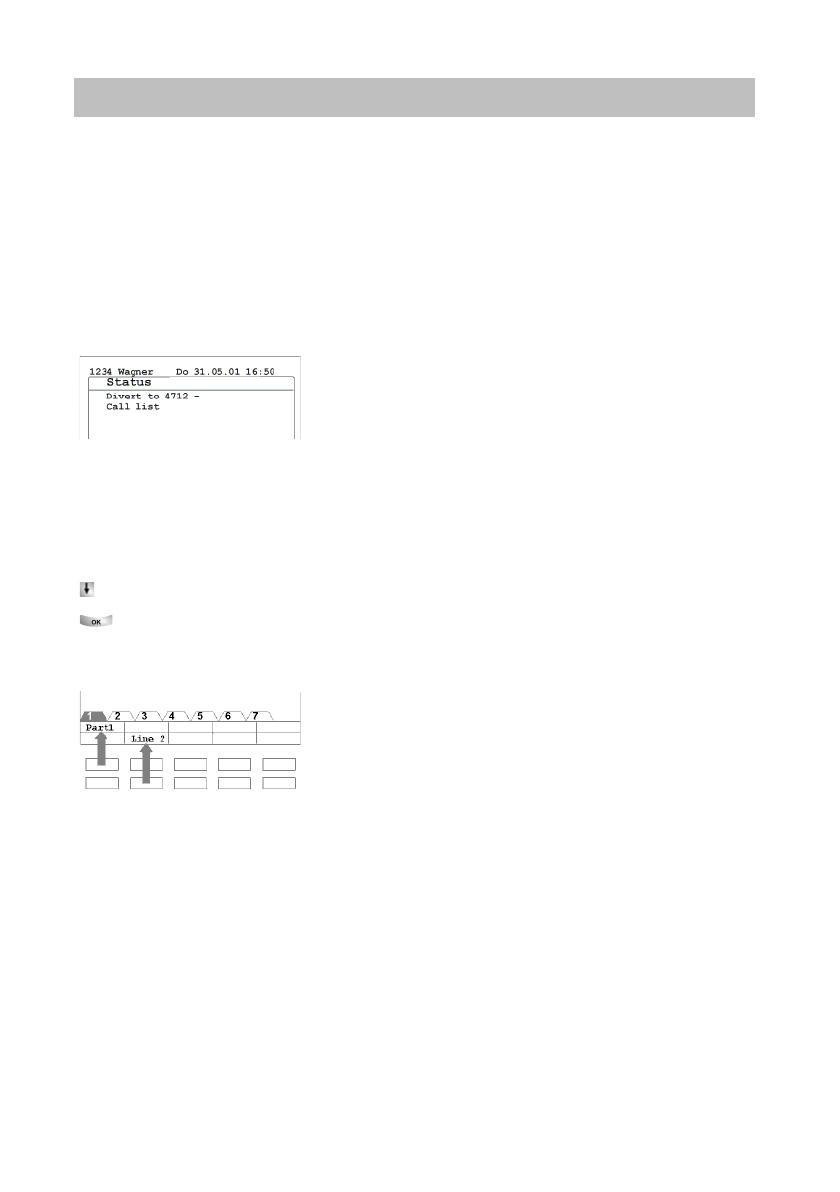
Status messages
When required, your telephone will display additional text in the idle display. This
ha
ppens when there is important information for you (e.g. new entry in the call list) or
you have activated special functions (e.g. "Divert to").
You can activate the associated menu item directly from a status message, e.g. to
cha
nge the setting.
Scroll to the desired status message.
Confirm your selection.
Display keys
Your telephone has 10 special function keys, the display keys. The current allocation
of
each key is shown in the display.
Examples: You can call Partner 1 (= Part 1) using the top left key. If you press the
seco
nd key in the bottom row, you seize exchange line 2 (= Line 2).

13
Familiarize yourself with your telephone
Basic rules of operation
Display keys in several levels
The first level display keys can be allocated to partners, lines or any other functions
as required. Normally, you will see the first level displayed.
You can assign destinations to display keys in other levels. You can change between
th
e levels using the "Switch level" key. The level tabs show you which level is in use.
Level 2 is active in the illustration.
Press this key. The next level of the display keys will be shown. The current
functions are shown in the display.
i
Note
• You can temporarily switch off the status message display with the Escape key.
• The destinations on the keys in level two and higher correspond to the entries in
your individual phone book. All entries are automatically assigned to the display
keys, starting with code 900.
• Avaya Service can change the number of levels for the display keys (max. 8).

Basic rules of operation
14
Familiarize yourself with your telephone
Entering text
Your telephone has its own keypad with letter keys (
→
p. 9). The keys are arranged
in a similar manner to a computer keyboard.
The default layout corresponds to the letters printed in white on the keys.
•For up
per case letters, the shift key (up arrow) must be held down.
• Special characters are shown in blue. For special characters, the Alt key must be
held down.
• Co
untry-specific special characters can be created as follows: First select the
special diacritic character shown in blue (e.g. an accent). Then enter the normal
(unaccented) letter.
Example:
You want to enter the character Á.
• Press and hold the Alt key.
Press ´ (above the D) on the middle row of keys.
Release both buttons.
• Press and hold the Shift key.
Press the A key.
Release both buttons.
The letter Á will be shown in the display.
i
Note
• If you have a telephone with an unprinted alphanumeric keypad (
→
p. 93) you
must place a keypad template over the alphanumeric keypad. The appropriate let-
ters and symbols are printed on the template.

15
Familiarize yourself with your telephone
Putting the telephone into service (T3 IP only)
Putting the telephone into servi ce (T3 IP only)
Please read and follow the following instructions regarding the commissioning of an
IP telephone.
InhaltContents
Connecting the telephone and logging in (T3 IP only) (
→
p. 16)
Modifying language for the log-in
procedure and IP settings (
→
p. 16)
Logging off from telephone (
→
p. 17)
i
Note
• IP-specific settings (
→
p. 103) are described in separate sections.
Putting the telephone into service (T3 IP only)
16
Familiarize yourself with your telephone
Connecting the telephone and logging in (T3 IP only)
After connecting the unit to the LAN (Local Area Ne
twork) and to the power supply
(only if the telephone is not powered via the LAN), the telephone software will first be
activated and after that a search for a gatekeeper (responsible for access authorisa-
tion) will start automatically. A gatekeeper will no
rmally be found. If this is the case,
the log-in window will then appear:
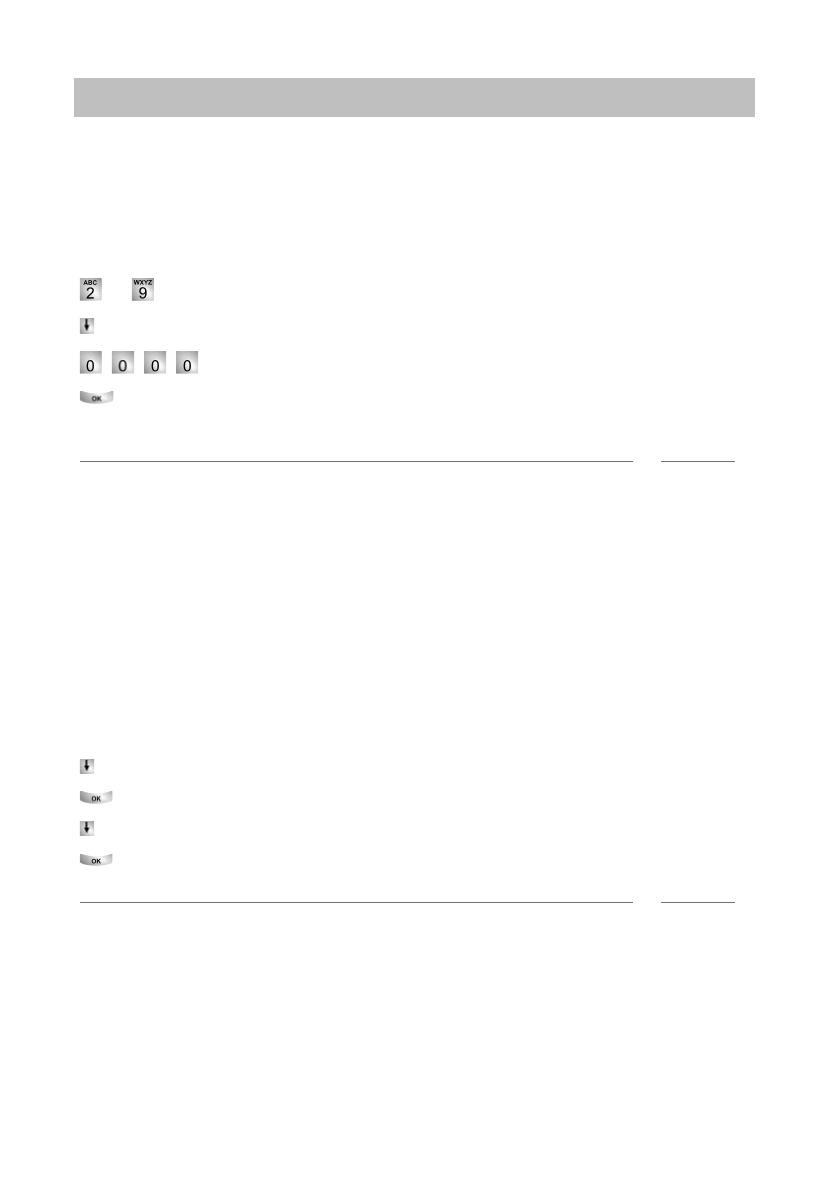
... Enter extension number.
Scroll to the PIN me
nu item.
Enter PIN The factory setting is "0000".
Confirm your selection. The idle display appears next. You will now also be
available under the entered call number (extension number).
i
Note
• You can change the language for the log-in procedure. (
→
p. 16)
• The log-in PIN is the same as the PIN yo
u can use to unlock your locked tele-
phone. You can change this PIN in the Lock (
→
p. 61) menu
• If you have cancelled a log-in procedure (i.e. you have left the log-in window using
the Escape key) in order to change or view settings in the menu, you can then log
back in again via the User administration menu option.
Modifying language for the log-in procedure and IP settings
If your telephone is not yet logged in, you can choose between six different langua-
ges (German/English/French/It
alian/Spanish/Dutch):
Press the "Menu" function key.
Scroll to the "Switch language" menu option.
Confirm your selection.
Select language, e.g. English.
Confirm your selection.
i
Note
• When first setting up your telephone you can choose your preferred language in
other ways: When the log-in window appears, press the Escape key twice. "D/GB/
F/I/E/NL" appears. Then select your preferred language. "D/GB/F/I/E/NL" disap-
pears when the language has been changed.

17
Familiarize yourself with your telephone
Putting the telephone into service (T3 IP only)
Logging off from telephone
When you want to log off from the telephone again:
Press the "Menu" function key.
Scroll to the Log off me
nu item.
Confirm your selection. You are now logged off from this telephone. Another
user can now log on.

Answering calls
18
Making calls as usual
Making calls as usual
Answering ca lls
You can lift the receiver and speak with the caller in the normal way.
If another subscriber within your system receives
a call, you can divert the call to
your phone (pick-up call).
It is also possible to answer calls using the handsfree key and then to telephone with
the recei
ver on-hook.
You can set your telephone to activate handsfree mode automatically when it recei-
ves an internal call. You will not need to lift the receiver, but can immediately start
spe
aking to the caller (Automatic handsfree when called (
→
p. 84)).
It is also possible to put calls on hold instead of answering them immediately. This
al
lows you to complete any operating procedures you have already started (e.g.
editing a phone book entry).
You can divert any incoming external calls to a preco
nfigured call forwarding station
(call forwarding).
InhaltContents
When you receive a call (
→
p. 19)
If another telephone receives a call (pick-up call) (
→
p. 19)
Answering a call for a partner (
→
p. 19)
Call during a conversation (second call) (
→
p. 19)
Call during a programming procedure (
→
p. 20)
Call forwarding (
→
p. 20)

19
Making calls as usual
Answering calls
If you receive a call
Your telephone rings. The call is shown in the display.
Lift the handset.
i
Notes
• Telephoning without the receiver: Press the "Handsfree/Monitoring" function key.
• You will be shown the number or name the caller dialled, e.g. when you receive a
diverted call.
• If you do not want the caller to hear what is being said at your end, press the
"
Mute" key. The opposite party will be able to hear you again after pressing this
key again.
If another telephone receives a call (pick-up call)
Another telephone rings.
Press the "Pick-up" function key. A list of incoming calls will be shown.
Scroll to the call you want to pick up.
Confirm your selection.
Lift the handset.
Answering a call for a partner
If you have assigned a partner to a function key or display keyAssigning partners to
keys (
→
p. 78)):
A partner is being called.
Press the display key or function key for the partner being called. Your telephone
rings.
Lift the handset.
Call during a conversation (second call)
You are on the phone. Someone else calls you.
You hear a single ring tone. The cal-
ler is shown as the top item on the menu.
Accept call. The first caller is waiting and cannot hear your conversation.

Answering calls
20
Making calls as usual
Call during a programming procedure
You receive a call but want to finish what you are doing on your telephone first. You
are
programming your phone. A call arrives.
Scroll to the Place call on hold menu item.
Confirm your selection. You can continu
e with your programming. After comple-
tion, the held call will be shown.
Call forwarding
You receive an external call and wish to divert
the call to the call forwarding stations:
Scroll to the Transfer menu item.
Confirm your selection. The call is dive
rted to the call forwarding stations.
i
Note
• The call forwarding stations must have been set up in the telecommunications
system.
/

