Page is loading ...

HanoverOutdoorFurniture
IMPORTANT
Ifyouhaveanyproblemswiththisproduct(missingordamagedparts,assemblyissues,etc.),
PLEASEDONOTRETURNTOTHERETAILER/STORE
fromwhereyoupurchasedtheproduct.
PleasecallourToll‐FreeCustomerServiceHotlineat:
1‐800‐416‐3511
Between9:00AMand5:00PMEasternTime,MondaythroughFriday
Orvisitourwebsiteat:
www.hanover‐products.com
Toexpediteanyfuturewarrantyclaims,pleaseretaintheInstructionSheet,Warranty
Cardandreceiptforfutureuse.
For additionalon‐linesupportonassembly,troubleshootingandcare&maintenanceofyouroutdoor
furniture,pleasevisitourwebsiteat:www.hanover‐products.com.
6/1/2015(a)

Page 2
Outdoor Furniture
1-Year Limited Warranty Program
Contact Warranty Services at
1-800-416-3511
For a period of one (1) year after purchase, the Manufacturer will either repair or replace defective components in accordance with this
Limited Warranty. This warranty is between Manufacturer and the original purchaser and is valid only when accompanied by the
original purchaser’s sales receipt showing original date of purchase and location of purchase. Replacements under this warranty
revert back to the date of original purchase for future warranty.
Manufacturer or its authorized dealer can accept or reject warranty claims based on its findings. This warranty applies in normal
residential use only and is not intended for commercial use. Manufacturer can make substitutions as required of materials,
components, and sub-components of comparable value and utility. This warranty is limited to product repair or replacement (to be
determined solely by Manufacturer). Warranty return is limited to only the single affected component.
This warranty covers only manufacturing defects and does not cover normal wear and tear, damage due to acts of nature (such as, but
not limited to freezing or high winds), abuse or misuse, including chemical damage from suntan oil or other chemicals, exposure to
extreme heat or cold, abrasion or excessive weight. This product is intended to be used in standard installations only. This warranty
is invalid if the product is not used for intended purpose. Manufacturer disclaims liability for any aspect of installation and any
inconvenience caused by a defective part of a component.
Certain items are not covered by this warranty. These include, but are not limited to the following:
1. Components subjected to abuse, including abuse intended to simulate failure.
2. Damages caused by retailer, shipper or installation crew (such as scratches, dents, tears, chips, etc.).
3. Any part which merely exhibits normal wear yet functions essentially as new, including chips, scratches or stretching of
materials and stitching.
4. Tears, punctures, scratches or any damage caused by improper installation or use.
5. Damage to frames/welds resulting from improper assembly or exposure to water and/or sub-freezing temperatures is not
covered. General frame rusting is not covered.
6. Fading and/or discoloration of fabrics/cushions/straps/wicker resulting from exposure to the elements, chemicals, oils, fluids
or any other cause are not covered.
7. Umbrella bases are not covered under any circumstances.
8. Items sold “as is” or floor models.
To make a claim, call the toll-free number below. Please have available a copy of the original sales receipt along with a brief
description of the problem. Please also provide your email address and daytime telephone or cell phone #. Repairs or replacement will
be made at the Manufacturer’s option.
THIS IS THE ENTIRE EXCLUSIVE EXPRESS LIMITED LIABILITY. THE MANUFACTURER NEITHER MAKES NOR IS RESPONSIBLE
FOR ANY OTHER WARRANTIES, EITHER EXPRESS OR IMPLIED, INCLUDING THOSE OF RETAILING DEALERS. THIS
EXCLUSIVE REMEDY IS LIMITED TO RECEIPT OF A CREDIT IN CONNECTION WITH THE REPAIR OR REPLACEMENT OF ANY
PRODUCT OR COMPONENT DEEMED TO BE DEFECTIVE UNDER THE TERMS AND CONDITIONS AS STATED IN THIS
WARRANTY. NEITHER THE PRODUCT MANUFACTURER NOR ITS AGENTS SHALL BE LIABLE IN ANY CASE FOR INCIDENTAL,
INDIRECT, SPECIAL OR CONSEQUENTIAL DAMAGES RESULTING FROM THE USE OF THIS PRODUCT OR ARISING OUT OF ANY
BREACH OF THIS WARRANTY OR NEGLIGENCE EVEN IF IT HAS BEEN ADVISED OF THE POSSIBILITY OF SUCH DAMAGES.
EXCEPT AS OTHERWISE MAY BE REQUIRED BY LAW, THERE ARE NO OTHER EXPRESS OR IMPLIED WARRANTIES OTHER
THAN THE WARRANTY DESCRIBED HEREIN, AND ALL OTHER WARRANTIES, INCLUDING ANY IMPLIED WARRANTY OF
Sales and use taxes, plus shipping and handling charges are the responsibility of the consumer.

Page 3
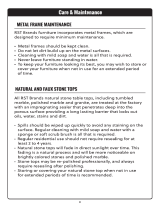
Care & Maintenance
Outdoor furniture can be enjoyed for many years when well maintained.
Regular Maintenance
How to Clean & Care for Teak Furnishings
How to Clean Woven Furnishings
How to Clean Fabric
How to Clean Mesh
How to Clean Strap
How to Clean Vinyl Strap
How to Clean & Care for Stone and Marble Tops
Wash the furniture with a solution of mild detergent and water, rinse with clear water, and dry thoroughly. To all metal frames, apply a
fine, clear automobile wax for maximum protection against harmful ultraviolet exposure and salt air.
For best protection, perform this maintenance two or three times per year in low pollution areas or more frequently in high pollution
areas. Please note that these durable materials can be safely cleaned as often as desired. Note: Some suntan and sun block products
may be harmful to resin, cushions and strap, mesh and vinyl lace and strap. Do not allow such products to come in contact with any
seating surfaces to avoid deep penetrating stains, which are not covered under warranty.
Left alone to age, the natural color of teak furnishings will weather to a soft, silver grey. This process will take approximately nine
months, depending on the degree of sunlight and rain exposure. Imperfections, which are inherent properties of the wood, will show
over time, enhancing the beauty of the furniture. In humid or wet climates, or after rains, the wood may naturally expand and contract,
causing the grain to rise. This is to be expected with exposure to the elements and will stabilize after the initial weathering occurs.
To maintain teak furnishings, use a soft bristled utility brush and stroke lightly in the direction of the grain to remove surface dust. For
more stubborn dirt, the wood may be washed with a mild solution of four parts laundry detergent or dish washing soap to one part
bleach in water, then rinsed thoroughly and allowed to dry completely. Oiling the wood may cause mildew or irregular coloring.
Woven furnishings are made of durable and weatherproof extruded polyethylene resin weave. Light stains and soils may be removed
with a solution of mild detergent and water, rinsed with clear water and dried thoroughly. Mildew and heavy stains can be removed with
a quality commercial outdoor furniture cleaner and protectant. Woven furnishings may not be suitable for intensely hot climates.
Fine outdoor fabrics are designed to endure years of sun, soil and moisture. Wash outdoor cushions with a solution of mild detergent
and water and thoroughly rinse with clear water. Stand cushions on end and allow to air dry completely. Light stains can be removed as
above. Mildew and heavy stains can be removed with a quality commercial outdoor furniture cleaner and protectant. Note: Do not dry
clean or use a washing machine or dryer. Do not steam or use water at temperatures above 100º F when washing. Note: Be careful to
keep the outdoor furniture cleaner from contact with the cushions of your outdoor furniture, as it will cause discoloration. Do not use
bleach on printed acrylic fabrics. Do not use solvent-type materials on woven vinyl, woven blend or ultra woven blend fabrics as they
will damage the yarns. Do not use chlorine based cleaners.
Remove light stains with a solution of mild detergent and water, then rinse with clear water and dry thoroughly. Mildew and heavy
stains can be removed with a quality commercial outdoor furniture cleaner and protectant.
For general or light cleaning, begin by brushing dirt off the strap. Apply a solution of mild detergent and warm water and allow it to soak
into the strap. Gently clean with a sponge or soft bristle brush, then rinse thoroughly with clear water and allow the strap to air dry.
Apply a quality vinyl protectant to guard against the effects of air pollution, salt air build-up, and mildew. To remove difficult stains use
rubbing alcohol applied with a soft cloth.
Tabletops are designed for normal outdoor use in residential settings. To maintain the natural beauty we recommend resealing your
table top when necessary, with the same sealer product applied during the manufacturing process. The sealer penetrates the stone
and acts as a repellent, preventing absorption of moisture and stainable materials.
If tabletop is stained with products such as wine, soda, coffee, or other colorants of organic origin, clean these spills immediately with a
mild detergent then rinse with water. In extreme cold climates, it is recommended that tabletops be stored in a dry indoor area or be
covered with suitable outdoor furniture cover. Be sure to allow space between the tabletop and the cover so that moisture does not
collect on the table; this will promote airflow and allow moisture to escape.

Page 4
ASSEMBLY INSTRUCTIONS
1
2
3
Assemble furniture on a smooth, non-abrasive surface. by using two
5/16"x40 mm bolts and washers as shown in . Guide the bolts through holes in back frame, into
pre-drilled holes in the . and back frame
by using four 5/16"x25 mm bolts and washers as shown in . A
and seat frame by using two 5/16"x25 mm bolts and two 5/16"x40 mm bolts and four washers as
shown in .
Fig.1
Hand tighten only.
Fig.2 Hand tighten only.
Fig.3 Hand tighten only.
Attach the back frame to right arm
right arm Attach the seat frame to right arm
ttach the left arm
to back
B
D
I
G
H
Fig.1
I
G
H
A
Fig.2
I
F
H
I
F
H
C
Fig.3
I
F
H
I
G
H
Attach the complete base to the complete seat by using four 5/16"x40 mm bolts and washers as shown
in . Guide the bolts through holes in base, into the pre-drilled holes in the seat.Fig.4 Hand tighten only.
Using the hex bolt driver provided, tighten all bolts.
Test the operation of glider. Gliding
motion should be smooth. Adjust tension on the glider brackets, nuts and bolts as needed. Cover nuts
and bolts with covers provided.
Do not over tighten bolts. If nuts and bolts are
too tight or too loose, the glider will not function properly.
I
G
H
Fig.4
E
I
G
H

Page 5
*NOTE:PARTSSHOWNONPARTSLISTARENOTTOSCALE
PARTS IDENTIFICATION LIST
G0080
PARTS LIST
HW0695
HEX BOLT DRIVER
HW0006
SEAT FRAME
1
1
1
A
B
C
D
E
F
G
H
I
J
DESCRIPTION ORDER PART #
QTY
GLIDER BRACKET
FACTORY ASSEMBLY
ST4 8 X 25 BOLT.
FACTORY ASSEMBLY
FOOT CAP
FACTORY ASSEMBLY
FC0013
6
5/16" X 25 MM BOLT
HW0186
8
5/16" X 40 MM BOLT
HW0275
HW0005Ø8.5 X 1.5 MM WASHER
BOLT COVER
HW0105
14
BACK FRAME
1
LEFT ARM
1
RIGHT ARM
1
GLIDER BASE W/
GLIDER BRACKET
1
14
SG0154
SG0155
SG0156
SG0157
SG0158
SG0159
BGS12023

Page 4
ASSEMBLY INSTRUCTIONS
1
2
Attach the seat frame to the back frame by using four 5/16"x40 mm bolts and washer as shown in
Guide these bolts through the holes in the seat frame, into the fixed nuts already in place in the back frame.
Figure 1.
.Do not over tighten
Attach love seat arm by inserting two mm bolts with washers through the holes in front seat portion
of the love seat frame and into the holes in the love seat arm shown in . Attach back of love seat arm
by inserting two mm bolts with washers through holes in the back portion of love seat frame and into
the holes in the rear portion of the love seat arm as shown in . . Repeat for the
opposite side.
Figure 2
Figure 2 Hand tighten only
5/16"x25
5/16"x40
A
B
H
F
G
C
D
G
E
H
G
FOOT CAP-1
F
H
G
E
H
G
F
H
3
Tighten all bolts using the hex bolt driver provided. Tighten each bolt a few revolutions at a time, alternating
between bolt connections until all bolts are tight.
Cover all bolts with bolt covers provided.
Do not over tighten. Over tightening may strip bolts or
damage the welds or frame.

Page 5
*NOTE:PARTSSHOWNONPARTSLISTARENOTTOSCALE
PARTS IDENTIFICATION LIST
BGC08006
8
5/16" X 40 MM BOLT
Ø8.5 X 1.5 MM
WASHER
LEFT ARM
RIGHT ARM
BOLT COVER
HEX BOLT DRIVER
FOOT CAP-1
FACTORY ASSEMBLY
HW0005
HW0022
HW0006
FC0030
1
12
HW0275
12
4
5/16" X 25 MM BOLT
HW0186
1
1
1
1
BACK FRAME
SEAT FRAME
PARTS LIST DESCRIPTION ORDER PART #
QTY
A
B
C
D
E
F
G
H
I
FOOT CAP-2
FACTORY ASSEMBLY
FC0308
SK0939
SK0940
SK0941
SK0942
/