Page is loading ...

Assembly Instructions: 6005-10 (Lancaster)
IMPORTANT:
• ALL INSTALLATION WORK SHOULD BE DONE BY ACCREDITED PROFESSIONAL.
• SHUT OFF POWER SUPPLY AT FUSE OR CIRCUIT BREAKER!
• USE ONLY THE SPECIFIED BULBS. DO NOT EXCEED THE MAXIMUM WATTAGE!
CLEANING TIPS
Treat the xture gently! Regular cleaning will reduce the need for deep cleaning. For regular cleaning, turn off the light and wipe down the
xture with a clean lint-free cotton or microber cloth. Never spray cleaner directly onto the xture.
For Customer Service, contact the
place of purchase.
PREPARING FOR INSTALLATION
Carefully remove all of the contents from the carton. See
the important notes above. Shut off the power at the circuit
breakerandcompletelyremovetheoldxturefromthe
ceiling, including the old mounting strap.
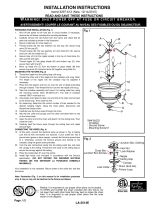
From the parts bag remove the mounting strap assembly.
One end of nipple (F) should be attached to mounting strap
(A)withwasher(C)andhexnut(D)inplace.Theotherend
should have canopy loop (Q) attached. Attach mounting
strap(A)tothejunctionboxusingmountingscrews(B)
and a screwdriver. Tighten securely. Unscrew canopy loop
collar (I) from canopy loop (Q). Pass canopy (P) over the
mountedcanopylooptotesttheheight.Approximatelyhalf
ofthecanopyloop’sexteriorthreadsshouldbeexposed,
andthecanopyloopcollarshouldtsnuglyontothe
canopy loop. Remove canopy (P) and adjust the height of
nipple (F) and canopy loop (H) until the desired height is
reached.
ASSEMBLING THE FIXTURE
By measuring, determine the correct number of chain links
needed for proper hanging height. If necessary, use a pair
ofplierstoopenandremoveanyexcesschain.Attachone
of chain connectors (H) to each end of chains (I). Use one
of chain connectors (H) to attach each of chains (I) to each
of canopy loops (Q) and close the chain connectors. Feed
thexture’swiresupthroughonesideofchain(I-every
three links or so). Pull the wires until taut. Use the free
chain connector (H) to attach the chain to one of canopy
loops (H). Use the other free chain connector (H) to attach
thechaintooneofcanopyloop(H).Pullthexture’swires
through the top of canopy (P).
CONNECTING THE WIRES
Haveanassistantsupportthexture’sweightwhilecompletingthewiring.Cutawayexcesswires.Attachthexture’swirestothe
powersupplywiresfromthejunctionbox.Connectblacktosmooth/black/transparent(L)wire;whitetoribbed/white/transparent(N)
wire;andgroundtoground(greenorcopper).Twisttheendsofthewirepairstogether,andthentwistonawireconnector.Makesureall
twistsareinthesamedirection.Ifthereisnogroundwire(greenorcopper)fromthejunctionbox,locategroundscrew(E)onmounting
strap(B)andwrapthexture’sgroundwirearoundthegreengroundscrew(E).Useascrewdrivertosecuregroundscrew(E)ontothe
mountingbracket/mountingstrap.Tuckallwiresneatlyintothejunctionbox.
FINISHING THE INSTALLATION
Pushcanopy(P)uptotheceilingandtightlythreadnut(G)ontotheexposedthreadsofnipple(F).
Slide glass shades (M) over sockets (L) and secure in place with washers (N) and socket rings (O).
Installlightbulbs(notprovided)inaccordancewiththexture’sspecications.Donotexceedthemaximumrecommendedwattage.
Yourinstallationisnowcomplete.Turnonthepowerandtestthexture.
A
C
B
D
E
JUNCTION
BOX
F
P
G
I
H
J
L
M
O
N
K
/