Page is loading ...

Quick Setup Guide
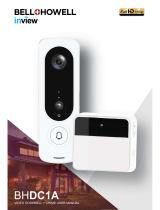
1080p Smart Doorbell

1 x 1080p Doorbell
(Model #: WDB-20)
1 x Digital Chime
Power Amp
(Model #:
SP-WDB2-DCPA)
• Drill
• Drill Bit (15/64) (3/64)
• Router/Modem
• USB Power Adapter
• Mobile Device (Phone or tablet iOS
®
/Android
™
)
• Night Owl Gateway
2 x Security Screws
(includes extra screw)
1 x Doorbell
Mounting Template
1 x Screwdriver
Handle
1 x microSD Card
Note: Storage size may
vary. If included, microSD
card will be pre-installed.
1 x Paintable
Faceplate
(Model #:
SP-WDB2-PFP)
1 x Flat
Mount
(Model #:
SP-WDB2-FM-B)
1 x Angled
Mount
(Model #:
SP-WDB2-AM-B)
3 x Mounting
Hardware
(includes extra screw)
Night Owl
Security Sticker(s)
1 x Philips Head
Torx Key
1 x USB to micro
USB cable
Package Contents (Images may vary)
Depending on your model #, the following items may or may not be included:
Items Not Included
What’s in the Box
Varies by Model
1
THIS DEVICE WILL REPLACE YOUR EXISTING DOORBELL. YOU MUST HAVE AN
EXISTING DOORBELL TO USE THIS PRODUCT.

2
Doorbell Status Light Keys
The Doorbell
is Ringing
The Doorbell
has been Answered
Wi-Fi is Connected /
No Internet Found
Wrong
Wi-Fi Password
Firmware
Update Error
Weak
Signal
Top Flashing Blue /
Bottom Flashing White
Bottom Half
Flashing Blue
Updating
Firmware
Spinning White/Blue
(Counter Clockwise)
Alternating Pulse
Blue / White
No Wi-Fi
Connection
Top Half
Flashing White
Top Half
Flashing Blue
Pairing
Mode
Spinning White
(Clockwise)
Spinning Blue
(Clockwise)
On /
Stand-By
Solid
White
Solid
Blue
Normal Light Notications
Error Light Notications

Product Overview
Front
Left
1080p HD Video
Smart Motion Detection
microSD Card Ready
*
2-Way Audio
Pre-installed Faceplate
Photo Sensor
Wire Connection
micro USB Connection
Reset Button
Back
Right
*Depending on model number, microSD card may not be included.
Note: The faceplate must be removed in order to access the sides of the Doorbell.
3

Doorbell Installation Guide
STEP 1: First Things First
STEP 2: Preparing The Doorbell For Setup
OR
Test 1:
Does your current doorbell work? If the current
doorbell chime doesn’t work, please consult
an electrician prior to installation.
Remove all the contents from the box.
For the best results, perform the setup process close to your router or Night Owl Gateway.
Using a mobile device, verify you have at least
50% Wi-Fi signal strength at the doorbells
location.
Test 2:
1
2
RESET
LAN1 LAN2 LAN3 LAN4 WA N
YOU MUST HAVE AN EXISTING DOORBELL TO USE THIS PRODUCT.
4

Remove the faceplate from the Night Owl Doorbell. Insert the small end of the
provided USB cable into the micro USB port on the doorbell.
Connect the other end of the cable to a USB power adapter and plug it into an outlet.
If you do not have a USB power adapter, you may use a USB charging port.
Be patient for a minute or two as the doorbell powers up. Listen for the audio message
“Doorbell is in pairing mode.” “PAIRING MODE” status is also identied by white LEDs
“Spinning” in a “Clockwise” direction.
3
Doorbell is in
pairing mode.
Note: Use a at tool to carefully remove the cover from the micro USB input. You must replace the cover before
mounting the doorbell.
Note: USB Power Adapter not included.
5
4
5

Meet Night Owl Connect
STEP 3: Download the Night Owl Connect App and Add the Doorbell
Download the Night Owl Connect
Application from the “App Store” for iOS
®
devices or “Play Store” for Android
™
devices.
Create a new account or login if you already
have an existing account.
After completing the account setup and
verication process, sign into the app
and tap the + symbol to add a device.
The Night Owl Connect App will guide
you through the rest of the setup process.
4
Note: Need more help? Check out the Night Owl
Support Site for videos and tutorials on setting up the
Night Owl Doorbell.
1
2
3
6

Doorbell Installation Guide
STEP 4: Doorbell Installation
Remove the old doorbell.
Place the doorbell on the wall or use the
provided mounting template to mark the
positioning for the new holes.
For stucco, brick, or concrete, make the new
holes using a 15/64 drill bit and insert the
provided plastic anchors into the holes. For
wood or siding, use a 3/64 drill bit and save
the wall anchors for another project.
OFF
TURN OFF THE POWER AT THE BREAKER
BEFORE TOUCHING ANY WIRES!
OR
1
2
3
4
7

5
Connect your Night Owl Doorbell to the existing
doorbell wiring. Feed the excess wiring back into
the wall.
Use the provided mounting screws to secure
the doorbell to the wall.
Once the doorbell is mounted, place the
faceplate over the doorbell. Securely fasten
the faceplate using the provided Torx Key
and security screw. (Torx Key is the smaller
end of the provided two-sided tool).
Turn the power back on at the breaker.
Test the doorbell. If it rings normally, you are
done and can relax. If it does not ring or rings
endlessly, please follow the steps starting on
page 9 to add the Digital Chime Power Amp.
6
7
8
9
Note: It does not matter which wire connects to which screw.
ON
8

To use the Night Owl Doorbell with a Digital Chime
Remove the cover from your internal doorbell.
Connect one wire from the Power Amp to
the “Front” terminal. Connect the other wire
to the “Transformer” terminal, leaving the
existing doorbell wires in place. Secure both
screws before continuing.
STEP 5: Digital Chime Power Amp Installation
TURN OFF THE POWER AT THE BREAKER
BEFORE TOUCHING ANY WIRES!
Note: It does not matter which Power Amp wire
connects to which terminal. Depending on your model
number, the Power Amp may be sold separately.
OFF
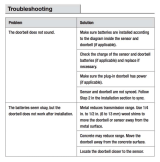
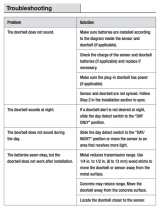
Loosen the “Front” and “Trans” terminal
screws on your internal doorbell. Make sure
you do not remove the wires connected to
the internal doorbell.
1
3
2
4
9
DEPENDING ON YOUR MODEL NUMBER, THE DIGITAL CHIME POWER AMP
MAY BE SOLD SEPARATELY.

Make sure the Power Amp doesn’t interfere
with any moving parts.
Replace the cover on the internal doorbell.
Turn on the power at the breaker.
YOU MUST RETURN TO THE NIGHT OWL CONNECT APP AND CHANGE
THE DOORBELL SETTINGS TO “DIGITAL CHIME”. DO NOT FORGET!
THIS IS IMPORTANT!!
ON
5
7
8
10

Rev 190501
FCC RADIATION NORM
FCC
This device complies with Part 15 of the FCC Rules. Operation is subject to the following two conditions: (1) this device may not cause harmful
interference, and (2) this device must accept any interference received, including interference that may cause undesired operation.
FCC Compliance Statement
These limits are designed to provide reasonable protection against frequency interference in residential installation. This equipment generates,
uses, and can radiate radio frequency energy, and if not installed or used in accordance with the instructions, may cause harmful interference to
radio communication. However, there is no guarantee that interference will not occur in television reception, which can be determined by turning
the equipment off and on. The user is encouraged to try and correct the interference by one or more of the following measures:
•
Reorient or relocate the receiving antenna.
•
Increase the separation between the equipment and the receiver.
•
Connect the equipment into an outlet on a circuit different from that to which the receiver is connected.
•
Consult the dealer or an experienced radio/TV technician for help.
CAUTION!
The Federal Communications Commission warns the user that changes or modications to the unit not expressly approved by the party
responsible for compliance could void the user’s authority to operate the equipment.
This equipment should be installed and operated with a minimum distance of 8 inches between the radiator and your body.
www.NightOwlSP.com
EMAIL
Sales Support
Sales@NightOwlSP.com
Technical Support
Support@NightOwlSP.com
PHONE (English, Spanish & French)
Sales/Technical Support
1.866.390.1303
Live Chat 24/7, 365 days a year
WEBSITE
24/7 Product Support
• How-To Videos
• Manuals
Contact Us
For system manuals, troubleshooting guides, FAQs,
video tutorials and more:
iPhone, iPad, Mac and Mac OS X are registered trademarks of Apple Inc.
Windows, Windows XP, Windows Vista, Windows 7, Windows 8 and
Windows 10 are registered trademarks of Microsoft Corporation in the
United States and/or other countries.
Need Help?
Please visit www.NightOwlSP.com.
Click the Support tab.
In the search bar, type “WDB20”.
Access the support material needed.
1
2
3
4
/