
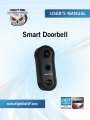
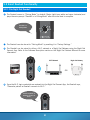
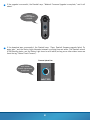
Smart Doorbell
USER’S MANUAL
www.NightOwlSP.com

2
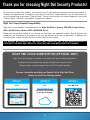
Thank you for choosing Night Owl Security Products!
By purchasing a Night Owl product, you receive a one (1) year warranty covering manufacturing defects in
material and workmanship. In addition to warranty and technical support benefits, you will have access to
our multitude of free instructional “How to Videos”. You can also view our instructional videos by clicking the
“How to Videos” tab within your product’s page on our website.
Night Owl’s Smart Doorbell Compatibility:
Please see the warranty section of this manual for exclusions and additional details. Not all features and
capabilities are shared across all models so you may see features which are not applicable. In addition you
may see screen images that do not exactly match those on your display.
Night Owl’s Smart Doorbell is compatible with the Night Owl Wireless Gateway (WG-20W-4); Hybrid Series
DVR’s (HC20X Series); Wireless NVR’s (WNVRC20 Series).
THIS MANUAL WAS ACCURATE AT THE TIME IT WAS COMPLETED. DUE TO OUR ONGOING EFFORT TO
CONSTANTLY IMPROVE OUR PRODUCTS, FUNCTIONS MAY HAVE BEEN ADDED OR CHANGED.
NIGHT OWL CLOUD SUBSCRIPTION (OPTIONAL ONLY)
Night Owl Cloud Storage is available in the Night Owl Connect Mobile Application.
The Night Owl Cloud adds more features to Night Owl Connect such as
backup storage, multiple storage sizes, and 24/7 remote recording.
Scan QR Code
Visit
http://NightOwlSP.com
and select Cloud Services
on the top of the page.
Visit
https://cloud.NightOwlSP.com
OPTION 1 OPTION 2 OPTION 3
For more information on adding your Doorbell to the Night Owl Cloud,
please use one of the following options:

3
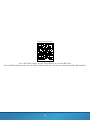
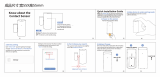
Quick Setup Guide
Use a QR Code scanner on your Smart Device to scan the QR Code.
Scan the QR code above to access the Quick Setup Guide for assistance in configuring Night Owl Doorbell.

4
TABLE
OF CONTENTS

5
Chapter 1: FCC Warnings ........................................................................................................ 7
Chapter 2: Safety Instructions ................................................................................................. 9
Chapter 3: Specifications ..................................................................................................... 11
3.1 System Requirements ........................................................................................ 11
3.2 Package Contents .............................................................................................. 11
3.2.1 Smart Doorbell Diagram ............................................................................... 12
Chapter 4: Getting Started .................................................................................................... 17
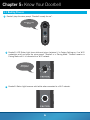
Chapter 5: Know Your Doorbell .............................................................................................. 25
5.1 Booting Process ................................................................................................. 25
5.2 Smart Doorbell Functionality ............................................................................... 27
5.2.1 Pair Night Owl Doorbell ................................................................................ 27
5.2.2 Resetting Doorbell to Factory Settings ........................................................... 28
5.2.3 Status Check Process ................................................................................... 29
5.2.4 Firmware Upgrade Process ........................................................................... 30
5.2.5 Ringing Process ........................................................................................... 32
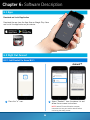
Chapter 6: Software Description ............................................................................................ 34
6.1 Apps ................................................................................................................ 34
6.2 Night Owl Connect ............................................................................................. 34
6.2.1 Add Doorbell to Home Wi-Fi.......................................................................... 34
6.2.2 Add the Doorbell to a Night Owl Gateway ....................................................... 39
6.2.3 Live View - Home Wi-Fi Connection ............................................................... 42
6.2.4 Doorbell Live View - Connected to Home Wi-Fi ................................................ 43
6.2.4 (a) Notification Not Answered - Live View .................................................... 43
6.2.4 (b) Notification Pressed - Live View ............................................................ 44
6.2.4 (c) Doorbell Connected to Wi-Fi - Settings Menu .......................................... 45
6.2.5 Doorbell Live View - Paired to Night Owl Gateway ........................................... 46
6.2.5 (a) Doorbell Individual Channel Screen – Live View ...................................... 46
6.2.5 (b) Notification Pressed Live View - Connected to Gateway ............................ 47
6.2.5 (c) Doorbell Individual Channel Settings – Connected to Gateway .................. 48
6.2.6 Night Owl Doorbell App’s Status .................................................................... 49
6.2.7 Doorbell Interaction with Chime .................................................................... 50
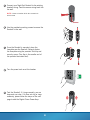
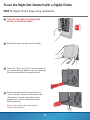
Chapter 7: Doorbell & Chime Compatibility ............................................................................ 53
7.1 Mechanical Chime Hardware Example ................................................................. 53
7.2 Digital Chime Hardware Example ........................................................................ 53
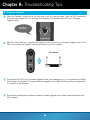
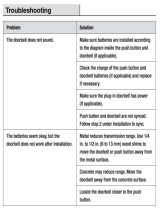
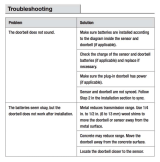
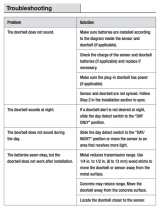
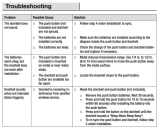
Chapter 8: Troubleshooting Tips ............................................................................................ 55
8.1 Firmware Upgrade ............................................................................................. 55
8.2 Factory Reset .................................................................................................... 56
8.3 Failed Firmware Upgrade .................................................................................... 56
8.4 Status Light Key ................................................................................................ 57
Chapter 9: Warranty ............................................................................................................. 59
Customer Support .................................................................................................... Back Cover
Table of Contents

6
CHAPTER 1
FCC WARNINGS

7
Chapter 1: FCC Warnings
FCC
This device complies with Part 15 of the FCC Rules. Operation is subject to the following two conditions: (1)
this device may not cause harmful interference and (2) this device must accept any interference received,
including interference that may cause undesired operation.
FCC Compliance Statement
These limits are designed to provide reasonable protection against frequency interference in residential
installation. This equipment generates, uses and can radiate radio frequency energy and if not installed or used
in accordance with the instructions, may cause harmful interference to radio communication. However, there
is no guarantee that interference will not occur in television reception, which can be determined by turning
the equipment off and on. The user is encouraged to try and correct the interference by one or more of the
following measures:
• Reorient or relocate the receiving antenna.
• Increase the separation between the equipment and the receiver.
• Connect the equipment into an outlet on a circuit different from that to which the receiver is connected.
• Consult the dealer or an experienced radio/TV technician for help.
CAUTION!
The Federal Communications Commission warns the user that changes or modifications
to the unit not expressly approved by the part responsible for compliance could void the
user’s authority to operate the equipment.

8
CHAPTER 2
SAFETY
INSTRUCTIONS

9
Chapter 2: Safety Instructions
CAUTION!
You may be subjected to severe electrical shock if you disassemble the Smart Doorbell.
The working temperature of the device is from -4 °F to 122 °F.
The Doorbell works using [AC 12 ~ 24V] supply. Do not connect the device directly to AC mains while
wiring the device, otherwise this may cause electric shock and permanent damage to the device.
For the Doorbell setup, plug in the device ONLY using the included USB 5V power adapter (Amperage
must not be less than 1A or it may cause damage to the device).
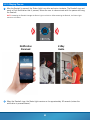
Please make sure you have a strong Wi-Fi connection in the location where you plan to install the device.
Weak Wi-Fi connections will reduce the quality of the video streaming.
Turn off power to the area where you will install the doorbell at the circuit breaker or fuse box before
beginning installation. Failure to turn off the power before installation may result in serious electrical
shock, injury or death.
Do not restore power until the Doorbell has been completely installed. Restoring power before
installation is complete may result in serious electrical shock, injury or death. If you need to replace your
transformer, we recommend that you use a licensed professional.
All electronic operation should be in strict compliance with the electrical safety regulations, re
prevention regulations and other related regulations in your local region.
When the product is installed on wall, the device MUST be rmly xed.
If smoke, odors or noise rise from the device, turn off the power at once and unplug the power cable,
and then please contact the service center.
Never attempt to disassemble the device yourself. (We shall not assume any responsibility for problems
caused by unauthorized repair or maintenance.)
Do not drop the device or subject it to physical shock, and do not expose it to high electromagnetism
radiation. Avoid the equipment installation on vibrations surface or places subject to shock (ignorance
can cause equipment damage).
Warranty is void if the device is plugged in directly or using any other adapter.
1
2
3
4
5
6
7
8
9
10
11

10
CHAPTER 3
SPECIFICATIONS

11
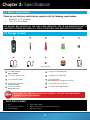
3.1 System Requirements
3.2 Package Contents
Please be sure that your mobile device complies with the following specifications:
• Android™: 4.4.2 and above
• iOS
®
: 10.3.3 and above
THIS MANUAL WAS ACCURATE AT THE TIME IT WAS COMPLETED. DUE TO OUR ONGOING EFFORT TO
CONSTANTLY IMPROVE OUR PRODUCTS, SPECIFICATIONS MAY HAVE BEEN ADDED OR CHANGED.
Chapter 3: Specifications
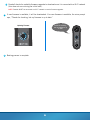
1 x 1080p Doorbell
(Model #: WDB-20)
1 x Digital Chime Power Amp
• Drill
• Drill Bit (15/64) (3/64)
• Router/Modem
• USB Power Adapter
• Mobile Device (Phone or tablet iOS
®
/Android™)
• Night Owl Gateway
2 x Security Screws
(includes extra screw)
1 x Doorbell Mounting Template
1 x Screwdriver Handle
1 x microSD Card
(Pre-installed)
3 x Mounting Hardware
(includes extra screw)
1 x Night Owl Security Sticker
1 x Philips Head/Torx Key
1 x USB to micro USB cable
Items Not Included
A
A
F
F
B
B
G
G
C
C
H
H
D
D
I
I J
E
J
E
(Pre-installed)
THIS DEVICE WILL REPLACE YOUR EXISTING DOORBELL. YOU MUST HAVE AN EXISTING
DOORBELL TO USE THIS PRODUCT.
NOTE: Storage size may vary.

12
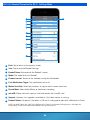
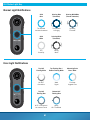
3.2.1 Smart Doorbell Diagram
PIR Sensor
Ring Button:
Press to ring the Night Owl Doorbell.
The LED Status light turns blue and
spins clock-wise for up to approximately
30 seconds.
A notication is sent to the mobile
device running the Night Owl Connect
App. Tapping on the notication allows
the user to answer the door.
Doorbell Lens
LEDs for Night Vision
FRONT VIEW

13
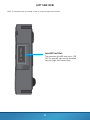
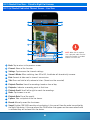
LEFT SIDE VIEW
NOTE: The faceplate must be removed in order to access the sides of the Doorbell.
microSD Card Slot:
The maximum microSD card size is 128
GB. The microSD card can be formatted
from the Night Owl Connect App.

14
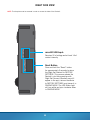
RIGHT SIDE VIEW
microSD USB Input:
Requires 5V of voltage and at least 1A of
current intensity.
Reset Button:
Press and hold the “Reset” button
for approximately 3 seconds to return
the Night Owl Doorbell to FACTORY
SETTINGS. This process reboots the
Doorbell, cuts the connection with
Night Owl Connect (Doorbell may still
appear in the app), returns the device
to FACTORY SETTINGS, and places it in
PAIRING MODE. The LED Status light
will turn white and spin clockwise when
in PAIRING MODE.
NOTE: The faceplate must be removed in order to access the sides of the Doorbell.

15
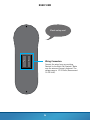
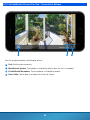
Wiring Connectors:
Connect the wires from your existing
Doorbell to the Night Owl Doorbell. Make
sure the wires are properly fastened. The
voltage range is 12-24 Volts (Recommend
16-24 Volts).
Check out my rear!
REAR VIEW

16
CHAPTER 4
GETTING STARTED

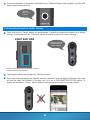
17
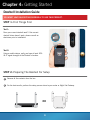
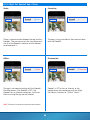
Doorbell Installation Guide
STEP 1: First Things First
STEP 2: Preparing The Doorbell For Setup
OR
Test 1:
Does your current doorbell work? If the current
doorbell chime doesn’t work, please consult an
electrician prior to installation.
Remove all the contents from the box.
For the best results, perform the setup process close to your router or Night Owl Gateway.
Using a mobile device, verify you have at least 50%
Wi-Fi signal strength at the Doorbell’s location.
Test 2:
1
2
RESET
LAN1 LAN2 LAN3 LAN4 WA N
YOU MUST HAVE AN EXISTING DOORBELL TO USE THIS PRODUCT.
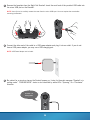
Chapter 4: Getting Started

18
4
Remove the faceplate from the Night Owl Doorbell. Insert the small end of the provided USB cable into
the micro USB port on the Doorbell.
Connect the other end of the cable to a USB power adapter and plug it into an outlet. If you do not
have a USB power adapter, you may use a USB charging port.
Be patient for a minute or two as the Doorbell powers up. Listen for the audio message “Doorbell is in
pairing mode.” “PAIRING MODE” status is also identied by white LEDs “Spinning” in a “Clockwise”
direction.
3
5
Doorbell is in
Pairing Mode.
NOTE: Use a at tool to carefully remove the cover from the micro USB input. You must replace the cover before
mounting the Doorbell.
NOTE: USB Power Adapter not included.

19
3
2
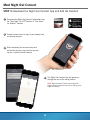
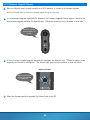
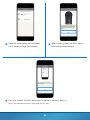
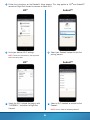
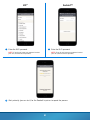
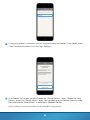
STEP 3: Download the Night Owl Connect App and Add the Doorbell
Download the Night Owl Connect Application from
the “App Store” for iOS
®
devices or “Play Store”
for Android
™
devices.
Create a new account or login if you already have
an existing account.
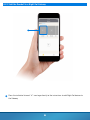
After completing the account setup and
verication process, sign into the app and
tap the + symbol to add a device.
The Night Owl Connect App will guide you
through the rest of the setup process.
1
4
NOTE: Need more help? Check out the Night Owl
Support Site for videos and tutorials on setting up the
Night Owl Doorbell.
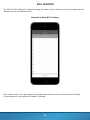
Meet Night Owl Connect

20
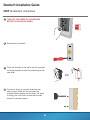
3
2
Remove the old doorbell.
Place the Doorbell on the wall or use the provided
mounting template to mark the positioning for the
new holes.
For stucco, brick, or concrete, make the new
holes using a 15/64 drill bit and insert the
provided plastic anchors into the holes. For wood
or siding, use a 3/64 drill bit and save the wall
anchors for another project.
1
4
OFF
TURN OFF THE POWER AT THE BREAKER
BEFORE TOUCHING ANY WIRES!
OR
Doorbell Installation Guide
STEP 4: Doorbell Installation
Page is loading ...
Page is loading ...
Page is loading ...
Page is loading ...
Page is loading ...
Page is loading ...
Page is loading ...
Page is loading ...
Page is loading ...
Page is loading ...
Page is loading ...
Page is loading ...
Page is loading ...
Page is loading ...
Page is loading ...
Page is loading ...
Page is loading ...
Page is loading ...
Page is loading ...
Page is loading ...
Page is loading ...
Page is loading ...
Page is loading ...
Page is loading ...
Page is loading ...
Page is loading ...
Page is loading ...
Page is loading ...
Page is loading ...
Page is loading ...
Page is loading ...
Page is loading ...
Page is loading ...
Page is loading ...
Page is loading ...
Page is loading ...
Page is loading ...
Page is loading ...
Page is loading ...
Page is loading ...
Page is loading ...
-
 1
1
-
 2
2
-
 3
3
-
 4
4
-
 5
5
-
 6
6
-
 7
7
-
 8
8
-
 9
9
-
 10
10
-
 11
11
-
 12
12
-
 13
13
-
 14
14
-
 15
15
-
 16
16
-
 17
17
-
 18
18
-
 19
19
-
 20
20
-
 21
21
-
 22
22
-
 23
23
-
 24
24
-
 25
25
-
 26
26
-
 27
27
-
 28
28
-
 29
29
-
 30
30
-
 31
31
-
 32
32
-
 33
33
-
 34
34
-
 35
35
-
 36
36
-
 37
37
-
 38
38
-
 39
39
-
 40
40
-
 41
41
-
 42
42
-
 43
43
-
 44
44
-
 45
45
-
 46
46
-
 47
47
-
 48
48
-
 49
49
-
 50
50
-
 51
51
-
 52
52
-
 53
53
-
 54
54
-
 55
55
-
 56
56
-
 57
57
-
 58
58
-
 59
59
-
 60
60
-
 61
61


Ask a question and I''ll find the answer in the document
Finding information in a document is now easier with AI
Related papers
-
NIGHT OWL DB-WNIP2-SU Owner's manual
-
NIGHT OWL B-PE161-47-4DM7 Operating instructions
-
-
NIGHT OWL -FWIP3-CM 3MP Indoor Pan and Tilt Camera User guide
-
-
-
-
-
-
Other documents
-
 Hampton Bay HB-7706-02 User guide
-
 Hampton Bay HB-7797-02 User guide
-
 Hampton Bay HB-7705-02 User guide
-
 Hampton Bay HB-7769-02 Troubleshooting guide
-
 Hampton Bay HB-7773-02 User guide
-
 Hampton Bay HB-7951-02 User guide
-
Sharper Image Ring® Video Doorbell 4 User manual
-
 HAOLIYUAN SBD02 Installation guide
-
Nextech WQC3886 User manual
-


